HOW-TO: Sync Calendar to iPhone (without iTunes)

Let's face it, many of you can't have iTunes installed on your work computers -- even to the point where the act of installing it will cost you your job. Some don't like them in their home computer, simply because it is one big piece of bloat. I share the same sentiment. The software often comes with added software that run together with it.

I have setup a virtual machine for iTunes purposes. That way if I need it to run, I just fire up the virtual box and use the software's function. This way it doesn't introduce vulnerabilities to my system. But that may be cumbersome to some. So how do you sync your calendar to your phone? Or sync the phone entirely to your machine without iTunes?

One of the ways to do this is via iCloud. iCloud can sync all of the contents of your iPhone or you could simply select particular data to sync. Download from the iCloud webpage.

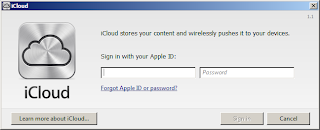
Upon completion of the download, launch the software. It will ask for you to login. Use your apple ID credentials.

iCloud Sign In

Next, tick on the data you need to sync. For me, I only sync my calendar to the iPhone. So I simply tick "Calendars & Tasks with Outlook". This option uses the iCloud storage of your apple ID, so you can also track its usage from the iCloud interface.

Select Information to Sync

On your phone, make sure that the iCloud calendar is checked or selected. When you see a corresponding check mark next to the iCloud calendar, you should be all set. After a while you should be seeing calendar entries getting pushed to your iPhone. If you have set other iDevices you own to sync with iCloud, the calendar entries from Outlook will sync to those devices as well.

The downside to this? You lose the ability to sync the phone to your computer since it is now using iCloud for backup.

Share:

HOW-TO: Confirm Free Memory Slots on your Server (Linux)

Often times, we system administrators let our fingers do the walking.. sometimes, literally. This is true for just about every activity involving administration. The only time when the system administrator meets face to face with the physical hardware they administer is when they need to replace failed parts or when upgrading hardware.

Upgrading though needs a few pre-requisites that need to be planned out in advance. Memory upgrades being an example, one needs to know what kind of memory is installed on the server, and if there are free memory slot(s). The last mentioned being a very important tidbit of information. A memory upgrade is not possible without free memory slots. This is a major gotcha that you need to avoid.

In the Linux world, this can be done in many ways. Let's discuss two of the more commonly used commands -- dmidecode and lshw.

Using dmidecode. Almost every linux box I have administered came with dmidecode installed by default. It is a rare encounter to find a box without dmidecode installed.

Launch a command terminal and run "sudo dmidecode --type memory". Running dmidecode by itself will spew out a lot of information regarding your machine. Putting the arguments "--type memory", singles out memory devices, keeping the needed info only.

Another argument that will limit the output to just memory listing is "-t 17". These commands will be showing a similar output as below.

dmidecode memory slot populated

As you can see from the above example, DIMM Slot #1 is populated with a 2GB DDR2-800 module. Even the part number and serial of the memory module is detected.

How about when the slot is empty? Take a look at the screenshot below for the output of dmidecode when a slot is empty.

dmidecode memory slot empty

Using lshw. Another very useful command is lshw. It will display all the installed hardware on the system. And just like dmidecode, you may choose to run it only to display or single out memory devices.

Launch a command prompt and run "sudo lshw". Adding "-C memory" or "-class memory" will limit the display to just the memory slots and modules.

lshw class memory

There you go, plan the memory upgrades properly given the above commands. They ensure not only having empty memory slots to fill, but also display the proper memory module to install. Given the above information, you can never go wrong with the upgrade.

Share:

FAQ: Re-Add/Return BigBoss Cydia Repository

Q: "I accidentally (or deliberately) deleted the BigBoss Cydia repository. I want it back and I can't do it. How do I put it back?"

I have heard this happen several times, have been asked the same several times, and have resolved them several times as well. This is more common on jailbroken Apple iPhones more than any other Apple gadgets I've seen. The solution to the problem may not be as hard as you expect it to be.

A: Follow along as pimp-my-rig post outlines a guide on how to return the BigBoss Cydia repository to your iDevice.

First, launch Cydia. Scroll down toward the middle of the Home screen and you will see "More Package Sources". It is just below "Upgrading and Jailbreaking Help". You should be seeing something similar to the below screenshot.

Cydia Home Screen

Tap on "More Package Sources". It should be showing you the BigBoss repository as one of the choices. The screen will be similar to the one below.

More Package Sources

Again, tap on "BigBoss". Then tap "OK" when prompted.

BigBoss Repository

That action will add BigBoss to Cydia repositories. If this happens to the ModMyI repository, or just about any other Cydia repository that is installed by default, the same procedure works.

Hope this helps you out.

Share:

HOW-TO: Create a USB VMware ESXi 5 Installer

Not all servers are created equal -- some have optical drives, some don't have. Given that, there might be times where you will be needing an alternative way of installing operating systems to that server. In the case of a VMware ESXi 5 hypervisor, the installer has a smaller footprint compared to most operating systems but, nevertheless, without any optical drive on the server the only other alternative is to install via USB.

This is not rocket science. USB installers are in fact a bit common nowadays. We have covered several how to's including the install of Windows 7 via USB. Aside from Windows, almost all flavors of Linux can be installed via USB, although the network install of Linux is the most prefered.

To create a USB installer, you will be needing the latest VMware ESXi ISO image from VMware. It needs a registered account to be able to download the ISO file. Register as it will be worth it.

Aside from the ISO file, you will also be needing the UNetbootin application. You may visit its sourceforge project page here. The current version of UNetbootin as of this writing is 5.81.

With the pre-requisites satisfied, launch UNetbootin. Tick on "Diskimage", select "ISO" on the dropdown (this is the default selection), and browse the location of the downloaded VMware ESXi 5 ISO file. You should have a Window similar to this (see below).

UNetbootin Start Window

Double check and ensure that the right USB drive is selected. Hit "OK" and watch UNetbootin build the USB installer.

UNetbootin Building

When UNetbootin installs the Bootloader (STEP#3), you will be asked to overwrite a file -- MENU.C32 -- accept that dialog. This is the only interaction that happens during the build. Everything else is automatic.

Upon completion, simply press "Exit". There is no need to reboot.

UNetbootin Done

The only caveat I have encountered on this build is that the USB drive used was formatted NTFS. This doesn't work so early on, you need to format the USB drive with a FAT32 filesystem. This solved a few headaches for me.

Share:

Subscribe for Latest Update

Popular Posts

Post Labels

100gb (1) acceleration (1) acrobat (1) adblock (1) advanced (1) ahci (1) airdrop (2) aix (14) angry birds (1) article (21) aster (1) audiodg.exe (1) automatic (2) autorun.inf (1) bartpe (1) battery (2) bigboss (1) binance (1) biometrics (1) bitcoin (3) blackberry (1) book (1) boot-repair (2) calendar (1) ccleaner (3) chrome (5) cloud (1) cluster (1) compatibility (3) CPAN (1) crypto (3) cydia (1) data (3) ddos (1) disable (1) discount (1) DLNA (1) dmidecode (1) dns (7) dracut (1) driver (1) error (10) esxi5 (2) excel (1) facebook (1) faq (36) faucet (1) firefox (17) firewall (2) flash (5) free (3) fun (1) gadgets (4) games (1) garmin (5) gmail (3) google (4) google+ (2) gps (5) grub (2) guide (1) hardware (6) how (1) how-to (45) huawei (1) icloud (1) info (4) iphone (7) IPMP (2) IPV6 (1) iscsi (1) jailbreak (1) java (3) kodi (1) linux (28) locate (1) lshw (1) luci (1) mafia wars (1) malware (1) mapsource (1) memory (2) mikrotik (5) missing (1) mods (10) mouse (1) multipath (1) multitasking (1) NAT (1) netapp (1) nouveau (1) nvidia (1) osmc (1) outlook (2) p2v (2) patch (1) performance (19) perl (1) philippines (1) php (1) pimp-my-rig (9) pldthomedsl (1) plugin (1) popcorn hour (10) power shell (1) process (1) proxy (2) pyspark (1) python (13) qos (1) raspberry pi (7) readyboost (2) reboot (2) recall (1) recovery mode (1) registry (2) rename (1) repository (1) rescue mode (1) review (15) right-click (1) RSS (2) s3cmd (1) salary (1) sanity check (1) security (15) sendmail (1) sickgear (3) software (10) solaris (17) squid (3) SSD (3) SSH (9) swap (1) tip (4) tips (42) top list (3) torrent (5) transmission (1) treewalk (2) tunnel (1) tweak (4) tweaks (41) ubuntu (4) udemy (6) unknown device (1) updates (12) upgrade (1) usb (12) utf8 (1) utility (2) V2V (1) virtual machine (4) VirtualBox (1) vmware (14) vsphere (1) wannacry (1) wifi (4) windows (54) winpe (2) xymon (1) yum (1) zombie (1)

RANDOM POSTS