
The gigantic technological leap SSD offered than conventional hard drives is nothing compared to the upgrade gap between a next generation processor or video card. It is bounds and leaps greater. Since its introduction over a year ago, SSDs have always been the talk of the town when it comes to raw performance.
This technology is, however, dependent on another technology that has to be supported by the operating system -- TRIM. Trim is the difference that makes conventional storage manage data better than SSDs. When data is written to a "virgin" cell of an SSD, it is a straight write but if the cell to be written has old junk (deleted data) the undergoing process is a read-modify-write. Imagine a heavily fragmented drive when a delete is performed, performance would suffer. And this questions the long-term performance of the SSD.
Windows 7 is where trim got introduced. The trim command reorganizes data to be written and also deletes junk data existing on the NAND cell. It scrubs junked data when a delete is performed so that when a write command is subsequently performed on a NAND cell, it is always "already" clean.
How then do you determine if your drive supports TRIM? You can use the software CrystalDiskInfo to determine and ensure that the SSD supports trim. Download the software from its webpage. I used the portable zipped version of the software.
This is how CrystalDiskInfo looks like (refer to screenshot).
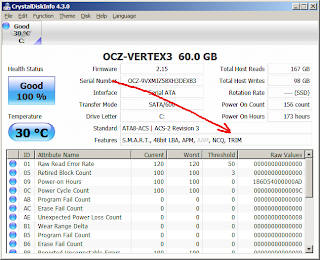
As seen from the screenshot, the OCZ Vertex3 60GB SSD supports the TRIM feature. You may then tweak the OS to take advantage of the trim feature on the SSD.
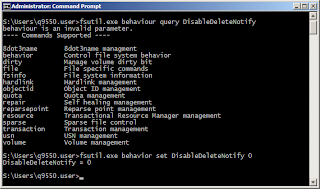
On Windows 7, the command to use is "fsutil.exe behavior set DisableDeleteNotify 0". The feedback will be "DisableDeleteNotify = 0" (as seen below).
If your SSD supports TRIM, better make use of it so long term performance of your SSD will not suffer. Windows 7 supports trim, so might as well make it the default operating system. Here's a guide to migrate from the conventional drive to the SSD.
This technology is, however, dependent on another technology that has to be supported by the operating system -- TRIM. Trim is the difference that makes conventional storage manage data better than SSDs. When data is written to a "virgin" cell of an SSD, it is a straight write but if the cell to be written has old junk (deleted data) the undergoing process is a read-modify-write. Imagine a heavily fragmented drive when a delete is performed, performance would suffer. And this questions the long-term performance of the SSD.
Windows 7 is where trim got introduced. The trim command reorganizes data to be written and also deletes junk data existing on the NAND cell. It scrubs junked data when a delete is performed so that when a write command is subsequently performed on a NAND cell, it is always "already" clean.
How then do you determine if your drive supports TRIM? You can use the software CrystalDiskInfo to determine and ensure that the SSD supports trim. Download the software from its webpage. I used the portable zipped version of the software.
This is how CrystalDiskInfo looks like (refer to screenshot).

As seen from the screenshot, the OCZ Vertex3 60GB SSD supports the TRIM feature. You may then tweak the OS to take advantage of the trim feature on the SSD.
On Windows 7, the command to use is "fsutil.exe behavior set DisableDeleteNotify 0". The feedback will be "DisableDeleteNotify = 0" (as seen below).

If your SSD supports TRIM, better make use of it so long term performance of your SSD will not suffer. Windows 7 supports trim, so might as well make it the default operating system. Here's a guide to migrate from the conventional drive to the SSD.


