Showing posts with label security. Show all posts

HOW-TO: Protect Yourself Against Malicious Autorun.INF Code

Laziness has its price.. One brain-child of what I consider laziness is autorun.inf. I call it a vulnerability rather than a feature. This is just my two-cents. The rationale behind this line of reasoning is that, viruses and malicious software take advantage of this so-called feature to install and infect your machine before you are aware it hit you. The actual payload installed varies from viruses to trojans, and likewise the damage it could inflict varies.

The most common mode by which malicious code propagates is by USB flash drives (others call them thumb drives or external storage device). They all mean the same thing. Before viruses, trojans and other malicious software lurking in these devices hit you, do something about it. Protect yourself! Autorun.INF is an inherent security hole that needs to be plugged. And the way circumvent this vulnerability is a simple task to do.

Just so you get an idea what AUTORUN.INF functionality is, whenever you plug an external storage and an application Window automatically opens that is AUTORUN.INF at work. Below is an example of what it looks like. Only that in cases of malicious code, this application Window might or might not be visible.
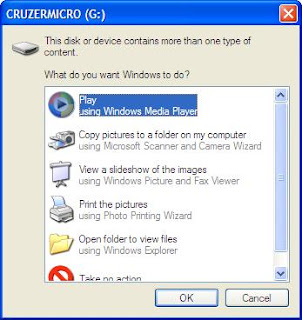
AUTORUN.INF

The solution to this problem is a registry hack. So before you proceed, ensure you have a backup of your machine. This hack works for me and am confident it works but I will not be held liable for consequences that may arise when you execute this procedure on your machine.

As "Administrator", open the registry editor and go to this key: HKLM > SOFTWARE > Microsoft > Windows NT > CurrentVersion > IniFileMapping > Autorun.INF. The "Autorun.INF" key does not exist by default, so you have to create it. Change the "(Default)" value to @SYS:XXXXXXX.

IniFileMapping

This simply means instead of looking for Autorun.INF (case-insensitive) on plugged external storage devices, it will look for the string you substituted on after the colon. Now, that is quite difficult to guess than "Autorun.INF".

 RELATED: Automatically Disable WIFI on LAN Connectivity

Making your computer a less vulnerable to malicious code will give you confidence in plugging an external storage device from a colleague for whatever purposes you deem necessary.

Share:

TIP: Config Baseline/Snapshot with WhatChanged

When something goes wrong or when you suspect that something is wrong, it is very difficult to pinpoint exactly what it is. Even for a seasoned system administrator, this situation can happen. Usually a scientific method followed for troubleshooting is in play but usually this method or procedure is very broad.

It is critical to establish a baseline or snapshot to compare with. And it is best to take a snapshot while the system is still healthy. One tool that can help in this is WhatChanged.

WhatChanged can take a list of files of your Windows drive and can also be configured to take a snapshot of every branch of the registry. If you suspect there is something wrong, or you got hit by a virus, compare the current state with the baseline previously taken with WhatChanged. This step can save you from a lot of time in troubleshooting what the probable cause can be. Whatever the purpose, whatchanged will list the files and registry entries that changed.

You can download WhatChanged from MajorGeeks.com or the author's website, vtaskstudio.com. It is amazing what a 96kb software can do.
WhatChanged is a system utility that scans for modified files and registry entries. It is useful for checking program installations. There are two steps for using WhatChanged:
1) First, take a snapshot to get the current state of the computer; 2) Second, run it again to check the differences since the previous snapshot.

Program interface look and feel is below.

Config Baseline/Snapshot with WhatChanged

To use it, just enumerate the drives you wish to monitor. It is recommended to put the drive where Windows is installed (usually C:). For multiple drives, just separate each drive letter with a space (e.g. C: D:). Then, tick the branches of the registry you wish to take a snapshot for baseline. For a thorough sample, tick all of the branches of the registry.

The software will then create files in the same path it resides. So make sure that the executable is stored in its own folder.

Config Baseline/Snapshot with WhatChanged

After taking a snapshot or baseline, you can backup the executable and the files it created to a USB drive or on another computer. If in the future you suspect something is wrong, just run whatchanged.exe and compare the results with the previous snapshot. More or less it should give you an idea where the problem lies or a clue where not to look (at the very least).

Share:

TIP: Test Your Browser's Functionality, Security and More

With the advent of HTML5, websites are presented to the end-user in a different light. What used to be flash dominated content are now CSS3 and javascript dominated. The development of jQuery library and javascript based modules and plug-ins present a different facet of webpage programming. What used to be javascript geeks are now known as javascript ninjas.

The HTML5 standard showed an advanced way of programming and at the same time required a little more from our browsers. Tied with these features are support requirements for different functions. Website gurus and javascript ninjas should ensure that their pages load in the same manner across different browsers. At the same time users with different browsers are able to view the same website without having to open another compatible browser. This cuts both ways.

New browsers present new bugs -- added functionality that may not work as it should. Security should also be taken into consideration with the added functionality. So how do programmers, developers and end-users alike test their browser's functionality and security? The site browserscope seem to have the answer.

Browserscope tests the functionality of today's modern browsers but doesn't leave security behind. This tool is really useful.

So before making a recommendation, we took it out for a spin with the favorite browsers of this generation. If you want to try it out for yourself, launch your favorite browser and point it to this URL: http://www.browserscope.org/alltests.

Google Chrome. This is version 12.0.742.122 of Google Chrome.
Test Your Browser's Functionality, Security and More

Test Your Browser's Functionality, Security and More

Mozilla Firefox. Current production release version 5.0.1.

Test Your Browser's Functionality, Security and More

Test Your Browser's Functionality, Security and More

We didn't really need to do much comparison as browserscope already has a database of browsers with which to compare your browser. But we were curious as to where our browser stands in comparison. From the results, it looks like Google's Chrome browser has the edge in all browsers.

Share:

TIP: Remaining Anonymous -- a Security Protocol

Nowadays, websites don't just give information for free. They ask you to subscribe or register to view content. This is not a bad thing, but it does make you give away your email address. Thus in turn, you give your identity away (sort of). There are sites where you are not going to be that confident in giving away your email address, whether it is your personal address or just a mailbox purposely intended for spam mails.

How about a disposable email address in exchange for their service? Register with a valid email address, verify your account, and forget it! You're still anonymous to them. This is exactly what 10MinuteMail offers. As the name suggests, the email address given to you will be valid for only 10 minutes, then expires. If you want it for a bit longer, you can add another 10 minutes, and another if you require.

Remaining Anonymous Security Protocol

There may be other uses for disposable emails and the site above will keep your anonymity intact.

What about for sites that require you to login to see answers to questions? Sites like Experts Exchange, require a login for you to be able to see solutions to questions and problems facing other users. Since this is a contribution-based site, the 10MinuteMail website does not fit the bill.

Other sites publish partial content or just headers and require you to login to see the rest of the article or feature. You will probably feel cheated (in a way) to register and give out your name and email just for one article.

You can use another site that keeps track of logins. Just use the search feature in case they have a valid and working login for your particular website. The site is bugmenot.com.

Remaining Anonymous Security Protocol

So there you go folks, sites that keep your anonymity on the web. Although you may not need them now, there may be times you will need them and they will come in very handy. Those sites above have helped me in several situations so far.

Share:

INFO: Keep GPS Data Safe and Secure

Your Garmin device can store a lot of information and history. It stores waypoints, tracks, routes, custom POIs, etc.. and most important your home address. So it is better to keep it secure at all times. In cases where the unit is stolen, there should be a layer of protection on the unit itself so as not to give away your identity. Not to worry though, as this feature is built into your Garmin GPS device.

Known as Garmin Lock, this feature works by requiring the user to input a four digit PIN number before the GPS becomes operational. Meaning, the PIN code is required to start-up and use the device. Without the PIN the GPS receiver is just another electronic paperweight. Although this doesn't prevent the GPS from being stolen, it is a security feature that prevents the theif from getting your personal information and other pertinent data from your device.

Garmin Lock has another feature -- the Secure Location. The secure location enables you to access the GPS without entering the PIN (in case you forget it). The secure location is not really a security feature in the real sense of the word. It is a bypass to the security of the Garmin Lock itself. But even with the secure location, the forgotten PIN could not be reset. So make sure never to forget this PIN code when considering on enabling this feature.

With that, how do you enable these features? On the GPS main screen tap the wrench (Tools), like below. Then System (on the leftmost part of the next screen).

Keep GPS Data Safe and Secure

Security should be at the bottom part of the screen, so scroll down once and it will be there. The instructions here are for a Garmin nuvi 255W, but should not differ much on your unit.

Keep GPS Data Safe and Secure

You will then see Garmin Lock and Safe Mode. Those two are Off by default. Turn Garmin Lock on and input the PIN code twice. For Safe Mode, set a Secure Location and it will turn on.

Keep GPS Data Safe and Secure

I hope this helps you protect personal information on your Garmin GPS from theft in the event your GPS unit gets lost or stolen.

Share:

INFO: Using Hostsman for Host Redirection

Our previous tip, blocking potentially hazardous websites with hosts file was one of the many methods you can harden your system. You can also install your own caching DNS server and disable ports that are opened by default. These tweaks contribute bit by bit to the overall security of our computer systems. In the tech lingo, it is referred to as hardening.

When we blocked potentially hazardous websites via hosts file, you noticed that browsing was faster too. This is because most web tracking elements that run on the background got blocked too. And since that tweak was enforced, your anonymity on the web has improved and you can now browse with a bit more confidence.

We can improve on that tweak above. There is a tool made exactly to accomplish the purpose of blocking websites via hosts redirection. That tool is hostsman (by abelhadigital.com).

What does hostsman do? In short, it accomplishes the block via a couple of clicks. To see it in action, download hostsman and extract the zip file to a directory of your liking. Make it easy to remember the path where you extract it. Or better yet, after extracting pin hostsman.exe to your taskbar for easy reach.

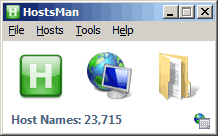
Launch the software. Click the middle button (icon with globe behind computer) to update hosts.

Using Hostsman for Host Redirection

Use the overwrite option when updating. Or you can use merge, then optimize later. Whichever option you choose, it accomplishes the same purpose. And this highlights the flexibility of hostsman.

Using Hostsman for Host Redirection

What's more? You can disable this blocking in a single mouse click. The first button (green "H" symbol) on hostsman disables the hosts file. Should it block a website you frequent, just disable host blocking with hostsman and when done, just re-enable. When disabled, the green "H" icon is colored red.

Using Hostsman for Host Redirection

Furthermore, hostsman when used this way does not exactly automate the updates. But it could. Set it to automatically start with Windows -- Tools > Options > System > (tick) Automatically start with Windows. Under Update tick Enable Hosts file Auto-Update.

Using Hostsman for Host Redirection

With that you will no longer have to worry about updates to the hosts file. When an update is available, hostsman will notify you of that. Or you can choose not to be bothered at all.

Share:

TIP: Browser Plugin Check for Firefox

Adding to our write-ups regarding security, is this feature called plug-in checker. How are these plug-ins related to security? You'll know soon enough.

Plug-ins are embedded in the browser and for us home users, this may be the most used application. And plug-ins, if you're not aware, are also as vulnerable as the browser itself. Flash is the suspected culprit in a recently reported high risk breach. And a vulnerability as simple as that could have led to an even bigger catastrophe, if not averted in time. And, little do we know the same flash plug-in is present in our system.

Firefox is not a perfect browser but this is the browser of my choosing. It is because of its plug-in checker, which is a major reason for my preference. If you are using Firefox, you can access this tool via typing in "about:plugins" on the address bar. On the second line of that plug-ins webpage, you can see "Find updates for installed plug-ins at mozilla.com/plugincheck."

Browser Plugin Check for Firefox

From there you will be taken to Mozilla's plug-in checker website to see which plug-ins need updating. Mind you, even if you have set the automatic updates of your plug-ins in Firefox, 3rd party plug-ins need manual updates. In my system, I need updates to my Adobe Reader plug-in (see below).

Browser Plugin Check for Firefox

This plug-in checker is certainly a very nifty gizmo. I'd love to see other browsers follow suit.

I have previously been puzzled that this plug-in checker doesn't work on my browser. As it turns out, it doesn't like to run when you are behind a proxy. So unconfigure proxy settings for Firefox before running this plug-in checker.

Share:

TIP: Blocking Potentially Hazardous Websites with Hosts File

Security has taken top ranks in the news lately -- terrorism in a different form. Hackers taking sensitive top secret information, even breaching topnotch security systems put in place. While hackers may not waste time hacking our desktops they could use our systems as zombies to launch or spread their attacks. So it is best to protect yourself from potentially contributing to the hack.

The sad part is that most of the security threats out in the open target Microsoft's Windows Operating System. The very OS that most desktops run with. Since this security threat is serious and our operating systems are very vulnerable, let us "harden" the OS by putting up a few defenses.

One way of putting up a wall is by host redirection. Protect yourself from potentially stumbling to a suspicious site and getting infected by malware or root-kits. How is this possible? Host redirection is a form of naming service inherent on your local system. It is how your machine knows another by name (which internally translates to its IP address). You can use the same to protect yourself from stumbling into potential danger.

A site that has dedicated itself to this purpose is MVPs. They have a well maintained and updated list of malicious sites that you can download and easily slipstream to the Windows hosts file.

Just download it from the link above. The file to download is hosts.zip. Once downloaded, extract the files. You will be seeing a list similar to the screenshot below.


How do you install the hosts file when there is no executable? I asked this same question as I have been asked the same by friends I have helped set-up a similar system. You will notice that in the archive just extracted is a batch file (extension: .bat). That is the executable. So all that is needed is to run that batch file.


Note that you will have to run mvps.bat as Administrator to accomplish this. Once successful, the hosts file has been modified with the latest list from MVPs. You just took a necessary step to securing your machine from potentially stumbling to malicious content.

Share:

INFO: Adobe Acrobat Reader Potential Exploit

News spreading around that there exist a zero-day exploit on the popular PDF application Acrobat Reader abound. This vulnerability is acknowledged by Adobe and their security bulletins and advisories site has it logged. And while a patch has been released by Abode to address the exploit, their download site seems to have lagged from that.

While users may have patched (or the unaware have already been patched by automatic updates), newly installed computers or those that do not have any PDF readers installed are still potentially vulnerable. This is because the binary available for download off Adobe's website is still the unpatched version.

Adobe Acrobat Reader Potential Exploit


As seen from the screenshot above, the version available for download is 9.1. While the latest updates that patch the zero-day exploit is 9.1.2.

If you do not install Adobe's Acrobat Reader you are in better shape than others. But to the common non-IT people, the default PDF application that installs is Acrobat. And installing the unpatched version poses a threat to the unwilling innocent victim.

So if you happen to have version 9.1 or the older 8.1.4 or 7.1.1 it is time to click that update button and save yourself from the threat.

Having the update/patch available is good. But making the available downloadable binary the patched version is the better scenario. It should not be that hard to do for a company like Adobe.

Share:

HOW-TO: Firefox Javascript Security Hole Stopgap Measure

Firefox 3.5 may be the greatest and latest release but it has its share of security holes. Hackers have posted the code and instructions on how to exploit the critical security hole in the popular browser, so until it is patched it literally leaves millions of users exposed to the threat.

The security hole is introduced with the addition of Tracemonkey, a javascript engine known to speed up javascript rendering in this version of Firefox.

There is no need for you to downgrade to Firefox 3.0. The same website referenced above illustrates the procedure on turning Tracemonkey feature off.
  • open a new tab;
  • type “about:config” and hit enter;
  • read the warning and heed its wisdom;
  • enter “jit” in the filter field;
  • change the value of “javascript.options.jit.content” to enable (true) or disable (false) TraceMonkey for JavaScript in Web content;
  • change the value of “javascript.options.jit.chrome” to enable (true) or disable (false) TraceMonkey for JavaScript in XUL/chrome.

While Mozilla is tackling the issue and trying to address the security hole with a patch/upgrade, it is advisable to plug the hole by disabling Tracemonkey. This thus downgrades the 3.5 to the 3.0 javascript rendering speeds. Believe me with millions (even billions) of websites out there, disabling the Tracemonkey engine is well worth the trade-off for now.

And with the millions of users who have downloaded Firefox 3.5 since its release, imagine the potential targets of malicious javascript code.

It is true, functionality should take precedence over security. But in this case it is prudent to prioritize security given the powerful functionality javascript has and what it can do, most especially when exploited. You can be the next unwilling victim!

With their track record, Mozilla should be able to come up with a fix soon.

Share:

FAQ: Disable Port 137, 138 and 139

"There’s No Such Thing As A Silly Question" -- does the cliche sound familiar? In this part of pimp-my-rig reloaded, technical questions are answered. Mail them to me and I will post the answers here. If you have a better answer, by all means share it with us.

In one of our FAQ entries, the disabling of port 135 was outlined. And it successfully shutdown port TCP/135. Now one of the questions asked was how to disable netbios ports UDP/137 (netbios-ns), UCP/138 (netbios-dgm) and TCP/139 (netbios-ssn). This procedure disables all three ports and the procedure is as follows.

[1] Right-click "My Network Places" and select "Properties" from the ensuing menu that opens.

[2] Executing the previous step opens a window showing the available network connections in the machine. Right-click on "Local Area Connection" and select "Properties". This step is almost similar to the previous.

[3] Scroll down to "Internet Protocol (TCP/IP)". Select it (to highlight it) and click "Properties". You will be opening another window similar to the one below.


[4] From the "Internet Protocol (TCP/IP) Properties" Window, click on "Advanced.." (toward the lower right). Then go to the "WINS" tab (like the screenshot below).


[5] Under "NetBIOS setting", tick "Disable NetBIOS over TCP/IP" and click OK to accept the change. Click OK to the other windows previously opened prior to this properties window.

The ports 137, 138 and 139 will have closed on the machine. If the machine has multiple network interface connections (or NICs), repeat the above for every connection.

Closing down the above ports for a Windows XP Pro machine has so far not impacted any application on my end. If it should impact an application you are running, please let me know so I can post them here for the information of others.

Share:

HOW-TO: Disable USB Storage Devices

IT infrastructure engineers install firewalls to protect the intra-net from outside. Mail filters on SMTP servers are there to protect users from SPAM. Anti-virus software are deployed to further boost protection on the workstation itself. Regardless of whatever software or hardware is put in place, it serves to beef up security.

One of the many open portals or backdoors that may compromise the infrastructure as a whole is the USB port. Why?.. because USB portable storage devices are probably the next best thing since sliced bread in the storage world -- portable, handly, concealable, you name it. As many as its advantages are its disadvantages. To secure the infrastructure, the access to the USB port needs to be restricted. But how?

A year ago 1GB seemed to be a lot, but 2GB is even frowned upon now. This topic is a bit old.. But still the threat is out there in the open. And the issue is still a hot topic for debate. There is a lengthy instruction on how this can be done but there is no concrete solution that permanently works. Even microsoft has published a lengthy procedure that outlines how this is done.

The procedure outlined in the microsoft KB article, suggests the denial of permissions on the two files responsible for the installation of drivers and services for USB storage functionality.
%SystemRoot%\Inf\Usbstor.pnf
%SystemRoot%\Inf\Usbstor.inf

The deny permission is important especially if the users are non-administrators. The mentioned files could also be renamed, but it needs to be noted so that the procedure can be reversed if need be.

Aside from the above, the registry needs to be checked for this key:
HKEY_LOCAL_MACHINE\SYSTEM\CurrentControlSet\Services\USBSTOR

The value for the data key "Start" should be set to 4 (or Disabled) from 3 (or Automatic). The value determines whether the driver is loaded or not when Windows starts. A reboot will be required after the changes.

But for a person who wants a click and go solution, one may want to try another utility to achieve the same purpose. You may download the utility from the author's website.


The click and go solution can also quickly reverse the procedure to enable USB storage devices. The only thing it cannot do is work around the required reboot.

Tighter security always sacrifices functionality. As usual, the goal is to strike a balance between the two. But when it comes to the balance and trade-offs, it is always a grey area.

Share:

HOW-TO: Reset Root Password (addendum)

It can happen to me.. to you.. or to one of your clients, where a machine will have to be worked on but the root password is somehow lost or forgotten. Pretty basic you might think, but you might be faced with this hurdle sooner than you think.

The above statements might already sound familiar to you. It is mentioned in the post tackling how to reset a forgotten root password. Still in the x86 realm, let us discuss how to reset the root password using a rescue CD (or DVD, if one exists).

As always, the best advice to give is: Do not panic. If the host has an optical drive, a good option is to use a rescue CD to reset the root password.

Reboot the host and set the BIOS to boot from the CD-ROM drive, save the settings and exit the BIOS. Make sure that the rescue disc in the drive as well.

Once the host is up, mount the root partition of the host. And edit the shadow file and leave root with a blank password.
# mount /dev/sda1 /mnt
# vi /mnt/etc/shadow

.. before:
root:$2a$10$Gw/SYEjxGEXnZESeW07sb.XdWB9VxDAnXC3SRUtpSwitb6EzkDwS.:14145::::::

.. after:
root::14145::::::


On some systems this works. And when you login as root, you will not be prompted for a password at all. So the best thing to do is set a root password as soon as the system reboots.

Another recommendation after mounting the root partition is to chroot to the mount point.
# mount /dev/sda1 /mnt
# chroot /mnt /bin/bash
# passwd
Changing password for root
New password:
Reenter New Password:
#


However, this does not work at all times. One of the errors encountered is like the message below:
# passwd
Changing password for root
New password:
Reenter New Password:
Cannot open /dev/urandom for reading: No such file or directory
Cannot create salt for blowfish crypt
Error: Password NOT changed.
passwd: Authentication token manipulation error


The above happens because the special file /dev/urandom (which is created at boot-up) does not exist in the chrooted environment. You may create the file using other binaries large enough to generate entropy for the crypt algorithms. And even a plain text file will do.
(execute this in the chrooted environment still)
# cp /etc/default/passwd /dev/urandom
# passwd
Changing password for root
New password:
Reenter New Password:
Password changed.


There you go. Two more ways to reset a forgotten root password. But with a rescue CD this time. If your distribution does not have a rescue CD, the first CD (or CD#1, the bootable CD) can be used instead. Boot to single-user or select rescue mode if available.

Share:

HOW-TO: Reset a Forgotten Root Password

It can happen to me.. to you.. or to one of your clients, where a machine will have to be worked on but the root password is somehow lost or forgotten. Pretty basic you might think, but you might be faced with this hurdle sooner than you think.

With the number of hosts to administer, the burgeoning problem of recalling passwords escalate. Discipline would entail putting passwords in a vault. But then again, human error factors in and this quick step was skipped. There are a number of different reasons to point to, but when faced with this scenario, what can one do?

Traditional wisdom will beckon you to reboot and go to the single-user mode. Let us discuss first how this is done.

In LILO, pass the parameter "single":
LILO: linux single


In GRUB, at the boot screen select the kernel and press "e" (to edit the entry) and select the second line containing the word kernel. Press "e" again to edit the line and append "single" to that line:
grub edit> kernel /boot/vmlinuz-x.x.x-x root=/dev/sda1 ro single


On many flavors of linux, the system will happily present you with a root shell to do your thing and change the root password. However, not all will happily oblige and still ask for the root password:
Give the root password for maintenance
(or type Control-D for normal startup):


When this happens, it is again back to square one. However, all is not lost. You may try to use a live CD (the steps to which we will discuss in another post). Assuming the host does not have an optical drive, try the procedure below.

A word of WARNING before proceeding. If you want to experiment on this, try it out on a development box or a virtual machine first. As a rule of thumb, when working on a production machine, have another pair of eyes on board.

Try passing the parameter "init=/bin/bash" instead of "single". What then does this do? It instructs the linux kernel to execute the shell bash (/bin/bash) instead of executing init. It does not give you much to work on as there services/daemons executed during startup were not executed, but it does give you a shell where the password can be reset.
LILO: linux init=/bin/bash

.. likewise, in grub:
grub edit> kernel /boot/vmlinuz-x.x.x-x root=/dev/sda1 ro init=/bin/bash


So if you have noticed, you get a root shell right out of boot-up. Unfortunately that is not yet enough to change the root password, as the filesystem is mounted read-only. Remedy this situation first.
# mount -o remount,rw /


Executing the above command will remount the root partition (/) read-write. We can now proceed in changing the root password. Now is the time to for proper discipline to kick in and note the new password in the vault.

Once done with the above, DO NOT REBOOT just yet. There are no safeguards in place to properly take the system down and the root partition was mounted read-write. Return it to its original state when it booted up -- a read only root partition.
# mount -o remount,ro /


Now the system can be rebooted or the reset button pressed.

Share:

HOW-TO: Plug the Clipboard Security Hole

Do you find copy and paste to be a very handy tool? If yes, I share the same exact sentiment. But what if the clipboard (the limbo where the copied text goes to) is compromised by your browser? That very handy tool now becomes an annoyance rather than a useful utility, isnt it?

It is a very true fact that the text you stored in the clipboard (for copy and paste) can be stolen. Some experts call this the "clipboard hack". Websites can use a combination of javascript and ASP to send possibly sensitive data in the clipboard to another site or via email. The question then is: Is there a workaround to this? How is it done?

The answer to the question above is a definite "YES!". Read on as this post will discuss one of the many ways to safeguard yourself and plug the clipboard security hole.

Luckily the security hole exists only in the Internet Explorer (IE) browser (the hole also exists in Netscape but the browser seems to have been discontinued). However, IE happens to be used more than any other browser, and worse, the hole exists by default.

Plug the hole. In order to plug the hole, open a new instance of IE. From the menu bar, click on "Tools" and select "Internet Options"..


Doing so will open another window similar to the one below..


Open the Security tab..


Click on Custom Level and scroll down to "Scripting". Modify settings for "Allow paste operation via script" from Enable to Disable.


A warning pop-up window will immediately open after changing the security settings for this zone. Accept by clicking on the "Yes" button.

It is imperative to the same for the "Restricted Sites" zone. Nevertheless, if paranoia tells you to modify the other zones, do so.

IE needs to be restarted for the security change to take effect. The clipboard is now safe after the change.

Share:

Subscribe for Latest Update

Popular Posts

Post Labels

100gb (1) acceleration (1) acrobat (1) adblock (1) advanced (1) ahci (1) airdrop (2) aix (14) angry birds (1) article (21) aster (1) audiodg.exe (1) automatic (2) autorun.inf (1) bartpe (1) battery (2) bigboss (1) binance (1) biometrics (1) bitcoin (3) blackberry (1) book (1) boot-repair (2) calendar (1) ccleaner (3) chrome (5) cloud (1) cluster (1) compatibility (3) CPAN (1) crypto (3) cydia (1) data (3) ddos (1) disable (1) discount (1) DLNA (1) dmidecode (1) dns (7) dracut (1) driver (1) error (10) esxi5 (2) excel (1) facebook (1) faq (36) faucet (1) firefox (17) firewall (2) flash (5) free (3) fun (1) gadgets (4) games (1) garmin (5) gmail (3) google (4) google+ (2) gps (5) grub (2) guide (1) hardware (6) how (1) how-to (45) huawei (1) icloud (1) info (4) iphone (7) IPMP (2) IPV6 (1) iscsi (1) jailbreak (1) java (3) kodi (1) linux (28) locate (1) lshw (1) luci (1) mafia wars (1) malware (1) mapsource (1) memory (2) mikrotik (5) missing (1) mods (10) mouse (1) multipath (1) multitasking (1) NAT (1) netapp (1) nouveau (1) nvidia (1) osmc (1) outlook (2) p2v (2) patch (1) performance (19) perl (1) philippines (1) php (1) pimp-my-rig (9) pldthomedsl (1) plugin (1) popcorn hour (10) power shell (1) process (1) proxy (2) pyspark (1) python (13) qos (1) raspberry pi (7) readyboost (2) reboot (2) recall (1) recovery mode (1) registry (2) rename (1) repository (1) rescue mode (1) review (15) right-click (1) RSS (2) s3cmd (1) salary (1) sanity check (1) security (15) sendmail (1) sickgear (3) software (10) solaris (17) squid (3) SSD (3) SSH (9) swap (1) tip (4) tips (42) top list (3) torrent (5) transmission (1) treewalk (2) tunnel (1) tweak (4) tweaks (41) ubuntu (4) udemy (6) unknown device (1) updates (12) upgrade (1) usb (12) utf8 (1) utility (2) V2V (1) virtual machine (4) VirtualBox (1) vmware (14) vsphere (1) wannacry (1) wifi (4) windows (54) winpe (2) xymon (1) yum (1) zombie (1)

RANDOM POSTS