TWEAK: Completely Diagnose System Problems in Minutes (Windows 7)

When it comes to diagnosing Windows problems, particularly the latest and greatest Windows 7, it is a bit difficult to really pinpoint the problem. There are 3rd party tools to use to get this done, but do you really have to resort to them? Not really.

If you're used to the XP-way of doing things, here's something new to Windows 7 that will attract you to upgrade. It is one of the many features of Windows 7 that I like. It is the "Resource and Performance Monitor". What does it do? It could tell you in a minute or two what is wrong with your system without resorting to 3rd party tools for a complete diagnosis.

To launch the "Resource and Performance Monitor", run "perfmon /report" on the Run box from the Start Menu. This command will open a window just like below.

Completely Diagnose System Problems in Minutes

Allow it to run and generate the report. It will then present a summary, like below.

Completely Diagnose System Problems in Minutes

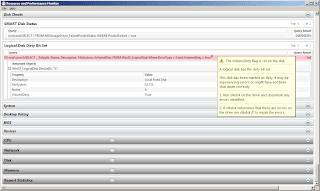
I clicked on the Basic System Checks that failed. And it presented further explanations of the failure and what caused the system to flag a failure. Example for this run I clicked on the failed "Disk Check" and it gave me further details. After clicking on "Disk Check", I did a mouse over the Red Triangular Flag and it gave further information -- a disk volume is dirty.

Completely Diagnose System Problems in Minutes

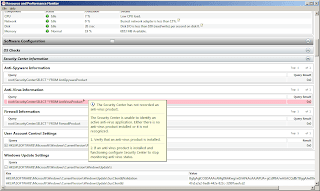
Also, further down on the list tagged as "Security Center Check" the failure is related to my not running an anti-virus.

Completely Diagnose System Problems in Minutes

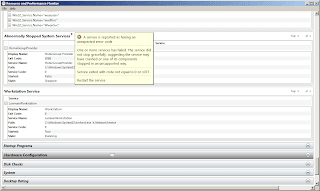
And, lastly, "System Service Checks" listed an "Abnormally Stopped System Service". It is related to the HomeGroup Provider. Like before, I can mouse over the red flag to obtain more information. It told me that the service returned an unexpected error code.

Completely Diagnose System Problems in Minutes

So in a matter of minutes, I found that there was something wrong with my Windows 7 system. And, I could resolve or mitigate the problem from the suggestions outlined by the tool. Rather than resort to a third party application, the Performance Monitor can provide a concise diagnosis and suggest resolutions. Kudos to Microsoft for putting this in Windows 7!

Try it out and see that it's time to upgrade to Windows 7.

Share:

HOW-TO: Resolve "BOOTMGR is missing" Boot Error

Further experimentation(s) with BartPE and cloning sysprep-ed Windows 7 SP1 systems led me to further problems. My interest and expertise in these cloning mechanisms and hands-free installs are for Solaris and Linux, not Windows so I was scratching my head for a while trying to resolve the problem.

It is a bit difficult to find a working resolution on the internet so after a while I got tired of searching for a way to migitate the problem and resorted to trial and error. Below is the procedure that eventually worked for me.

The dreaded error:
BOOTMGR is missing.
Press ctrl+alt+del to restart

On the system that encountered this error insert the Windows 7 installation DVD. If you have a Windows 7 USB installer, that works just fine.

Either bootable media works. On the first screen that is presented, select the Language, Time and Currency and Keyboard input method. Then, click Next. You will be on a screen like the one below.

BOOTMGR is missing Boot Error

On the screen above, click on "Repair your computer". The built-in recovery software will try to detect the installed version(s) of Windows. Select the appropriate operating system from the list. Usually there is only one listed here just click on it to highlight the selection and click on Next.

Another window will open presenting system recovery options. Refer to the screenshot below.

BOOTMGR is missing Boot Error

Select command prompt (toward the bottom). And a command window will open.

Rebuild the bcd directory via "bootrec /rebuildbcd" on the command prompt. And restart your computer. This should resolve the "BOOTMGR is missing" boot error (The bootrec command is explained in greater detail on Microsoft: KB927392).

Executing the above procedure solved my problem. Discipline urged me to create a backup of my old boot configuration data (BCD), but I didn't do it anymore.

Just to be on the safe side, if you wish to save a backup of the BCD, you can execute "ren d:\boot\bcd d:\boot\bcd.old" prior to running "bootrec /rebuildbcd".

Share:

FAQ: BartPE/WinPE On USB Error

"There’s No Such Thing As A Silly Question" -- does the cliche sound familiar? In this part of pimp-my-rig reloaded, technical questions are answered. Mail them to me and I will post the answers here. If you have a better answer, by all means share it with us.

While trying to build BartPE earlier this week, I was perplexed at the problem that got me stuck. I know I had encountered this before, and not having to work with Windows for quite a while, I could no longer recall what I did in the past. This seems to be a common problem on forums and I have helped a lot of people stuck in this problem before.

To give you a better picture, I built BartPE for USB using PE2USB. After being successful at building the USB, I plugged it on the computer to be cloned and.. ERROR!

Remove disks or other media. 
Press any key to restart.

The USB device seems to be ok, as I tried it with other computers. So I rebuilt the BartPE using PE Builder. Same result. The same error results regardless of whether the source is Windows XP Pro SP3 or Windows Server 2003 SP1.

It seems that the common denominator is the Windows 7 on the Thinkpad and the Windows 7 on the desktop. So I tried the build on a VirtualBox Windows XP Pro SP3. The same exact procedure I followed to build resulted in success.

And it hit me -- the bootsectors or boot code written by Windows 7 is different from Windows XP. When using Windows 7 on your machine and building BartPE or WinPE 1.x, you have to write a version 5 boot code (NTLDR) on the USB flash drive. Native Windows 7 format utilities default to version 6 (BOOTMGR) boot code. And this results in errors when booting an XP-based WinPE/BartPE.

BartPE WinPE on USB Error

As seen above, the bootsect.exe was able to write version 5 bootcode to the USB flash drive and I was able to boot to BartPE without errors.

The reverse applies to Windows XP machines creating WinPE version 2 or version 3. You will have to run bootsect.exe to put version 6 boot code to the USB flash drive to properly boot.

The standalone file bootsect.exe can be downloaded from here. Don't worry it is virus-free and runs regardless of whether your version of Windows is 32-bit or 64-bit.

Share:

HOW-TO: Unload nouveau and Install Nvidia Driver

If you have installed Linux on a machine with Nvidia graphics cards, Linux (Red Hat based ones) would likely default to installing the nouveau video driver for that graphics card. It is a challenge to unload the driver and install the Nvidia graphics drivers to properly display the desktop environment.

As you can see from the output of lsmod below, there are a lot of dependencies to the nouveau driver.

[root@host ~]# lsmod | grep nouveau
Module                  Size  Used by
nouveau               639801  1 
ttm                    57516  1 nouveau
drm_kms_helper         28144  1 nouveau
drm                   185516  3 nouveau,ttm,drm_kms_helper
i2c_algo_bit            4690  1 nouveau
i2c_core               25825  5 i2c_i801,nouveau,drm_kms_helper,drm,i2c_algo_bit
mxm_wmi                 1473  1 nouveau
video                  16720  1 nouveau

The nouveau driver needs to be uninstalled before the Nvidia drivers can be installed. Installing the Nvidia drivers for Linux without removing nouveau will result in errors. Trying to unload and remove the driver is not that easy.

[root@host ~]# rmmod nouvueau
ERROR: Module nouveau is in use

And as you can see from the output of the above rmmod command, it resulted in an error. How then do you install the Nvidia drivers if nouveau could not be uninstalled?

I followed the steps below to unload nouveau and install the Nvidia driver for my workstation's video card. This procedure was taken from http://nouveau.freedesktop.org/wiki/KernelModeSetting.

[root@host ~]# echo 0 > /sys/class/vtconsole/vtcon1/bind
[root@host ~]# rmmod nouveau
[root@host ~]# /etc/init.d/consolefont restart
-bash: /etc/init.d/consolefont: No such file or directory
[root@host ~]# rmmod ttm
[root@host ~]# rmmod drm_kms_helper
[root@host ~]# rmmod drm

I was now able to install the Nvidia drivers. However, when I rebooted the machine, the nouveau drivers were still loaded even though the Nvidia drivers were already installed.

You will need to prevent the nouveau drivers from loading at boot-time. You can do this two-ways:

[1] Create the blacklist file inside the /etc/modprobe.d/ directory. This can be any arbitrary file as long as it is inside that directory. For the sake of easy administration, let us name this file "nouveau.conf". Put the following files:

blacklist nouveau
options nouveau modeset=0

and/or;

[2] If in case the ramdisk image contains the nouveau drivers, disable it at boot-time. Add the following phrase to your /etc/grub/grub.conf (on the kernel line):

rdblacklist=nouveau

The other alternative would be to rebuild the initrd image without the nouveau drivers.

RELATED: Quantifiably Measure Boot Time Optimizations

After making the above changes to my CentOS 6.1 workstation, Nvidia drivers were loaded and I had things going for me. I hope this helps those who have difficulty in unloading and removing nouveau drivers.

Share:

Subscribe for Latest Update

Popular Posts

Post Labels

100gb (1) acceleration (1) acrobat (1) adblock (1) advanced (1) ahci (1) airdrop (2) aix (14) angry birds (1) article (21) aster (1) audiodg.exe (1) automatic (2) autorun.inf (1) bartpe (1) battery (2) bigboss (1) binance (1) biometrics (1) bitcoin (3) blackberry (1) book (1) boot-repair (2) calendar (1) ccleaner (3) chrome (5) cloud (1) cluster (1) compatibility (3) CPAN (1) crypto (3) cydia (1) data (3) ddos (1) disable (1) discount (1) DLNA (1) dmidecode (1) dns (7) dracut (1) driver (1) error (10) esxi5 (2) excel (1) facebook (1) faq (36) faucet (1) firefox (17) firewall (2) flash (5) free (3) fun (1) gadgets (4) games (1) garmin (5) gmail (3) google (4) google+ (2) gps (5) grub (2) guide (1) hardware (6) how (1) how-to (45) huawei (1) icloud (1) info (4) iphone (7) IPMP (2) IPV6 (1) iscsi (1) jailbreak (1) java (3) kodi (1) linux (28) locate (1) lshw (1) luci (1) mafia wars (1) malware (1) mapsource (1) memory (2) mikrotik (5) missing (1) mods (10) mouse (1) multipath (1) multitasking (1) NAT (1) netapp (1) nouveau (1) nvidia (1) osmc (1) outlook (2) p2v (2) patch (1) performance (19) perl (1) philippines (1) php (1) pimp-my-rig (9) pldthomedsl (1) plugin (1) popcorn hour (10) power shell (1) process (1) proxy (2) pyspark (1) python (13) qos (1) raspberry pi (7) readyboost (2) reboot (2) recall (1) recovery mode (1) registry (2) rename (1) repository (1) rescue mode (1) review (15) right-click (1) RSS (2) s3cmd (1) salary (1) sanity check (1) security (15) sendmail (1) sickgear (3) software (10) solaris (17) squid (3) SSD (3) SSH (9) swap (1) tip (4) tips (42) top list (3) torrent (5) transmission (1) treewalk (2) tunnel (1) tweak (4) tweaks (41) ubuntu (4) udemy (6) unknown device (1) updates (12) upgrade (1) usb (12) utf8 (1) utility (2) V2V (1) virtual machine (4) VirtualBox (1) vmware (14) vsphere (1) wannacry (1) wifi (4) windows (54) winpe (2) xymon (1) yum (1) zombie (1)

RANDOM POSTS