HOW-TO: Generate Binance API Keys for Trading Bot

This is the first of a two-part series that supplements the article Crypto Trading Bot -- Is It For Me?. Configurations of the crypto exchange need to compliment that of the trading bot for them to be able to communicate and trades could then be made.

As mentioned in the article, Binance is my crypto exchange of choice since it has the lowest trading fees, set at 0.1%. Binance developed its own crypto coin which they call Binance Coin (or BNB). Among other things, the primary purposes of this crypto is to pay for trading fees. When used, the trading fee gets a 50% discount, making it 0.05%.

First, register at Binance (if you don't have an account). (I'm requesting to be your referrer, with ID 26356236. Please use this code when asked for a referrer ID.)

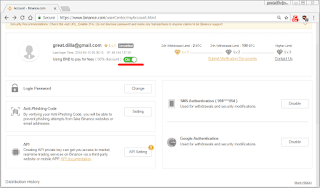
Open your inbox and verify the email address you used to register with Binance. The next and most important part of the configuration is to use Binance coin to pay for trading fees. You will find this in your account settings, as seen below.

Use BNB for trading fees

On the same page, you can generate API keys that the trading bot will use to access your Binance crypto exchange account (see lower left of the screenshot above). Click on the box "API setting".

Binance Create API Keys

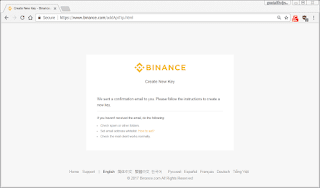
Binance will be sending an email to confirm the API key creation. Again, check your inbox for that mail.

Once keys are created, make sure the "secret key" is noted down. It will not be shown again.

Binance API Keys Generated

Last but definitely not least, enable enhanced security settings for your account. Enable 2FA (or two-factor authentication), either by SMS and/or Google Authenticator.

RELATED: Crypto Trading Bot -- Is It For Me?

You are now ready with your Binance crypto exchange account. Next, the cryptohopper settings.


References (affiliate links):
Binance Exchange.
CryptoHopper Bot.

Share:

TIP: Crypto Trading Bot -- Is It For Me?

The major difference between a typical stock exchange (further called fiat stock exchange) and a crypto stock exchange is the fact that crypto stock exchanges are open 24 hours a day, 7 days a week, the whole year round. Fiat stock exchanges have an opening and closing bell, which means at times that the exchange is closed, no trades can be done. What does this mean for you and I? Simple, it means you and I could trade crypto currencies at any time of the day -- even on holidays!

But I need sleep.. I have a day job.. and I don't know how to trade, let alone perform technical analysis or interpret candlesticks, you say. That's why crypto trading bots were made -- to do this for you while you sleep, while you work. It is not exactly set it and forget it, but close enough. I trade crypto currencies using a trading bot. This is why I could sleep and I'm able to function in my day job. How? Let me outline several steps and possibly guide you to do the same.

DISCLAIMER: I'm not a financial advisor, nor do I want to become one. The steps outlined here are to guide you and let you assess if trading crypto currencies using a bot is a viable income generator for you. There is no assurance that it will.

First, you need to have an account on a crypto currency exchange. My recommended crypto exchange is Binance (affiliate link: Binance Exchange). The primary reason why I recommend Binance is due to it having the cheapest trading fees. The default trading fee is 0.1%. And if you have Binance Coins (BNB) and use these to charge trading fees, a 50% discount is given making the trading fee 0.05%. Fees add up as you rack up trades, and that discount is HUGE.

(I have a Binance Account and my referral identification number is 26356236. Should you opt me to be your referrer kindly use this id number when you register. This gesture will enable me to help more people by being able to keep this site running. I appreciate your generosity.)

Next, take a trial of CryptoHopper Bot. While there are other trading bots out there, CryptoHopper is what I have tested and works for me so far. The 30-day trial of CryptoHopper is awesome. This enables you to test it out and see if the service is what you require.

I'm currently in my second week of the trial (a bunny account). During this time, I'm trying to secure the funds required to subscribe a hare account ($49/month). Hare subscription is recommended to take advantage of the trading bot's features. Just the same, the bunny account provided during trial has been productive. See below stats for reference.

CryptoHopper Stats

CryptoHopper will require API keys from your Binance account. Plug them in to the hopper configuration. The hopper is disabled by default. Just the same double-check to see if it is disabled. Disable "buying" just to be sure.

I initially invested about ~2 ETH (Etherium). I also trade with Etherium as my base currency. Even with the turmoil and volatility going on in the crypto currency market, the CryptoHopper bot has been delivering consistent profits for my investment.

Etherium Investment Growth

I will go into detail about the setup of each in the next post. For now, my suggestion is to take some Udemy courses on technical analysis and candlesticks interpretation, in preparation for the configuration. This will really help you grasp the concepts of trading and how to setup the hopper.

The courses below have helped and are currently with 100% OFF codes.

Cryptocurrency Masterclass: Technical Analysis for Beginners
Code: BHBJDBJHBD

Learn to Trade for Profit: Candlestick and Technical Trading
Code: LEARNTOTRADE3094

Crypto Trading 101: Buy Sell Trade Cryptocurrency for Profit
Code: FREEBITCOIN

Am not sure for how long these courses will remain free. My tip would be to enroll even if you cannot take the course(s) right away. These have lifetime access, so you literally can take them up in your free time. Grab them while they are still available 100% OFF.

SUGGESTED: Epic Formula to Grow Your Crypto Currency Portfolio

Stay tuned for the guides on how to setup Binance Exchange in tandem with CryptoHopper soon.


References (affiliate links):
 * Binance Exchange
 * CryptoHopper Bot


Share:

TIP: Epic Formula to Grow Your Crypto Currency Portfolio

Ever heard of bitcoin? Nowadays it is quite rare to meet somebody who hasn't heard of bitcoin or has not encountered of anyone who talks about bitcoin. Bitcoin is the king of cryptocurrencies -- pretty much like, the US$ Dollar of crypto. It was invented by a nobody named Satoshi Nakamoto. Not much is known about this personality who invented bitcoin.

However, his innovative solution to the Byzantine General's Problem, the blockchain (from which bitcoin is built upon) is really a breakthrough. Bitcoin, the technology, has been synonymous with blockchain. And the other commonly accepted term for it is crypto currency.

Both you and I are already late in the game when it comes to crypto currency, or so it seems. Why is this? If you invested in bitcoin in the late 2000s, the price was less than $1000. This is probably the reason why a lot of people ignored it. Whereas, at the moment it is hovering over $7000. Those who did adopt the tech early on are now millionaires, if not billionaires. People often tend to measure bitcoin or crypto portfolio by the price. So are you really late in the game? Not really.

The question becomes, how do you grow your bitcoin or crypto currency portfolio without having to spend much or without having much background on cryptocurrency? Let me start by avoiding ICOs (or initial coin offerings). Pretty much everybody, even seasoned crypto currency veterans, can loose their hard earned investments in a blink of an eye. If you don't believe me, read about the infamous BitConnect.

The tested and proven ways of growing your crypto portfolio are: faucets and airdrops. Faucets are websites that "trickle" a small amount of bitcoin per period of time -- much like your literal faucet gives droplets of water. The most popular of these websites is https://freebitco.in (this is my affiliate link to that website). The other advantage of this faucet is once you have 30,000 satoshis in your wallet, it starts to earn interest.

freebitco.in Interest Earned

The other bitcoin faucet I frequent is https://bitcoinker.com (this is my affiliate link to that website). Unlike, the other faucet, this one requires your having a bitcoin wallet. If you happen to live in the Philippines, you can open a bitcoin wallet in coins.ph. And use it for this faucet.

Airdrops are initial distribution of coins that do not trade in any exchange. Some are listed but generally not traded yet. Their value is a pittance compared to bitcoin itself. However, once the crypto currency gains traction, the value skyrockets. A perfect example of this is EOS.

For now there are a lot of airdrops.. I have a few that I have tested myself. And one of them is MANNA. It is used for distribution of universal basic income (or UBI). If you're interested in the whitepaper checkout their website https://www.mannabase.com (this is my affiliate link to that website). I have received 200 MANNA so far. Airdrop (coin distribution) happens every week.

Another airdrop I personally tried is the crypto ALX, intended for mobile games. You can visit the website https://alax.io (this is my affiliate link to that website) and follow the instructions shown on how to participate in the airdrop. As far as I know, the airdrop is still ongoing and distribution of the initial wave of coins are yet to happen this month.

SUGGESTED: Top Python Courses for Beginners

Regardless of which method you try, these are the proven ways of growing your crypto portfolio without having to shell out or risk your money. Like they say, slowly but surely. Try it out and see for yourself.

NOTE: I have placed affiliate links to both the faucets and airdrops. Should you want to opt out of the referral program, you can simply visit the website prior to the links. I would like to thank you in advance for showing support for this website by using the affiliate links.

Share:

TIP: Udemy Download Trick You Must Try

In an effort to continuously improve myself, invest in my growth (both personally and professionally) and keep up to date with the data science trend, I have been taking courses in Udemy. I have also shared that journey in this platform -- from Python courses for beginners, Python courses for advanced users, as well as Python courses specific to data science.

One neat feature of Udemy is the ability to download courses to your mobile device for "OFFLINE" viewing, using the Udemy mobile phone application. This works out well, except when your device is storage bound. This is particularly a problem for Apple iPhone users, but may apply to certain Android users as well.

The next best option is to download to your notebook (yes, for desktops as well but they are not that portable to take with you on the go). However, Udemy courses are not downloadable from the web interface, unless the instructor specifically allowed the download. Is it still possible? HOW?!

Yes, it is possible. You are as interested in doing it as I am. And here's how.

First, install Python on your notebook. If you don't have it yet, download miniconda3 (link: https://conda.io/miniconda.html). When installing miniconda3, make sure to include python on your PATH.

Next, clone or download the zip of the udemy-dl github repository (link: https://github.com/r0oth3x49/udemy-dl). Expand the zip file to a directory of your choice. Open the requirements.txt file. Use conda to install the libraries listed. Or if you want simply, run "pip install -r requirements.txt". The use of conda is recommended, but as I have tested pip also works. Either way, it installs the modules or libraries required.

You are now ready to download the Udemy course of your choice. Note and copy the URL of your course.

Then execute "python udemy-dl.py http://www.udemy.com/replace-this-link-with-the-course-url/". Do not forget to replace the http URL with the course URL.

The example below executed for Linux High Availability Clustering.

Linux High Availability Cluster

The payloads for Udemy courses may reach upwards of 3GB. So you can expect this download to take a while, depending on your internet speeds.

RELATED: Top Python Courses for Beginners

There you have it. Udemy course videos for OFFLINE viewing on your notebook.


References:
https://conda.io/miniconda.html (Miniconda3)
https://github.com/r0oth3x49/udemy-dl (udemy-dl)

Share:

INFO: Top Python Courses for Data Science

If you have stumbled upon this post looking for online Python courses for beginners, or Python courses for advanced users, you may visit their respective links. This post is directed toward the specific tracks for data science and data engineering.

Are you still in doubt if pursuing data science is not for you? This chart should convince you. The chart below shows interest on data science as tracked by Google itself.


Data Science Trend in Google

Play around with the chart and see the world's interest for data science. As with the "Diffusion of Innovation Theory", there are five (5) major groups at any point in time. We're at the stage where the "early adopters" have tipped the scales -- meaning, the movement has begun. (NOTE: If you're not familiar with the Diffusion of Innovation Theory, there is a link to a reference at the bottom of this page.)

Data has become the new oil, and it is up to you and I to mine it. The following courses will help..

[1] Python A-Z: Python for Data Science.

This course assumes you will jump from beginner (or even having no background at all) and go through the journey of using python for data science. Since it uses a step-by-step approach, you will not be overwhelmed. It also uses real life scenarios of how to tell a story using data translated into visual form.

[2] Python for Data Science and Machine Learning Bootcamp.

If you want to skip the courses for Advanced Users and head straight to data science targetted courses, this is for you. It goes through all machine learning algorithms -- classification, regression and clustering, then goes further into neural networks and deep learning. If you are into TensorFlow or interested in diving straight into it, this course is recommended.

This course got me interested in Python and Spark (PySpark) for Big Data, which is like Pandas on steroids.

[3] Machine Learning A-Z: Hands-On with Python & R.

Training under this course took me the longest time to complete. It is intense as it tackles the theory part first, then moves into not just one but two programming languages, when applicable. Both Python and R are used for machine learning algorithms. The instructor also uses a different IDE -- spyder -- which is quite interesting.

Toward the later part of the training you will be exposed to Artificial Neural Network (ANN) and Convolutional Neural Network (CNN). It is exciting to see how these deep learning techniques are deployed using just a few lines of code.

[4] Deep Learning and Computer Vision A-Z: OpenCV, SSD and GANs.

This course is very interesting. It will demonstrate how computers are taught to perceive the world. And will explain how self-driving cars are made aware of its surroundings. It is quite difficult to describe the experience but if you have got the time (and budget), don't miss taking this course.

Lots of valuable techniques abound from the above courses. They vary in application too. And if there are no barriers to learning from them, my suggestion is to take them up one at a time.

RELATED: Top Python Courses for Beginners

Are you now convinced that pursuit of data science is worth it? At this point, it is clear to see that Python is really a powerful and useful programming language to learn and master. This will really benefit you at the same time equip you for the data science challenges you may face in the future.


Reference(s):
Diffusion of Innovation Theory.


Share:

INFO: Top Python Courses for Advanced Users

In order to jumpstart skills for data science, I listed recommended python courses for beginners. The list contains several courses specially designed for beginners. Now that you are quite equipped with the necessary Python skills, it is time to up the ante.

I have compiled a list of suggested courses for advanced users below. These are specifically targeted and geared toward a career in data engineering and data science. These are the product of my training experiences and I have found these have provided significant learning and coding value for time (and money) spent.


As mentioned, I myself am a product of composite Udemy courses. It follows that these are from Udemy as well. On with the list..

[1] Data Analysis with Python and Pandas.

Building a training track for data science or data engineering, Python Pandas library is a must. Pandas, otherwise known as Python Data Analysis Library, is a library designed to manipulate and transform datasets with ease. It is designed to read from a variety of input formats, from structured to unstructured, as well as write it back to various formats.

Pandas strength lies in the flexibility to add columns, transform a dataframe to turn it as an input for visualizations or machine learning training and test sets. To make the story short, mastery of the pandas library is a data scientist's pride.

[2] The Complete Python 3 Course: Go from Beginner to Advanced!.

Data visualization is part of Python. Libraries are available to provide the functionality. That is discussed in depth in this course.

Pandas is built on the Numpy library. To compliment your mastery of Pandas, this course is a good tandem. Another skill to master is Regular Expressions, or regex. That is the last module to be discussed in this course.

[3] The Complete Python 3 Course: Beginner to Advanced!.

Not to be confused with #2 above. They are distinct courses.

What I liked most about this course is its practical approach. It dives into "projects" involving real life applications of Python. Django is also part of the curriculum. And the last project involving speech recognition and artificial intelligence is what I enjoyed most. Talk about saving the best for last!

These courses are what I found to provide the valuable modules that provide long term benefits and coding examples that you could use and re-use. Not only is Pandas used for extract, transform and load (ETL), but also for visualizations and projections to a map. These techniques will be applicable to day to day data analytics.

Some of the lessons in the beginners courses are reviewed in these courses. That just goes to show how important it is to go back to the basics. After taking the courses listed here and you find it a bit difficult to absorb the lessons discussed, take time to go back to the beginner courses. Remember, you may access the course again and again.

Also, having real world examples really invoke one's interest in pursuing learning Python. Some of these courses don't only contain practical approaches to data science and data engineering, they also tackle applications outside of that field.

RELATED: Top Python Courses for Beginners

You can always go back to these courses, including the basic courses, for reference. Udemy provides lifetime access to the courses enrolled. Next list will contain courses specifically directed to a data science and data engineering career -- for hardcore Python coders. Stay tuned.


Share:

TWEAK: Specify UserName to a KiTTY (or PuTTY) Session

As a *nix sysad, 99% of the time I work on terminals. There are a few exceptional scenarios where I would sit in front of a SunOS terminal and work on the console itself. In that 99%, SSH sessions are almost always the protocol involved. And as the workstations issued to *nix engineers are Windows-based, the SSH client of choice is either PuTTY or KiTTY.

They are basically the same in functionality and overall usability. I prefer to use KiTTY for the added functionality of being able to drag-n-drop a file to the KiTTY window to execute an SCP of the dropped file to the remote host, provided that pscp.exe or kscp.exe are in the same folder as the kitty.exe executable.

Both software can save sessions. And did you know that you can tweak the saved session so that you no longer have to key in the username for the specific session? Sure you can! And I will show you how.

In this example, I will use the KiTTY to connect to my Raspberry Pi with an address of 192.168.1.199. Normally, I would only save the IP address of the remote host, as shown below.

SSH Session

Then, down on the "Connection" > "Data", I would input the auto-login username.

This is where the tweak comes into play, as you can actually skip putting the auto-login username, and simply place that same username as part of the IP address or FQDN of the remote host, separated with the "@" sign, as shown below.

USERNAME@SSH Session

Launching the KiTTY (or PuTTY) session, you will only be asked for the password. And, if you are running pageant.exe with the corresponding private keys for the remote SSH server, a password-less SSH session is started. It saves you a lot of time having to repeatedly input usernames for future sessions to the same host.

RELATED: Password-less SSH Windows to Linux

Despite the added functionality of KiTTY, PuTTY still ranks higher up in terms of usage. Give KiTTY a try if you want to try out the added functionality mentioned above.


Share:

INFO: Top Python Courses for Beginners

I am often asked which online course has helped me hone my Python skills. If not that, what do they take up to start a career in data science. To me these two questions are almost one and the same. Python skill is a necessity in data science. And a good foundation goes a long way.

I have gone through a bit of training myself -- lots of them are trial and error. But let me save you from that experience, and list down the trainings that I found have benefited much and at the same time enjoyed the sessions, and most of all gave me value for the time (and money) spent. If you consider yourself a beginner in Python, these are for you.

Complete Python Bootcamp: from Zero to Hero

My Python training experience is from Udemy. They offer lifetime access to the training materials, even updates made by the instructors. You can complete the courses at your own pace. Also, certificates are given out to students upon successfully completing the training. The course list below takes those into consideration. With that, let me enumerate the list..

[1] The Complete Python BootCamp: Zero to Hero.

This is by far the most comprehensive beginner course that benefitted me. It is also the most complete and the discussion is detailed and structured. Finishing this course makes you prepared to take advanced courses. This has my highest recommendation.

[2] 30 Days of Python | Unlock Your Python Potential.

This course is designed pace your learning program one-day at a time. You will learn a lot in this course, especially the aspects of web scraping and interactions to external applications like twitter. The description of the course is really interesting and will poke your interest just by reading through it.

[3] Python - A to Z Full Course for Beginners.

From this course, you will learn to handle exceptions (an advanced lesson). If you are not familiar with a particular IDE (integrated development environment), the instructor uses "Sublime Text" and runs Python code within the interface. That, including syntax highlighting and autocompletion are very useful tools for beginners.

[4] Python 3.6 for Total Beginners.

This course was not available when I started coding in Python. This is also a good course to start with. The instructor will introduce you to jupyter notebooks. This for me is a big plus, if you want to jumpstart your coding prowess. Best of all, this course is FREE!

There you have it. My top Python courses for beginners. This is very short and concise. The basics of Python are discussed in depth in the courses above. You will be equipped to take advanced courses, completing any of them. Should you choose to take more than one, go ahead. A summary of the advantage of each course is included, in order to compare them with each other.

RELATED: Install Adblock on Raspberry Pi via Pi-Hole

If you got suggestions or you have found another course that has helped you in developing coding skills when you were still a beginner, share it with us. I will share another list for advanced users soon..


Share:

TWEAK: Secure Jupyter Notebook with Password

In the previous post, PySpark and Jupyter Notebooks, we got PySpark (Spark Python Big Data API) and jupyter notebook to work in tandem. Thus, we are now able to leverage the power of Spark which is massively parallel processing (MPP), thereby utilizing all cores of the server (or cluster). Execution can scale across several cluster nodes as you want, and as many cores as you want. It is worthy to note that it doesn't necessarily require Hadoop to run.

If you can recall, the execution of [jupyter notebook] with an open IP address showed: WARNING: The notebook server is listening on all IP addresses and not using encryption. This is not recommended. Indeed, while running this on the internal network is acceptable, it does not conform to best practice.

This "might" be acceptable for an internal development setup but is more critical for a public cloud setup. Note that "might" is not acceptable for production notebook servers. So it is better to address the issue.

For added security, let's password-protect the jupyter notebook so that only user's that know the password are able to use the pyspark setup. On the terminal, execute [jupyter notebook password]. Input the password, and repeat when asked.

jupyter notebook password

This protects the jupyter notebook with a password, to keep unauthorized users from incidental access. However, packets are transmitted in plain-text and could be sniffed. The next half of the procedure, solves this problem and completes the resolution of the WARNING message.

Generate the needed certificate for use with the jupyter notebook server. Execute [openssl req -x509 -nodes -days 365 -newkey rsa:1024 -keyout jupyter.pem -out jupyter.pem] to create a self-signed certificate. The command will ask for other details, that's up to you to fill out. I would move the cerfiticate inside the .jupyter directory, so in this procedure that will be considered.

Recall, that we added several lines to the generated jupyter notebook configuration (/home/user/.jupyter/jupyter_notebook_config.py). In that same file add this line:

c.NotebookApp.certfile = '/home/user/.jupyter/jupyter.pem'

The modified configuration encapsulates traffic between the jupyter notebook server and the browser in SSL encryption. And it solves the WARNING. All that needs to be done is restart the notebook application.

RELATED: Set-Up PySpark (Spark Python Big Data API)

Notice that the token is not required by the connection to the jupyter notebook server. This is due to it being protected by password and encapsulated in SSL encryption. This should set you up with a working PySpark installation for multi-threaded data crunching. Next up, let's solve this issue using SSH tunnels instead.


Share:

HOW-TO: PySpark and Jupyter Notebooks

At this point, I have a working persistent terminal session and installed all the necessary components to run PySpark. I just need a development environment where I could put those together to work in tandem.

For this I would need the jupyter notebook development environment. For those not familiar with the jupyter environment or what it does, the developers have come up with fantastic documentation in this link. The miniconda3 that was previously installed before is perfect for this. Jupyter integrates right into this. Simply invoke [conda install jupyter --yes], to install jupyter notebook. This will install a lot of python libraries, and will definitely take a while depending on your internet connection.

Again, as mentioned the documentation of jupyter is fantastic. If you refer to the quickstart guides and follow along, the details will get you up and running in no time. For this guide, let's jump a bit forward into the configuration and generate a default configuration. Execute [jupyter notebook --generate-config] on the terminal.


jupyter notebook --generate-config

As seen from the screen capture above, the default configuration file is written to the user's home directory inside a newly created hidden directory ".jupyter". Inside, there will be only one file -- "jupyter_notebook_config.py". Modify this config file such that it allows the jupyter notebook to be accessed by any remote computer on the network.

Insert the following lines of code (start at line #2):

c = get_config()
c.NotebookApp.ip = '*'
c.NotebookApp.port = 8888
c.NotebookApp.open_browser = False

After inserting the lines above, test the configuration by running [jupyter notebook] on a terminal.

jupyter notebook

Once you see the terminal above, where it says "Copy/paste this URL into your browser when you connect..", the jupyter configuration is now good to go. There is one problem, however -- when you close the terminal the jupyter session dies. This is where "screen" comes in. Execute [jupyter notebook] in a screen session and detach the session.

Just so you have an idea what PySpark can do, I have tried sorting 8M rows of a timeseries pyspark dataframe and it took roughly ~4s to execute. Try this with a regular pandas dataframe and it will take minutes to complete. It doesn't stop there, there are lots more it can do.

RELATED: Data Science -- Where to Start?

Having a working PySpark setup residing on a powerful server that is accessible via web is one powerful tool in the arsenal of a data scientist. Next time, let's heed the warning about the jupyter notebook being accessible by everyone -- how? Soon..

Share:

HOW-TO: Set-Up PySpark (Spark Python Big Data API)

Python in itself natively executes single-threaded. There are libraries that allow the possibility of executing code multi-threaded but it involves complexities. The other downside is the code doesn't scale well enough to the number of execution threads (or cores) the code runs on. Running single-threaded code is stable and proven, but it just takes a while to execute.

I have been on the receiving end of the single-threaded execution. It takes a while to execute, and during the development stage the workaround is to slice a sample of the dataset so that execution does not have to take a long time. More often than not, this is acceptable. Recently, I stumbled on a setup that takes code and executes Python multi-threaded. What is cool about it? It scales to the number of cores thrown at it, and it scales to other nodes as well (think distributed computing).

This is particularly applicable to the field of data science and analytics, where the datasets grow into the hundreds of millions and even billions of rows of data. And since Python is the code of choice in this field, PySpark shines. I need not explain the details of PySpark as a lot of resources already do that. Let me describe the set-up so that code executes in as many cores as you can afford.

The derived procedure is based on an Ubuntu 16 LTS installed on a VirtualBox hypervisor, but is very repeatable whether the setup is in Amazon Web Services (AWS), Google Cloud Platform (GCP) or your own private cloud infrastructure, such as VMware ESXi.

Please note that the procedure will enclose the commands to execute in [square brackets]. Start by updating the apt repository with the latest packages [sudo apt-get update]. Then install scala [sudo apt-get -y install scala]. In my experience this installs the package "default-jre" but in case it doesn't, install default-jre as well [sudo apt-get -y install default-jre].

Download miniconda from the continuum repository. On the terminal, execute this command [wget https://repo.continuum.io/miniconda/Miniconda3-latest-Linux-x86_64.sh]. This link points to the 64-bit version of python3. Avoid python2 as much as possible, since development for it is approaching its end; 64-bit is almost always the default. Should you want to install the heavier anaconda3 in place of miniconda3, you may opt to do so.

Install miniconda3 [bash Miniconda3-latest-Linux-x86_64.sh] on your home directory. This avoids package conflicts with the pre-packaged python of the operating system. At the end of the install, the script will ask to modify the PATH environment to the installation directory. Accept the default option, which to modify the PATH. This step is optional, but if you want to you may add the conda-forge channel [conda config --add channels conda-forge] in addition to the default base channel.

Install Miniconda

At this point, the path where miniconda was installed needs to precede the path where the default python3 resides [source $HOME/.bashrc]. This of course assumes that you chose to accept .bashrc modification as suggested by the installer. Next, use conda to install py4j and pyspark [conda install --yes py4j pyspark]. The install will take a while so go grab some coffee first.

While the install is taking place, download the latest version of spark. As of this writing, the latest version is 2.2.1 [wget http://mirror.rise.ph/apache/spark/spark-2.2.1/spark-2.2.1-bin-hadoop2.7.tgz]. Select a download mirror that is closer to your location. Once downloaded unpack the tarball on your home directory [tar zxf spark-2.2.1-bin-hadoop2.7.tgz]. A directory named "spark-2.2.1-bin-hadoop2.7" will be created in your home directory. It contains the binaries for spark. (This next step is optional, as this is my personal preference.) Create a symbolic link to the directory "spark-2.2.1-bin-hadoop2.7" [ln -s spark-2.2.1-bin-hadoop2.7 spark].

The extra step above will make things easier to upgrade spark (since spark is actively being developed). Simply re-point spark to the newly unpacked version without having to modify the environment variables. If there are issues with the new version, simply link "spark" back to the old version. Think of it like a switch with the clever use of a symbolic link.

At this point, all the necessary software are installed. It is imperative that checks are done to ensure that the software are working as expected. For scala, simply run [scala] without any options. If you see the welcome message, it is working. For pyspark, either import the pyspark library in python [import pyspark] or execute [pyspark] on the terminal. You should see a similar screen as below.

Test: scala spark pyspark

Modify the environment variables to include SPARK_HOME [export SPARK_HOME=$HOME/spark]. Make changes permanent by putting that in ".bashrc" or ".profile". Likewise, add $HOME/spark/bin to PATH.

RELATED: Data Science -- Where to Start?

This setup becomes even more robust by integrating pyspark with the jupyter notebook development environment. This is a personal preference and I will cover that in a future post.

Share:

TIP: Screen -- Persistent Terminal Sessions in Linux

If there is one thing I learned in Linux that makes life extremly easy, I would say it is the possibility (or ability) to maintain persistent terminal sessions. This tool comes in handy when working remote and working with servers in particular. Imagine if you are uploading a sosreport or uploading huge core dumps as supplement attachments for a support ticket, and your shift ends. Would you want to wait another couple of hours for the upload to finish? Or, would you want to have a persistent terminal session so that your uploads are thugging along while you drive home?

I'm quite sure the answer is obvious. Linux has this utility called "screen". Screen allows the user a persistent shell session, at the same time multiple tabs for the same connection. It also allows the user to disconnect and re-connect at will, which is really handly for remote users or if for some reason the network connection gets interrupted. Another benefit is for users to simultaneously connect to the same screen session.

This utility is not installed by default. In Ubuntu, to install simply run [sudo apt-get -y install screen].

To run screen, simply run [screen]. You might notice that nothing much has changed upon execution, but running [screen -ls] shows a session is already running. This is how plain it looks (I scrolled it back 1 line just to show you I ran screen).

Screen Without .screenrc

You can change this behaviour by making modifications to the screen startup configuration. It is a file named ".screenrc" that is placed in the home directory of the active user. This file does not exist by default and needs to be created by the user himself/herself.

I have created my own ".screenrc". It is available in github at this link: https://github.com/dillagr/dotfiles.

A few notes regarding the configuration. It alters the default behaviour of screen. The control command or escape command which is [CTRL]+[A] by default -- modified to [CTRL]+[G]. Meaning, any other hot-key for screen is preceded by a [CTRL]+[G] then [C] for example to create another tab (or create another window); [CTRL]+[G] then [D] to detach from screen.

Shown below is how it looks on my Raspberry PI. See any notable difference(s) compared to the previous screenshot?

Screen With .screenrc

The other thing that is most notable about this configuration is that you will see the number of tabs at the bottom, the hostname of the server at the lower left corner and the current active tab. This way it is really clear that the terminal is running an active screen session. Scrollback is set to 1024 lines. That way you can go back 1024 lines that are already off the screen. You may customize this as well.

RELATED: Install Adblock on Raspberry Pi via Pi-Hole

Having screen and a persistent terminal session is one of the best tools for a system administrator.. But as I will show you soon, it is not limited to administering servers. Stay tuned.

Share:

FAQ: Data Science -- Where to Start (continued)?

In my previous post "Data Science -- Where to Start?", I enumerated a few specifics regarding my answer and pointed out several Python online courses to effectively jumpstart your data science career. Now, I would like to suggest a specific book to read that will help you focus on an aspect of your professional career and gain insight on a principle that is not adapted by most. This is particularly applicable when you are reaching the age of 30, whereby you have relatively gained experience in a few professional endeavors.

This post in many ways answers the question: "Is it better to focus on my strengths or on my weaknesses?" The book to read is Strengths Finder 2.0 by Tom Rath. And right there, the answer to the question is already a give-away. And, in more ways than one, your knowledge of yourself and your strengths are immensely helpful.

This is how the book looks like.

Strengths Finder 2.0

The book initially discusses the example of basketball's greatest Michael Jordan -- why can't everyone by like Mike? Way back when, my friends and I wanted to be like Mike and the book has a very good explanation of why everyone cannot be like Mike. It begins by quantifying his strength when it comes to basketball. Assuming that on a scale of 1-10, his basketball skills are rated 10 (being the greatest player). Assuming mine are rated 2. More like 1, but for the sake of comparison, lets put it at 2 compared to MJ.

To be able to make it easier to understand, the book quantifies the result of focusing on strengths by taking a product of the rated skillset or strength and the amount of effort put in honing it. I'm quite positive it is exponential in nature not just multiplicative but to illustrate, if MJ does work related to basketball with an effort of 5, that results to 50. Simply put if MJ focuses on basketball and plays to his strength, this goes to a potential of 100.

In contrast, with a rating of 2, I could only go as much as 20. That just requires meager effort from MJ to match. Given the possibility of exponential product from having the innate strength in the first place, the answer to why everyone can't be like Mike could not be any clearer. This is why it is important to know your strengths.

Coincidentally, MJ shifted to baseball. Did he have a successful season like what he had in basketball? History has recorded this outcome and his return to basketball cemented his legacy.

Bundled with the book is a code you could use to take the Strengths Finder exam. It is a series of questions that when evaluated together produces a profile of strengths. I took the exam a while back and my top 5 strengths are: Strategic, Relator, Learner, Ideation and Analytical. The result goes further to describe my top strength as: "People who are especially talented in the Strategic theme create alternative ways to proceed. Faced with any given scenario, they can quickly spot the relevant patterns and issues." The rest of the strengths are discussed as well.

Also included are "Ideas for Action", one of which is: "Your strategic thinking will be necessary to keep a vivid vision from deteriorating into an ordinary pipe dream. Fully consider all possible paths toward making the vision a reality. Wise forethought can remove obstacles before they appear." As I read through my profile, it's like I was reading the explanation of my past experiences. It explains why I behaved that way and why the decision I made was that. More important is why I am who I am now.

I compared my results with others who took the exam, having the Strategic strength and the descriptions are different. Likewise, the ideas for action are disparate. Having similar strengths doesn't mean having the same overall theme. Strengths also boost each others effects. With the exception of Relator, my strengths are bundled along the "Strategic Thinking" domain.

RELATED: Data Science -- Where to Start?

Although knowing your strengths (and "playing" to your strengths) is not entirely data science related, it helps to know. In my experience, the investment in acquiring a copy of the book Strengths Finder 2.0 for myself is definitely worth it, plus the Gallup Strengths Finder exam. If you have taken the exam, share with us your top 5 strengths and how it has helped you with your career so far.

Share:

FAQ: Data Science -- Where to Start?

Data is the new oil. Perhaps this statement has now become a cliche. It goes without saying that data science has become the hottest job of the decade. It was predicted that there will be a shortage of data scientists, and that shortage is already prevalent now.

The reality of it all is this, the academe lags behind in preparing students to fill this gap. Data science is simply not taught in school, and the demand for it grows by the minute. While on the subject of data science, I have been often asked: "Where do I start preparing to gain practical skills for data science?" And too often, my answer is Python. But Python in itself is a broad topic and I will be a little more specific in answering that in question in this post.

In my line of work, having knowledge of Python really gives you an edge, not just an advantage. So if you want to start a career in data science, building a Python skillset is simply practical.

Knowledge, and even expertise, in Python can go a long way. It can be applied to ETL (or extract transform and load), data mining, building computer models, machine learning, computer vision, data visualizations, all the way to advanced applications like artificial neural networks (ANN) and convolutional neural networks (CNN). In any of the mentioned aspects of data science, Python can be applied and building expertise really becomes valuable over time.

Complete Python Bootcamp: from Zero to Hero

For beginners, those who have no idea how to program in Python or those who have only heard about it for the first time, the online course(s) really work. The course that has really helped me in getting a head start is Complete Python Bootcamp: from Zero to Hero. I have mentioned this often enough and will continue to advise the course to anyone who wants to learn Python.

While taking on this course, the other recommendation is building knowledge in jupyter notebooks. This will boost your Python productivity. Also, it helps you understand (and re-use) other peoples code as well as aid you in sharing yours, if you wish to. In fact, several of those online courses share code in the form of jupyter notebooks.

To complete the answer, the Python library to master for data science is pandas. Pandas is often referred to as the Python Data Analysis Library and it rightfully deserves that reputation. More often than not, pandas is involved in data analysis, where it really shows its muscle. My recommended course for learning and mastering pandas is Data Analysis with Pandas and Python.

There goes my answer and I hope that helps you build the needed skillset to build a career on data science. These are by no means the only training courses you need, it simply addresses the "where to start" part of it, in my opinion. The more you use Python in your daily activities, the better honed you become and it will be easier for you to talk in the Python lingo before you notice it.

RELATED: Huge Discounts on Python Courses at Udemy

So, how did your data science journey, or Python experience start? Was this able to answer your question? Share your thoughts in the comments below.

All product names, logos, and brands are property of their respective owners. Use of these names, logos, and brands does not imply endorsement.
Share:

Subscribe for Latest Update

Popular Posts

Post Labels

100gb (1) acceleration (1) acrobat (1) adblock (1) advanced (1) ahci (1) airdrop (2) aix (14) angry birds (1) article (21) aster (1) audiodg.exe (1) automatic (2) autorun.inf (1) bartpe (1) battery (2) bigboss (1) binance (1) biometrics (1) bitcoin (3) blackberry (1) book (1) boot-repair (2) calendar (1) ccleaner (3) chrome (5) cloud (1) cluster (1) compatibility (3) CPAN (1) crypto (3) cydia (1) data (3) ddos (1) disable (1) discount (1) DLNA (1) dmidecode (1) dns (7) dracut (1) driver (1) error (10) esxi5 (2) excel (1) facebook (1) faq (36) faucet (1) firefox (17) firewall (2) flash (5) free (3) fun (1) gadgets (4) games (1) garmin (5) gmail (3) google (4) google+ (2) gps (5) grub (2) guide (1) hardware (6) how (1) how-to (45) huawei (1) icloud (1) info (4) iphone (7) IPMP (2) IPV6 (1) iscsi (1) jailbreak (1) java (3) kodi (1) linux (28) locate (1) lshw (1) luci (1) mafia wars (1) malware (1) mapsource (1) memory (2) mikrotik (5) missing (1) mods (10) mouse (1) multipath (1) multitasking (1) NAT (1) netapp (1) nouveau (1) nvidia (1) osmc (1) outlook (2) p2v (2) patch (1) performance (19) perl (1) philippines (1) php (1) pimp-my-rig (9) pldthomedsl (1) plugin (1) popcorn hour (10) power shell (1) process (1) proxy (2) pyspark (1) python (13) qos (1) raspberry pi (7) readyboost (2) reboot (2) recall (1) recovery mode (1) registry (2) rename (1) repository (1) rescue mode (1) review (15) right-click (1) RSS (2) s3cmd (1) salary (1) sanity check (1) security (15) sendmail (1) sickgear (3) software (10) solaris (17) squid (3) SSD (3) SSH (9) swap (1) tip (4) tips (42) top list (3) torrent (5) transmission (1) treewalk (2) tunnel (1) tweak (4) tweaks (41) ubuntu (4) udemy (6) unknown device (1) updates (12) upgrade (1) usb (12) utf8 (1) utility (2) V2V (1) virtual machine (4) VirtualBox (1) vmware (14) vsphere (1) wannacry (1) wifi (4) windows (54) winpe (2) xymon (1) yum (1) zombie (1)

Blog Archives

RANDOM POSTS