INFO: Metro Manila Traffic Navigator

Are you by any chance living or planning to live in the Philippines? Or do you plan to visit the Philippines? If you are, chances are you will visit or pass by Metro Manila. Traffic in Metro Manila is probably one of the worst in the world. Traffic will eat up much of your travel time.

Many have attempted to put in place solutions to decongest the Metro. And one that seems to be working is the color coding scheme -- where, depending on your license plates ending number, you are not allowed to enter major thoroughfares at certain periods of the day. But even though this scheme is in place, traffic seems to be a burgeoning problem that remains.

Another clever and intuitive solution that just surfaced is the traffic update website that TV5 and MMDA has brought into existence. This they dubbed the Metro Manila Traffic Navigator (BETA).

The website has a very nice and clean interface that is easy to use. The system view offers a glimpse of the major thoroughfares of the metro and the traffic update is color-coded. Green for light traffic, amber for moderate traffic and red for heavy traffic. It immediately makes sense at first glance.

Metro Manila Traffic Navigator


Also included are six major routes -- EDSA, Quezon Avenue, Espana, C5, Roxas Blvd and SLEX. Putting a monitoring system for roads with most volume of traffic is an excellent idea. The views of each line are broken down into sections, each with their own traffic conditions. And you can probably expect more coverage in the future.

Metro Manila Traffic Navigator


The "system view" as well as the "line views" update themselves every 10-15 minutes without any need to refresh the browser.

Not only that, you can also find a link to google maps link for each of the sections of the routes. Not bad.

What we're wishing for is a subscription for GPS traffic updates. On the road, it would be unwise to drive and glance at the site once in a while. Having the traffic updates sent to your GPS unit probably is the best solution. Were not aware of this kind of service currently being offered in Manila or anywhere else in the Philippines.

For now, check the site to plan out the less congested route to get to your destination. This beats having no information at all.

Taking the initiative to put up this traffic updates website is indeed a very good idea. Kudos to TV5 and MMDA for this service!

Share:

TIP: Access All Control Panel Applets/Tools

From reading the features on PIMP-MY-RIG reloaded, you will have probably decuded that the we have this funny habbit of making things efficient. Some find it weird, but this unconventional behavior for us is the norm, it is after all more effective, useful and practical. Always, always put technology to good use.

We take the new Control Panel in Windows 7, for example. In its categorized view, you will get lost from the cryptic options. But don't take our word for it, see it for yourself! Icon view is a bit better.. How would you like another way of looking at the control panel the easier (or perhaps the easiest) way? Here's how.

You might have heard about the Windows 7 "God Mode". If you haven't, then it's about time. God mode in Windows 7 is a way to access all the applets or tools of the control panel at once. The Control Panel icon view pales in comparison to God Mode. But when I first saw the menu, there is just too much information. It is virtually finding a needle in the haystack.

For the information of those who first heard of God Mode in Windows 7, you just basically have to create a folder on your computer and name it "GodMode.{ED7BA470-8E54-465E-825C-99712043E01C}. Here, the string GodMode can be any name or word as long as the rest is preserved. We named ours "Hack Mode.{ED7BA470-8E54-465E-825C-99712043E01C}, which gives it a nicer ring. When you browse this folder, you will notice a ton of configuration options, like below.


From there you probably agree with our earlier statement that there is just too much information. You can, however, filter it to the particular function you will want to use. To do this, use the search bar on the upper right corner of the window. In this example, the keyword "display" is used. What this does is filter (or search) the control panel tools that are related to "display" (refer to screenshot below).


All that is left is to select the functionality you want for display. Since the menu options are quite descriptive of what they do, things will be faster and more efficient for you to accomplish what you want.

That is the functionality that is needed with a better interface and easier to manage. Best of all, it is easy to do in a non-destructive manner.

Share:

FUN: System Administrator's Resignation Letter

While rummaging through old CDs today, I found a text file named resignation letter.txt. On impulse, I opened the file and here is what I found.

Perusing through, I found it really hilarious. Read on, enjoy, and share the fun. (Credits to the author. Posted for humor ONLY, no pun intended.)

Dear Mr. Baker:

As an employee of an institution of higher education, I have few very basic expectations. Chief among these is that my direct superiors have an intellect that ranges above the common ground squirrel. After your consistent and annoying harassment of my co-workers and me during our commission of duties, I can only surmise that you are one of the few true genetic wastes of our time.

Asking me, a system administrator, to explain every nuance of everything I do each time you happen to stroll into my office is not only a waste of time, but also a waste of precious oxygen. I was hired because I know how to administer computer systems, and you were apparently hired to provide amusement to your employees, who watch you vainly attempt to understand the concept of "cut and paste" as it is explained to you for the hundredth time.

You will never understand computers. Something as incredibly simple as binary still gives you too many options. You will also never understand why people hate you, but I am going to try and explain it to you, even though I am sure this will be just as effective as telling you what an IP is. Your shiny new iMac has more personality than you ever will.

You wander around the building all day, shiftlessly seeking fault in others. You have a sharp dressed, useless look about you that may have worked for your interview, but now that you actually have responsibility, you pawn it off on overworked staff, hoping their talent will cover for your glaring ineptitude. In a world of managerial evolution, you are the blue-green algae that everyone else eats and laughs at. Managers like you are a sad proof of the Dilbert principle.

Seeing as this situation is unlikely to change without you getting a full frontal lobotomy reversal, I am forced to tender my resignation; however, I have a few parting thoughts:

1. When someone calls you in reference to employment, it is illegal for you to give me a bad recommendation as I have consisted performed my duties and even more. The most you can say to hurt me is, "I prefer not to comment." To keep you honest, I will have friends randomly call you over the next couple of years, because I know you would be unable to do it on your own.

2. I have all the passwords to every account on the system and I know every password you have used for the last five years. If you decide to get cute, I will publish your "Favorites," which I conveniently saved when you made me "back up" your useless files. I do believe that terms like "Lolita" are not viewed favorably by the university administrations.

3. When you borrowed the digital camera to "take pictures of your mother's b-day," you neglected to mention that you were going to take nude pictures of yourself in the mirror. Then, like the techno-moron you are, you forgot to erase them. Suffice it to say, I have never seen such odd acts with a ketchup bottle. I assure you that those photos are being kept in safe places pending your authoring of a glowing letter of recommendation. (And, for once, would you please try to use spellcheck? I hate correcting your mistakes.)

I expect the letter of recommendation on my desk by 8:00 am tomorrow. One word of this to anybody and all of your twisted little repugnant obsessions will become public knowledge. Never #*@k with your systems administrator, Mr. Baker! They know what you do with all that free time!

Sincerely,
David
System Administrator

Share:

TWEAK: Improve Boot Time with Soluto

Frustrated by your sluggish and unresponsive PC? Soluto is bringing an end to PC user frustration with transparency, killer technology, and your help. The same statements can be found on the webpage of soluto.

Soluto (anti-frustration software) will accomplish the above in three (3) ways namely: chop boot time, lighten web browser and heal crashes. For this feature, we will take a look at the "chop boot" functionality.

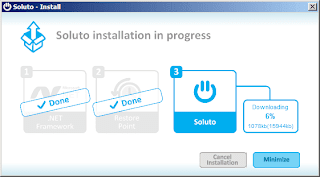
In order to accomplish this you will need to download soluto. Then launch soluto installer. The software will download the latest soluto application to the local drive. The download is a bit hefty so be patient while the software downloads the required packages.

Improve Boot Time with Soluto

Soluto will then ask for a reboot and detect the software installed. During the reboot it will profile the performance of the computer during boot-up and detect the software being launched. Then it will download a few other software, which could probably be the genome database or a part of it. This will take another while to load.

Improve Boot Time with Soluto

Soluto will then present the result of the boot profile including suggestions on which software can be disabled, paused or delayed. It also identifies which software are not safe to be tweaked. While tweaking, you are presented with the list of software that can improve boot time and the potential impact on cutting boot time. This also includes a suggestion on how the other soluto users set the service or application boot-up settings.

Using soluto can be help out a lot since it uses the power of the crowd of soluto users to see the best configuration for your computer. Rest assured, you can always do a trial and error as soluto creates a backup of your original boot-up configuraion. And restore them in the future if you want to back out changes.

On my desktop, I shaved off around 4 seconds by delaying or disabling startup applications and scripts. From a boot-up time of 0:55 down to 0:51. That is achieved by delaying the start-up of 10 applications and services.

Improve Boot Time with Soluto

My desktop is already optimized so the impact is quite lower. Your mileage may vary. So go ahead and try out soluto on your system.

Try out this tweak to boot Windows 7 even faster.

Share:

TIP: Archive Old Messages in Gmail Inbox

Previously, we outlined a tweak to view only unread mails in Gmail. As a supplement to that, let us discuss another tweak -- archiving old messages. If you have been a Gmail user since its infancy, chances are you have tons of emails in your inbox. We need to reduce the clutter to a minimum.

Aside from Priority Inbox, there are two other ways to manage this situation. One is by using the search bar and the other is with the use of filters.

Let us start with the search bar. Launch your favorite browser and sign-in to your Gmail account. On the search bar, type "before: 2010/06/01" (translating to June 01, 2010). Any date will do here as long as the format is yyyy/mm/dd. All that is left is to press the Search button.


Select the mails you wish to archive, and click on Archive. You will be getting a screenshot just like the one above.

Gmail seemed to have noticed that I ticked all mails that fall into the search criteria "before: 2010/06/01". And presented me with another option -- to select all messages that match the search. Just like below.


I clicked that link and archived all messages before June 1, 2010. Once you click Archive, wait for a minute or two for Gmail to process your request. Once its done, your Inbox will be quite easier to handle and loads a bit faster too. Quick and easy.

The next method is though the use of filters. Next to the search bar is the search button for mail and web. Then next to those in fine font is Create a filter. Fill out the field "Has the words:" with "before: 2010/06/01". Again, this could be another date but has to conform to the format yyyy/mm/dd, like below. Then click Next Step.


Next, tick Skip the Inbox (Archive it) and below it, also tick Also apply filter to XXXX conversations below. The filter will take a minute or two to execute, and once done you can delete the filter.


Just keep in mind that this is not a destructive process -- meaning your mails were not deleted and are still intact. You can still access them under All Mail or search for them on the search bar. What the procedures above did was to archive them from the inbox.

Share:

INFO: Install Angry Birds on Chrome Browser

The game popularized by its presence on most mobile devices and a recent animation movie -- Angry Birds (by Rovio) -- is now on the Google Chrome browser. And you don't have to pay for it. It's absolutely free!

To install, browse to the chrome web store > Apps > Games > Angry Birds and toward the right side there will be an Install button. Click it and install.

Angry Birds on Chrome Browser

WARNING: You can get hooked with Angry Birds. And it will eat a lot of your time. So don't say we didn't warn you.

To play the game, just open a new tab and the Angry Birds icon will be on the top layer under the Apps header. Or input http://chrome.angrybirds.com/on the address bar.

Angry Birds on Chrome Browser

Enjoy the Angry Birds game for free on your Chrome browser.

Share:

TWEAK: Tips to Improve Page Speed Performance

I was having a conversation with a fellow administrator (he is a webmaster on the side and wishes to remain anonymous) about blogs over coffee and I mentioned about having a blog. He told me a very valuable tip that I thought I would likewise share -- page loading performance. His example was none other than google. He noted that google.com always instantaneously loads. And in turn, that keeps users happy.

He further advised that one of the best ways to measure and at the same time get tips and recommendations on improvement of page load performance is GTmetrix. GTmetrix concurs with his advise:
Speed matters.

Studies show that users leave a site if it hasn't loaded in 4 seconds; keep your users happy and engaged by providing a fast performing website!

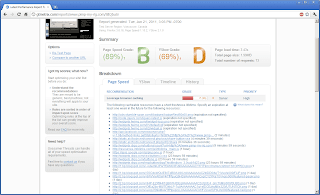
So without further ado, I submitted PIMP-MY-RIG reloaded and waited for results.

Improve Page Speed Performance

It is good to see PIMP-MY-RIG reloaded main page loads under the 4 second barrier. But the bounce rate on this site is still high -- one of the things we need to work on and, hopefully, improve on.

As bonus GTmetrix will feedback areas of improvement that can be further tweaked. Yslow's rating was a D.

Improve Page Speed Performance

The aspect of the webpage that pulled the performance down is web browser caching. And here, you will probably notice that pictures expire after a day. But since browsers do not have a handle on their caches, this is an excellent circumstance where a caching proxy server comes to play.

This is really important since pictures are static content. And if you hit the page from time to time, it improves performance big time once the browser gets pictures from cache.

You can also test page loading performance using page speed extension for Firefox and Chrome. But I found GTmetrix better with its recommendations on how to improve the webpage, and the site in general.

Share:

INFO: IT Graduates Not Well Trained

I didn't graduate from an IT course, nor is my degree IT related but my work is IT related. When I read this story, it definitely caught my attention. I can relate as most of my knowledge in IT, I didn't gain in school but rather from job experiences. But even though I graduated years ago, not much has changed.. or so it seems.

More on the story as published by PCWorld:
There is a disconnect between students getting high-tech degrees and what employers are looking for in those graduates.

Employers agree that colleges and universities need to provide their students with the essential skills required to run IT departments, yet only 8% of hiring managers would rate IT graduates hired as "well-trained, ready-to-go", according to a survey of 376 organizations that are members of the IBM user group Share and Database Trends and Applications subscribers.

The study found nearly 4 out of 10 respondents report that their IT hires are not sufficiently prepared to perform jobs within their companies, and another 44% say, at a minimum, that there are noticeable gaps in their skills.

The report indicates that organizations are ready to hire, with employers reporting they are seeking the following skills from higher-education institutions:

- 77% want schools to provide programming skills
- 82% seek database skills
- 76% would like schools to provide analysis and architectural skills
- 80% seek problem solving and technical skills

This skills gap apparently doesn't stop organizations from hiring professionals with little, if any previous experience. The survey found that nearly half of companies responding to the survey hire new IT employees straight out of school. Two-thirds of organizations do require at least some college internship experience among their hires, according to the study.

The study went on to note that 59% of respondents indicate that they are either currently hiring or planning to hire programmers and developers in the coming months; 43% are hiring systems programmers and systems analysts; 50% are hiring database professionals; 36% are hiring analysts and architects, and 27% seek supplication management talent.

A Network World story last year cited a Dice.com survey that said Java development supplanted IT security as the most difficult skill set for hiring managers to locate. Virtualization jobs, meanwhile, have become easier to fill, but hiring managers are increasingly having trouble finding talented software developers and C# programmers, according to the survey.

The top 10 list of most difficult positions to fill is as follows:

1. Java/J2EE
2. Security
3. Software Developer
4. SAP
5. Database Administrator
6. .NET
7. Oracle
8. SharePoint
9. C#
10. Active Federal Government Security Clearance

The last item on the list refers to tech professionals with the necessary federal security clearance to work for government agencies and government contractors, such as Lockheed Martin.

Published on: http://www.pcworld.com/businesscenter/article/220771/it_graduates_not_welltrained_readytogo.html

Share:

INFO: IPMP or IP Multipathing to Improve Resiliency

High availability (HA) is a system design approach and associated service implementation that ensures a prearranged level of operational performance will be met during a contractual measurement period. (source: wikipedia).

Tweaks about high availability are not taught in school. Either you learn it on the job or seek knowledge from sites on the net. Then, you will have to try it out and see for yourself how it gets implemented. High availability ensures minimal downtime or impact from outage. Others define it as elimination of single points of failure.

HA can be very costly but if implemented right, tweaking for HA may not be as expensive. This is where a simple tweak like IPMP (short for IP Multipathing) comes in. It is not as expensive. And just covers the single point of failure on the network part.

I found this tweak from Sun Blueprints a long while ago, but it seems that site is no longer in existence, I'm putting up a similar procedure.

Solaris supports IPMP right out of the box. And implementation is not as complex as one might think. Only basic knowledge of Solaris network configuration is required. In this example, implementation of IPMP is for a failover of a public IP with two private IPs.

Let's assume your server has two network interfaces (NICs). In Solaris, the network interface is recognized as ce0 and ce1 (for copper ethernet).

[1] Ensure that each network card has a unique MAC address flag set to true.
On the OBP: setenv local-mac-address?=true
On the CLI: eeprom "local-mac-address?=true"

[2] Reserve three IP addresses on the same subnet or VLAN. Add them to /etc/hosts.
root@host# cat /etc/hosts
#
# Internet host table
#
127.0.0.1       localhost       
192.168.0.10   host-name  loghost 
192.168.0.11   host-priv1 
192.168.0.12   host-priv2

[3] Configure the individual interfaces with the corresponding IP addresses assigned (assuming ce0 and ce1, could be any NIC of your choice).

root@host# cat /etc/hostname.ce0
host-priv1 netmask + broadcast + group production deprecated -failover up \
addif host-name netmask + broadcast + up
root@host# cat /etc/hostname.ce1
host-priv2 netmask + broadcast + group production deprecated -failover up

There are many variations to this configuration. But what this particular configuration does is sets up two private IP addresses that are fixed to each interface (host-priv1 and host-priv2); it sets the interfaces under a group named production; and, it adds an IP (host-name) that is assigned to ce0 but migrates between interfaces in cases of failure.

In the above configuration, receiving of packets is done by the active host-name but transmission is shared by each, thereby "doubling" the uplink bandwidth.

root@host# ifconfig -a
...
ce0: flags=1000843 mtu 1500 index 3
inet 192.168.0.11 netmask ffffff00 broadcast 192.168.0.255
ether 00:14:4f:2e:94:43
groupname production
ce0:1: flags=21000843 mtu 1500 index 4
inet 192.168.0.10 netmask ffffff00 broadcast 192.168.0.255
ce1: flags=29040843 mtu 1500 index 4
inet 192.168.0.12 netmask ffffff00 broadcast 192.168.0.255
groupname production
ether 00:14:4f:62:51:3b

Administration best practice is to try out the failover to test resiliency to failure. To simulate failure, use the command below. Execute tail -f /var/adm/messages to view the informative and error messages.

root@host# if_mpadm -d ce0
Oct 10 16:28:23 host in.mpathd[428]: Successfully failed over from NIC ce0 to NIC ce1
root@host# if_mpadm -r ce0
Oct 10 16:37:45 host in.mpathd[428]: Successfully failed back to NIC ce0

With the configuration tried and tested, the single point of failure on the network is eliminated. To further improve resiliency, it is recommended to plug each NIC connection to different switches.

NOTE: The secondary network card can also be setup in standby mode with only one data address between the cards. However, by assigning a data address for each card, the outbound load is spread by IPMP. But using only one shared IP address, if the card with a single data address fails during boot up, the address may not be failed over, leaving both interfaces inactive.

Share:

INFO: AutoPatcher -- Install Windows Updates Offline

How many times did you have to leave your computer, after a format, to download the updates you had before it? How many times did you have to go do something else, leaving your friend’s computer download the load of updates with their poor little dial-up modem? How many times have you wished for the updates to be portable from one computer to another and not require but a few mouse clicks to install?

If you’re the "computer guy" of the pack, no doubt the answer to the above questions was "I’ve lost count"! And if you have one or two computers you should consider yourself lucky as well. Think of what would happen if you had to update ten or twenty computers daily!

The above is a preamble of the homepage of autopatcher. It answers the question: "What is AutoPatcher?" and it further adds:

AutoPatcher is based on the functionality of these special updates, automating their installation process. This way, with only a few mouse clicks and two minutes of your time, AutoPatcher is able to continue with the installation of the items you selected. In short, AutoPatcher combines the advantage of both Windows Update (presentation and description of updates and automated installation), and the special administrative updates (portability and installation without the need of an Internet connection).

AutoPatcher is a comprehensive collection of patches, addons and registry tweaks that give you peace of mind in the knowledge that your Windows system is up to date, even before you connect it to the Internet. It's designed to quickly patch a system with the most current updates and tweaks available, and requires no user interaction once you have selected what or which to install.

This handy dandy tool can be downloaded off the downloads link on its webpage. Once downloaded, unpack apup131.zip. There will be a file named hit_this_to_generate_a_log_file_for_apup.cmd. Run this file and you will be presented with a Window like this:

AutoPatcher Install Windows Updates Offline

Just hit Next and AutoPatcher Updater will download the necessary files it needs to function. You will notice after the first run that more files are added to the apup directory.

Launch hit_this_to_generate_a_log_file_for_apup.cmd again. And select the all the products intended for offline patching.

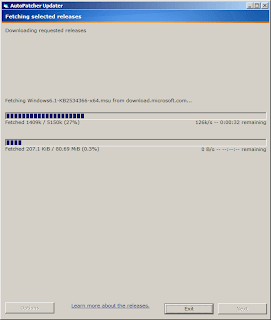
In this example, I ticked AutoPatcher for Windows 7 SP1 (x64) and clicked Next. Then AutoPatcher Updater started to download all of the updates.

AutoPatcher Install Windows Updates Offline

One of the files downloaded during the first run is autopatcher.exe. This is the executable to install patches on the system. It will run and detect patches present in the system and suggest the ones that need to be installed. The ones that need to be installed are black (automagically ticked), while the patches already installed are in blue.

AutoPatcher Install Windows Updates Offline

This is the screenshot on an updated system. Notice that the patches are all blue, meaning, no further updates need to be installed. So go ahead deploy AutoPatcher, thus download once and install on many.

Once in a while run apup.exe to keep AutoPatcher updated. Microsoft usually releases huge updates every second Tuesday of the month, so it would be a good idea to check for updates soon after that day.

Share:

INFO: npackd -- Package Manager for Windows

Most of the operating systems I'm familiar with come with a package manager to simplify installs, uninstalls, and updates. Maybe I'm just used to *nix way of doing things and its command line. However, these operating systems have provided sysads the easier job of administration with just a few commands. It's logical and intuitive, especially from a support perspective.

In contrast, Microsoft and its Windows family of operating systems seem to be missing a similar tool. Even third parties have tried to design a radical solution and most have failed. But there seems to be a project ongoing to bridge the gap Microsoft failed to plug. This project is npackd (pronounced unpacked).

Npackd can be downloaded from its google code project hosting page. From its project page:

Npackd (pronounced "unpacked") is an application store/package manager/marketplace for applications for Windows. It helps you to find and install software, keep your system up-to-date and uninstall it if no longer necessary. You can watch this short video to better understand how it works. The process of installing and uninstalling applications is completely automated (silent or unattended installation and un-installation). There is also a command line based version of Npackd.

Npackd is a free Windows package manager that aids the user in discovering, installing, updating and uninstalling applications. From first use, it has already helped me discover a few programs that prove to be useful in the Windows environment.

When launched, the application will check its repository for updates. Then, it lists down the packages that are available from the repository including their respective versions. Also included in the list are the programs that are installed -- whether via npackd or through their own standalone installers -- and if an update is available.

npackd Package Manager for Windows

It only lists down installed programs that are available in its repository. If a program is installed but npackd is not "aware" of the program, it is not listed. The way it looks, npackd only lists opensource or free programs.

Since the list is quite long, npackd has a text box for searching for a particular application. Search begins as characters are typed in. Also part of the filtering mechanism are category listing as to whether the applications are installable, installed, updatable and a combination of two of those categories.

npackd Package Manager for Windows

Installing, updating and uninstalling are done via buttons on the toolbar. Also provided is a button that opens the default browser to the homepage of the particular application.

Npackd, in its current version, can only update and uninstall programs that it installed. Meaning, even if npackd is aware of the program, once it is installed via the program's standalone installer npackd cannot update nor uninstall it.

Multiple installations could not be done in one click. Installs must be done one at a time. This feature could be in the development wishlist and en-route for future releases. For me, this is really a good nice-to-have.

Like installing, updating is done in a single click. Still one at a time. Although here, instead of simply downloading the update the process involves uninstalling the old version, downloading the installer of the updated version and finally installing it.

Regardless of its limitations, npackd is a step in the right direction. I find it a really useful tool most especially a central point in administering software installations. As more people become aware of its existence, npackd will have more contributors, as well as developers.

Share:

FAQ: uTorrent -- Stopped By User Activity

"There’s No Such Thing As A Silly Question" -- does the cliche sound familiar? In this part of pimp-my-rig reloaded, technical questions are answered. Mail them to me and I will post the answers here. If you have a better answer, by all means share it with us.

FAQ. A friend recently called me up to ask if I have experienced my torrent suddenly stop. He further described that every torrent in the queue is greyed out. There was a red button in the status bar with an exclamation, follow by a message stopped by user activity. I asked him for a screenshot but he graciously declined for his own security.

I haven't experienced this scenario before so I told him to keep me updated should he come across a solution for it. I later discovered that after a few days that he re-installed Windows just because his torrents won't run. I felt bad for that poor bloke.

I forgot all about this issue until I came to experience it myself. Here is what the utorrent interface looks like with the error.

uTorrent - Stopped By User Activity

Like him, I couldn't do anything. The torrents were started, not stopped but the program just won't download anything.

So I searched for a solution in the net and immediately found one, from none other than the utorrent forum itself.

I followed the procedure outlined and my torrents are back at work.

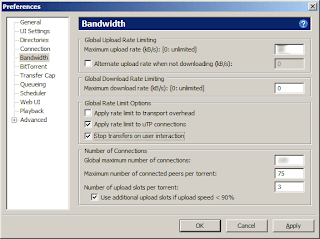
Preferences > Bandwidth > (untick) Stop transfers on user interaction

uTorrent - Stopped By User Activity

So click on the wheel icon or press [CTRL]+[P] > Bandwidth, and under Global Rate Limit Options untick Stop transfers on user interaction (like the screenshot above). Then accept the change by clicking OK. Once this is done, downloading will resume.

That solution is much much simpler than re-installing Windows.

Share:

INFO: AIMP2 Music Player Review

I'm not an audiophile but I love listening to music. Famous playwright Shakespeare once said, "If music be the food of love; play on." Music touches our lives in strange and unique ways. Music can set the mood, make you relax and just take away the stress of everyday life, and more..

When it comes to computer systems, most would install Winamp to play music. I used belong to this category. But lately, I discovered another multimedia player that is better than Winamp with a simple yet very intuitive interface, easy to use, and just plays music better out-of-the-box. Meet AIMP2.

AIMP2 is a full-featured audio player that supports all popular audio formats as well as Internet radio playback and recording. It offers a media library, sound recorder and audio format conversion along with a modern, user-friendly interface. The program also includes a 18-band equalizer, build-in sound effects, tag editing, playlist support, automatic cross-fading between tracks, personal ratings and much more.

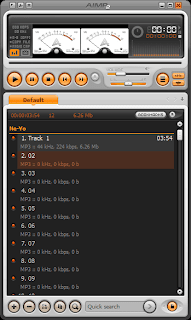
AIMP2 Music Player

The AIMP2 music player is free. And the best thing about it is, it comes with its own easily accessible set of utilities -- a audio file converter, CD ripper and audio recorder. You can convert audio files to several different formats so they are compatible with other players. Rip your CD’s into the audio library using different formats from mp3 to FLAC and others.

AIMP2 Music Player

AIMP2 has one click sound recording. The program could detect the sound card on your system. Based on its capabilities, it can allow you to record from an input source such as line-in or microphone. And, if your card is capable it will allow you to record streaming media. Not only can you record but you can record directly to mp3 format!

AIMP2 Music Player

The only downside to it that I saw was that the interface language is set to Russian by default. The only way I made it to change the language setting was to "hide" the Russian language file. Explore to C:\Program Files (x86)\AIMP2\Langs (if using Windows 7 x64) or C:\Program Files\AIMP2\Langs. There you will find two files: english.lng and russian.lng. What you can do is rename russian.lng to russian.lng.hide. This is what I did. If you wish to delete the file, you can do that as well.

There you go folks, another alternative to Winamp. It doesn't hold back on features, and from what I observed AIMP2 is very light on system resources.

Share:

S/W: Mozilla Firefox 5.0 Just Out

Firefox is the award winning next generation browser from Mozilla. Firefox empowers you to browse faster, more safely, and more efficiently than with any other browser. Make the switch today - Firefox imports your Favorites, settings and other information, so you have nothing to lose. Stop annoying popup ads in their tracks with Firefox's built in popup blocker. View more than one web page in a single window with this time saving feature. Open links in the background so that they're ready for viewing when you're ready to read them. Built with your security in mind, Firefox keeps your computer safe from malicious spyware by not loading harmful ActiveX controls. A comprehensive set of privacy tools keep your online activity your business.

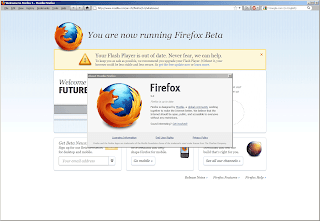
Mozilla Firefox 5


Links: Homepage | Download | Changelog

It promises to be faster, quicker and faster and quicker; also, more secure. But it's not all about speed and security, one of the new features to watch for are the built-in PDF viewer and MP3 player.

What I wish to see in this new version of firefox is memory usage improvement. Firefox is a big memory hog.

Mozilla Firefox 5

That I will never know since I got an error trying to install Firefox 5. I'm running Windows 7 x64 SP1.

I hope your upgrade experience is better than mine.

UPDATE: As it turns out, the above is due to a corrupt download.

Mozilla Firefox 5

And as it seems this is not a final version but a beta version.. Hmmm..

Not much change in memory usage. Firefox 5 is still a memory hog. These are screenshots of Firefox 4.0.1 and Firefox 5.0, single-tab while playing Backyard Monsters.

Firefox 4.0.1.

Mozilla Firefox 5

Firefox 5.0.

Mozilla Firefox 5

This is a simple test but it doesn't look promising.

Share:

TWEAK: Adding Custom POI to your Garmin GPS

Now that the GPS has a map, let us maximize its potential by putting its features to good use. The feature we are aiming at is the custom points of interest (or POIs).

This could be a very lengthy discussion but for now let's limit it to the basic use -- making it work on your very own Garmin nuvi. In this article, the unit tested is a Garmin nuvi 255W. If your unit is a newer model, this should work on those as well.

I drive a turbo diesel with a Euro IV compliant engine. But in the Philippines, most of the diesel pumping stations are only Euro II compliant only. That will be to the detriment of the engine in the long run. Fortunately, SeaOil BioXceed is available and is Euro V rated. That is the primary reason why I made SeaOil stations the custom POI -- for the information of those who are not yet aware. Don't get me wrong, I'm not affiliated with SeaOil in any way.

To start with, you will need to download Garmin POI Loader. Once downloaded, install the application.

If you already have SeaOil waypoints on your unit, it will probably be in the HH MM SS format. We need to covert that to its decimal equivalent. If you don't have the desired POI you can obtain them via google maps or wikimapia. Just convert the coordinates to decimal form.

Create a .csv file with the following format: longitude, latitude, name of POI. Remember, longitude first. Wikimapia and google maps list them latitude first, so just make the necessary adjustments. In our example, the .csv file will have this entry (I compiled this information from wikimapia, you may add more if you wish).

120.97570, 14.23108, SeaOil Silang
121.04165, 14.45521, SeaOil Sucat
120.92569, 14.45248, SeaOil Binakayan
120.99146, 14.41744, SeaOil Las Piñas
121.01322, 14.63977, SeaOil Del Monte
121.05002, 14.67199, SeaOil Tandang Sora

Now that we have a .csv, connect your Garmin GPS to a USB port and launch POI Loader.

[1] A welcome screen will open. Click Next > Garmin Device.

[2] Click on Find Device. You may choose between the internal memory and the SD card. Click Next.

[3] Tick Install new Custom POI > Next.

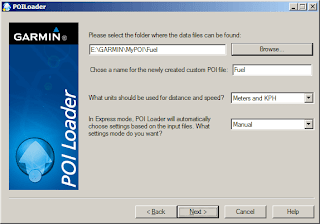
[4] Browse to the folder where the .csv file was saved. Choose a name for the newly created custom POI file: Fuel. Choose units that you are most comfortable with, here I choose the metric format -- meters and KPH. And set it to Manual. See below.

Adding Custom POI to your Garmin GPS

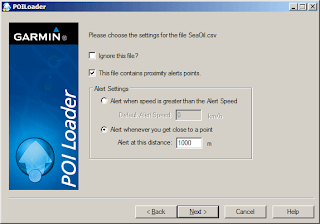
[5] POI Loader will find the .csv file. Tick This file contains proximity alerts points. And below it choose Alert whenever you get close to a point. Set the distance of the proximity alert. I set mine to a kilometer or 1000m. Like below.

Adding Custom POI to your Garmin GPS

[6] Click Next and wait for transfer to complete.

Now whenever you travel to that destination, and upon entering 1km proximity, you will hear an audible ding-dong sound coming from the Garmin GPS and a visible alert on screen (like below).

Adding Custom POI to your Garmin GPS

So go ahead put this tweak to good use on your Garmin. And may it help you find SeaOil stations. It will benefit your engine and it will benefit the environment.

Share:

TWEAK: Using GmapTool to Create Finalized Mapset

In a previous post involving the upload of maps to a Garmin nuvi 255W, one of the methods used is to use mass storage mode. However, if you don't have a .img file to directly copy to your GPS unit, this method is practically futile.

True, the method is useless but not entirely hopeless. You may use a utility called gmaptool to join the MapSource map files to a single .img file and use that to copy over to your GPS internal memory or SD card. The software gmaptool can be downloaded here. Download the latest version available. As of this writing the version available is 0.60b.

When download is finished, install gmaptool. It will soon ask if you want to copy gmt.exe to the windows directory. Just let it copy the file. Since gmaptool requires cgpsmapper.exe, download cgpsmapper as well. Unpack it and note down the path to it.

In this example we will use the RoadGuide.ph latest V1.25 demo map. Note that this is applicable to any MapSource compatible map files, not just limited to RoadGuide's maps. As I'm currently located in the Philippines, most people say RoadGuide has the best Garmin compatible map. Notice that once you unpack the executable downloaded from the above link there will be files created in C:\jklinc\roadguide.ph. Note this path as we will be needing it again soon.

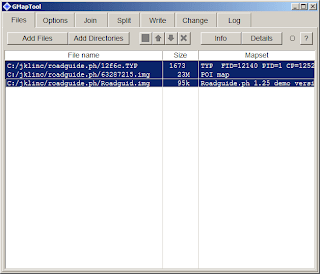
[1] Launch gmaptool. Under the Files tab, press "Add Directories". Add the directory C:\jklinc\roaduguide.ph. Once you have added the directory, gmaptool will automagically select the required files from that folder. You should have a screen like below.

Using GmapTool to Create Finalized Mapset

Note that there will be extra files in the C:\jklinc\roadguide.ph directory. Not all of those are needed in the output file. So if you choose "Add Files" there, make sure to select only the above listed files.

Drag-n-drop works in the same way as Add Files. Just select the files in Explorer and drag-n-drop it to the gmaptool window. Still, Add Directories is the safest option here.

[2] Under Options tab, locate cgpsmapper.exe. Remember to note down cgpsmapper location, as stated above. That tip is very useful in this step.

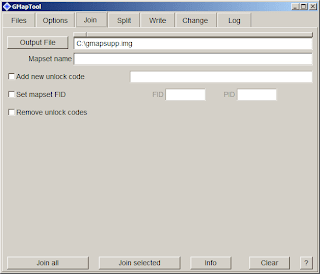
[3] Under Join tab, fill-out Output File. For this example, we will use C:\gmapsupp.img so it will be easier for us to locate the output file.

Using GmapTool to Create Finalized Mapset

[4] Press Join Selected or Join All. Then the gmaptool will join the selected files. Check the logs for errors. If error free, the output C:\gmapsupp.img file can be copied over to the GPS using mass storage mode.

Using GmapTool to Create Finalized Mapset

There you go folks, another way to create an image file for use on your Garmin GPS unit.

DISCLAIMER: I have performed the above procedure and tested to work on my Garmin nuvi 255W GPS unit. I also used gmaptool version 0.60b, the latest on the developer's download site. Your mileage may vary.

Share:

TWEAK: Peer Squid Caching Proxy Server

Following up with the install and configuration with another squid proxy tweak.. Setting up your own squid caching proxy server on your very own Windows machine at home is very beneficial, but there are more of those that remain unstated. If you happen to have multiple caching proxy servers set-up, you can further tweak them to share their caches. They help each other, so to speak.

That is another benefit of having a caching proxy server. Regardless of whether there are hardware limitations on memory and hard drive space, proxies can be set-up as peers. And this is not limited to just two (2) peers. You can have many peers set-up to help each other out with the caching. Fetching from local cache is faster than fetching the same information from the web, which definitely helps speed-up browsing.

It doesn't take rocket science to set this up. The same procedure in setting up a squid caching proxy server is followed. The configuration file is the pretty much the same, only tweak it a little to let squid know the peer exists. This part of the previous squid.conf is very important.

icp_port 3130
icp_query_timeout 5000

It is required for peer caches to be able to query each other. The directive icp_port 3130 tells squid to listen to port 3130 for peer queries. And icp_query_timeout of 5000 means the timeout of a peer query is 5 seconds, ample enough to wait for timeout between proxies. That is what I have in my configuration, test it out to see which applies best in your environment.

The other directive that is required for a peer cache proxy is cache_peer. It lets squid know who the peers are and which port it listens to. Further information about this directive and its options are on the squid documentation. The code to use is below:

cache_peer [peer_proxy_name or ip_address] http_port icp_port options 

Note that in the above syntax, http_port and icp_port both refer to the ports used on the peer, not on the local proxy server. It helps to simplify things by using the same ports for peer caches.

In order to see if the peer caches really query each other, you may wish to turn on access_logging. Checking the squid.conf.default file you can see that the original directive for this is:

access_log c:/squid/var/logs/access.log squid

Just replace the line "access_log none" with the above code. Then, re-configure squid to reflect the changes.


After browsing for a bit, check the log file and see if the IP address (or hostname) of the peer cache proxy appears on the log. That should be a good indication that the proxies are now helping each other out.


On this part, it is easy to miss the portion where you configure the browser. I have had many experiences of trying to troubleshoot the proxy (and wasting precious time in the process) only to find out the browser was never configured to use the proxy in the first place. Lessons learned here, so the first question I always ask is: Have you configured the browser to use the proxy?

Share:

HOW-TO: Squid Caching Proxy Server in Windows

Having a caching proxy server even at home can have a lot of benefits. For one, having a caching proxy server can make browsing faster. Data frequently used can be served by the proxy instead of fetching them from the webserver itself. This is how a caching proxy server can make browsing seem faster.

You can also save on disk space -- catch all cache for all your browsers. If you use multiple browsers, you will notice that firefox has its own disk cache, internet explorer has its own and so does chrome and all others. While having a proxy, the proxy will cache all the data and you can set each browser's disk cache to zero. Saving you disk space. I know this has little impact due to the price per gigabyte of disks now. But imagine if you have an SSD on your notebook. Would you rather waste its write cycles as browser disk cache?

Another benefit of a local caching proxy server is bandwidth savings. In the Philippines where ISPs are unregulated and there is no committed information rate (or CIR), bandwidth can vary in the so-called "peak" hours and between locations. Getting a bigger/fatter pipeline for more bandwidth doesn't justify the cost. Internet connection in the Philippines is just plain expensive. The caching proxy server can serve the requests rather than fetch the information from the webserver itself, thus saving you bandwitdh.

Given the above reasons, are you now "sold" on the idea of putting up your own caching proxy? Those are just a few benefits to mention, there are more on the list. For now, just know that squid is not just for geeks you can set it up for yourself -- even on your home network. And if you search the internet for squid, there will be a lot of links where Linux is involved. Squid is not just for Linux, it runs in your Windows desktop too.

First, download squid for Windows. You can obtain the stable version of 2.7 or play around with the experimental version 3. For my desktop, I have version 3 and installed version 2.7 on the notebook both running Windows 7.

Unpack the downloaded zip file and copy the directory \squid over to C:. You will then have C:\squid containing all folders and files from the downloaded zip file. All default configurations for squid are on this path, so simplify the install and configuration by putting it on that path.

Next, inside the C:\squid\etc directory are default files (.default extension) for squid configuration. Rename them so the .default extension is eliminated (for example: squid.conf.default --> squid.conf). Do this for the three files: squid.conf.default, mime.conf.default and cachemgr.conf.default.

Create a backup of the file squid.conf (perhaps a file named squid.conf.bak). Using your favorite text editor, open squid.conf and modify the configuration as follows. For detailed explanation on the directives, consult the squid documentation.

##--- ACLs
acl localnet src 127.0.0.1/255.255.255.255
acl localnet src 192.168.0.0/24
acl localnet src 10.0.0.0/24
acl all src all
##--- for Squid3
visible_hostname host  # change this to the hostname of the proxy server
##--- NO SNMP/HTCP
htcp_port 0
htcp_access deny all
snmp_port 0
snmp_access deny all
http_port 3128
http_access allow localnet
http_access deny all
##--- ICP (required for peer siblings)
icp_port 3130
icp_query_timeout 5000  # 5 second timeout
icp_access allow localnet
icp_access deny all
##--- CACHE
cache_mem 128 MB  # use 128MB cache memory, change as appropriate
cache_dir ufs c:/squid/var/cache 4096 12 128
pid_filename c:/temp/squid.pid
##--- NO LOGS
access_log none
cache_log none
cache_store_log none
##--- refresh_patterns
refresh_pattern ^ftp: 1440 25% 100800
refresh_pattern -i \.(gif|png|jpg|jpeg|ico|bmp)$ 1440 300% 260009 override-expire
refresh_pattern -i \.(iso|avi|wav|mp3|mp4|mpeg|swf|flv|x-flv|mpg|wma|ogg|wmv|asx|asf)$ 1440 150% 260009 override-expire
refresh_pattern -i \.(deb|rpm|exe|zip|tar|tgz|ram|rar|bin|ppt|doc|tiff|pdf|uxx)$ 1440 150% 260009 override-expire
refresh_pattern -i \.index.(html|htm)$ 1440 90% 40320 refresh-ims
refresh_pattern -i \.(html|htm|css|js)$ 1440 90% 40320 refresh-ims
refresh_pattern (/cgi-bin/|\?) 0 0% 0
refresh_pattern . 0 25% 4320
##--- unlinkd.exe
unlinkd_program c:/squid/libexec/unlinkd.exe
##--- MIME
mime_table c:/squid/etc/mime.conf

The configuration above should get you started on your caching proxy server. Should there be troubles on the configuration file, enable the logs by changing the "none" to a full path to the log file. Just keep in mind that squid doesn't like spaces in the filenames. You should wrap those in quotations.

Before running squid for the very first time, create the proxy cache directories via command prompt and using the command "C:\squid\sbin\squid -z". Then install squid as a service so each time the computer reboots, it should also start in the background. Use command "C:\squid\sbin\squid -i" to accomplish this.


If the above commands do not return an error, it is time to start squid. On the same command prompt, use command "net start squid" or via GUI through Start > Control Panel > Administrative Tools > Services select Squid and start the service.

The only other task left is to configure browsers to use the proxy. Just remember that the port used here is directed by the value assigned to http_port.

Share:

INFO: Garmin Mapsource Error Upon Install

When I first received my GPS, I was overwhelmed with excitement -- for one, over the fact that I got a very nice gift, and the overwhelming urge to use it the following day. But it took a bit more effort to upload a compatible and usable map to the Garmin nuvi 255W. For me to be able to use the GPS I was told that I needed mapsource.

So off I went and downloaded training center and then mapsource from Garmin's software and update site. After installing training center and mapsource, I launched mapsource. And.. ERROR! Little by little I started losing interest in using the Garmin nuvi 255W GPS. The error message:

Mapsource could not find any installed MapSource map products.
Please install one or more MapSource map products and start MapSource again.

You will find a screenshot similar to the one below.


The search for answers got me nowhere. Until I found out another way to upload a usable map to the nuvi 255W. The solution was to simply copy the gmapsupp.img to the \Garmin folder of the SD card on the nuvi. Still, it puzzled me why MapSource would not work on my desktop. So the quest to make MapSource to work continued.

I was almost ready to give up on MapSource until I remembered that I had Process Monitor. As it turns out, the MapSource installer copies the base map on registry keys on HKLM\SOFTWARE\Garmin\MapSource\Families. While the MapSource application binary is reading from the registry key HKLM\SOFTWARE\Wow6432Node\Garmin\Mapsource\Families.

As it turns out, the problems was that the desktop I was using was running Windows 7 x64. MapSource is running in WOW64 mode and finds keys in the wrong branch of the registry. I then exported the registry branch HKLM\SOFTWARE\Garmin\MapSource\Families as installed by MapSource. Then, opened the exported .reg file in notepad, inserted "Wow6432Node" on the appropriate keys, and imported the modified .reg file back to the registry.

Did MapSource work this time? Yes. And the screenshot of the default MapSource application is below.


Just to expound a little on the procedure above, replace every instance of HKLM\SOFTWARE\Garmin\MapSource\Families with HKLM\SOFTWARE\Wow6432Node\Garmin\Mapsource\Families on the exported file. That did the trick for me.

Then, I tried loading OSM_PHIL map and MapSource successfully uploaded it to the GPS unit.

I can now backup waypoints and tracks from my nuvi. And I enjoy using the Garmin nuvi 255W since MapSource has empowered it with more options and functionality.

Share:

ARTICLE: Flash Without Adobe Flash Player

Flash is making eye-candy on the web. It enabled some applications to interface with browsers. Even movies and clips are streamed online using flash. Dynamic contents are delivered via scripts to flash containers and displayed to the end user in a nice interface.

But did you ever notice why flash has not penetrated nor gained ground in the mobile world? Though it may be actively developed, flash content in the mobile arena is virtually non-existent. And one of the big reasons behind it is battery life. While flash may be dominating media and content delivery, it can dramatically shorten battery life and that would be detrimental to mobile devices.

And since Adobe dominates this arena for a while now, we can have another alternative to Flash -- DivX web player. While Adobe seems to be holding the de facto standard when it comes to flash, it is no longer the lone player in this field.

The DivX HiQ browser plugin (a component of DivX web player) enables playback of flash-based video and it promises better performance, better video quality and most of all better battery life. That is indeed good news for mobile users. We shall soon see if Divx delivers its promise.

There are a lot of limitations to DivX Web Player. Currently, it can only support movies and streaming media. In terms of browsers, Firefox 3.6 is supported while the later Firefox 4 is not and until Google Chrome 9. Starting from Google Chrome 10, the plug-in is no longer compatible. All these deficiencies are tantamount to the technological gaps that DivX Web Player needs to fill.

The browser used is Mozilla Firefox 4.0.1 and the plugins, the latest Flash Player V10.3.181.14 and DivX Web Player 2.1.1.94. The test video, the HD trailer of Iron Man streamed from YouTube at 1080P resolution.

I know the current DivX Web Player is not compatible with Firefox 4, but you can "force" it to be compatible. More on that in another post but this is how the trailer is streamed with DivX in Firefox.


.. while below is the screenshot with the Flash Player plugin.


While the video is streaming, the CPU usage is monitored in the background for comparison in terms of performance. And DivX delivered its promise here. CPU usage with the DivX plugin is lower compared to that with the Flash Player. This, in a larger picture, explains the shorter battery life when using flash based content.


DivX web player still has a lot of room to improve. But on the aspects it covers, like streaming movies or clips, it definitely gives Adobe Flash Player a run for its money.

Share:

HOW-TO: Uploading Map(s) to a Garmin nuvi 255W

I have lived in the Philippines almost my entire life. But I don't know my way around quite that well. And to be honest, I haven't been around to many of the tourist destinations either. Most of you may have visited far more places than I have been to.

But thanks to technology, most of the places in the country can be visited with the help of a global positioning system or GPS device. I just acquired a Garmin nuvi 255W recently (thanks to my sister). But sadly, the Garmin nuvi unit came prepackaged with US and Europe maps. Not very applicable where I'm at. Here is how I uploaded a Garmin compatible map for the Philippines.

On the quest for knowledge on how to do this, I found three (3) working procedures on how this gets done: [a] via mass storage mode, [b] via Garmin's mapsource, and [c] via a proprietary software called cgpsmapper. I have only used the first two so I can only outline details about them.

Mass storage mode. This is the simplest procedure to execute. Plug the Garmin nuvi device to an available USB port. It is detected as a mass storage device (not a GPS device but don't worry) -- one for the internal memory of the unit and another for the SD card. So two drives will be added to Windows explorer.

You will not mistake one for the other as the drive for the internal memory gets the name Garmin and the SD card is named Removable Media. The Garmin drive referring to the device's internal memory has an icon of a blue triangle pointing up.

Download the openstreetmap image file from osmphil_garmin website. Make sure to download the compressed gmapsupp.img.

The file downloaded has name gmapsupp.img. This needs to be copied over to the \Garmin folder on the SD card of the GPS. If the folder \Garmin does not exist, create it. (NOTE: On newer Garmin models the equivalent folder for \Garmin is \Map.)

Now unplug the GPS unit from the USB port and check the map just copied.

Using mapsource. To be able to install Garmin mapsource, download training center and mapsource (Garmin software and updates). Then install training center, after which install mapsource.

Download the openstreetmap image file from osmphil_garmin website. Make sure to download the executable file for Mapsource. Once done downloading, install the .exe file downloaded.

Plug the Garmin nuvi to the USB port. Then, launch mapsource and select the (OSM_PHIL) from the dropdown, like the screenshot below.


Under the Transfer > Send to device and tick Maps. Wait for the prompt message stating success -- "The data was successfully sent". This is illustrated by the screenshot below (Unid ID blurred for my own safety).


Now unplug the GPS unit from the USB port and check the map just copied.

There you go folks, a Garmin compatible map has been uploaded to your GPS unit for use in the Philippines. I still haven't gone around to test the accuracy but it beats having a GPS in situations where you don't know which way to go.

This procedure is known to work with the Garmin nuvi devices. Let me know if this procedure doesn't work for your unit.

Share:

INFO: What Exactly Happens in Facebook Every 20minutes

This demographic is really interesting. Click on thumbnail for a larger image.

(credits to the owner)


Share:

HOW-TO: Install Windows 7 Using a USB Flash Drive

On an earlier how-to, was posted a tutorial on how to unify Windows 7 x86 and x64 installers into one DVD (or one DVD image). However, not all computer systems nowadays come with an optical drive -- like the DVDs or the more advanced Blurays -- but most computer systems have USB ports.

Even though the desktop comes with an optical drive, one could not deny the fact that USB ports transfer data faster than optical drives. If so, then why not create an installer that plugs on the USB port right? That is indeed a good idea.

This procedure requires the following items (only one of the items marked by ** are required):
  • Windows 7 x86 [32-bit] DVD (or ISO) **
  • Windows 7 x64 [64-bit] DVD (or ISO) **
  • Unified Windows 7 Installer DVD (or ISO) **
  • a USB flash drive (at least 4GB in size)

Another thing to note here, is that this procedure can be done for any of the following sources: Windows 7 x86, Windows 7 x64 or the unified installer for both x86 and x64 Windows 7.

Follow the procedure below:

[1] Prepare a USB flash drive (UFD). Format it to NTFS. If the option for NTFS is not available, perform any of the following: using diskpart or tweak the unplug policy. For some strange reason, the installer requires an NTFS filesystem. I tried this on FAT32 and the installer will not work but does on NTFS.

[2] If you still have the D:\WIN7 directory structure from the older tutorial, simply copy the contents of D:\WIN7\x86\ over to the UFD.
--or--
[2] If you have the individual Windows 7 x86 or Windows 7 X64 installers, copy the contents of the DVD (or ISO) to the UFD.

[3] Open a command prompt as Administrator. Change directory to the \boot of the DVD or if using the unified installer D:\WIN7\x86\boot. Execute "bootsect /nt60 G:" (like below).


[4] You now have a USB capable of installing Windows 7. Try it out on another machine and prove to yourself the improvement in speed when installing from UFD.

USB install is versatile and fast. Not only that, our previous procedure unifying the installers can be put to a single 4GB USB flash drive. Another upside to this is carrying a UFD is much better than carrying a DVD -- it can even fit in your pocket!

Share:

FAQ: Execute WDidle3 via Virtual Floppy Drive

"There’s No Such Thing As A Silly Question" -- does the cliche sound familiar? In this part of pimp-my-rig reloaded, technical questions are answered. Mail them to me and I will post the answers here. If you have a better answer, by all means share it with us.

FAQ. When I published the document regarding Caviar Green W20EARS drives making strange clunk sounds, one of the readers of the post sent me a mail to ask how to execute this mod if he has no floppy drive.

First of all, thanks for your interest in this mod. We are pretty much in the same boat -- I don't have a floppy drive in my desktop as well. Although it is not expensive to obtain, I don't see any use for the floppy anymore, just like you. Besides, for the price of acquiring the floppy drive an equivalent USB flash drive (UFD) can be bought for the same amount but with a larger capacity than a floppy can contain.

The solution to our problem is a virtual floppy. But how do you emulate a virtual floppy on a computer that has not booted yet? Here's the trick.

Before you begin, it is highly recommended that you read through the entire instructions first. As pre-requisites, download the following software:


[1] Format the UFD with FAT or FAT32 file system type. Grub4dos does not support NTFS filesystem so use FAT or FAT32 but the older FAT file system is most recommended. That is the rationale behind the recommended UFD size of 2GB or less.

[2] Extract the grubinst zip file (in this example we will assume directory D:\grubinst. Likewise, extract the grub4dos zip file (in this example we will assume directory D:\grub4dos). Extract the other files as well.

[3] In the directory D:\grubinst, locate grubinst_gui.exe and run it as Administrator. Click on "Run" when shown the security warning.

[4] A Grub4Dos Installer window will be opened. In this window tick Disk and beside that select the disk referring to the UFD. Hit the refresh button if the selection dropdown is empty. You will be able to correctly select the UFD from the dropdown as it reflects the size of the disk.

On the Part List dropdown, Whole disk (MBR) should be selected from the dropdown. For options, tick the Don't search floppy box. Click on Install.


A command prompt will be opened with a message informing you of a successful installation.

[5] Open the MS-DOS 6.22 floppy image in winimage. Expand the overall capacity of the floppy image from 1.4MB to 2.8MB. Then inject the file wd3idle.exe to the root folder of the floppy image. For tutorial purposes, save the new image as WDIDLE3.IMG. Note down where you will save this file as it will be used below.

(NOTE: The filename is case sensitive!)

[6] Now copy the following files to the root of the UFD:
  • grldr (from D:\grub4dos)
  • WDIDLE3.IMG (from step#4 above)

[7] Create a text file menu.lst in notepad. Copy and paste the code below into menu.lst. This directive in grub makes the computer emulate a virtual floppy drive using the WDIDLE3.IMG file as the virtual floppy.

timeout 10
default 0

# boot WDidle3 floppy image
title WDidle3 tool
map --mem (hd0,0)/WDIDLE3.IMG (fd0)
map --hook
chainloader (fd0)+1
rootnoverify (fd0)
map --floppies=1
boot

# reboot
title Reboot
reboot

With the UFD having the required files, you can now boot from it and run WDIDLE3 to mod your WD Caviar Green drive. Use wdidle3 /s300 and validate with wdidle3 /r.

Share:

Subscribe for Latest Update

Popular Posts

Post Labels

100gb (1) acceleration (1) acrobat (1) adblock (1) advanced (1) ahci (1) airdrop (2) aix (14) angry birds (1) article (21) aster (1) audiodg.exe (1) automatic (2) autorun.inf (1) bartpe (1) battery (2) bigboss (1) binance (1) biometrics (1) bitcoin (3) blackberry (1) book (1) boot-repair (2) calendar (1) ccleaner (3) chrome (5) cloud (1) cluster (1) compatibility (3) CPAN (1) crypto (3) cydia (1) data (3) ddos (1) disable (1) discount (1) DLNA (1) dmidecode (1) dns (7) dracut (1) driver (1) error (10) esxi5 (2) excel (1) facebook (1) faq (36) faucet (1) firefox (17) firewall (2) flash (5) free (3) fun (1) gadgets (4) games (1) garmin (5) gmail (3) google (4) google+ (2) gps (5) grub (2) guide (1) hardware (6) how (1) how-to (45) huawei (1) icloud (1) info (4) iphone (7) IPMP (2) IPV6 (1) iscsi (1) jailbreak (1) java (3) kodi (1) linux (28) locate (1) lshw (1) luci (1) mafia wars (1) malware (1) mapsource (1) memory (2) mikrotik (5) missing (1) mods (10) mouse (1) multipath (1) multitasking (1) NAT (1) netapp (1) nouveau (1) nvidia (1) osmc (1) outlook (2) p2v (2) patch (1) performance (19) perl (1) philippines (1) php (1) pimp-my-rig (9) pldthomedsl (1) plugin (1) popcorn hour (10) power shell (1) process (1) proxy (2) pyspark (1) python (13) qos (1) raspberry pi (7) readyboost (2) reboot (2) recall (1) recovery mode (1) registry (2) rename (1) repository (1) rescue mode (1) review (15) right-click (1) RSS (2) s3cmd (1) salary (1) sanity check (1) security (15) sendmail (1) sickgear (3) software (10) solaris (17) squid (3) SSD (3) SSH (9) swap (1) tip (4) tips (42) top list (3) torrent (5) transmission (1) treewalk (2) tunnel (1) tweak (4) tweaks (41) ubuntu (4) udemy (6) unknown device (1) updates (12) upgrade (1) usb (12) utf8 (1) utility (2) V2V (1) virtual machine (4) VirtualBox (1) vmware (14) vsphere (1) wannacry (1) wifi (4) windows (54) winpe (2) xymon (1) yum (1) zombie (1)

Blog Archives

RANDOM POSTS