TIP: Configure NGROK Tunnel with Supervisor

I use a Raspberry PI (RPI) at home. I have blogged several times about my adventures with the RPI and some automation that I programmed in. It is currently running a very lightweight and optimized version of Linux named DietPI. The RPI is cheap. It operates cheap, since it doesn't consume a lot of electricity meaning I could leave it running headless 24x7x365. The only time it reboots is if there are critical updates that require it.

Since it is running 24x7, the RPI could also serve as my SSH tunnel to my home network from the internet. I use ngrok to achieve this and forward the SSHD port to the tunnel server. Ngrok does not run in daemon-mode and the developer has expressed that this feature will not be built-into the software. But on Linux this is not a really problem.

A supervisor could handle the software and even restart it if necessary. This is how I did it on my RPI.

First, install supervisor and download the latest version of ngrok.
apt-get -y install supervisor

Download ngrok off its developer's website, https://ngrok.com/download. Choose Linux ARM. Extract the contents of the zip file and copy it to /usr/local/bin. While in the ngrok website, register and obtain an authtoken.

NGROK AuthToken

Next, generate the default ngrok configuration file by running:
/usr/local/bin/ngrok authtoken [putyourownauthtokenhere]

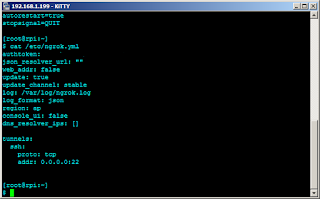
A configuration file will be generated in $HOME/.ngrok2/ngrok.yml. I modified this configuration file and copied it to /etc. The entire contents of my ngrok.yml is below.

NGROK Configuration ngrok.yml

On to supervisor configuration. Create the configuration file as follows:
[program:ngrok]
command=/usr/local/bin/ngrok start --all --config=/etc/ngrok.yml
autostart=true
autorestart=true
stopsignal=QUIT

Then, set supervisor to autostart at boot.
systemctl enable supervisor
systemctl start supervisor

To check the status of supervisor controlled daemons, run..
supervisorctl status

Check the dashboard on the ngrok website to see how you could connect to the tunnel from any internet connection.

RELATED: Root Backdoor to VMware ESXi Host

The best part is: this configuration doesn't have to modify firewall configurations nor forward ports on the router.


Share:

INFO: HP Notebook Battery Recall

Nowadays, whenever the mention of battery is heard, it immediately connotes the Samsung Galaxy Note 7.. This is not isolated to Samsung though. Neither is it limited to mobile phones either. It is applicable to all gadgets with batteries in them, including notebooks or laptops.

Last Tuesday, HP announced the recall of about ~100,000 batteries of its notebooks. If you haven't heard about it yet, the announcement is here.

You may not be able to check the physical hardware itself due to the rugged design of some notebooks. Some require specialized hardware to open the units but you will be able to check the device by a utility that HP made available in its website. Using it this way will avoid untoward voiding of warranties due to unnecessary tampering of seals.

HP Battery Recall Utility

As you can see from the screenshot above, the laptop assigned to me is safe from the defective batteries that were circulated. Ensuring that the safety of the equipment you are using is paramount.

If you have friends or relatives that use HP notebooks, let them know about the recall. The period covered by the recall are notebooks purchased between Year 2013 to 2016. This is a huge window of time.

Share this information to help others avoid the risks of having defective batteries.

RELATED: Monitor Hard Drive Health

Should you wish to download the HP utility to detect if the battery on your notebook is affected, click this link to download.

Share:

INFO: IP Shifter, Profile-Based Network Configuration

In this time where technology abounds and the internet of things (IoT) is being ushered in, everything seems to be either automated or has some form of dynamic-ity built-in. DHCP (or Dynamic Host Configuration Protocol), has been an industry standard for that dynamic assignment of IP addresses. It defines how one device connects to network and communicates with the rest of the devices in the internet of things.

There are many cases where DHCP is not applicable -- special services like DNS and active directory are there to name a few. To these systems are assigned so-called static IP addresses. And there are times when you as the support personnel need to shift between both static and dynamic assignment. If you have experienced this, you know the pain in encoding the static IP address(es) to machines. Not to mention different operating systems follow different procedures and different configuration file locations.

In the Windows world, this seems to be standard. But then again, it is still cumbersome to do. There must be a way to shift or at least a semi-automated way to do it.

One tool that I have used specifically for this purpose is "IP Shifter" by ZQWARE.

ZQWARE IP Shifter

I have configured it to easily shift between DHCP IP address and static IP address using profiles. The change in configuration happens with just a few clicks.

As you will see from the screenshot above, I have a profile that sets my wired connection (LAN or Local Area Network) to DHCP, a profile that sets the LAN to a pre-assigned static IP address, and a profile that sets my wireless connection (or WIFI) to DHCP. You may also add as many predefined profiles as you wish. Simply choose the profile and hit "Apply". It is that simple.

RELATED: Automatically Disable WIFI on LAN Connectivity

Coming from an infrastructure background, this tool has helped me save time moving from one static IP to the next one. I hope it makes your work easier as well. You may download the utility from its developer, ZQWARE. Please don't forget to donate to the developer if you find it very useful.


Share:

HOW-TO: NAT (Network Address Translation) on a Mikrotik Router

Previous articles have discussed the configuration on a Mikrotik Router as I have experienced it -- the initial configuration and succeeding LAN provisions, like DHCP and DNS. I have linked those to the corresponding posts, should you want to check them out. This time, let's outline the internet access side of the configurations.

It is likely that your internet service provider (ISP) will not give you an entire block of IP addresses (otherwise, it will be a very expensive service). They expect you configure some form of network address translation in order to access the internet or traverse to another network. In order to understand the concepts, let us define the two common methods of NAT, which are source NAT (in Mikrotik lingo "srcnat") and destination NAT (in Mikrotik lingo "dstnat"). Just keep in mind that for connections bound to the internet (going out of the network), srcnat is involved; consequently, for connections going in to the local area network, it is dstnat.

NAT in this case does the one-to-many translations. As the traffic passes through the router bound for the internet, the router "masquerades" the IP address of the packet with the public IP address (refer to the initial configuration post) of the router (as additional reading references, you may want to checkout the RFC1918 standard). The router also performs another significant function of tracking the active connections. When inbound packets return, it uses this tracking information to determine the private IP address to forward the packets to.

Having mentioned that, there are two major configuration blocks that need to be added to the Mikrotik router. The NAT part and the firewall forward chain part. At your discretion, you may also want to adjust connection tracking parameters of the router, if the default configuration does not fit.

LAN-to-ISP Network Topology

SRCNAT. First, source NAT or srcnat. Still taking into account the same configuration that we used in the previous articles. Given a static public IP address, srcnat is best deployed.
/ip firewall nat
add action=srcnat chain=srcnat out-interface=ether1 \
 src-address=192.168.1.0/24 to-addresses=1.1.1.2

Another way of configuring this is to use another form of source NAT called "masquerade". Masquerade is a specialized form of srcnat. While srcnat requires a destination IP address, masquerade requires a specific interface and retrieves the IP address assigned to the interface when performing the NAT process. There is an associated overhead to masquerade due to this. Just know that in the absence of a static public IP, masquerade is the solution to go. Masquerade was created to work with dynamic IP addresses on the outbound interfaces.
/ip firewall nat
add action=masquerade chain=srcnat out-interface=ether1 \
 src-address=192.168.1.0/24

Given a static public IP address on the outbound interface, both configurations will work. However, it is recommended to use the first configuration to minimize overhead. I have not tested how big the overhead is on my setup but I guess it will vary from setup to setup.

FORWARD chain. The router's built-in firewall needs to be instructed to forward packets NAT'd to the local area network. It needs to accept new connections initiated from the LAN as well.

/ip firewall filter
add chain=forward action=drop comment="DROP invalid packets" connection-state=invalid
add chain=forward action=accept comment="FORWARD packets from LAN" \
 connection-state=related,established

This block of code needs to come after the input chain (router protection).

RELATED: Initial Configuration of a Mikrotik Virtual Router

There you go, after putting the above code in conjuction with the previous configurations done, you will now have a working router able to provide basic network connectivity plus internet access. Next we will discuss quality of service (QoS) or packet prioritization and bandwidth shaping on the Mikrotik router.

Share:

Subscribe for Latest Update

Popular Posts

Post Labels

100gb (1) acceleration (1) acrobat (1) adblock (1) advanced (1) ahci (1) airdrop (2) aix (14) angry birds (1) article (21) aster (1) audiodg.exe (1) automatic (2) autorun.inf (1) bartpe (1) battery (2) bigboss (1) binance (1) biometrics (1) bitcoin (3) blackberry (1) book (1) boot-repair (2) calendar (1) ccleaner (3) chrome (5) cloud (1) cluster (1) compatibility (3) CPAN (1) crypto (3) cydia (1) data (3) ddos (1) disable (1) discount (1) DLNA (1) dmidecode (1) dns (7) dracut (1) driver (1) error (10) esxi5 (2) excel (1) facebook (1) faq (36) faucet (1) firefox (17) firewall (2) flash (5) free (3) fun (1) gadgets (4) games (1) garmin (5) gmail (3) google (4) google+ (2) gps (5) grub (2) guide (1) hardware (6) how (1) how-to (45) huawei (1) icloud (1) info (4) iphone (7) IPMP (2) IPV6 (1) iscsi (1) jailbreak (1) java (3) kodi (1) linux (28) locate (1) lshw (1) luci (1) mafia wars (1) malware (1) mapsource (1) memory (2) mikrotik (5) missing (1) mods (10) mouse (1) multipath (1) multitasking (1) NAT (1) netapp (1) nouveau (1) nvidia (1) osmc (1) outlook (2) p2v (2) patch (1) performance (19) perl (1) philippines (1) php (1) pimp-my-rig (9) pldthomedsl (1) plugin (1) popcorn hour (10) power shell (1) process (1) proxy (2) pyspark (1) python (13) qos (1) raspberry pi (7) readyboost (2) reboot (2) recall (1) recovery mode (1) registry (2) rename (1) repository (1) rescue mode (1) review (15) right-click (1) RSS (2) s3cmd (1) salary (1) sanity check (1) security (15) sendmail (1) sickgear (3) software (10) solaris (17) squid (3) SSD (3) SSH (9) swap (1) tip (4) tips (42) top list (3) torrent (5) transmission (1) treewalk (2) tunnel (1) tweak (4) tweaks (41) ubuntu (4) udemy (6) unknown device (1) updates (12) upgrade (1) usb (12) utf8 (1) utility (2) V2V (1) virtual machine (4) VirtualBox (1) vmware (14) vsphere (1) wannacry (1) wifi (4) windows (54) winpe (2) xymon (1) yum (1) zombie (1)

RANDOM POSTS