TWEAK: Filter Unread Emails in Gmail

I thought I'd share a few tricks on the use of Gmail and Google. This is no secret but for the benefit of those who don't know them yet, here goes.

Gmail. Did you know that the average individual would spend around 47 minutes a day checking emails? While if you are at work it would consume about 2 hours to sift through and read business related emails (reference material). Although that data is old, it still highlights the time it takes to read emails.

But while we're just average folks spending about an hour in front of the computer, it would be a good idea to cut down on that hour and spend it on more meaningful things rather than click thru emails. One step to be that efficient is to be able to see unread mails at a glance.

Outlook has this filter already in place. You can even customize search folders in outlook. But most users (me included) just browse through webmail. And this is where the challenge starts. Gmail doesnt have this filter; but Yahoo! Mail does.

However, I prefer Gmail over Yahoo! Mail. And while this is not a debate about the better mail service (and I would not want to start one), I use Gmail as a personal preference. One mailbox to make life simpler. Sadly, Gmail doesn't have this unread messages filter just yet. And it is about time for that feature.

While waiting for it, you can use a tweak for now. It is a simple tweak. Browse to your personal Gmail inbox and after logging in, key in "is:unread" on the search bar. You will then be presented with the unread messages only.

There you go, a filter for unread messages in Gmail. Since this is a really simple tweak, it wouldn't hurt to integrate that to the Gmail page as a button to click. Til then you may use the "is:unread" tweak.

Google Search. You probably have read about this tweak in the many webpages you have visited in the past but for the sake of those who haven't, here's a trick that puts Google's search engine algorithms to good use.

Google can be used to conduct a search for almost any file type, including Mp3s, PDFs, and videos. Open web directories are one of the easiest places to quickly find an endless quantity of freely downloadable files. It is a wonder in this age of security, that there still are webmasters failing to secure their web servers.

Try opening google.com (or click here). On the search bar, key in any of the following you are looking for.

To find music:
inurl:(htm|html|php) intitle:"index of /" +"parent directory" +size 
+(wma|mp3) "Justin Beiber"

To find videos:
inurl:(htm|html|php) intitle:"index of /" +"parent directory" +size 
+(mpg|wmv|avi) "Iron Man"

To find PDFs:
inurl:(htm|html|php) intitle:"index of /" +"parent directory" +size 
+(chm|pdf|doc) "Red Hat"


You can find just about anything -- given the right keywords. You can even view "unsecured" webcams. But I will leave it to you to find out how.

Share:

FAQ: Change NIC Speed in AIX

"There’s No Such Thing As A Silly Question" -- does the cliche sound familiar? In this part of pimp-my-rig reloaded, technical questions are answered. Mail them to me and I will post the answers here. If you have a better answer, by all means share it with us.

Experience in administering a Solaris Unix box made me think changing the speed of a network interface can be a simple execution of a series of commands -- but not in AIX. My experience was not so simple.

Recently while trying to change the speed of a NIC in an AIX box, I got into errors. Errors which I discovered to be a common discussion among system administrators in the web. The error is below:

Method error (/usr/lib/methods/chgent):
0514-062 Cannot perform the requested function because the
specified device is busy.


This was after the interface was "down"-ed and "detach"-ed, executing "chdev -l ent0 -a media_speed=1000_Full_Duplex". Being an AIX sysad amateur myself, I came to consult a colleague who has more in-depth knowledge and experience in AIX. I am grateful for his insight into the matter and here is the outline of what he did.

Here is a brief background of our objective -- change the NIC speed from Auto_Negotiation to 1000_Full_Duplex in an AIX box. And the workplan in place is:

[1] ifconfig en0 down detach

[2] chdev -l ent0 -a state=detach

[3] chdev -l ent0 -a media_speed=1000_Full_Duplex

[4] smit chinet >> (select interface) and change Current STATE to "up"
(NOTE: using "ifconfig en0 up" here sometimes assigns IP address of 0.0.0.0, so use smit instead)

[5] mkdev -l en0


I never got to execute beyond step [3] due to the error. So I sought for help.

What we did was to modify step [3] and inserted another step in the procedure : rmdev -l ent0. Which when executed outputs:
# rmdev -l ent0
ent0 Defined


After which, succeeding steps in the procedure above went smoothly.

To verify the change, execute entstat on the interface:
# entstat -d ent0 | grep Speed

Media Speed Selected: 1000 Mbps / 1 Gbps, Full Duplex
Media Speed Running: 1000 Mbps / 1 Gbps, Full Duplex


Another remarkable point to note here is that in step [4] of the original procedure, executing ifconfig to change the state of the device to "up" sometimes assigns it an IP address of 0.0.0.0.

As a Solaris sysad, this change in AIX was very much new to me. But hey, it is not bad to learn something new. And I hope that by sharing the inserted step in the above procedure, this little experience might be able to help other sysads stuck in the same error.


Share:

ARTICLE: Enable AHCI Technology in Windows

At its onset, SATA technology promised a lot of improvements. It was considered the mainstream hard drive's best thing since sliced bread. Speed being one of its many promises along with hot swapping and native command queuing. And now, AHCI (short for Advanced Host Controller Interface) was brought to SATA. We know what SATA is, but what is AHCI?

According to Wikipedia:
The Advanced Host Controller Interface (AHCI) is a technical standard defined by the Intel Corporation that specifies the operation of Serial ATA (SATA) host bus adapters in a non-implementation-specific manner.
The specification describes a system memory structure for computer hardware vendors to exchange data between host system memory and attached storage devices. AHCI gives software developers and hardware designers a standard method for detecting, configuring, and programming SATA/AHCI adapters. AHCI is separate from the SATA 3Gb/s standard, although it exposes SATA's advanced capabilities (such as hot swapping and native command queuing) such that host systems can utilize them.


To complicate things even more, motherboard manufacturers have this BIOS setting to enable and disable AHCI. And worse, Windows has this technology disabled by default. If this technology promises performance improvements, then why not take advantage of the technology right? Afterall, you bought a system that has this technology and in essence, you paid for it! Might as well put it to good use.

Follow the procedure below:

[1] Assuming you already have a Windows 7 system, fire-up the registry. Start > Run > regedit.

[2] If the UAC window pops-up and nags if you want to proceed, just click "Yes".

[3] Open the branch: HKEY_LOCAL_MACHINE\SYSTEM\CurrentControlSet\services\msahci

[4] Right-click on the "Start" key and select "Modify". Set the value to "0" (Automatic). The unmodified default should be "3" (disabled).

Enable AHCI Technology in Windows


[5] Close the registry editor and reboot for the change to take effect.

The default setting of most motherboards for AHCI is disabled. After the computer has shutdown, it is recommended to enter the BIOS and enable AHCI first then allow it to reboot. If unsure how to get to the settings, consult your motherboard manual or the website of its manufacturer.

Your computer system may have this technology already. As mentioned, might as well make the most out of it.

Share:

TWEAK: English as Default Google Search Language

Nowadays it is unusual to encounter folks who don't know google. Google has branded itself with search engines that browsers come with google as the default out-of-the-box search engine. More often that not, the term search is replaced by "google".

However, google's top-secret algorithm and architechture sometimes fouls up that even if your browser's default language is English, it returns searches in the local language of the geographically nearest google server -- google.com.ph, google.com.hk, etc (you get the idea). And when you get redirected, the language is no longer English. How then do you google that results always return in English?

Let us split the discussion to two popular browsers -- firefox and google chrome. Both of this browsers exhibit this behavior, as per experience.

Firefox. For firefox, you may download the Google (in English) add-on.

[1] Launch the link for "Google (in English)" add-on above or click here.

[2] Once the webpage loads, click on the "Add to Firefox" link and allow the website to install the add-on. Restart firefox if asked to do so.

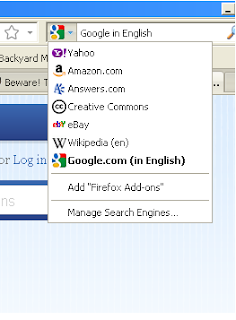
[3] Once installed, you may select from the drop down of the search bar (to the right of the address bar) "Google (in English)" as the default search engine (see snapshot below).

English as Default Google Search Language


Your searches should now always return in the English language.

Google Chrome. For Chrome, follow the procedure below.

[1] Right-click on the address bar. Select "Edit search engines..".

[2] Toward the bottom of the page are three blank fields. On the first field (containing: Add a new search engine) type "Google (in English)" or whatever makes you happy. This contains an arbitrary name of the custom search engine.

[3] On the second field (containing: Keyword), you can input anything or leave this space blank. In this example, the keyword used is "google.com".

[4] The last field (containing: URL with %s in place of query), key in:
http://www.google.com/search?q=%s

[5] The search engine you just added moves to the top half of the screen (Default search options). You can mouse over the added search engine and click on "Make default". The label "Google (in English)" then becomes bold when it becomes the default search engine.

English as Default Google Search Language


From the above screenshot, my google search engine takes me to Hong Kong (google.com.hk) and some results return in the Chinese language. And unfortunately, I don't speak any Chinese at all.

There you go folks. Google search that returns results in the English language.

Share:

ARTICLE: Unified Windows 7 Installer for x64 and x86

As processor technology continues to progress, the inverse is true x86 (or 32-bit) version of Windows -- the need for it has regressed. But for some, the 32-bit Windows still is has its uses. Netbooks will probably put it to good use for quite some time in the foreseeable future, while modern and powerful desktops come bundled with a x64 (or 64-bit) versions of Windows.

So having the requirement for both versions, so does the need to keep installers for both versions. Why not just bundle and keep one installer for both?

For all intents and purposes, let us assume that the working directory for our example is D:\WIN7 and the files for the x86 and x64 will be copied to subdirectories under the directory of D:\WIN7 -- meaning D:\WIN7\x86 and D:\WIN7\x64 respectively.

This procedure requires the following items:
  • Windows 7 x86 [32-bit] DVD (or ISO)
  • Windows 7 x64 [64-bit] DVD (or ISO)
  • imagex.exe (part of Windows 7 AIK)
  • ISO maker (e.g. cdimage.exe or oscdimg.exe)

Here's how to transform two installers to one.

[1] As stated above, create the folders D:\WIN7\x86 and D:\WIN7\x64.

[2] To make things simpler, copy imagex.exe to D:\WIN7. This will save you from a lot of typing.

[3] Copy the contents of the x64 DVD (or ISO) to D:\WIN7\x64. Do the same for x86 DVD (or ISO) but the intended target directory is now D:\WIN7\x86.

[4] Open a command prompt with Administrator privileges. On the Start menu search bar, key in Command and right-click Command Prompt to run it as Administrator. This is important, run cmd.exe as Administrator.

[5] Run the following commands to merge the installer. You may use the full path of imagex.exe or the relative path, whichever works for you.
  • imagex.exe /export "D:\WIN7\x64\sources\install.wim" 1
    "D:\WIN7\x86\sources\install.wim" "Windows 7 HOMEBASIC x64"
  • imagex.exe /export "D:\WIN7\x64\sources\install.wim" 2
    "D:\WIN7\x86\sources\install.wim" "Windows 7 HOMEPREMIUM x64"
  • imagex.exe /export "D:\WIN7\x64\sources\install.wim" 3
    "D:\WIN7\x86\sources\install.wim" "Windows 7 PROFESSIONAL x64"
  • imagex.exe /export "D:\WIN7\x64\sources\install.wim" 4
    "D:\WIN7\x86\sources\install.wim" "Windows 7 ULTIMATE x64"

[6] Explore to the D:\WIN7\x86 folder and delete the file "ei.cfg" file. If the following files exist: "install_Windows 7 HOMEBASIC.clg", "install_Windows 7 HOMEPREMIUM.clg", "install_Windows 7 PROFESSIONAL.clg", "install_Windows 7 STARTER.clg" and "install_Windows 7 ULTIMATE.clg", delete them as well.

[7] Copy the file etfsboot.com from D:\WIN7\x86\boot to D:\WIN7. Simply using the file D:\WIN7\x86\boot\etfsboot.com as bootsector when making the ISO will generate errors.

[8] Create the ISO (assuming you got Command prompt in D:\WIN7).
oscdimg.exe -l GRMCULFRER_EN_DVD -m -betfsboot.com -n -h D:\WIN7\x86 WIN7AIO.ISO


Test the newly created ISO in VirtualBox or VMware. Save yourself the cost of a DVD media by testing the ISO first before finally burning the image to a blank DVD. Or if you have a DVD-RW media, you may opt to burn the media and test it on your computer.

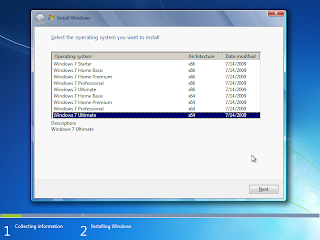
On VMware, the installer should be showing something like this.

Unified Windows 7 Installer for x64 and x86


You may use the all-in-one ISO to create a USB all-in-one installer too.

Share:

TWEAK: Take Ownership Context Menu

Working as a system administrator, I have had several experiences and encounters wherein I tried to reason out that functionality takes precedence over security. Often times this is a futile campaign. You will only end up having to resort to painful workarounds. It is true, the IT industry has generally come to terms that security is serious and functionality stepped back to the end of the queue.

Security comes at a price -- painful and sometimes expensive workarounds. And starting with Windows Vista, there are several file permission implementations that were too complicated. If one gets to change or delete a file without the proper permissions, errors are prompted. This happens even if one is a member of the Administrator group. The same elevated security mechanisms were carried over to the successor Windows 7.

The above scenario was among the many reasons I skipped the upgrade to Vista. There were just too many complications. The opposite of what technology should accomplish.

To illustrate how painful it is to take ownership of a file or folder, the steps are below:

[1] Locate the file or folder on which you want to take ownership in windows explorer. Right click on file or folder and select Properties from context menu.

[2] Open the Security tab. Click on Advanced.

[3] Now click on Owner tab in Advance Security Settings for User window.

[4] Click on Edit button and select user from given Change Owner to list if user or group is not in given list then click on other users or groups. Enter name of user/group and click ok.

[5] Now select User/group and click apply and ok. (Check Replace owner on subcontainers and objects if you have files and folder within selected folder.) Click OK when Windows Security Prompt is displayed. Now Owner name must have changed.

[6] Just click OK to exit from Properties window.

You have just taken ownership of a file or folder. After this you would have to grant yourself full control of the file or folder. Previously (in XP), you didn't have to do that. I can't recall an instance of having to do that to change or delete a folder.

It was good that someone from the Winmatrix Forums posted an easier way to workaround this stressful clicks.

Simply save the code below in notepad (or your favorite text editor) and save as a file with .reg extension.

########## start copy here ##########
Windows Registry Editor Version 5.00

[HKEY_CLASSES_ROOT\*\shell\takeownership]
@="Take Ownership"
"NoWorkingDirectory"=""

[HKEY_CLASSES_ROOT\*\shell\takeownership\command]
@="cmd.exe /c takeown /f \"%1\" && icacls \"%1\" /grant administrators:F"
"IsolatedCommand"="cmd.exe /c takeown /f \"%1\" && icacls \"%1\" /grant administrators:F"

[HKEY_CLASSES_ROOT\Directory\shell\takeownership]
@="Take Ownership"
"NoWorkingDirectory"=""

[HKEY_CLASSES_ROOT\Directory\shell\takeownership\command]
@="cmd.exe /c takeown /f \"%1\" /r /d y && icacls \"%1\" /grant administrators:F /t"
"IsolatedCommand"="cmd.exe /c takeown /f \"%1\" /r /d y && icacls \"%1\" /grant administrators:F /t"
########## end copy here ##########


Right-click on the .reg file you just saved. And Merge to insert the code in the registry. Confirm when asked.

To make this job safer and easier, download Ultimate Windows Tweaker (UWT). Under Additional Options tick Show "Take Ownership" and accept the change.

Take ownership.. A not so painful workaround.

Share:

HOW-TO: Windows 7 on DELL D630 -- BlueTooth Woes

As previously mentioned in my post ReadyBoost with PCMCIA Adapter and Compact Flash, I did an upgrade on my DELL Latitude D630 to the latest (and greatest?) Windows 7 x64.

The upgrade went quite well and although the DELL website doesn't certify the D630 for Windows 7, I upgraded anyway with the assumption that I could use Windows Vista drivers. But this doesn't work out good in the end, as proven by the experience. Why? All the other drivers work, except for the Bluetooth drivers.

Here was where I got stuck. I downloaded the Windows Vista x64 driver from the D630 support page.

The installation took quite a bit of time as it had to unpack the bluetooth software, install the drivers, update firmware and a few other things. At the end of the installation it will ask for a reboot, accede to its demands.

After doing this, bluetooth software will launch but the bluetooth indicator light (a blue led with bluetooth logo to the right of the wifi light) would not turn on. And devices would not pair as they are not able to search for the notebook's bluetooth. This was where I started to search for another solution.

Bluetooth wasn't that big of a deal. But I have gadgets that communicate with the notebook, to either transfer files, notes and pictures or listening to music without cable clutter on a Bluetooth headset. So I wished I had bluetooth working.

So here I was again stuck at another problem that I could potentially turn into another pimp-my-rig post. As always, I would consult google regarding my problem hoping that somebody had already been to my situation and has found a working solution. But after sifting through posts for about painstaking 4hours and found nothing that worked, I decided to proceed on my own.

And here is the extra step that got the Bluetooth to work on the D630.

I downloaded the Toshiba Bluetooth software stack. Installed it and rebooted.

 Windows 7 on DELL D630 BlueTooth Woes


After reboot, there is now a bluetooth icon on the system tray. And I could enable/disable the bluetooth radio from there. Then, I tried pairing gadgets to the notebook and it works!

Share:

HOW-TO: ReadyBoost with PCMCIA Adapter + Compact Flash

I recently upgraded my relatively aging but still healthy Dell Latitude D630 notebook to Windows 7 (yeah, I jumped into the bandwagon but it's about time). And seeing that there is already a Service Pack 1 (SP1) out, this made sense to me. During the Windows XP era, it wasn't all good and stable until the SP1 came out. Let's hope history repeated itself here.

One thing that attracted me to the move was the all-improved Readyboost that 7 has. I have experienced the improvement on my desktop and it made sense to put the same to good use on my notebook. But hanging a USB flash drive (UFD) on a portable machine doesn't make sense at all. Good thing the D630 has a PCMCIA slot and I happened to have a PCMCIA card reader with 8GB of hi-speed compact flash media to boot.

But alas when I plugged it in to enable it for use of Readyboost, it wasn't compatible at all. How then do I enable Readyboost on the PCMCIA-CF card? Next thing I did was to ask my friend Google only to find out there are literally thousands (if not millions) of us facing the same dilemma.

Good thing I found this forum post on how to enable USB hdisk drives for ready boost. I tried it out and after a few trials (and errors), I got it to work.

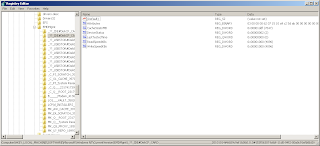
As shown, make changes to the registry (NOTE: Changing the registry can render your computer unusable. You better know what you're doing!) like below. This is the registry key for my Sandisk Ultra PC Card Adapter with RiDATA 8GB 233x Lightning Series Compact Flash card.

ReadyBoost with PCMCIA Adapter and Compact Flash


After I made changes to the registry, I restarted explorer (using Start > Run > "tskill explorer"). Voila! The device can now be used for Readyboost!

ReadyBoost with PCMCIA Adapter and Compact Flash


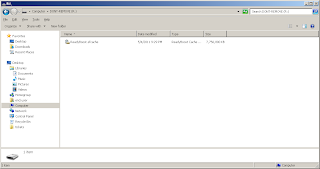
Now explore the Readyboost-enabled card and see that it has the file ReadyBoost.sfcache which is used by Readyboost.

ReadyBoost with PCMCIA Adapter and Compact Flash


There you go. PCMCIA Adapter and compact flash media for Readyboost. I now have a Readyboost device on my notebook that is completely flushed and barely noticeable at all. Performancewise, I can feel a slight improvement in launching of applications which means Readyboost works.

If you want to tweak this further, you may want to hide the Readyboost drive in Windows Explorer. Google for "NoDrives" registry key.

Share:

Subscribe for Latest Update

Popular Posts

Post Labels

100gb (1) acceleration (1) acrobat (1) adblock (1) advanced (1) ahci (1) airdrop (2) aix (14) angry birds (1) article (21) aster (1) audiodg.exe (1) automatic (2) autorun.inf (1) bartpe (1) battery (2) bigboss (1) binance (1) biometrics (1) bitcoin (3) blackberry (1) book (1) boot-repair (2) calendar (1) ccleaner (3) chrome (5) cloud (1) cluster (1) compatibility (3) CPAN (1) crypto (3) cydia (1) data (3) ddos (1) disable (1) discount (1) DLNA (1) dmidecode (1) dns (7) dracut (1) driver (1) error (10) esxi5 (2) excel (1) facebook (1) faq (36) faucet (1) firefox (17) firewall (2) flash (5) free (3) fun (1) gadgets (4) games (1) garmin (5) gmail (3) google (4) google+ (2) gps (5) grub (2) guide (1) hardware (6) how (1) how-to (45) huawei (1) icloud (1) info (4) iphone (7) IPMP (2) IPV6 (1) iscsi (1) jailbreak (1) java (3) kodi (1) linux (28) locate (1) lshw (1) luci (1) mafia wars (1) malware (1) mapsource (1) memory (2) mikrotik (5) missing (1) mods (10) mouse (1) multipath (1) multitasking (1) NAT (1) netapp (1) nouveau (1) nvidia (1) osmc (1) outlook (2) p2v (2) patch (1) performance (19) perl (1) philippines (1) php (1) pimp-my-rig (9) pldthomedsl (1) plugin (1) popcorn hour (10) power shell (1) process (1) proxy (2) pyspark (1) python (13) qos (1) raspberry pi (7) readyboost (2) reboot (2) recall (1) recovery mode (1) registry (2) rename (1) repository (1) rescue mode (1) review (15) right-click (1) RSS (2) s3cmd (1) salary (1) sanity check (1) security (15) sendmail (1) sickgear (3) software (10) solaris (17) squid (3) SSD (3) SSH (9) swap (1) tip (4) tips (42) top list (3) torrent (5) transmission (1) treewalk (2) tunnel (1) tweak (4) tweaks (41) ubuntu (4) udemy (6) unknown device (1) updates (12) upgrade (1) usb (12) utf8 (1) utility (2) V2V (1) virtual machine (4) VirtualBox (1) vmware (14) vsphere (1) wannacry (1) wifi (4) windows (54) winpe (2) xymon (1) yum (1) zombie (1)

Blog Archives

RANDOM POSTS