Showing posts with label dns. Show all posts

HOW-TO: Errors Updating PiHole DNS Cache

I personally use pihole to block ads, phishing and malicious websites (more leaning toward the latter), from access in my home network. This software can be easily setup on a Raspberry PI, and a little knowledge about good ol' Linux. On my setup I use pihole in tandem with the DietPI operating system (kudos go to Darwin Sonza for suggesting DietPI). This combo brings about faster internet access, since frequent DNS lookups are handled (and cached) by pihole at the same time dietpi limits write IOPs to the SD card, preserving its useful life.

In case you are interested in setting up your own Raspberry PI with pihole, checkout the previous post Install Adblock on Raspberry Pi via PiHole. In order to benefit further, pihole needs to be regularly updated much like dietpi. However, the recent update of pihole broke on my setup. And, here's the solution to the problem, if ever you encounter it yourself.

Just so you have an idea what the problem is or how to replicate it, I ran the command "pihole -up" to initiate a pihole update. This command ended up with the error message: "Error: Could not update local repository. Contact support."

The complete message is captured by the screenshot below, including messages prior to that error.
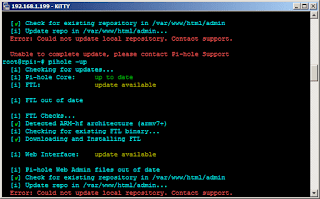
Error: Could not update local repository. Contact support.

If you are hit by the same message, on the command line, execute the following:
rm -R /var/www/html/admin
git clone https://github.com/pi-hole/AdminLTE /var/www/html/admin
pihole -r

After these commands are ran, you see a similar window like below.

PiHole Update Complete!

The Raspberry PI is a very useful tool in my home network. I have also used it as a PVR for downloading my favorite TV series.

 SUGGESTED: Introduction to Raspberry PI (Udemy)

Is there a better solution to the above? Or perhaps another way to solve the issue? I always am on the lookout for those. Kindly share them in the comments section below.

Share:

HOW-TO: LAN Configuration of a Mikrotik Virtual Router

In the previous article, we discussed about the configuration of the Mikrotik router, with particular focus on connectivity and protection from unauthorized access. This time, we could start with specific services that it will provide to the local area network (LAN).

Configuring on the LAN side, requires that we prevent locking ourselves out of the router while executing changes. What does this mean? Any change that will potentially disconnect us from the router will be blocked. The router is smart enough to figure this out. In the Mikrotik linggo, the term used to refer to this is "safe mode". The name itself is very intuitive!

To enable safe mode, simultaneously press [CTRL]+[X] on the keyboard. The same set of hotkeys used for "cut" to those familiar with the Windows world. Upon enabling safe mode, the terminal prompt changes with the string ‹SAFE› appended to it. You will see that in the screenshot below.

Mikrotik SSH Safe Mode

To release safe mode, the same set of keys are used. Similarly, the prompt returns to normal and it shows that safe mode is no longer in effect.

Mikrotik SSH Safe Mode (Toggle)

Without further ado, let us configure the router to be able to perform DNS lookups for our network. This configuration forwards queries to Google's public DNS servers (8.8.8.8 and 8.8.4.4) at the same time caches the queries in the router's memory. Change the DNS servers to your own if Google's DNS servers are not desired.
/ip dns
set allow-remote-requests=yes cache-size=4098KiB servers=8.8.4.4,8.8.8.8

Next, let us prepare the network segments used on the LAN side by defining an IP pool. This will be used for DHCP services later. Let us assume a segment from 192.168.1.0/24.
/ip pool
add name=POOL1 ranges=192.168.1.11-192.168.1.239

Once the pool is defined, let's use that pool for DHCP services. This is done in two-parts. First, define the network segment.
/ip dhcp-server network
add address=192.168.1.0/24 comment=LOCAL_LAN dns-server=192.168.1.1 \
 domain=pimp-my-rig.local gateway=192.168.1.1 \
 ntp-server=NTP_SVR_IP_HERE wins-server=WINS_SVR_IP_HERE

Second, define the DHCP directive.
/ip dhcp-server
add add-arp=yes address-pool=POOL1 authoritative=yes disabled=no \
 interface=ether3 lease-time=1d name=DHCP1

This configuration will not be complete without assigning the LAN gateway IP address to an existing interface on the router. In this case, it is ether3.
/ip address
add address=192.168.1.1/24 comment=LOCAL_LAN interface=ether3 network=192.168.1.0

At this point, the router is able to provide communication between the devices in the local area network. It will be able to support devices that require dynamic host configuration protocol (or DHCP) for automatic configuration of IP addresses. Internet connectivity could not be established since the RFC1918 addresses (to which the 192.168.0.0/16 network belongs) are non-routable on the internet. What needs to happen is network address translation (or NAT). And the Mikrotik router is just as able to perform this task. We will discuss that in the next article.

 RELATED: Initial Configuration of a Mikrotik Virtual Router

For now the router is able to provide network connectivity to hosts within the LAN. It could provide DHCP addresses and cache DNS queries. Please note that all capitalized configuration keywords (e.g. POOL1, DHCP1 and LOCAL_LAN) can be replaced with your own naming convention(s).

Share:

HOW-TO: Install Adblock on Raspberry Pi via Pi-Hole

Bandwidth is a precious resource in this digital age.. This might not be the case for everyone but in the Philippines where the cost of being connected is still through the roof, this statement is still true. Couple this with the fact that people want to be connected and online, and the mix gets a bit complicated.

Studies have shown that bandwidth (or network traffic) can be minimized by using adblock technology. Thus this resource could be better utilized by more important or more significant information to be consumed by the end user, not ads. A research has shown this to be by a factor of 25% to 40% (click here for reference). That is HUGE!

With that study and its statistics, it figures that one should be minimizing network traffic or find means and ways to reduce the non-significant content -- in the form of ads. One way to do this is with the use of Raspberry Pi (R-Pi). This is in fact a very cheap way to implement adblock, and you will see it is very simple to do.

This article aims to outline installation instructions over a popular R-Pi operating system OSMC. The installation procedure for OSMC has been discussed in the previous post. There has been a series of posts involving the use of Raspberry Pi in this site.

Prior to installing Pi-Hole, it would be good to browse its documentation and have a better understanding of how it does the adblock. Click here to go there.

The installation procedure itself is pretty simple and as automated as you want it to be. Just launch a PuTTY session to the R-Pi and run the command on the banner of the Pi-Hole website -- curl -L https://install.pi-hole.net | bash (or copy-n-paste this command).

Pi-Hole Install

It is as simple as it could get. Now the only thing that needs to be done is to configure the router to assign the R-Pi as the primary DNS server when it hands out DHCP IP addresses.

Related: Setup Caching DNS Server using TreeWalk

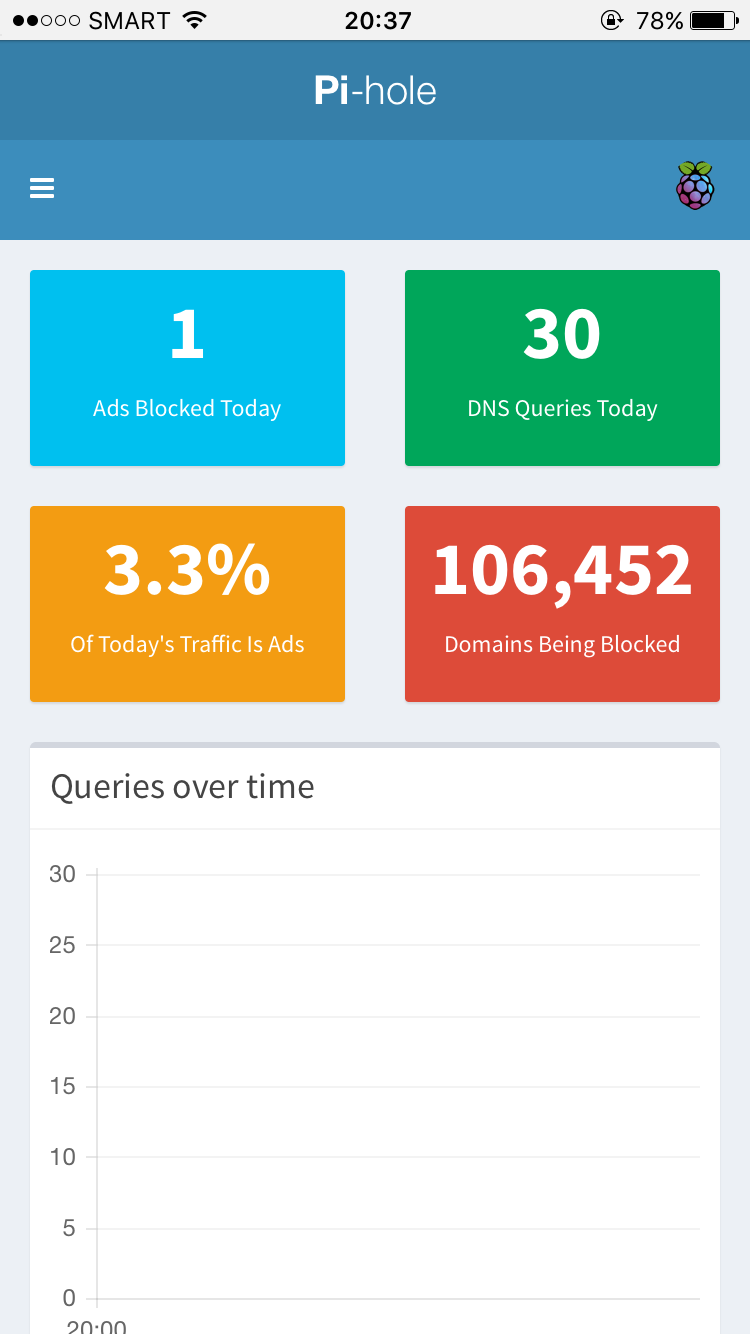
Once in a while, you may want to tickle your curiosity and find out how much traffic is blocked by Pi-Hole and you just open a browser and browse the admin console of Pi-Hole. It should be something like "http://RASPBERRY_PI_IP_ADDRESS/admin/".

Pi-Hole Statistics

On mine, it looks like this.. This statistic is after about less than an hour of having it installed. Do you have Pi-Hole installed? Share your story in the comments.

Share:

HOW-TO: Setup ISC Bind9 for Windows

On our guide to setting up a caching name server via Treewalk, it outlined the procedure to follow in configuring the Treewalk (a fork of bind) on Windows. However, the download link for Treewalk is no longer available and as it seems, development for it has stopped altogether.

You should look no further than bind itself, not its fork. ISC bind is still being actively developed and bugfixes are still being published for it. What deters users from using bind is it is a bit tricky to setup while treewalk is a simple install and run. So let's try to configure and install ISC bind.

First, download the Windows binaries of bind. As of this writing, the current production version is 9.9.1-P2. A zip file named bind991-p2.zip will be downloaded on your computer.

Extract this file under path C:\Windows\DNS\bin. This directory does not exist by default so you might want to create it first. Configuration files will also be created in C:\Windows\DNS\etc, and likewise this directory does not exist by default and will need to be created.

Create a file named.conf in the C:\Windows\DNS\etc directory. A sample configuration can be found here. On this sample configuration file, change the "directory" directive and replace the value /var/named to C:\Windows\DNS\etc. It should get you started.

From the above, it is obvious that this configuration is intended for Linux or Unix. The "logging" directive needs fixing as well. It is not applicable Windows implementations of bind. Drop the path, and just leave the filename.

Now, it is time to setup the service. Execute the command below in a privileged command prompt (note the space after the equal sign):

sc create bind9 binpath= C:\Windows\DNS\bin\bind.exe DisplayName= "Bind9 DNS Server" start= auto
sc start bind9

You should be getting a similar window as this one.

Using SC to Add Bind DNS Server Service

Checking the service, it should have started and properly setup to start with Windows even when rebooted. The service will automatically start.

Bind9 DNS Server Service

Now, try out the caching name server. You should be feeling the impact of faster performance and speedy DNS lookups as the DNS cache is built.

Share:

INFO: Network Profiler and Analyzer

When it comes to the network (end to end infrastructure), there is little you can do as the end user. But on your end, you can do a little something to be able to provide feedback to our internet service provider (ISP). And as much as possible, you can reduce our dependence on the ISP if that service is found below par.

One very good example to this is your DNS connection. Your ISP doesn't care about latency. So they don't put up much infrastructure to handle DNS requests. Much of the time their servers are busy. Third party DNS servers are better at this. Or as suggested before, put up your own caching DNS server for your local network. That tweak will have a big impact on your network.

Afterall, whether they admit to it or not, ISPs are after profit. And putting up infrastructure for DNS is additional cost without any potential for gains.

Other than DNS, the other parts you can improve on are virtually unknown. But you can test your very own network to see what aspects can be enhanced. Sounds geeky. But it is very easy. Just so you have an idea, here is a website that has a network profiler and analyzer you can try out on your home network -- netalyzr.icsi.berkeley.edu.

Here is a screenshot of the profile of a tested network.

Network Profiler and Analyzer

From there you can see that there is an issue on the non-randomized DNS ports. Minor issues include low bandwidth, which the owner has no control over. Internet connection in the Philippines is horrible, not to mention expensive. Your system's clock is also analyzed and is an issue which can be easily ignored.

So go ahead. Capture a profile of your own home network and see the analysis of the netalyzer. Chances are, there could be things you can tweak on your end of the chain. It helps to know.

Share:

TWEAK: Squid Cache + TreeWalk DNS = Faster Browsing

Having a local caching proxy server has significantly improved browsing speed; and, the local caching DNS server has improved security at the same time minimized dependence with the ISP. Both of these tweaks have boosted browsing speed. The apparent impacts of both are remarkable for sites frequently visited. This can be taken a step further by making the squid caching proxy take advantage of faster lookups by accessing the local DNS table cached by TreeWalk.

If you can recall, during the installation of TreeWalk, one of the prompts on the later parts was: "You are currently using a PROXY. If the proxy is not a local one disable it if possible, otherwise you may not take full advantage from the local DNS resolver." Good! It detected our squid caching proxy.

Squid Cache + TreeWalk DNS = Faster Browsing

Since we are using a local caching proxy, we can expect to gain the full benefit of having a local caching DNS server -- just the exact end state we want.

Open the squid configuration file on your favorite editor. On the default installation settings, the config file is in C:\squid\etc\squid.conf. Add this line:
dns_nameservers 127.0.0.1

Where: 127.0.0.1 is the IP address of the TreeWalk DNS cache. If the DNS cache resides on a different machine, replace the 127.0.0.1 with the corresponding IP address of the host. For some reason, squid doesn't like a host name in this directive. So IP address it is.

Save the configuration changes restart squid via Start > Run > C:\squid\sbin\squid -k reconfigure -n Squid.

To do a quick restart of squid, you might want to add this line to squid.conf:
shutdown_lifetime 2 second

With the above tweak you will notice restart or reconfigure is quicker. And finally, for a big speed boost enable pipelining on squid. Add this line to squid.conf:
pipeline_prefetch on

You will need to reconfigure (or restart) squid after making the tweaks above. Browsing will now be even faster given the benefits of both local caches. As always, don't forget to configure your browser to use the proxy. All this will be in vain if the browser will not take advantage of it.

Share:

TWEAK: Setup Caching DNS Server using TreeWalk

News from around the web recently revolved around security breaches and hacked websites. And when news broke out, many others found out about breaches on their systems too. Beefing up security on their end was too late.

For us end-users, protection is likewise necessary. Examples of everyday threats include viruses and DNS poisoning. However, it is not limited to those. Like the saying goes an ounce of prevention is better than a pound of cure. These attacks may look simple but the impact may be huge -- a big chain reaction. If you have lost data due to a virus before, we don't have to tell you how painful (and expensive) that experience can be.

One good way to overcome DNS poisoning is to setup you own DNS cache that forwards requests straight and direct to root DNS servers or trusted DNS servers. Don't rely on your ISP for DNS services when you can put up your own. It is very easy!

Bind is the actively developed software for this purpose. It is compatible to just about any operating system out there and bind is the same software we will deploy. For Windows, TreeWalk is the trunk that is freely available. Download the application installer directly from the developer or any of the mirrors.

Setup Caching DNS Server using TreeWalk

Install it and start the service, there is no need to reboot after install. Open a command prompt as Administrator and start the service with net start twdns. Or use the Management Console (Start > Run.. > services.msc), scroll down to twdns and start the service.

Setup Caching DNS Server using TreeWalk

The software installs itself on C:\Windows\System32\dns on 32-bit machines. While on 64-bit ones the path is C:\Windows\SysWOW64\dns. Then just configure the system to use the local DNS server. It is now recommended to turn off Windows very own DNS cache or DNS client. It would make no sense for it running in parallel with bind.

If you followed our recommendation of running your own proxy server on your computer system, stay tuned as we will utilize the DNS cache we just installed with our proxy server.

Share:

Subscribe for Latest Update

Popular Posts

Post Labels

100gb (1) acceleration (1) acrobat (1) adblock (1) advanced (1) ahci (1) airdrop (2) aix (14) angry birds (1) article (21) aster (1) audiodg.exe (1) automatic (2) autorun.inf (1) bartpe (1) battery (2) bigboss (1) binance (1) biometrics (1) bitcoin (3) blackberry (1) book (1) boot-repair (2) calendar (1) ccleaner (3) chrome (5) cloud (1) cluster (1) compatibility (3) CPAN (1) crypto (3) cydia (1) data (3) ddos (1) disable (1) discount (1) DLNA (1) dmidecode (1) dns (7) dracut (1) driver (1) error (10) esxi5 (2) excel (1) facebook (1) faq (36) faucet (1) firefox (17) firewall (2) flash (5) free (3) fun (1) gadgets (4) games (1) garmin (5) gmail (3) google (4) google+ (2) gps (5) grub (2) guide (1) hardware (6) how (1) how-to (45) huawei (1) icloud (1) info (4) iphone (7) IPMP (2) IPV6 (1) iscsi (1) jailbreak (1) java (3) kodi (1) linux (28) locate (1) lshw (1) luci (1) mafia wars (1) malware (1) mapsource (1) memory (2) mikrotik (5) missing (1) mods (10) mouse (1) multipath (1) multitasking (1) NAT (1) netapp (1) nouveau (1) nvidia (1) osmc (1) outlook (2) p2v (2) patch (1) performance (19) perl (1) philippines (1) php (1) pimp-my-rig (9) pldthomedsl (1) plugin (1) popcorn hour (10) power shell (1) process (1) proxy (2) pyspark (1) python (13) qos (1) raspberry pi (7) readyboost (2) reboot (2) recall (1) recovery mode (1) registry (2) rename (1) repository (1) rescue mode (1) review (15) right-click (1) RSS (2) s3cmd (1) salary (1) sanity check (1) security (15) sendmail (1) sickgear (3) software (10) solaris (17) squid (3) SSD (3) SSH (9) swap (1) tip (4) tips (42) top list (3) torrent (5) transmission (1) treewalk (2) tunnel (1) tweak (4) tweaks (41) ubuntu (4) udemy (6) unknown device (1) updates (12) upgrade (1) usb (12) utf8 (1) utility (2) V2V (1) virtual machine (4) VirtualBox (1) vmware (14) vsphere (1) wannacry (1) wifi (4) windows (54) winpe (2) xymon (1) yum (1) zombie (1)

RANDOM POSTS