Showing posts with label tips. Show all posts

TIP: Taking Advantage of Virtual Hot Add Technology

As a system administrator, I could say virtualization is one of the best things that happened since sliced bread. This of course is in terms of utilization and the thin provisioning mechanism it entails. What usually happens is that, the guest operating system is tricked into believing that it has all that resource for itself; whereas, what actually happens is that it only is allocated a slice of it, and it will get the resource as necessary.

This is neat technology. The other side of the coin is that you may allocate a thick provisioned resource but at a fraction of its entirety. What does this mean? The short term -- skimping -- I use this when I can't estimate the exact requirement of an application. I rely on the "hot add" technology of virtualization to allocate the final pieces of the architecture when more accurate information is available. In the virtualization lingo, the terms "hot add" and "hot plug" are often used interchangably and likely pertain to the same thing.

Modern operating systems play a big role in this "hot add" technology. For example, in the Linux world once the application has been tested and it was later found to be CPU-bound, just hot add more cores. Not really that interesting, right? But wait, you can do this without having to reboot the virtual machine -- NO DOWNTIME! Adding virtual CPUs while it is running -- now that's cool stuff! This of course assumes that the hot add feature has been turned on.

This is how its done on the VMware side of things.
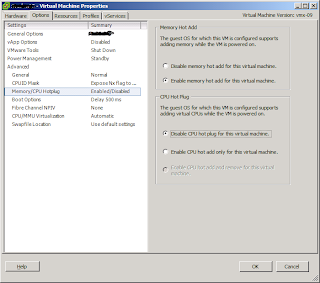
Enable Hot Add

The same can be done to memory -- once a guest is identified to be memory-bound -- just hot add more memory.

A recent experience taught me that this doesn't always work. It works for CPU hot plug, but for memory hot add it doesn't. I'm using the recent version of RHEL 6.4 x86_64 and CentOS 6.4 x86_64. Both of these operating systems don't work well with memory hot add, but their older versions used to work.

Executing a memory hot add on a RHEL/CentOS 6.4 guest, this error appears:

------------[ cut here ]------------
WARNING: at arch/x86/mm/init_64.c:701 arch_add_memory+0xe2/0x100() (Not tainted)
Hardware name: VMware Virtual Platform
Modules linked in: vsock(U) vmci(U) autofs4 sunrpc ipv6 ipt_REJECT ppdev parport_pc parport microcode vmware_balloon e1000 shpchp sg i2c_piix4 i2c_core ext4 mbcache jbd2 sd_mod crc_t10dif sr_mod cdrom mptsas mptscsih mptbase scsi_transport_sas pata_acpi ata_generic ata_piix dm_mirror dm_region_hash dm_log dm_mod [last unloaded: nf_conntrack]
Pid: 25, comm: kacpi_notify Not tainted 2.6.32-358.2.1.el6.x86_64 #1
Call Trace:
 [] ? warn_slowpath_common+0x87/0xc0
 [] ? warn_slowpath_null+0x1a/0x20
 [] ? arch_add_memory+0xe2/0x100
 [] ? add_memory+0xb7/0x1c0
 [] ? acpi_memory_enable_device+0x95/0x12b
 [] ? acpi_memory_device_add+0x118/0x121
 [] ? acpi_device_probe+0x50/0x122
 [] ? driver_probe_device+0xa0/0x2a0
 [] ? __device_attach+0x0/0x60
 [] ? __device_attach+0x0/0x60
 [] ? __device_attach+0x53/0x60
 [] ? bus_for_each_drv+0x64/0x90
 [] ? device_attach+0xa4/0xc0
 [] ? bus_probe_device+0x2d/0x50
 [] ? device_add+0x527/0x650
 [] ? pm_runtime_init+0xcb/0xe0
 [] ? device_register+0x1e/0x30
 [] ? acpi_add_single_object+0x837/0x9e8
 [] ? acpi_ut_release_mutex+0x63/0x67
 [] ? acpi_bus_check_add+0xe0/0x138
 [] ? acpi_os_execute_deferred+0x0/0x36
 [] ? acpi_bus_scan+0x3a/0x71
 [] ? acpi_bus_add+0x2a/0x2e
 [] ? acpi_memory_device_notify+0xa6/0x24f
 [] ? acpi_os_execute_deferred+0x0/0x36
 [] ? acpi_bus_get_device+0x2a/0x3e
 [] ? acpi_bus_notify+0x4b/0x82
 [] ? acpi_os_execute_deferred+0x0/0x36
 [] ? acpi_ev_notify_dispatch+0x64/0x71
 [] ? acpi_os_execute_deferred+0x29/0x36
 [] ? worker_thread+0x170/0x2a0
 [] ? autoremove_wake_function+0x0/0x40
 [] ? worker_thread+0x0/0x2a0
 [] ? kthread+0x96/0xa0
 [] ? child_rip+0xa/0x20
 [] ? kthread+0x0/0xa0
 [] ? child_rip+0x0/0x20
---[ end trace 081e3b980cb5c943 ]---
ACPI:memory_hp:add_memory failed
ACPI:memory_hp:Error in acpi_memory_enable_device
acpi_memhotplug: probe of PNP0C80:00 failed with error -22

 driver data not found
ACPI:memory_hp:Cannot find driver data

You will see the above error message when the command "dmesg" is executed on a terminal window. This seems to be a bug in the kernel module for memory hot add.

This is a bug that I hope gets fixed in future versions of the Linux kernel. If you rely on memory hot add feature, please be aware of this limitation on the new versions of RHEL and CentOS. It seems to be rooted to the kernel code so most likely all other flavors of Linux are in the same boat.

The Windows operating system doesn't seem to have this problem. Hot plug of virtual CPUs and hot add of memory works without any problem.

Share:

TIP: PHP Install/Upgrade "Sanity Check"

I used to be a meticulous configure, compile and make installer of packages -- the old school Linux way of doing things. I customize to take advantage of the CPU optimizations to squeeze every bit of performance from the processor and any of the available resources the server has. And usually, the source is more updated than the pre-packaged binaries available for install.

Nowadays, largely due to the virtualization technology, I left that practice and settled for pre-packaged repo-based RPM binaries. I found this to be less hassle and takes less time to complete. What's more? Dependencies are automatically installed and most of all upgrading the packages takes even less effort. It takes a bit of time and exposure to finally settle to this practice. To be honest, it was a bit difficult at first.

Still, the discipline involved in the installs and upgrades are there. This is more valuable than anything else. I got to practice this habbit of post-upgrade checks and I am thankful for putting the effort early on to develop this skill.

Lately, a request was made to install PHP modules to take advantage of built in libraries. The repository already had upgraded versions of the PHP binaries and I was forced to upgrade due to this. The repo-based RPM install saved me. After yum completed the installs, the sanity check was to run "php -m" to see if all of the modules run intact. It showed errors on the pdo_oci.so module. The exact error is below:

PHP Warning:  PHP Startup: Unable to load dynamic library '/usr/lib64/php/modules/oci8.so' - libclntsh.so.12.1: cannot open shared object file: No such file or directory in Unknown on line 0
PHP Warning:  PHP Startup: Unable to load dynamic library '/usr/lib64/php/modules/pdo_oci.so' - libclntsh.so.12.1: cannot open shared object file: No such file or directory in Unknown on line 0

The shared object pdo_oci.so is dependent on the oracle client libraries. So after downloading the RPM off the oracle website, and installing the dependency was resolved. The extra step that needed to be done was to include the new oracle client libraries to the global LD_LIBRARY_PATH of the system.

This was via creating the file /etc/ld.so.conf.d/oracle12-client.conf. The file needed to contain the path "/usr/lib/oracle/12.1/client64/lib" (the path to the newly installed oracle client libraries). To make things easier, run this on the a terminal.

echo /usr/lib/oracle/12.1/client64/lib > /etc/ld.so.conf.d/oracle12-client.conf

After completing the above steps, execute "ldconfig -v" and see if the new oracle client libraries got included by the library dependency resolver.

Running "ldd /usr/lib64/php/modules/pdo_oci.so" displayed all of the dependent libraries present without any missing ones.

# ldd /usr/lib64/php/modules/pdo_oci.so
        linux-vdso.so.1 =>  (0x00007ffffa754000)
        libclntsh.so.12.1 => /usr/lib/oracle/12.1/client64/lib/libclntsh.so.12.1 (0x00007fd40e195000)
        libc.so.6 => /lib64/libc.so.6 (0x00007fd40de01000)
        libnnz12.so => /usr/lib/oracle/12.1/client64/lib/libnnz12.so (0x00007fd40d6eb000)
        libons.so => /usr/lib/oracle/12.1/client64/lib/libons.so (0x00007fd40d4a7000)
        libdl.so.2 => /lib64/libdl.so.2 (0x00007fd40d2a3000)
        libm.so.6 => /lib64/libm.so.6 (0x00007fd40d01e000)
        libpthread.so.0 => /lib64/libpthread.so.0 (0x00007fd40ce01000)
        libnsl.so.1 => /lib64/libnsl.so.1 (0x00007fd40cbe8000)
        librt.so.1 => /lib64/librt.so.1 (0x00007fd40c9df000)
        libaio.so.1 => /lib64/libaio.so.1 (0x00007fd40c7de000)
        libclntshcore.so.12.1 => /usr/lib/oracle/12.1/client64/lib/libclntshcore.so.12.1 (0x00007fd40c28e000)
        /lib64/ld-linux-x86-64.so.2 (0x0000003ddc200000)

Executing "php -m" again displayed all the modules used by PHP but without any warnings this time. The discipline of running post-upgrade sanity checks always pays off. It is a habbit that is hard to develop but a practice that is required of every hard-core system administrator.


Share:

TIP: Linux Virtual Machine Performance Tweaks

The advent of virtualization, changed many rules of technology -- what may apply to the physical world could be detrimental to its virtual equivalent. This is likewise true in terms of performance. Optimizing the performance of one virtual machine impacts the performance of others. In the end, tweaking for performance not only pays off big time, but does that in magnitudes of two-, three-fold or even more.

The above statements are true due to sharing of resources in the hypervisor level. If resources are freed by performance tweaks, it makes them available to others waiting for the same resource to be available for use.

The first of these tweaks is to ensure that the disk used by the virtual machine is aligned. Why is this important? To better understand the underlying infrastructure of the virtual filesystem, refer to the screenshot. (Illustration from http://www.yellow-bricks.com)


As seen from the diagram, the misalignment of the array, to the virtual filesystem, and, to the guest disk is very, very significant. A big performance degradation will occur due to the misalignment. What happens here is that, what could be seen as a single I/O operation on the guest operating system could end up as multiple I/O operations on the physical disk or array.

Translate the above performance degradation to multiple virtual machines and you see the drift. According to VMware (Reference):
The degree of improvement from alignment is highly dependent on workloads and array types. You might want to refer to the alignment recommendations from your array vendor for further information. 

Still, I/O could be a potential performance bottleneck if the disk alignment is not kept in check.

While on the same topic of I/O bottlenecks, Linux virtual machines could benefit from the proper I/O scheduler. Again, this is another arena where the physical rules and virtual rules differ.

Modern Linux kernels default to the "completely fair queuing" (or CFQ) scheduler. This is how the kernel deals with optimizing I/O. It re-orders I/O in such a manner that when the head moves across the platter, it does that in an orderly, sequential manner rather than moving back and forth to complete requests. The best illustration to this is an elevator, where it drops people to floors in an orderly sequential manner. Instead of dropping passengers as they push the corresponding floor buttons, what happens is the elevator drops people off at 2, then 5, then 6, before going to 11. The kernel has different methods of doing this.


Imagine that the hypervisor has its own elevator, the guest has its own elevator and the array has its own. When the guest performs that optimization, the hypervisor does the same, and the array does the same. Who then decides what is the best re-ordering or optimization? The hypervisor has no insight on the guest operating system (this time a Linux machine), meaning it can't tell the method used for optimization, or how they got re-ordered, if they indeed got re-ordered or why it came to that decision.

This kernel optimization has no impact on the virtual environment and in some situations could have a negative effect. Why? The hypervisor has no way of telling how long an I/O has been outstanding or how it got re-ordered and why it was that way on the guest level. Add the hypervisor elevator and that adds further latency to the already outstanding I/O request.

It would be best to leave all optimizations on the hypervisor level and turn off the elevator on the kernel level. This is done by having the string "elevator=noop" on the kernel line of the grub.conf file of Linux. The other way of turning it off is by choosing the noop scheduler, as recommended by VMware.

This is the default setting.
# cat /sys/block/[DEVICE]/queue/scheduler
noop deadline anticipatory [cfq]
Change it for every [DEVICE].
# echo noop > /sys/block/[DEVICE]/queue/scheduler
# cat /sys/block/[DEVICE]/queue/scheduler
[noop] deadline anticipatory cfq

If you have screensavers running, those are detrimental to the performance of virtual machines. Disable them at once. I have seen a virtual machine with a load of 5.0 reduced to 0.0 simply by disabling the screensaver!

The other tweak you could perform is to change to runlevel 3. Running on a GUI (runlevel 5), consumes a lot of resources that would otherwise be free if running at runlevel 3.

Permanently change it on the file /etc/inittab.
id:3:initdefault

By tweaking, you squeeze the best performace out of your current infrastructure and free up resources otherwise sapped by useless unnecessary processes or simple misconfigurations. The combination of the tweaks above may yield better results than applying one tweak alone.

Share:

TIP: Firefox Speed Boost via Vacuum Places Improved Add-on

Firefox 10 was recently released to the public and Firefox continues its rapid release process.. And soon before we know it version 11 will be out. This trend will continue for as long as development goes. Firefox's market share is being taken away by Chrome mainly due to its faster startup and faster page rendering. While page render speed is subject to a lot of debates and discussions, there is significant improvements over Firefox's memory management and rendering speeds over previous versions.

For a few tweaks and features, pimp-my-rig has published quite a bit of them -- including but not limited to plugin checker, tuning and configuration, and forcing add-on compatibility. We also did a guide on getting a larger active tab.

Our primary reason for sticking it out with Firefox is the download them all plug-in. This add-on is not available for Chrome, and will likely stay the same in the long term. So it is of good reasoning for us to continue using Firefox, keeping it up to date, and secure. And also, tweaking it to get the most in terms of performance.

Lately, we found another tweak to make Firefox faster. If you have been a firefox user ever since, you will notice that Firefox would get hogged and slow down unlike when you first installed it. This is because its history, cache and data stores gets fragmented over time.

But there is an add-on that can solve this -- vacuum places improved. You can add the same on your Firefox and see it speed up.

Firefox Speed Boost via Vacuum Places Improved

For you to get a comparison of the before and after of this add-on, locate your profile and check the size of the file places.sqlite. To execute the vacuum, go to Tools -> Vacuum places.sqlite. You will be notified of a successful operation by a notification box on the system tray.

After doing the initial vacuuming, check places.sqlite it should have decreased in space. You will also notice that Firefox is also more responsive. For a regular everyday Firefox user, this improvement is very evident.

You can set Firefox to automagically do this for you after every X number of startups. It can be set in the add-on options. Our VPI is set to run every 30 startups.

Firefox Speed Boost via Vacuum Places Improved

Vacuum places improved is one very useful, pimp-my-rig recommended add-on to Firefox.

Share:

TWEAK: Completely Diagnose System Problems in Minutes (Windows 7)

When it comes to diagnosing Windows problems, particularly the latest and greatest Windows 7, it is a bit difficult to really pinpoint the problem. There are 3rd party tools to use to get this done, but do you really have to resort to them? Not really.

If you're used to the XP-way of doing things, here's something new to Windows 7 that will attract you to upgrade. It is one of the many features of Windows 7 that I like. It is the "Resource and Performance Monitor". What does it do? It could tell you in a minute or two what is wrong with your system without resorting to 3rd party tools for a complete diagnosis.

To launch the "Resource and Performance Monitor", run "perfmon /report" on the Run box from the Start Menu. This command will open a window just like below.

Completely Diagnose System Problems in Minutes

Allow it to run and generate the report. It will then present a summary, like below.

Completely Diagnose System Problems in Minutes

I clicked on the Basic System Checks that failed. And it presented further explanations of the failure and what caused the system to flag a failure. Example for this run I clicked on the failed "Disk Check" and it gave me further details. After clicking on "Disk Check", I did a mouse over the Red Triangular Flag and it gave further information -- a disk volume is dirty.

Completely Diagnose System Problems in Minutes

Also, further down on the list tagged as "Security Center Check" the failure is related to my not running an anti-virus.

Completely Diagnose System Problems in Minutes

And, lastly, "System Service Checks" listed an "Abnormally Stopped System Service". It is related to the HomeGroup Provider. Like before, I can mouse over the red flag to obtain more information. It told me that the service returned an unexpected error code.

Completely Diagnose System Problems in Minutes

So in a matter of minutes, I found that there was something wrong with my Windows 7 system. And, I could resolve or mitigate the problem from the suggestions outlined by the tool. Rather than resort to a third party application, the Performance Monitor can provide a concise diagnosis and suggest resolutions. Kudos to Microsoft for putting this in Windows 7!
Try it out and see that it's time to upgrade to Windows 7.

Share:

HOW-TO: Unblock Microsoft Outlook "Unsafe" Attachments

There are folks who send you mails disguised from persons you might know, but little do you know of the malicious content they send as attachment. In the name of security, Microsoft has started to put in place measures so that the average joe will not be able to potentially stumble on attachments that auto-execute when clicked. That is a good practice. And while that is not bad, they should also advise the end-user how to bypass such security when necessary.

This is not the case, however. Microsoft Outlook will block registry files, executable files, javascript files, scripts and other files that are potentially hazardous. This is a blanket rule that doesn't have an exception. So whenever you get sent an attachment that fits the rule, even if you are sure it will not cause any harm it gets blocked. And you will be getting a window just like below (from Microsoft Outlook 2007).

Unblock Microsoft Outlook Attachments

Error message will look like below (filename may differ):
Outlook blocked access to the following potentially unsafe attachments: attachment_filename.exe

How then do you access the attachment when you are sure of the sender and the attachment is confirmed to be safe? This is another classic scenario of functionality versus security. Follow the procedure below to be able to access the blocked attachment.

If Microsoft Outlook is open, close it. Then open the registry editor and browse to the below registry branch.

Locate the following key(s) depending on the version of Microsoft Outlook you have:
* Outlook 2000 [HKEY_CURRENT_USER\Software\Microsoft\Office\9.0\Outlook\Security]
* Outlook 2002 [HKEY_CURRENT_USER\Software\Microsoft\Office\10.0\Outlook\Security]
* Outlook 2003 [HKEY_CURRENT_USER\Software\Microsoft\Office\11.0\Outlook\Security]
* Outlook 2007 [HKEY_CURRENT_USER\Software\Microsoft\Office\12.0\Outlook\Security]
* Outlook 2010 [HKEY_CURRENT_USER\Software\Microsoft\Office\14.0\Outlook\Security]

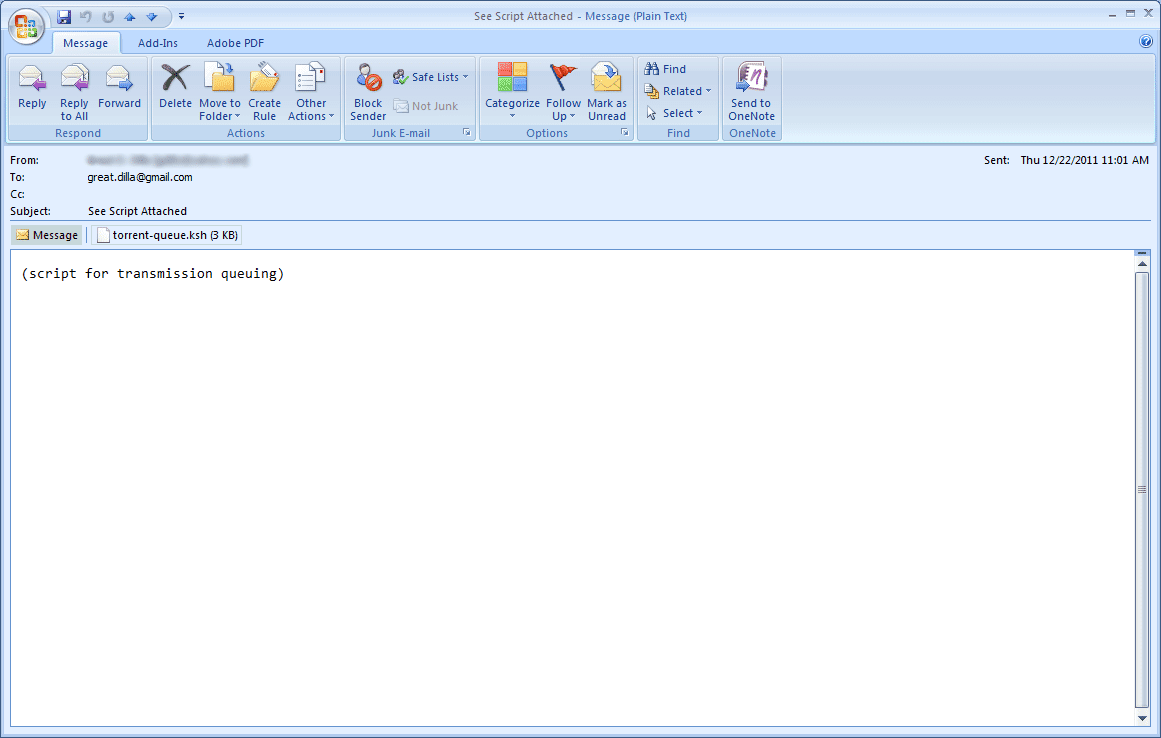
Look for the key "Level1Remove". If it does not exist create it as a string data type. Separate each file extension entry with semi-colons. Make sure to follow the syntax as this is case sensitive. As I use my email to archive scripts, I usually send a mail to myself with the script attached. So this is how it looks on my registry (see below).

Unblock Microsoft Outlook Attachments

After making the necessary changes above, launch Microsoft Outlook and re-open the email with the attachment(s) and you can now access the attachment.

Unblock Microsoft Outlook Attachments

There you go folks.. Another tweak to access blocked attachments. As a security measure especially on shared computers, once you add this and access the required attachment remove the registry entry Level1Remove. Just add it when you require access to blocked attachments in the future.

Share:

TIP: Backup Wireless Network Settings (Windows 7)

One of the many advantages of Windows 7 over its predecessors is the wide array of options in backing up the system. Already inherent in its line-up of tools is the capability to create its own repair disc. But the most overlooked capability, which I think is just as useful, is the capacity to backup wireless settings.

This feature can be beneficial to you in two ways -- a backup of the configuration and a way to share wireless network configuration to another computer. Since it can backup the wireless network security key, it also serves as a way to recall the that key.

In order to create a backup of the wireless settings, go to Start --> Control Panel --> Network and Sharing Center (if using the view by icons). If your Control Panel is displayed in Category view, choose Network and Internet --> Network and Sharing Center. A similar window like below is displayed.

Backup Wireless Network Settings Windows 7

Click on Manage wireless networks (on the top left column).

Backup Wireless Network Settings Windows 7

You will be shown a list of wireless network infrastructures or ad-hoc networks that your computer can connect to. Double-click the wireless network you wish to backup.

Backup Wireless Network Settings Windows 7

Next, click on "Copy this network profile to a USB flash drive".The backup process requires a USB flash drive (UFD) to write the configuration files to. If your computer doesn't have one, you may plug one in. Then, click "Next".

Backup Wireless Network Settings Windows 7

A few files will now be written on the UFD. The files "AUTORUN.INF" and "setupSNK.exe" are now present on the UFD, together with the directory "SMRTNTKY". These files contain the backup of the wireless network settings of the computer system.

You may choose to plug the UFD on another computer and run the executable "setupSNK.exe" to configure that computer to use the same wireless network settings as the original computer. This way you have imported the wireless network settings to another computer without having to do much work.

Backup Wireless Network Settings Windows 7

Since the UFD already contains a copy of the wireless network settings, it is a backup that you can secure in a safe place. You might be needing it one way or another in the future.

Share:

TIP: Dexpot Utility for Virtual Desktops

As a system administrator, I need a lot of real estate on my desktop to be able to do multitasking and accomplish things in parallel. In the *nix environment this doesn't cause issues as there are virtual desktops readily available. This is true regardless of whether you are on the command-line or the graphical user interface (GUI). Even on the text-mode interface, Linux has virtual terminals still making it possible to do multiple tasks at once.

However, most sysads nowadays use Windows and just open terminal connections to the remote server. There are no virtual desktops on the Windows environment. And often, given the mobility preference, screen size is limited. This is where virtual desktops play a big factor.

Where this functionality is absent, dexpot comes to fill the gap. You can have up to 20 multiple virtual desktops, if you require that many. This is an easy way of increasing work area without having to shell out. What's more, switching to another desktop is easy as this functionality is supplied via hotkey.

For ease-of-use, this is how I configure dexpot. For hotkeys, I assign [CTRL]+[1] ... [CTRL]+[4] for desktop switching. You can customize the same for your own taste.

Dexpot Utility for Virtual Desktops

Then I also let the Desktop Manager run with dexpot. I place the icons near the system tray so that I could either use hotkeys to switch desktops or click on the Desktop Manager icons. Below is how it looks.

Dexpot Utility for Virtual Desktops

For some reason, the developers assigned German as the default language of dexpot. It is quite difficult to change the language settings on the application interface if you don't understand German. The fastest way to get around this configuration is to explore the directory sprache (under the dexpot directory). In this directory you will find language files. Delete everything except english.dxs (or move them to another folder if you wish). This will make dexpot run in English and is the easiest way to get this configuration done with less effort.

Even with a small screen on my Dell Latitude D630 notebook, dexpot has given me a lot of real estate with the virtual desktop functionality. You might find this useful too.

Share:

TIP: Give Windows a Regular Maintenance Routine

It is true, Windows implementation of its registry and and its filesystem will leave you literally fragmented after running for a while. This is where Windows lags from other OS big time. For me re-installing is not an option and I'm quite positive the same goes for you. Re-installing is a big no, no.. so how do you perform a clean-up of the system with confidence that you won't be ruining things rather than make it better?

I use CCleaner to clean-up the registry and clean-up the filesystem. CCleaner identifies the crap and cleans it. That is why it is a required tool for me. The next one that helps root out crap on the PC, is Windows' very own Disk Cleanup.

Purging via CCleaner. CCleaner (Crap Cleaner) is very robust in itself. But it can further be enhanced. Further functionality can be added to CCleaner with the CCEnhancer.

CCEnhancer can further extend the functionality of CCleaner to clean-up more applications. Below is a screenshot of CCleaner extended with CCEnhancer.

Give Windows a Regular Maintenance Routine

From the above, just select the applications that need clean-up and hit "Run Cleaner". If you want to review or preview the details of the clean-up, you can "Analyze" first and "Run Cleaner" later.

Disk Cleanup. There are other software CCleaner will not touch. And the Disk Cleanup utility can purge it. What's more Disk Cleanup can be run in Automated-Mode. Here's how you set it up.

Launch the disk cleanup and configure it for automation. You do this via the Run command window. Start -> Run.. "cleanmgr /sageset:11" (11 can be any number you want, as long as it is easy to remember). You then get a window that looks like the screenshot below. I usually tick everything in it.

Give Windows a Regular Maintenance Routine

To automate the setting, you can run cleanmgr like this: "cleanmgr /sagerun:11" (11 here is the number you set from the argument /sageset above). Launch the Task Scheduler > "Create a Basic Task" > Give it a Task Name. Click Next.

Trigger, could be monthly or weekly depending on how frequent you want the cleanup to run. I set mine to run monthly, every 15th of the month. Action is to start a program "cleanmgr.exe" and argument is "/sagerun:11".

Accept by clicking ok. And as scheduled, the cleanup will run when the schedule triggers it to. It is also automated, which makes life hassle-free once you set it up the first time.

Share:

TIP: Rename TV Series Files with theRenamer

We have featured a few tweaks here and there regarding transmission bittorrent client (or transmissionbt as others call it) -- queuing torrents, blackhole directory and adding torrents paused. It can download just about anything you throw at it, that you are only virtually limited by your internet bandwidth and the free disk space on your device. Not only that, transmissionbt is extremely lightweight and could run on a device running linux. As you probably notice, I run my transmissionbt from a Popcorn Hour C-200 network media jukebox.

However, given all the downloads, it is difficult to track them down without a good naming convention. This is true especially in the case of TV series. Files would not be named aptly and renaming them is quite tedious. It might seem a simple task for a few files, but just imagine having to do that in one season.. Now imagine several seasons.. And several TV series(es)!

Not to worry though. As there are tools made and specifically designed for this job. Meet theRenamer. It can do the googling for you, it will identify the series based on the filenames, and rename them appropriately in one sweep. It can even add the episode title! All you have to do is drag the files to the application window and check if the program got the name and title right. If it did, just click proceed and you're done. Just so you get the picture here is how it's done.

[1] Download theRenamer from its website. Once done, install it. For this feature, here is what a collection looks like prior to using theRenamer.

Rename TV Series Files with theRenamer

[2] Launch the program. And configure it to your liking. Click on the wrench on the upper right side of the application window. What is important to set here are the separators (or the naming convention). I set mine to "space-dash-space" or " - ".

Rename TV Series Files with theRenamer

[3] Once the config is set, try it on a file and check the result. Drag a file to the application window and you will be presented with a preview of what the new filename will become.

Rename TV Series Files with theRenamer

[4] Click the proceed button at the bottom right and watch the program do its magic. It will then rename the file(s) dragged to the application window. Here's how the collection looks like afterward.

Rename TV Series Files with theRenamer

That wasn't too hard now, was it? You could rename a few TV series in a matter of minutes rather than spend hours sorting them to your liking. Let theRenamer do it for you.

Share:

TWEAK: Transmission Blackhole Directory

Now that our transmission torrent client has queuing capabilities, how about adding a few more tweaks on the side. This post aims to add a couple more tweaks to those who want to modify the behavior of the transmission torrent client, namely [1] add torrents paused and [2] watch or monitor a "blackhole" directory. Of course, these tweaks are applicable to the transmission torrent client in general, but this feature is purposed for the Popcorn Hour C-200 Network Media Jukebox (PCH-C200).

The tweaks above are dependent on having the LTU 0.76 package installed via CSI and (optional) queuing of torrents. Instead of the LTU package, you may substitute it with another version of transmission from CSI. And although optional, this tweak works best with transmission queuing script.

Add .torrent(s) paused. By default, torrents are started as they are added. You can, however, override this behavior. You can add the directive "start-added-torrents" and give this a value of "false". Locate settings.json for transmission. This is usually inside your home directory under a folder .transmission.

On the PCH-C200, this depends on the version of transmission but if you are running version 2.33 that came with the LTU 0.76 package it is located on the path /share/.transmission. Stop the transmission torrent client first, then edit the file settings.json.

Add this line:
"start-added-torrents" : false
Blackhole directory. If you have automated scripts that download torrents, you will want transmission to automatically download those torrents. The way for transmission to do that is to monitor a directory. In transmission lingo, the term used to refer to this directory is the "blackhole" directory.

The directive "watch-dir" points the transmission torrent client to watch which directory. Mix this with "watch-dir-enabled" and give it a value of "true". When these directives are present, transmission will watch and monitor the directory for .torrent files.

Again on the PCH-C200, this depends on the version of transmission but if you are running version 2.33 that came with the LTU 0.76 package it is located on the path /share/.transmission. Stop the transmission torrent client first, then edit the file settings.json.

Add these lines:
"watch-dir": "/share/.transmission/blackhole",
"watch-dir-enabled": true
The directory /share/.transmission/blackhole can be another directory of your liking. It is just easier and less complex to put transmission related files under one folder. Also, this directory does not exist by default, so it needs to be created.

After making the changes above, you may start transmission torrent client. You will know that the above tweaks work when you list the contents of the blackhole directory. The .torrent files that have been downloaded or copied there are now renamed .torrent.added. And when you check the transmission via its transmission-remote binary or its web interface, the newly added torrents are queued (paused).

Share:

TIP: Config Baseline/Snapshot with WhatChanged

When something goes wrong or when you suspect that something is wrong, it is very difficult to pinpoint exactly what it is. Even for a seasoned system administrator, this situation can happen. Usually a scientific method followed for troubleshooting is in play but usually this method or procedure is very broad.

It is critical to establish a baseline or snapshot to compare with. And it is best to take a snapshot while the system is still healthy. One tool that can help in this is WhatChanged.

WhatChanged can take a list of files of your Windows drive and can also be configured to take a snapshot of every branch of the registry. If you suspect there is something wrong, or you got hit by a virus, compare the current state with the baseline previously taken with WhatChanged. This step can save you from a lot of time in troubleshooting what the probable cause can be. Whatever the purpose, whatchanged will list the files and registry entries that changed.

You can download WhatChanged from MajorGeeks.com or the author's website, vtaskstudio.com. It is amazing what a 96kb software can do.
WhatChanged is a system utility that scans for modified files and registry entries. It is useful for checking program installations. There are two steps for using WhatChanged:
1) First, take a snapshot to get the current state of the computer; 2) Second, run it again to check the differences since the previous snapshot.

Program interface look and feel is below.

Config Baseline/Snapshot with WhatChanged

To use it, just enumerate the drives you wish to monitor. It is recommended to put the drive where Windows is installed (usually C:). For multiple drives, just separate each drive letter with a space (e.g. C: D:). Then, tick the branches of the registry you wish to take a snapshot for baseline. For a thorough sample, tick all of the branches of the registry.

The software will then create files in the same path it resides. So make sure that the executable is stored in its own folder.

Config Baseline/Snapshot with WhatChanged

After taking a snapshot or baseline, you can backup the executable and the files it created to a USB drive or on another computer. If in the future you suspect something is wrong, just run whatchanged.exe and compare the results with the previous snapshot. More or less it should give you an idea where the problem lies or a clue where not to look (at the very least).

Share:

TECH: Gmail-to-SMS Service For Free!

Apart from free email service, Gmail added another service that you folks will love. What is this service? It is the Gmail-to-SMS service. Gmail-to-SMS allows you to send SMS to Globe Telecom, Smart Communications, and Sun Cellular subscribers from your GMail account. The GMail-to-SMS service allows Globe, Smart, and Sun subscribers to receive text messages direct to their handsets. What's more? This service is FOR FREE!

According to Myriam Boublil, Head of Communications and Public Affairs for Google Southeast Asia:
SMS in Gmail Chat will bring a new level of flexibility and mobility to Gmail users in the Philippines. With more than 70 million mobile subscribers in the Philippines and the country being the SMS capital of the world, we think this service will allow for seamless integration between mobile and PC communication and make it more convenient for Pinoys to send each other messages.

To use this service, login to your Gmail account. Then type the phone number on the chat bar. Gmail will start to search your contacts as you type. Once you have used this service, an SMS search bar will appear on top of the Chat bar, like the screenshot below.

Gmail-to-SMS Service For Free

The process is similar to sending as instant message -- the only difference being, Gmail users compose a text from the desktop interface not on a handset. Messages sent this way are stored and archived like any other chat or IM messages. Whenever the recipient of the SMS responds to the SMS, the response will appear in the sender’s Gmail interface. It's like chatting but the recipient is mobile. You can pop-out the window too, just like chat.

Gmail-to-SMS Service For Free

For replies, standard network SMS charges apply for any carrier -- Globe, Smart or Sun. However, sending SMS from the Gmail Chat to a phone is FREE. The same service can be availed in similar countries in Asia, not just the Philippines. For a comprehensive list of countries that can utilize this service, checkout the frequently asked question (FAQ) page here.

I tested this out on my mobile number and here is the message as it appears on my handset.

Gmail-to-SMS Service For Free

As of this writing, the limit as to the number of SMS you can send is 50. Not yet sure how the service replenishes the credits. If you have any additional information on this, kindly share it with us.

Share:

TIP: Test Your Browser's Functionality, Security and More

With the advent of HTML5, websites are presented to the end-user in a different light. What used to be flash dominated content are now CSS3 and javascript dominated. The development of jQuery library and javascript based modules and plug-ins present a different facet of webpage programming. What used to be javascript geeks are now known as javascript ninjas.

The HTML5 standard showed an advanced way of programming and at the same time required a little more from our browsers. Tied with these features are support requirements for different functions. Website gurus and javascript ninjas should ensure that their pages load in the same manner across different browsers. At the same time users with different browsers are able to view the same website without having to open another compatible browser. This cuts both ways.

New browsers present new bugs -- added functionality that may not work as it should. Security should also be taken into consideration with the added functionality. So how do programmers, developers and end-users alike test their browser's functionality and security? The site browserscope seem to have the answer.

Browserscope tests the functionality of today's modern browsers but doesn't leave security behind. This tool is really useful.

So before making a recommendation, we took it out for a spin with the favorite browsers of this generation. If you want to try it out for yourself, launch your favorite browser and point it to this URL: http://www.browserscope.org/alltests.

Google Chrome. This is version 12.0.742.122 of Google Chrome.
Test Your Browser's Functionality, Security and More

Test Your Browser's Functionality, Security and More

Mozilla Firefox. Current production release version 5.0.1.

Test Your Browser's Functionality, Security and More

Test Your Browser's Functionality, Security and More

We didn't really need to do much comparison as browserscope already has a database of browsers with which to compare your browser. But we were curious as to where our browser stands in comparison. From the results, it looks like Google's Chrome browser has the edge in all browsers.

Share:

TIP: Remaining Anonymous -- a Security Protocol

Nowadays, websites don't just give information for free. They ask you to subscribe or register to view content. This is not a bad thing, but it does make you give away your email address. Thus in turn, you give your identity away (sort of). There are sites where you are not going to be that confident in giving away your email address, whether it is your personal address or just a mailbox purposely intended for spam mails.

How about a disposable email address in exchange for their service? Register with a valid email address, verify your account, and forget it! You're still anonymous to them. This is exactly what 10MinuteMail offers. As the name suggests, the email address given to you will be valid for only 10 minutes, then expires. If you want it for a bit longer, you can add another 10 minutes, and another if you require.

Remaining Anonymous Security Protocol

There may be other uses for disposable emails and the site above will keep your anonymity intact.

What about for sites that require you to login to see answers to questions? Sites like Experts Exchange, require a login for you to be able to see solutions to questions and problems facing other users. Since this is a contribution-based site, the 10MinuteMail website does not fit the bill.

Other sites publish partial content or just headers and require you to login to see the rest of the article or feature. You will probably feel cheated (in a way) to register and give out your name and email just for one article.

You can use another site that keeps track of logins. Just use the search feature in case they have a valid and working login for your particular website. The site is bugmenot.com.

Remaining Anonymous Security Protocol

So there you go folks, sites that keep your anonymity on the web. Although you may not need them now, there may be times you will need them and they will come in very handy. Those sites above have helped me in several situations so far.

Share:

INFO: Using Hostsman for Host Redirection

Our previous tip, blocking potentially hazardous websites with hosts file was one of the many methods you can harden your system. You can also install your own caching DNS server and disable ports that are opened by default. These tweaks contribute bit by bit to the overall security of our computer systems. In the tech lingo, it is referred to as hardening.

When we blocked potentially hazardous websites via hosts file, you noticed that browsing was faster too. This is because most web tracking elements that run on the background got blocked too. And since that tweak was enforced, your anonymity on the web has improved and you can now browse with a bit more confidence.

We can improve on that tweak above. There is a tool made exactly to accomplish the purpose of blocking websites via hosts redirection. That tool is hostsman (by abelhadigital.com).

What does hostsman do? In short, it accomplishes the block via a couple of clicks. To see it in action, download hostsman and extract the zip file to a directory of your liking. Make it easy to remember the path where you extract it. Or better yet, after extracting pin hostsman.exe to your taskbar for easy reach.

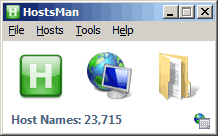
Launch the software. Click the middle button (icon with globe behind computer) to update hosts.

Using Hostsman for Host Redirection

Use the overwrite option when updating. Or you can use merge, then optimize later. Whichever option you choose, it accomplishes the same purpose. And this highlights the flexibility of hostsman.

Using Hostsman for Host Redirection

What's more? You can disable this blocking in a single mouse click. The first button (green "H" symbol) on hostsman disables the hosts file. Should it block a website you frequent, just disable host blocking with hostsman and when done, just re-enable. When disabled, the green "H" icon is colored red.

Using Hostsman for Host Redirection

Furthermore, hostsman when used this way does not exactly automate the updates. But it could. Set it to automatically start with Windows -- Tools > Options > System > (tick) Automatically start with Windows. Under Update tick Enable Hosts file Auto-Update.

Using Hostsman for Host Redirection

With that you will no longer have to worry about updates to the hosts file. When an update is available, hostsman will notify you of that. Or you can choose not to be bothered at all.

Share:

TIP: Browser Plugin Check for Firefox

Adding to our write-ups regarding security, is this feature called plug-in checker. How are these plug-ins related to security? You'll know soon enough.

Plug-ins are embedded in the browser and for us home users, this may be the most used application. And plug-ins, if you're not aware, are also as vulnerable as the browser itself. Flash is the suspected culprit in a recently reported high risk breach. And a vulnerability as simple as that could have led to an even bigger catastrophe, if not averted in time. And, little do we know the same flash plug-in is present in our system.

Firefox is not a perfect browser but this is the browser of my choosing. It is because of its plug-in checker, which is a major reason for my preference. If you are using Firefox, you can access this tool via typing in "about:plugins" on the address bar. On the second line of that plug-ins webpage, you can see "Find updates for installed plug-ins at mozilla.com/plugincheck."

Browser Plugin Check for Firefox

From there you will be taken to Mozilla's plug-in checker website to see which plug-ins need updating. Mind you, even if you have set the automatic updates of your plug-ins in Firefox, 3rd party plug-ins need manual updates. In my system, I need updates to my Adobe Reader plug-in (see below).

Browser Plugin Check for Firefox

This plug-in checker is certainly a very nifty gizmo. I'd love to see other browsers follow suit.

I have previously been puzzled that this plug-in checker doesn't work on my browser. As it turns out, it doesn't like to run when you are behind a proxy. So unconfigure proxy settings for Firefox before running this plug-in checker.

Share:

HOW-TO: Shorten Google+ Profile URL

We previously announced the public opening of Google+ invitations. In lieu to that, here is a tip on how to shorten your Google+ profile URLs.

So you got a Google+ profile, now what? The learning curve varies here. G+ is an entirely different approach to social networking. It is a bit intriguing at first. But in order to share your profile to everyone without you (and them) having to resort to complex mnemonics, a website has provided a way to shorten your profile. Go grab one now while a wide variety of shorter nicks are still available.

Launch your favorite browser and head over to: http://gplus.to. Key-in your favorite nickname on the space provided. Likewise, do the same for your Google+ profile ID.

In order to get your profile ID, open a new tab and browse: http://plus.google.com/me. This link will be replaced by your profile ID. Copy that and put that in the previous field.

Shorten Google+ Profile URL

Now, you don't have to memorize a ton of stuff just to share your profile. Enjoy!

If you wish to add me to your circles, here's my shortened profile: http://gplus.to/dillagr.

Share:

TIP: Blocking Potentially Hazardous Websites with Hosts File

Security has taken top ranks in the news lately -- terrorism in a different form. Hackers taking sensitive top secret information, even breaching topnotch security systems put in place. While hackers may not waste time hacking our desktops they could use our systems as zombies to launch or spread their attacks. So it is best to protect yourself from potentially contributing to the hack.

The sad part is that most of the security threats out in the open target Microsoft's Windows Operating System. The very OS that most desktops run with. Since this security threat is serious and our operating systems are very vulnerable, let us "harden" the OS by putting up a few defenses.

One way of putting up a wall is by host redirection. Protect yourself from potentially stumbling to a suspicious site and getting infected by malware or root-kits. How is this possible? Host redirection is a form of naming service inherent on your local system. It is how your machine knows another by name (which internally translates to its IP address). You can use the same to protect yourself from stumbling into potential danger.

A site that has dedicated itself to this purpose is MVPs. They have a well maintained and updated list of malicious sites that you can download and easily slipstream to the Windows hosts file.

Just download it from the link above. The file to download is hosts.zip. Once downloaded, extract the files. You will be seeing a list similar to the screenshot below.


How do you install the hosts file when there is no executable? I asked this same question as I have been asked the same by friends I have helped set-up a similar system. You will notice that in the archive just extracted is a batch file (extension: .bat). That is the executable. So all that is needed is to run that batch file.


Note that you will have to run mvps.bat as Administrator to accomplish this. Once successful, the hosts file has been modified with the latest list from MVPs. You just took a necessary step to securing your machine from potentially stumbling to malicious content.

Share:

TIP: Appear Offline in Microsoft Office Communicator

Microsoft Office Communicator (or MOC) has quickly become the social networking tool of choice in the work place. I have even witnessed relationships formed and forged out of MOC. It allows people to interact with a wide variety of tools which includes chat, video and desktop screen sharing.

Once MOC is online it announces your virtual presence by your status -- Online, Busy, Don't Disturb, etc.. There are times, however, that we don't want to be disturbed or just stay online without having to annouce our presence. In Yahoo Messenger (or YM), this is the Invisible status. MOC has this too, but it is not Invisible like YM. For MOC, it is "Appear Offline".

"Appear Offline" is disabled by default. It is not among the list of presence status. But that doesn't mean you can't use it. You can enable this status. Here's how.
[1] Open the registry editor (Start > Run.. > regedit).

[2] Open the branch HKLM\SOFTWARE\Policies\Microsoft\Communicator. On the registry editor, HKLM appears as HKEY_LOCAL_MACHINE.

[3] Create "EnableAppearOffline" as a DWORD. Then change its value to "1".

[4] Close the registry editor and exit MOC. After signing back in, "Appear Offline" will be among its list of presence status.
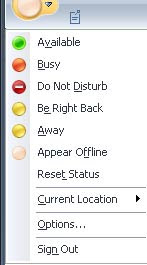
You will see a similar screenshot as below.

Appear Offline in Microsoft Office Communicator

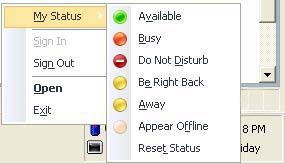
You may also set the status via the system tray icon of MOC. Once again, "Appear Offline" shows up there.

Appear Offline in Microsoft Office Communicator

If editing the registry sends shivers down your spine, don't worry. The above can also be accomplished by importing a registry file. Copy and paste the below code to you favorite text editor, save as a .reg file.
;----- start copy here -----
Windows Registry Editor Version 5.00

[HKLM\SOFTWARE\Policies\Microsoft\Communicator]
"EnableAppearOffline"=dword:00000001

;----- end copy here -----

Once done, right-click on the file on Windows Explorer and select Merge. Just like the procedure above, MOC has to be re-started. And upon signing in, "Appear Offline" can be selected as status.

Share:

Subscribe for Latest Update

Popular Posts

Post Labels

100gb (1) acceleration (1) acrobat (1) adblock (1) advanced (1) ahci (1) airdrop (2) aix (14) angry birds (1) article (21) aster (1) audiodg.exe (1) automatic (2) autorun.inf (1) bartpe (1) battery (2) bigboss (1) binance (1) biometrics (1) bitcoin (3) blackberry (1) book (1) boot-repair (2) calendar (1) ccleaner (3) chrome (5) cloud (1) cluster (1) compatibility (3) CPAN (1) crypto (3) cydia (1) data (3) ddos (1) disable (1) discount (1) DLNA (1) dmidecode (1) dns (7) dracut (1) driver (1) error (10) esxi5 (2) excel (1) facebook (1) faq (36) faucet (1) firefox (17) firewall (2) flash (5) free (3) fun (1) gadgets (4) games (1) garmin (5) gmail (3) google (4) google+ (2) gps (5) grub (2) guide (1) hardware (6) how (1) how-to (45) huawei (1) icloud (1) info (4) iphone (7) IPMP (2) IPV6 (1) iscsi (1) jailbreak (1) java (3) kodi (1) linux (28) locate (1) lshw (1) luci (1) mafia wars (1) malware (1) mapsource (1) memory (2) mikrotik (5) missing (1) mods (10) mouse (1) multipath (1) multitasking (1) NAT (1) netapp (1) nouveau (1) nvidia (1) osmc (1) outlook (2) p2v (2) patch (1) performance (19) perl (1) philippines (1) php (1) pimp-my-rig (9) pldthomedsl (1) plugin (1) popcorn hour (10) power shell (1) process (1) proxy (2) pyspark (1) python (13) qos (1) raspberry pi (7) readyboost (2) reboot (2) recall (1) recovery mode (1) registry (2) rename (1) repository (1) rescue mode (1) review (15) right-click (1) RSS (2) s3cmd (1) salary (1) sanity check (1) security (15) sendmail (1) sickgear (3) software (10) solaris (17) squid (3) SSD (3) SSH (9) swap (1) tip (4) tips (42) top list (3) torrent (5) transmission (1) treewalk (2) tunnel (1) tweak (4) tweaks (41) ubuntu (4) udemy (6) unknown device (1) updates (12) upgrade (1) usb (12) utf8 (1) utility (2) V2V (1) virtual machine (4) VirtualBox (1) vmware (14) vsphere (1) wannacry (1) wifi (4) windows (54) winpe (2) xymon (1) yum (1) zombie (1)

RANDOM POSTS