HOW-TO: Execute the evasi0n iOS7 Jailbreak

The long awaited jailbreak for iOS7 is out. If you have held back from upgrades due to the missing ability to jailbreak, then you'd probably jump the gun and download the jailbreak. Just to warn iPhone5 users out there, if you own a 64-bit phone (iPhone 5s and iPhone 5c) the current release of the evasi0n7 jailbreak will not work. You just have to wait a bit more for the 64-bit mobile substrate to be available then execute the jailbreak.

First of all, you need to download a copy of the evasi0n7 jailbreak. And, if you don't have a recent backup of your phone, hook it up to iTunes and do a backup. Be aware as this is more mandatory than optional. But if you want to risk it, you may proceed without one. It's your phone afterall.

If you are restoring to iOS7 from iOS6 or even iOS5, the backup is required. It will wipe your phone!

For me, I upgraded to iOS 7.0.4 from iOS 5.1.1. This was Apple closing its doors to any restores to iOS6 when they released iOS7. But it's not too late. I have an iPhone4S so this 32-bit phone was safe to "hack" using evasi0n7 jailbreak. I used the v1.0.2 from their website to jailbreak my iPhone4S.

Having the requirements above, upgrade to iOS 7.0.4 via iTunes. Jailbreak on "over the air upgrades" have been reported to fail so I didn't want to experience what others already did.

(I'm assuming that since you we're able to upgrade to iOS 7.0.4 -- like I did -- that you have an internet connection. The evasi0n7 jailbreak needs to connect to the internet to download some binaries.)

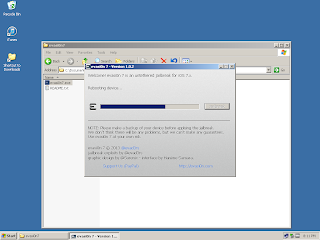
Once iOS7 is installed on the device, fireup the evasi0n7 jailbreak executable and follow the on-screen instructions. It will look similar to this:

Uploading Jailbreak Data

Uploading evasi0n App

The device will reboot three times -- first to inject the jailbreak, next after executing the evasi0n7 application and lastly after Cydia upacks.

Rebooting Device

All these take less than 30minutes to execute.

Lastly, restore your phone's latest backup after the jailbreak. Enjoy.

Share:

ERROR: This Host or Cluster is not Valid Selection

Title of this article is an error message encountered whenever a template gets converted back or deployed to a Virtual Machine. This is on the VMware side of things, of course. Deploying templates is the fastest way to commission a virtual machine for whatever purpose it may serve. Compared to the conventional way of deploying bare-metal machines which could take hours, virtual machine templates can deploy in a matter of minutes, sometimes seconds on top tier hardware. However, depending on how the templates got built out, you will soon discover they may not deploy back as virtual machines.

One of those situations is described by the error on this article. Whenever you deploy or convert a template back to virtual machine, the error ""This Host or Cluster is not Valid Selection" is encountered. The error in itself doesn't really give you a clue what mechanism is involved which caused it. In the VMware world, you will be getting this screenshot.

Error Message

This error is actually caused by a missing resource on the host server. It could be an ISO on a datastore that was used by the virtual machine prior to its conversion to a template. This is more often the likely cause of the error. I used to throw the template away since I didn't know what else to do. But as you will soon see, that goes back to the conventional way of deploying bare-metal machines. The advantage of using templates on the virtual world is defeated.

(DISCLAIMER: Read and understand the procedure first prior to execution. I will not be responsible for the outcome of your actions.)

First, remove the template from inventory. Just remove from inventory, do not remove from disk. Otherwise, the template could no longer be imported back to the virtual infrastructure.

Then, open a terminal session to the ESXi host and look for the files related to the template. This is where a backdoor to the ESXi host comes in really handy.

Locate the datastore where the template is stored. The virtual machine template files are usually stored in a directory under the same name as the original virtual machine prior to conversion. The file with extension .vmtx is the file you are after. Do a listing of the contents of the directory and if you see a file with .vmtx on the filename, then you are on the right track.

Use an editor to view and edit this .vmtx template file. For brevity, I downloaded the .vmtx file to my notebook and opened it on notepad. The screenshot is below:

Edit Template File

The lines to remove are related to the virtual CD-ROM (resource ide1:0, as shown in the picture). Create a backup of the .vmtx file. Remove the three lines with ide1:0 from the .vmtx file. Then, import the template back to the virtual infrastructure. In the VMware lingo, this action is to "Add to Inventory".

If this procedure is done right, Virtual Machines could be deployed from the template without the earlier errors encountered. This was what I did and the templates I have are again usable.


Share:

Subscribe for Latest Update

Popular Posts

Post Labels

100gb (1) acceleration (1) acrobat (1) adblock (1) advanced (1) ahci (1) airdrop (2) aix (14) angry birds (1) article (21) aster (1) audiodg.exe (1) automatic (2) autorun.inf (1) bartpe (1) battery (2) bigboss (1) binance (1) biometrics (1) bitcoin (3) blackberry (1) book (1) boot-repair (2) calendar (1) ccleaner (3) chrome (5) cloud (1) cluster (1) compatibility (3) CPAN (1) crypto (3) cydia (1) data (3) ddos (1) disable (1) discount (1) DLNA (1) dmidecode (1) dns (7) dracut (1) driver (1) error (10) esxi5 (2) excel (1) facebook (1) faq (36) faucet (1) firefox (17) firewall (2) flash (5) free (3) fun (1) gadgets (4) games (1) garmin (5) gmail (3) google (4) google+ (2) gps (5) grub (2) guide (1) hardware (6) how (1) how-to (45) huawei (1) icloud (1) info (4) iphone (7) IPMP (2) IPV6 (1) iscsi (1) jailbreak (1) java (3) kodi (1) linux (28) locate (1) lshw (1) luci (1) mafia wars (1) malware (1) mapsource (1) memory (2) mikrotik (5) missing (1) mods (10) mouse (1) multipath (1) multitasking (1) NAT (1) netapp (1) nouveau (1) nvidia (1) osmc (1) outlook (2) p2v (2) patch (1) performance (19) perl (1) philippines (1) php (1) pimp-my-rig (9) pldthomedsl (1) plugin (1) popcorn hour (10) power shell (1) process (1) proxy (2) pyspark (1) python (13) qos (1) raspberry pi (7) readyboost (2) reboot (2) recall (1) recovery mode (1) registry (2) rename (1) repository (1) rescue mode (1) review (15) right-click (1) RSS (2) s3cmd (1) salary (1) sanity check (1) security (15) sendmail (1) sickgear (3) software (10) solaris (17) squid (3) SSD (3) SSH (9) swap (1) tip (4) tips (42) top list (3) torrent (5) transmission (1) treewalk (2) tunnel (1) tweak (4) tweaks (41) ubuntu (4) udemy (6) unknown device (1) updates (12) upgrade (1) usb (12) utf8 (1) utility (2) V2V (1) virtual machine (4) VirtualBox (1) vmware (14) vsphere (1) wannacry (1) wifi (4) windows (54) winpe (2) xymon (1) yum (1) zombie (1)

RANDOM POSTS