Showing posts with label vmware. Show all posts

TIP: Rename Ubuntu16 Interfaces Back to ethX

If you have been working on Linux for a while, you will probably be very used to interface names that are ethX (eth something). In Ubuntu16 LTS, this is no longer the case. There is a long debate about this issue as it seems, and eventually this is the result. This post does not intend to spark another debate, nor feed the flames. The intention is that if you want to revert back to the "legacy" behavior you can, of course. And here's how.

Before that, in order to have a better picture of what and why, this change was introduced in systemd V197 and the explanation is discussed in lengthy detail. Visit the link to be better informed regarding the change and why it was put forward.

As put forth:
Starting with v197 systemd/udev will automatically assign predictable, stable network interface names for all local Ethernet, WLAN and WWAN interfaces. This is a departure from the traditional interface naming scheme ("eth0", "eth1", "wlan0", ...), but should fix real problems.

The manifestation of this in a new install of Ubuntu16 LTS virtual machine is an interface named "ens192".

Ubuntu New Interface Naming

To put it back to the original naming convention, edit the file /etc/default/grub. Look for the line:
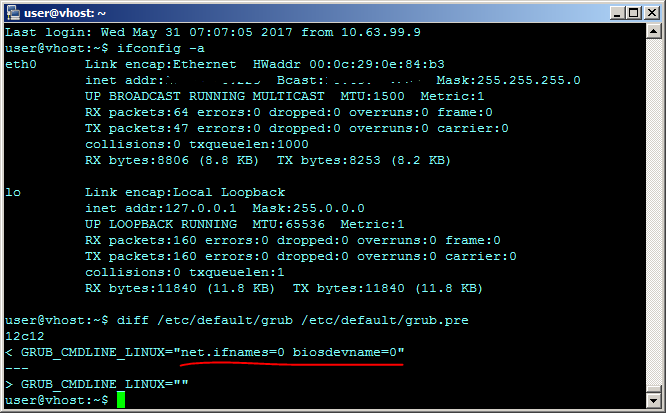
GRUB_CMDLINE_LINUX=""
 ... change it to:
GRUB_CMDLINE_LINUX="net.ifnames=0 biosdevname=0"

Then execute, "update-grub" on a terminal. Next, edit the file /etc/network/interfaces and change all instances of ens192 (this the interface assigned to my virtual machine and may not be the same as yours).

WARNING! Do not reboot yet if you have no access to the console. You may permanently lose network connectivity as a result of this change! To make the change(s) take effect, reboot.

Executing the above steps, gave me back the network interface "eth0".
Ubuntu Legacy Interface Naming

Following best practice, I created a backup of the file /etc/default/grub prior to making the change. This is a screenshot of the diff between the current file and the file prior to the change.

Diff of Grub After Modification

 RELATED: P2V (Physical to Virtual) Prep Work for Ubuntu

I have not executed this on a virtual machine with multiple interfaces. My suggestion on how to execute this procedure on a host with multiple interfaces is to go about the change one interface at a time. So far, this suggestion has worked for a friend whom I gave this advise to.

Share:

HOW-TO: Locate VMware ESXi Hosts in Your Infrastucture

There are times when you have to operate within the constraints of the environment in which you operate in -- like when you have a workstation that requires multiple operating systems (as well as multiple applications) and all that's available to you for network configuration is dynamic host configuration protocol (or DHCP).

This becomes even more complicated if the operating system installed on your workstation is a hypervisor, like VMware ESXi. Locating your host in the network segment can become a challenge. Especially when there are scheduled maintenance work that requires your workstation to be shutdown or when you leave the office on a weekend only to return the following week facing a host that is assigned a different IP. In case you are wondering, I don't have control over the DHCP server to reserve an IP address.

Given that constraint, I have to adapt and discover some things to make my life easier, accept the challenge and work around it. Fortunately, I'm not alone in this boat. Others have faced similar issues and have developed tools to specifically address this.

For this particular issue, the appropriate software is called "VMware Scanner". And it functions just like typical IP Scanners.

VMware Scanner Initial Screen

Simply input the range of IP Addresses to scan and let the application work for you. The application is very quick in locating ESXi hosts.

VMware Scanner Result

RELATED: Create a USB VMware ESXi 5.X Installer

Working within your constraints is necessary sometimes. This is where adaptability and resourcefulness come into play.

Hope this tip helps you face the same dilemma I was in.

Share:

ERROR: Could not setup macAddress for ethernet0


I encountered the above error after performing a V2V procedure on Teradata Aster Queen.. I was also going to do the same for the Teradata Aster Worker, next. But I got stuck on this error and could not power on the Queen virtual machine. If you're wondering if I had tested them on the VMware Player first, yes I did.

Further reading on VMware documentation revealed that they introduced new policies for static MAC addresses to start only with the prefix 00:50:56:xx:xx:xx. Not so convinient. I have previously tried using automatically generated MAC addresses but the Aster Express cluster would not activate. So this time, I have tried using static ones. Not really sure if this was the cause, but I'm pretty sure it is one of the differences between the original virtual machines and the converted ones.

To get a better sense of what the error looks like, I preserved a screenshot for you.

Power On Error

If you can't see the image, the verbatim "Error Stack" is:

Failed to start the virtual machine.
Module DevicePowerOn power on failed.
Could not setup "macAddress" for ethernet0.
Invalid MAC Address specified.
00:0c:29:9d:7f:5d is not an allowed static Ethernet address. It conflicts with VMware reserved MACs.


The limitation (or change in policy) introduced in ESXi V5.5 has its advantages but if you are stuck with the above error, it ain't pretty. However, there is a workaround should you require the old behavior back.

First, turn on the SSH service on the ESXi host.. Then connect to it. Next, locate the data store where the virtual machine is stored and look for the .vmx file.

Edit this file and add the line:

ethernet0.checkMACAddress = "false"


It would be prudent to make a copy of the file for backup purposes prior to making any change, just in case. This is applying best practice and instilling the discipline.

After making the necessary change to the .vmx file, power on the virtual machine. It should proceed to boot without hitch. Do the same for the Aster worker machine.

Activate Success

RELATED: P2V (Physical to Virtual) Prep Work for Ubuntu

I was able to activate the Aster Express cluster after performing these steps. Not really sure if the preserved MAC addresses resolved my activation issues, but I'm pretty happy to be able to perform analytics on the cluster. I hope it helps you as well.

Share:

HOW-TO: P2V (Physical to Virtual) Prep Work for Ubuntu

This post is supplementary to the previously written article Prep Work for Linux P2V (Physical to Virtual). The previous post covered mostly the tasks for an RPM based host (RedHat, Fedora and CentOS). This time it will cover more of the Debian based distribution.

It was just recently that I worked on several Ubuntu hosts. These presented a different perspective on the P2V process, especially since I had been tasked to convert them with little time to spare -- it is a spur of the moment, unexpected, unplanned need. With the added adjectives, you probably get the idea.

Although Linux-based, Ubuntu is a bit different than its RPM based brothers. For one, Ubuntu disk devices are mounted based on UUID. That is just the primer. The end of the P2V of VMware vCenter Standalone Converter prompted an error installing grub. To give you an idea of the error, refer to the screenshot below.

P2V Grub Install Error

FAILED: An error occurred during the conversion: 'GrubInstaller::InstallGrub: /usr/lib/vmware-converter/installGrub.sh failed with return code: 127, and message: Installing GRUB1 on (hd0)... /vmware-updateGrub.sh: 52: /vmware-updateGrub.sh: grub: not found Error installing GRUB Command: grub --no-floppy --batch --device-map="/vmware-device.map" root (hd0,0) setup (hd0) Error running vmware-updateGrub.sh through chroot into /mnt/p2v-src-root /usr/lib/vmware-converter/installGrub.sh: line 143: /mnt/p2v-src-root:
Is a directory '

Let's tackle these prep work one at a time.

For the UUID based filesystems, if you take a look at /etc/fstab you would see something similar to the below entries:

# /etc/fstab: static file system information.
#
# Use 'blkid' to print the universally unique identifier for a
# device; this may be used with UUID= as a more robust way to name devices
# that works even if disks are added and removed. See fstab(5).
#
#                
# / was on /dev/sda1 during installation
UUID=a4fc19b3-6df9-4fcb-a565-12a9bd59fff1 /               ext4    errors=remount-ro 0       1
# swap was on /dev/sda5 during installation
UUID=1061e56a-f69d-4d44-b3d1-566c960719b1 none            swap    sw              0       0

The operating system is good enough to note the disk slices and its corresponding UUID unique identifiers. However, if this is not present on your system, the command "blkid" will show the same information.

[admin@vhost ~] sudo blkid
/dev/sda1: UUID="a4fc19b3-6df9-4fcb-a565-12a9bd59fff1" TYPE="ext4" 
/dev/sda5: UUID="1061e56a-f69d-4d44-b3d1-566c960719b1" TYPE="swap" 

The above entries need to be converted to its /dev/sdX counterpart prior to P2V. This is a simple change of removing the UUID=xxxxx-xxx-xxx-xxx and replacing it with its /dev/sdX equivalent. Exercise prudence, and make a backup of the file /etc/fstab prior to making changes.

Next, let's deal with the GrubInstall error. The grub install happens when the P2V is almost complete, meaning, the copying of the physical host files are done. The only challenge is the virtual machine made will not boot. This was a tough one to resolve at first.

As it turns out, you require the Linux Security Remix ISO file. Boot off the ISO and execute Boot Repair (recommended Boot Repair).

Once Boot Repair is done, reboot and the virtual machine is up and running.

The only hiccup that delayed the activity for me was to download the Linux Security Remix ISO. It is close to 1GB in size so if you are doing a lot of P2V conversions this file will come in handy. There are two (2) versions of this file -- the 32-bit and the 64-bit versions. If your system is 64-bit, the 32-bit version will not work. Having both versions is recommended.

As consolation, the only similarity I found with other Linux flavors was on the file /etc/udev/rules.d/70-persistent-net.rules, where the MAC addresses of the physical machine are hard-coded. If this file exists, comment out the entries or remove the file completely prior to P2V. The udev process will re-create this file on boot-up.

Share:

ERROR: "The operation is not allowed in the current state of the host"

I experienced the above error while powering on virtual machines after a scheduled shutdown. Just so you can replicate my experience, I was administering vCenter v5.5 Update 2b and ESXi v5.5 Update 2 hosts. The cluster's HA was turned off, DRS was set to partially automated from its fully automated setting, and all ESXi hosts were put into maintenance mode prior to them shutting down.

Powering up there were no issues -- all VMFS datastores were mounted and there are no alarms nor alerts. So after checks and everything was all set, ESXi hosts were exited from maintenance mode and virtual machines were started.

Most of the virtual machines booted back. But some of those that were powered up did not proceed on booting but instead prompted the error: "The operation is not allowed in the current state of the host."

This was completely new to me. And VMware forums and public knowledge base had an almost similar error: "The operation is not allowed in the current connection state of the host." Which was not quite what I was facing.

I was using the vSphere Web Client, so I tried using the old graphical user interface. Things did not seem to change -- same error.

I restarted the VMware VirtualCenter Server service but I still ended up with the same error. So I started to scratch my head. Of the several virtual machines that manifested this error, one thing was common: they belonged to similar ESXi hosts.

I went back to reading the posts with the almost identical error and it suggested to restart the management agents on the ESXi hosts. So I tried that but instead of just the management agents, I executed a stop and start of the entire services.sh.

Below are the traces of the execution.

~ # services.sh stop
Running hp-ams.sh stop
Terminating hp-ams-watchdog process with PID 35513 50567 50568
Stopping process 35479 35477 ...
hpHelper process is now stopped.
Running vmware-fdm stop
Stopping vmware-fdm:success
Running hp-mst.init stop
Unable to unload module mst: Module not found
Running xorg stop
Running sfcbd stop
This operation is not supported.
Please use /etc/init.d/sfcbd-watchdog stop
Running wsman stop
Stopping openwsmand
Running snmpd stop
Running sfcbd-watchdog stop
Running hpcru.init stop
Running hpilo.init stop
Running hpsmx.init stop
Running vpxa stop
watchdog-vpxa: Terminating watchdog process with PID 34561
vpxa stopped.
Running vobd stop
watchdog-vobd: Terminating watchdog process with PID 33332
vobd stopped
Running lacp stop
watchdog-net-lacp: Terminating watchdog process with PID 33542
Running memscrubd stop
memscrubd is not running
Running smartd stop
watchdog-smartd: Terminating watchdog process with PID 34425
smartd stopped
Running dcbd stop
watchdog-dcbd: Terminating watchdog process with PID 34370
Running cdp stop
watchdog-cdp: Terminating watchdog process with PID 34328
Running nscd stop
watchdog-nscd: Terminating watchdog process with PID 34283
Running slpd stop
Stopping slpd
Running storageRM stop
watchdog-storageRM: Terminating watchdog process with PID 34231
storageRM stopped
Running hostd stop
watchdog-hostd: Terminating watchdog process with PID 34191
hostd stopped.
Running vmfstraced stop
watchdog-vmfstracegd: PID file /var/run/vmware/watchdog-vmfstracegd.PID does not exist
watchdog-vmfstracegd: Unable to terminate watchdog: No running watchdog process for vmfstracegd
vmfstracegd is not running
Failed to clear vmfstracegd memory reservation
Running lbtd stop
watchdog-net-lbt: Terminating watchdog process with PID 34130
net-lbt stopped
Running sdrsInjector stop
watchdog-sdrsInjector: Terminating watchdog process with PID 34094
sdrsInjector stopped
Running rhttpproxy stop
watchdog-rhttpproxy: Terminating watchdog process with PID 34053
rhttpproxy stopped.
Running sensord stop
sensord is not running
Running hp-oem.init stop
Running usbarbitrator stop
watchdog-usbarbitrator: Terminating watchdog process with PID 33941
usbarbitrator stopped
Running DCUI stop
Disabling DCUI logins
VobUserLib_Init failed with -1
Running ntpd stop
Stopping ntpd
watchdog-ntpd: Terminating watchdog process with PID 33876
Connect to localhost failed: Connection failure
Running vsantraced stop
watchdog-vsantraced: Terminating watchdog process with PID 33807
vsantraced stopped
watchdog-vsantracedUrgen: Terminating watchdog process with PID 33836
vsantracedUrgen stopped
Persisting traces to /locker/vsantraces
~ #
~ # services.sh start
Running vsantraced start
Scratch partition is not backed by persistent storage
Storing traces to /vmfs/volumes/4dc4866f-040de4b6-1f88-0017a477f825/vsantraces
vsantraced started
vsantracedUrgen started
Running ntpd start
Connect to localhost failed: Connection failure
Starting ntpd
Running DCUI start
Enabling DCUI login: runlevel = 
VobUserLib_Init failed with -1
Running usbarbitrator start
usbarbitrator started
Running hp-oem.init start
Running sensord start
sensord started
Running rhttpproxy start
rhttpproxy started.
Running sdrsInjector start
sdrsInjector started
Running lbtd start
net-lbt started
Running vmfstraced start
VMFS Global Tracing is not enabled.
Running hostd start
Ramdisk 'hostd' with estimated size of 803MB already exists
hostd started.
Running storageRM start
storageRM started
Running slpd start
Starting slpd
Running nscd start
nscd started
Running cdp start
cdp started
Running dcbd start
dcbd started
Running smartd start
smartd started
Running memscrubd start
The checkPages boot option is FALSE, hence memscrubd could not be started.
Running lacp start
LACP daemon started
Running vobd start
vobd started
Running vpxa start
Connect to localhost failed: Connection failure
Running hpsmx.init start
Running hpilo.init start
Running hpcru.init start
Running sfcbd-watchdog start
Connect to localhost failed: Connection failure
Running snmpd start
Running wsman start
Starting openwsmand
Running sfcbd start
This operation is not supported.
Please use /etc/init.d/sfcbd-watchdog start
Running xorg start
Running hp-mst.init start
Running vmware-fdm start
Starting vmware-fdm:success

Running hp-ams.sh start
Starting hpHelper service...
~ # 

One thing to note here is that during the stop and start of services.sh vCenter server will complain about the host being disconnected. This is normal as the daemons handshaking and talking to each other lose connectivity.

After the stop and start was done, powering up of the virtual machines that had errors were successfully executed. Another point chalked to experience.

Share:

ERROR: This Host or Cluster is not Valid Selection

Title of this article is an error message encountered whenever a template gets converted back or deployed to a Virtual Machine. This is on the VMware side of things, of course. Deploying templates is the fastest way to commission a virtual machine for whatever purpose it may serve. Compared to the conventional way of deploying bare-metal machines which could take hours, virtual machine templates can deploy in a matter of minutes, sometimes seconds on top tier hardware. However, depending on how the templates got built out, you will soon discover they may not deploy back as virtual machines.

One of those situations is described by the error on this article. Whenever you deploy or convert a template back to virtual machine, the error ""This Host or Cluster is not Valid Selection" is encountered. The error in itself doesn't really give you a clue what mechanism is involved which caused it. In the VMware world, you will be getting this screenshot.

Error Message

This error is actually caused by a missing resource on the host server. It could be an ISO on a datastore that was used by the virtual machine prior to its conversion to a template. This is more often the likely cause of the error. I used to throw the template away since I didn't know what else to do. But as you will soon see, that goes back to the conventional way of deploying bare-metal machines. The advantage of using templates on the virtual world is defeated.

(DISCLAIMER: Read and understand the procedure first prior to execution. I will not be responsible for the outcome of your actions.)

First, remove the template from inventory. Just remove from inventory, do not remove from disk. Otherwise, the template could no longer be imported back to the virtual infrastructure.

Then, open a terminal session to the ESXi host and look for the files related to the template. This is where a backdoor to the ESXi host comes in really handy.

Locate the datastore where the template is stored. The virtual machine template files are usually stored in a directory under the same name as the original virtual machine prior to conversion. The file with extension .vmtx is the file you are after. Do a listing of the contents of the directory and if you see a file with .vmtx on the filename, then you are on the right track.

Use an editor to view and edit this .vmtx template file. For brevity, I downloaded the .vmtx file to my notebook and opened it on notepad. The screenshot is below:

Edit Template File

The lines to remove are related to the virtual CD-ROM (resource ide1:0, as shown in the picture). Create a backup of the .vmtx file. Remove the three lines with ide1:0 from the .vmtx file. Then, import the template back to the virtual infrastructure. In the VMware lingo, this action is to "Add to Inventory".

If this procedure is done right, Virtual Machines could be deployed from the template without the earlier errors encountered. This was what I did and the templates I have are again usable.


Share:

TIP: Taking Advantage of Virtual Hot Add Technology

As a system administrator, I could say virtualization is one of the best things that happened since sliced bread. This of course is in terms of utilization and the thin provisioning mechanism it entails. What usually happens is that, the guest operating system is tricked into believing that it has all that resource for itself; whereas, what actually happens is that it only is allocated a slice of it, and it will get the resource as necessary.

This is neat technology. The other side of the coin is that you may allocate a thick provisioned resource but at a fraction of its entirety. What does this mean? The short term -- skimping -- I use this when I can't estimate the exact requirement of an application. I rely on the "hot add" technology of virtualization to allocate the final pieces of the architecture when more accurate information is available. In the virtualization lingo, the terms "hot add" and "hot plug" are often used interchangably and likely pertain to the same thing.

Modern operating systems play a big role in this "hot add" technology. For example, in the Linux world once the application has been tested and it was later found to be CPU-bound, just hot add more cores. Not really that interesting, right? But wait, you can do this without having to reboot the virtual machine -- NO DOWNTIME! Adding virtual CPUs while it is running -- now that's cool stuff! This of course assumes that the hot add feature has been turned on.

This is how its done on the VMware side of things.

Enable Hot Add

The same can be done to memory -- once a guest is identified to be memory-bound -- just hot add more memory.

A recent experience taught me that this doesn't always work. It works for CPU hot plug, but for memory hot add it doesn't. I'm using the recent version of RHEL 6.4 x86_64 and CentOS 6.4 x86_64. Both of these operating systems don't work well with memory hot add, but their older versions used to work.

Executing a memory hot add on a RHEL/CentOS 6.4 guest, this error appears:

------------[ cut here ]------------
WARNING: at arch/x86/mm/init_64.c:701 arch_add_memory+0xe2/0x100() (Not tainted)
Hardware name: VMware Virtual Platform
Modules linked in: vsock(U) vmci(U) autofs4 sunrpc ipv6 ipt_REJECT ppdev parport_pc parport microcode vmware_balloon e1000 shpchp sg i2c_piix4 i2c_core ext4 mbcache jbd2 sd_mod crc_t10dif sr_mod cdrom mptsas mptscsih mptbase scsi_transport_sas pata_acpi ata_generic ata_piix dm_mirror dm_region_hash dm_log dm_mod [last unloaded: nf_conntrack]
Pid: 25, comm: kacpi_notify Not tainted 2.6.32-358.2.1.el6.x86_64 #1
Call Trace:
 [] ? warn_slowpath_common+0x87/0xc0
 [] ? warn_slowpath_null+0x1a/0x20
 [] ? arch_add_memory+0xe2/0x100
 [] ? add_memory+0xb7/0x1c0
 [] ? acpi_memory_enable_device+0x95/0x12b
 [] ? acpi_memory_device_add+0x118/0x121
 [] ? acpi_device_probe+0x50/0x122
 [] ? driver_probe_device+0xa0/0x2a0
 [] ? __device_attach+0x0/0x60
 [] ? __device_attach+0x0/0x60
 [] ? __device_attach+0x53/0x60
 [] ? bus_for_each_drv+0x64/0x90
 [] ? device_attach+0xa4/0xc0
 [] ? bus_probe_device+0x2d/0x50
 [] ? device_add+0x527/0x650
 [] ? pm_runtime_init+0xcb/0xe0
 [] ? device_register+0x1e/0x30
 [] ? acpi_add_single_object+0x837/0x9e8
 [] ? acpi_ut_release_mutex+0x63/0x67
 [] ? acpi_bus_check_add+0xe0/0x138
 [] ? acpi_os_execute_deferred+0x0/0x36
 [] ? acpi_bus_scan+0x3a/0x71
 [] ? acpi_bus_add+0x2a/0x2e
 [] ? acpi_memory_device_notify+0xa6/0x24f
 [] ? acpi_os_execute_deferred+0x0/0x36
 [] ? acpi_bus_get_device+0x2a/0x3e
 [] ? acpi_bus_notify+0x4b/0x82
 [] ? acpi_os_execute_deferred+0x0/0x36
 [] ? acpi_ev_notify_dispatch+0x64/0x71
 [] ? acpi_os_execute_deferred+0x29/0x36
 [] ? worker_thread+0x170/0x2a0
 [] ? autoremove_wake_function+0x0/0x40
 [] ? worker_thread+0x0/0x2a0
 [] ? kthread+0x96/0xa0
 [] ? child_rip+0xa/0x20
 [] ? kthread+0x0/0xa0
 [] ? child_rip+0x0/0x20
---[ end trace 081e3b980cb5c943 ]---
ACPI:memory_hp:add_memory failed
ACPI:memory_hp:Error in acpi_memory_enable_device
acpi_memhotplug: probe of PNP0C80:00 failed with error -22

 driver data not found
ACPI:memory_hp:Cannot find driver data

You will see the above error message when the command "dmesg" is executed on a terminal window. This seems to be a bug in the kernel module for memory hot add.

This is a bug that I hope gets fixed in future versions of the Linux kernel. If you rely on memory hot add feature, please be aware of this limitation on the new versions of RHEL and CentOS. It seems to be rooted to the kernel code so most likely all other flavors of Linux are in the same boat.

The Windows operating system doesn't seem to have this problem. Hot plug of virtual CPUs and hot add of memory works without any problem.

Share:

TIP: Linux Virtual Machine Performance Tweaks

The advent of virtualization, changed many rules of technology -- what may apply to the physical world could be detrimental to its virtual equivalent. This is likewise true in terms of performance. Optimizing the performance of one virtual machine impacts the performance of others. In the end, tweaking for performance not only pays off big time, but does that in magnitudes of two-, three-fold or even more.

The above statements are true due to sharing of resources in the hypervisor level. If resources are freed by performance tweaks, it makes them available to others waiting for the same resource to be available for use.

The first of these tweaks is to ensure that the disk used by the virtual machine is aligned. Why is this important? To better understand the underlying infrastructure of the virtual filesystem, refer to the screenshot. (Illustration from http://www.yellow-bricks.com)


As seen from the diagram, the misalignment of the array, to the virtual filesystem, and, to the guest disk is very, very significant. A big performance degradation will occur due to the misalignment. What happens here is that, what could be seen as a single I/O operation on the guest operating system could end up as multiple I/O operations on the physical disk or array.

Translate the above performance degradation to multiple virtual machines and you see the drift. According to VMware (Reference):
The degree of improvement from alignment is highly dependent on workloads and array types. You might want to refer to the alignment recommendations from your array vendor for further information. 

Still, I/O could be a potential performance bottleneck if the disk alignment is not kept in check.

While on the same topic of I/O bottlenecks, Linux virtual machines could benefit from the proper I/O scheduler. Again, this is another arena where the physical rules and virtual rules differ.

Modern Linux kernels default to the "completely fair queuing" (or CFQ) scheduler. This is how the kernel deals with optimizing I/O. It re-orders I/O in such a manner that when the head moves across the platter, it does that in an orderly, sequential manner rather than moving back and forth to complete requests. The best illustration to this is an elevator, where it drops people to floors in an orderly sequential manner. Instead of dropping passengers as they push the corresponding floor buttons, what happens is the elevator drops people off at 2, then 5, then 6, before going to 11. The kernel has different methods of doing this.


Imagine that the hypervisor has its own elevator, the guest has its own elevator and the array has its own. When the guest performs that optimization, the hypervisor does the same, and the array does the same. Who then decides what is the best re-ordering or optimization? The hypervisor has no insight on the guest operating system (this time a Linux machine), meaning it can't tell the method used for optimization, or how they got re-ordered, if they indeed got re-ordered or why it came to that decision.

This kernel optimization has no impact on the virtual environment and in some situations could have a negative effect. Why? The hypervisor has no way of telling how long an I/O has been outstanding or how it got re-ordered and why it was that way on the guest level. Add the hypervisor elevator and that adds further latency to the already outstanding I/O request.

It would be best to leave all optimizations on the hypervisor level and turn off the elevator on the kernel level. This is done by having the string "elevator=noop" on the kernel line of the grub.conf file of Linux. The other way of turning it off is by choosing the noop scheduler, as recommended by VMware.

This is the default setting.
# cat /sys/block/[DEVICE]/queue/scheduler
noop deadline anticipatory [cfq]
Change it for every [DEVICE].
# echo noop > /sys/block/[DEVICE]/queue/scheduler
# cat /sys/block/[DEVICE]/queue/scheduler
[noop] deadline anticipatory cfq

If you have screensavers running, those are detrimental to the performance of virtual machines. Disable them at once. I have seen a virtual machine with a load of 5.0 reduced to 0.0 simply by disabling the screensaver!

The other tweak you could perform is to change to runlevel 3. Running on a GUI (runlevel 5), consumes a lot of resources that would otherwise be free if running at runlevel 3.

Permanently change it on the file /etc/inittab.
id:3:initdefault

By tweaking, you squeeze the best performace out of your current infrastructure and free up resources otherwise sapped by useless unnecessary processes or simple misconfigurations. The combination of the tweaks above may yield better results than applying one tweak alone.

Share:

FAQ: Cloned Linux Virtual Machine with Boot Errors

Q. While working on a few cloned RHEL virtual machines just a few days ago, I encountered a weird error that almost stopped me dead on my tracks. I was expecting the tasks to be a breeze since cloning via virtual machine templates is as easy as click, click, click.

As it turned out, what was supposedly a few clicks was more complex than what I thought. The clone virtual machines simply refused to boot. To give you a better understanding of the error see the screenshot below.


Opening the console of the virtual machine, the repeated errors prompted are:
vmsvc[xxx]: [ warning] [guestinfo] RecordRoutingInfo: Unable to collect IPV4 routing table.

The messages above are repeated at about every minute.. And, worse, the boot sequence is stuck at this phase and will not proceed.

After exhausting my patience waiting for the host to boot up, I gave up and resorted to shutting down the virtual machines to figure out what was wrong. The VMware logs didn't give a clue what was wrong. Even RedHat forums didn't have information regarding the error.

What was striking was the "vmsvc" string, indicating this was somewhat VMware configuration related or a service related to VMware. This was happening to a RHEL Linux virtual machine. So I tried a different flavor of Linux -- CentOS. Same result. But for Windows Server 2003, it was not.

Google search came out with this same exact error message on the VMware Knowledge Base (KB #2048572). Executing the procedure in the resolution part did not help either.

It only applied when the guest operating system's time is ahead of the host. But that gave me a further clue -- how about if the time of the cloned guest is too far off from the host ESXi host? (Afterall it was converted to a template a while back. And it was not selective, as every cloned machine displayed this manifestation.)

It turned out this was the case. I decided to disable time synchronization completely between the host ESXi and guest RHEL virtual machine.. Bingo error gone.

A. To completely disable the time sync between the host ESXi hypervisor and the guest RHEL virtual machine, simply shutdown or power off the guest virtual machine and edit the .vmx configuration file. Add the following lines, if they don't exist:
tools.syncTime = "0"
time.synchronize.continue = "0"
time.synchronize.restore = "0"
time.synchronize.resume.disk = "0"
time.synchronize.shrink = "0"
time.synchronize.tools.startup = "0"
time.synchronize.tools.enable = "0"
time.synchronize.resume.host = "0"

It helps to enable SSH on the ESXi server and use vi to make changes to the guest .vmx file. After adding the above lines, problem was solved and subsequent clones were easier.

The only task left to be done was to convert the template to a VM, make the same changes and re-template. This was a very fruitful learning experience.

Share:

INFO: NetApp iSCSI to VMware Virtual Infrastructure

iSCSI, the implementation of the SCSI protocol over internet packets, is one of the cheapest (if not the cheapest) forms of connectivity to an external storage. It is a form of transmitting data from host to storage, and back, over the IP network. It is cheap since putting up a fiber channel infrastructure will cost more. But nowadays almost every infrastructure already has fiber with 10gigabit connectivity.

iSCSI enables the transmission of SCSI commands over IP-encapsulated packets. This allows organizations to consolidate storage and gain better utilization, not to mention this is easier to manage and backup. The protocol gives hosts an "illusion" that the storage is directly or locally attached to while in reality it sits somewhere else.

The biggest implementation of iSCSI that I have seen so far is its use for disaster recovery (or DR) purposes. On the VMware infrastructure, iSCSI can be utilized where there is a need to share disks or LUNs. And it is easily implemented since most servers nowadays come with adequate number of network interfaces. And it is independent of any physical hardware as long as everything is connected via IP.

The same implementation of NetApp iSCSI is used in the virtual infrastructure that I administer. Everything works after having introduced the LUNs and assigning IP addresses. And it sticks to the notion of keeping everything simple so it is easier to manage. However, during my research of best practice(s) of VMware infrastructure with NetApp storage via iSCSI, a community post in the VMware forums and NetApp community suggested that the NetApp virtual storage console plugin for vSphere needs to be installed.

True enough when the VSC plugin was installed, its interface showed alerts on the screen. Below is a screenshot of what it looks like.


Apparently, although it works after configuration, the settings are not that optimal. It needs further tweaking and the VSC interface itself can tweak the settings for optimal multipath settings, optimal active-active configuration, failover settings, etc.


Correcting or applying the right settings to the current environment is easy. It all it takes is to right click the alert icon and select "Set Recommended Values..".


It will then ask which of the recommended values are applied. All the needed options are ticket by default. The interface also displays what settings it changes.


When the recommended values are applied, the interface immediately changes from "Alert!" to "Normal". But reboot is still required as shown on the Status where it says "Pending Reboot".

After rebooting the ESXi host, the optimal settings are applied. The VSC interface on the vSphere Client application window confirms this.

To ensure that the guest machines are not impacted by the change, it is recommended to put the ESXi host in maintenance mode. It is easy to do since vMotion is there to ensure no downtime is incurred. This is the same route I applied. It also allows you to immediately reboot after applying the resolutions suggested by the virtual storage console.

After applying the tweaks, you will notice faster access to the storage infrastructure from the guest machines. If you have a similar infrastructure, install the VSC plugin and the benefits pay off immediately.

Share:

HOW-TO: Prep Work for Linux P2V (Physical to Virtual)

Virtualization is the technology trend that is "in" nowadays. It is debatable whether the money you save in hardware costs (and other variable costs) can equate or best the savings of whatever virtualization technology deployed or implemented. But that is beyond the point of this article.

Physical to virtual (otherwise known as P2V) is the process of converting a baremetal host to a virtual equivalent. For Linux hosts, there is only one way to do this. P2V is done from a Windows host that has the VMware Standalone Converter installed. The best way to do this without downtime is to do your homework prior to. Prep work is vital in a production environment.

The quickest way to avoid downtime is to choose to shutdown the physical machine and boot the virtual machine when conversion (or P2V) is done. This is via checking a tick box during the conversion process. However, in my experience the virtual machine doesn't always boot after the conversion. How then do we ensure that the virtual machine boots up after conversion?

One key strength of VMware is its virtual machines (and their corresponding drivers) are assigned or given a generic set of hardware. The hardware on the VMs are as generic as possible for maximum compatibility. This enables the VM to migrate (or vMotion) to compatible architectures with least impact or even no impact at all. The end-user will not even feel the vMotion occur or experience any glitch while the machines migrate from one ESXi host to the other. While a continuous ping is done it might drop one or two packets while a vMotion is going on but that really is not felt by the user most of the time.

Given the above, one way to ensure a successful P2V is that hardware specific limitations do not exist on the virtual machine (or VM). What then are hardware specific limitations? The MAC address is one. Virtual machines are automatically assigned a different MAC address than the one on the physical host. If the MAC address is hard-wired, then obviously the resulting Linux VM will not like it.

On Fedora flavors of Linux as well as its Community operating system counterpart, there are two locations where the MAC address is hard-wired or hard-coded. The file /etc/udev/rules.d/70-persistent-net.rules contain the hard-coded MAC address. As seen from the screenshot below, the host has two (2) network interface cards, and CentOS has detected them all and assigned them names eth0 and eth1. Their corresponding MAC addresses are also listed. This way the OS knows which NIC is assigned what name.


Sometimes, the files ifcfg-eth0, ifcfg-eth1 -- located in /etc/sysconfig/network-scripts -- also contain the hard-coded MAC addresses. This is another way for the OS to know the particular NIC has been assigned a corresponding device name. Below are entries for the file ifcfg-eth0.


On both of the above scenarios, you may choose to delete the lines containing the MAC addresses or place a hash (#) in the beggining of the line to make the OS ignore them.

Other times, the VM refuses to boot due to a missing module in the initrd file. And the solution could vary between scenarios. Still, it helps to do your homework prior to so you can minimize downtime and anticipate headaches that may come your way.


Share:

INFO: Root Backdoor to VMware ESXi Host

Administering the virtual infrastructure has been the focus of my administrative tasks as of late. It has been a challenge learning and understanding the technology at first. It comes with the same set of rules that govern physical machines, as well as extended technology (and imagination) -- really giving meaning to the acronym elastic sky x (or ESX). While the name might be gibberish, the technology it stands for is way, way interesting.

While ESXi is an advanced technology, it does have its own set of quirks and limitations. On top of this list is the root password protection. Never forget the root password, or else.. Although there are proven steps to "crack" (for the lack of a better word) the root password, it is far too complex for beginners.

On the VMware knowledge base site, we read this:

ESXi 3.5, ESXi 4.x, and ESXi 5.x
Reinstalling the ESXi host is the only supported way to reset a password on ESXi. Any other method may lead to a host failure or an unsupported configuration due to the complex nature of the ESXi architecture. ESXi does not have a service console and as such traditional Linux methods of resetting a password, such as single-user mode do not apply.

While reinstalling is not that long, it requires tedious re-configuration right after. So never forget the root password.. Again, never forget the root password.. But this statement is never fool-proof.

It helps to anticipate, so way before the forgetfulness hits you will need to setup a backdoor to the ESXi host -- passwordless SSH. And here's how to set it up.

First, you'll need to generate SSH keys. It is outlined in our previous article outlined for passwordless SSH. If you already have SSH keys in place, skip this step.

Next, you will need to copy the generated public key to the ESXi host. In order to do that, execute the command below:

cat ~/.ssh/id_rsa.pub | ssh root@[ESXi HOST] 'cat >> /etc/ssh/keys-root/authorized_keys'

Input the root password when prompted.

NOTE: Replace the string [ESXi HOST] with the fully qualified domain name of the ESXi host or its corresponding IP address.

There are other ways to do this as well. To me the above hits the spot in one line.

To verify, try to SSH to the ESXi host and see passwordless SSH do its wonders. If the above fails, make sure that the ESXi host is not in lockdown mode and/or its SSH service is running.

To increase security and protect the ESXi host from that backdoor, disable SSH service and/or put the host in lockdown mode. To turn on the backdoor, use the configuration controls via vSphere Server.

Just note that whenever an ESXi host experiences a configuration reset, the passwordless SSH settings are wiped out. Although this rarely happens, a backdoor needs to be setup again.

Share:

HOW-TO: Create a USB VMware ESXi 5 Installer

Not all servers are created equal -- some have optical drives, some don't have. Given that, there might be times where you will be needing an alternative way of installing operating systems to that server. In the case of a VMware ESXi 5 hypervisor, the installer has a smaller footprint compared to most operating systems but, nevertheless, without any optical drive on the server the only other alternative is to install via USB.

This is not rocket science. USB installers are in fact a bit common nowadays. We have covered several how to's including the install of Windows 7 via USB. Aside from Windows, almost all flavors of Linux can be installed via USB, although the network install of Linux is the most prefered.

To create a USB installer, you will be needing the latest VMware ESXi ISO image from VMware. It needs a registered account to be able to download the ISO file. Register as it will be worth it.

Aside from the ISO file, you will also be needing the UNetbootin application. You may visit its sourceforge project page here. The current version of UNetbootin as of this writing is 5.81.

With the pre-requisites satisfied, launch UNetbootin. Tick on "Diskimage", select "ISO" on the dropdown (this is the default selection), and browse the location of the downloaded VMware ESXi 5 ISO file. You should have a Window similar to this (see below).

UNetbootin Start Window

Double check and ensure that the right USB drive is selected. Hit "OK" and watch UNetbootin build the USB installer.

UNetbootin Building

When UNetbootin installs the Bootloader (STEP#3), you will be asked to overwrite a file -- MENU.C32 -- accept that dialog. This is the only interaction that happens during the build. Everything else is automatic.

Upon completion, simply press "Exit". There is no need to reboot.

UNetbootin Done

The only caveat I have encountered on this build is that the USB drive used was formatted NTFS. This doesn't work so early on, you need to format the USB drive with a FAT32 filesystem. This solved a few headaches for me.

Share:

FAQ: Tame the Time of a Virtual Machine?

"There’s No Such Thing As A Silly Question" -- does the cliche sound familiar? In this part of pimp-my-rig reloaded, technical questions are answered. Mail them to me and I will post the answers here. If you have a better answer, by all means share it with us.

FAQ: The current concept of centralization is being countered by the evolution of virtual machines (VM). Specific functions are decentralized into containers that can be decommissioned just as fast as they were commissioned. However, one can run into problems as the VM seems to have a mind of its own when it comes to time. How then can you tame the VM's concept of time?

Virtual machines are convinient. Given enough resources, VM's for testing purposes can come and go. However, for time sensitive applications the VMs seems to have its own world. And it is important to tame the beast.

For Linux or Solaris x86:

1. Configure ntp client and enable to start automatically on boot.

2. Install vmware-tools on the client and enable to run on boot as well.

3. Still on the client, add clock=pit in the line containing kernel of the grub configuration file (menu.lst). On some distributions, this should be clocksource=pit instead of clock=pit.

4. On the VM server, edit the client vmware config file (SOME_HOST.vmx) on the vmware server. Change "tools.syncTime" value from "FALSE" to "TRUE".

5. Reboot the client after making the above changes.


For Windows:

1. Install vm-tools on the client and enable the service to automatically start. A reboot is required after the install.

2. The vm-tools icon will appear on the system tray of the VM client. Right click on this icon and launch vm-tools.

3. Under the Options tab, tick "Time synchronization between the virtual machine and the host operating system." (see below). Click OK to accept the changes.


The above will keep the VM time in sync with the host OS.
Share:

Subscribe for Latest Update

Popular Posts

Post Labels

100gb (1) acceleration (1) acrobat (1) adblock (1) advanced (1) ahci (1) airdrop (2) aix (14) angry birds (1) article (21) aster (1) audiodg.exe (1) automatic (2) autorun.inf (1) bartpe (1) battery (2) bigboss (1) binance (1) biometrics (1) bitcoin (3) blackberry (1) book (1) boot-repair (2) calendar (1) ccleaner (3) chrome (5) cloud (1) cluster (1) compatibility (3) CPAN (1) crypto (3) cydia (1) data (3) ddos (1) disable (1) discount (1) DLNA (1) dmidecode (1) dns (7) dracut (1) driver (1) error (10) esxi5 (2) excel (1) facebook (1) faq (36) faucet (1) firefox (17) firewall (2) flash (5) free (3) fun (1) gadgets (4) games (1) garmin (5) gmail (3) google (4) google+ (2) gps (5) grub (2) guide (1) hardware (6) how (1) how-to (45) huawei (1) icloud (1) info (4) iphone (7) IPMP (2) IPV6 (1) iscsi (1) jailbreak (1) java (3) kodi (1) linux (28) locate (1) lshw (1) luci (1) mafia wars (1) malware (1) mapsource (1) memory (2) mikrotik (5) missing (1) mods (10) mouse (1) multipath (1) multitasking (1) NAT (1) netapp (1) nouveau (1) nvidia (1) osmc (1) outlook (2) p2v (2) patch (1) performance (19) perl (1) philippines (1) php (1) pimp-my-rig (9) pldthomedsl (1) plugin (1) popcorn hour (10) power shell (1) process (1) proxy (2) pyspark (1) python (13) qos (1) raspberry pi (7) readyboost (2) reboot (2) recall (1) recovery mode (1) registry (2) rename (1) repository (1) rescue mode (1) review (15) right-click (1) RSS (2) s3cmd (1) salary (1) sanity check (1) security (15) sendmail (1) sickgear (3) software (10) solaris (17) squid (3) SSD (3) SSH (9) swap (1) tip (4) tips (42) top list (3) torrent (5) transmission (1) treewalk (2) tunnel (1) tweak (4) tweaks (41) ubuntu (4) udemy (6) unknown device (1) updates (12) upgrade (1) usb (12) utf8 (1) utility (2) V2V (1) virtual machine (4) VirtualBox (1) vmware (14) vsphere (1) wannacry (1) wifi (4) windows (54) winpe (2) xymon (1) yum (1) zombie (1)

RANDOM POSTS