HOW-TO: LAN Configuration of a Mikrotik Virtual Router

In the previous article, we discussed about the configuration of the Mikrotik router, with particular focus on connectivity and protection from unauthorized access. This time, we could start with specific services that it will provide to the local area network (LAN).

Configuring on the LAN side, requires that we prevent locking ourselves out of the router while executing changes. What does this mean? Any change that will potentially disconnect us from the router will be blocked. The router is smart enough to figure this out. In the Mikrotik linggo, the term used to refer to this is "safe mode". The name itself is very intuitive!

To enable safe mode, simultaneously press [CTRL]+[X] on the keyboard. The same set of hotkeys used for "cut" to those familiar with the Windows world. Upon enabling safe mode, the terminal prompt changes with the string ‹SAFE› appended to it. You will see that in the screenshot below.

Mikrotik SSH Safe Mode

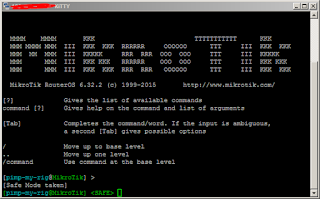
To release safe mode, the same set of keys are used. Similarly, the prompt returns to normal and it shows that safe mode is no longer in effect.

Mikrotik SSH Safe Mode (Toggle)

Without further ado, let us configure the router to be able to perform DNS lookups for our network. This configuration forwards queries to Google's public DNS servers (8.8.8.8 and 8.8.4.4) at the same time caches the queries in the router's memory. Change the DNS servers to your own if Google's DNS servers are not desired.
/ip dns
set allow-remote-requests=yes cache-size=4098KiB servers=8.8.4.4,8.8.8.8

Next, let us prepare the network segments used on the LAN side by defining an IP pool. This will be used for DHCP services later. Let us assume a segment from 192.168.1.0/24.
/ip pool
add name=POOL1 ranges=192.168.1.11-192.168.1.239

Once the pool is defined, let's use that pool for DHCP services. This is done in two-parts. First, define the network segment.
/ip dhcp-server network
add address=192.168.1.0/24 comment=LOCAL_LAN dns-server=192.168.1.1 \
 domain=pimp-my-rig.local gateway=192.168.1.1 \
 ntp-server=NTP_SVR_IP_HERE wins-server=WINS_SVR_IP_HERE

Second, define the DHCP directive.
/ip dhcp-server
add add-arp=yes address-pool=POOL1 authoritative=yes disabled=no \
 interface=ether3 lease-time=1d name=DHCP1

This configuration will not be complete without assigning the LAN gateway IP address to an existing interface on the router. In this case, it is ether3.
/ip address
add address=192.168.1.1/24 comment=LOCAL_LAN interface=ether3 network=192.168.1.0

At this point, the router is able to provide communication between the devices in the local area network. It will be able to support devices that require dynamic host configuration protocol (or DHCP) for automatic configuration of IP addresses. Internet connectivity could not be established since the RFC1918 addresses (to which the 192.168.0.0/16 network belongs) are non-routable on the internet. What needs to happen is network address translation (or NAT). And the Mikrotik router is just as able to perform this task. We will discuss that in the next article.

RELATED: Initial Configuration of a Mikrotik Virtual Router

For now the router is able to provide network connectivity to hosts within the LAN. It could provide DHCP addresses and cache DNS queries. Please note that all capitalized configuration keywords (e.g. POOL1, DHCP1 and LOCAL_LAN) can be replaced with your own naming convention(s).

Share:

ERROR: s3cmd ([Errno 104] Connection reset by peer) Workaround

I use AWS S3 to backup files automatically on my Raspberry PI (let's call it RPI, from here). My RPI does some automation for me on my home network. It has been very sucessful at doing syncs and automated downloads as well backups. The usual target for backups is my NAS but I need to backup the scripts and configuration files as well. When the micro-SD card on the RPI failed, I was grateful that the efforts I initially put in paid off.

If you recall, one of the automated systems I have on my home network is a PVR named sickgear. I was covered on the configuration of its files but I missed its database. Too late for that now, but not entirely too late to solve it.

To remediate, I used a script that called s3cmd (from s3cmd package) on the RPI. The script is a bit simple to implement and the logic is to "touch" an empty file everyime I run the backup job. If the database file is newer than the empty file, then execute the backup.

When I tested the script, I was in for a surprise. The s3cmd implementation on RPI was not working and the error is a mix between:
WARNING: Upload failed: /sickbeard.db ([Errno 104] Connection reset by peer)
WARNING: Retrying on lower speed (throttle=0.0x)
WARNING: Waiting..
 --- OR ---
WARNING: Upload failed: /sickbeard.db ([Errno 32] Broken pipe)
WARNING: Retrying on lower speed (throttle=0.0x)
WARNING: Waiting..

[Errno 104] Connection reset by peer

The error is quite long and eventually fails. It seems to work for small files, but fails as the uploaded files increase in size. The workaround suggested on several forums is to ditch s3cmd and replace it with AWSCLI. Several folks have confirmed that it worked. But I'm not quite inclined to develop several scripts for the workaround. So I continued my experimentation still using s3cmd.

The workaround I discovered was a very simple one. I just replaced the "put" with "sync". For more information on the differences between the two, it is is explained in the s3tools webpage. That is just what I needed.

s3cmd sync successful

As you can see from the above screenshot, the same file uploaded to AWS S3 bucket takes a few seconds to completely upload. No more errors.

RELATED: Install Adblock on Raspberry Pi via Pi-Hole

I hope this workaround helps you as well.

Share:

HOW-TO: Initial Configuration of a Mikrotik Virtual Router

This year, I shifted technology specialization away from the infrastructure profession to data science, with more particular focus on data cleansing, mining, and archiving and warehousing. And necessities sometimes require application of my infrastructure background and experience. This is what I like about my new assignment -- never a boring day. Had the chance to work on selection of virtual routers, to which I ended up shortlisting two of them, namely, VyOS and Mikrotik.

Eventually, the pick ended up Mikrotik. And will be posting several notes on my adventure with Mikrotik Virtual Router. For all intents and purposes, this post pertains to VMware setup on x86 architecture. For now let us cover the initial setup.

After downloading the ISO from the Mikrotik website (obtain a license as well), prepare the virtual machine. On mine, I set it up with 2 vCPUs, 512MB of memory and 1GB of disk space. Remove other hardware from the initial configuration (e.g. Floppy Drive, USB ports, etc) that a network router will not have. The setup is pretty straight forward, so let's skip that part and assume it went well.

While on the Mikrotik website, download their utility application called "winbox". This will come in very handy to configure the router.

Other tutorials suggest to rename the network interfaces to WAN and LAN; others, ether1-gateway and ether2-local. On mine, I left them as is. So you don't get confused on my setup, ether1 is facing the ISP (my primary WAN link), ether2 is facing the backup WAN, and ether3 is facing my local area network. Please note that all my network interfaces use the vmxnet3 virtual network cards. You may add as many NICs as you need, but for me this is enough for my requirement.

Your ISP will probably give you both a /30 and /29 IP block. You will need that information. I cannot provide the particulars of my address blocks so for all intents and purposes, let us assume that to be 1.1.1.1/30. To make things easier to interpret, you may plug that information in an IP calculator to obtain more details that need to be added to the router configuration.

IPCALC IP Calculator

Assign that /30 IP address on the Mikrotik router. This is could be done a couple of ways.. First the winbox (GUI) way, IP » Addresses and put the IP address information and set it on interface ether1. Via CLI (terminal on winbox, or telnet, or SSH), /ip address add address=1.1.1.2/30 network=1.1.1.0 comment=WAN-PRI interface=ether1. The router will be reachable at its default address of 192.168.88.1/24 (username is "admin" without a password). Note that 1.1.1.2/30 (address) and 1.1.1.0 (network) were taken from the IP calculator, as seen above.

Next, secure and protect the router from external access by putting a password, turning off unnecessary services and putting firewall rules.

For my setup, I provided a password for admin then limited its access to the console. I created another password-protected username with full admin access but unlike admin its limits allow access from the LAN.
/user set admin password=PASSWORD address=127.0.0.1/32
/user add name=pimp-my-rig password=PASSWORD group=full address=192.168.0.0/16

After setting the admin password, you may choose to disable it. And use another administrative account in its place. Simply append the string "disabled=yes" to the line containing admin. This makes it harder for external hacks to your router especially since it is the router facing your ISP.

Unwanted Services. Access to the router is open by default. It needs lockdown to be secure. I also disabled services that I no longer need. You will see those below with the "disabled=yes" string appended.
/ip service
set telnet address=192.168.0.0/16 disabled=yes
set ftp address=192.168.0.0/16 disabled=yes
set www address=192.168.0.0/16 disabled=yes
set ssh address=192.168.0.0/16
set www-ssl address=192.168.0.0/16 disabled=yes
set api address=192.168.0.0/16 disabled=yes
set winbox address=192.168.0.0/16
set api-ssl address=192.168.0.0/16 disabled=yes

Execute a "print" to check the current configuration. You should see something similar.

Mikrotik Router Default Services

Firewall. Extend the protection to the built-in firewall. The rules I used are below.
/ip firewall filter
add chain=input action=tarpit protocol=tcp in-interface=!ether3 \
 comment="TARPIT connections not coming from LAN (ETH3)"
add chain=input action=drop in-interface=!ether3 \
 comment="DROP other traffic not comming from LAN (ETH3)"

Execute a "print" to check the current configuration. You should see something similar.

Mikrotik Router Initial Firewall

Rules are interpreted from top to bottom and the lesser rules there are the faster the router performs. Not to mention lesser resources are consumed. This should be pretty much lockdown the router while it allows configurations and customizations from the console or terminal sessions from the LAN interface. I will post configuration on the LAN side and services like DNS, DHCP, web-proxy and NTP in succeeding articles.

You may also opt to drop external traffic rather than tarpit. For more information regarding the action tarpit, refer to this excellent explanation from Wikipedia.

RELATED: Install Adblock on Raspberry Pi via Pi-Hole

I am a CLI guy so I did my configuration mostly on the command line. Hope this helps you in getting your router up and running.

Share:

HOW-TO: Protect Yourself Against Malicious Autorun.INF Code

Laziness has its price.. One brain-child of what I consider laziness is autorun.inf. I call it a vulnerability rather than a feature. This is just my two-cents. The rationale behind this line of reasoning is that, viruses and malicious software take advantage of this so-called feature to install and infect your machine before you are aware it hit you. The actual payload installed varies from viruses to trojans, and likewise the damage it could inflict varies.

The most common mode by which malicious code propagates is by USB flash drives (others call them thumb drives or external storage device). They all mean the same thing. Before viruses, trojans and other malicious software lurking in these devices hit you, do something about it. Protect yourself! Autorun.INF is an inherent security hole that needs to be plugged. And the way circumvent this vulnerability is a simple task to do.

Just so you get an idea what AUTORUN.INF functionality is, whenever you plug an external storage and an application Window automatically opens that is AUTORUN.INF at work. Below is an example of what it looks like. Only that in cases of malicious code, this application Window might or might not be visible.

AUTORUN.INF

The solution to this problem is a registry hack. So before you proceed, ensure you have a backup of your machine. This hack works for me and am confident it works but I will not be held liable for consequences that may arise when you execute this procedure on your machine.

As "Administrator", open the registry editor and go to this key: HKLM > SOFTWARE > Microsoft > Windows NT > CurrentVersion > IniFileMapping > Autorun.INF. The "Autorun.INF" key does not exist by default, so you have to create it. Change the "(Default)" value to @SYS:XXXXXXX.

IniFileMapping

This simply means instead of looking for Autorun.INF (case-insensitive) on plugged external storage devices, it will look for the string you substituted on after the colon. Now, that is quite difficult to guess than "Autorun.INF".

RELATED: Automatically Disable WIFI on LAN Connectivity

Making your computer a less vulnerable to malicious code will give you confidence in plugging an external storage device from a colleague for whatever purposes you deem necessary.

Share:

ERROR: A Required Device Driver is Missing on Windows 7 Install

I could say I'm too familiar with computers to confidently install just about any modern Windows or Linux operating system from USB or boot from USB for that matter.. However, a recent experience with a Windows 7 install, made me hit a brick wall and the experience was one that made it a little more memorable.

I do installs from USB this since not all modern servers and notebooks have internal optical drives. And bringing an optical drive as standard toolkit is too much hassle. Creating your very own USB Windows 7 installer has been posted in this blog before. And in this case, I have used the same installer in the past few years without hitch. It is only now that I have encountered an error trying to install on a friend's notebook.

To give you a better idea of what the error screen looks like, I took a snapshot of the screen with my phone. It is shown below:

A Required Device Driver is Missing

A required CD/DVD device driver is missing. If you have a driver floppy disk, CD, DVD, or USB flash drive, please insert it now.


The weird thing is that no matter what I do after this error, it will not allow me to proceed with the install (the "Next" button is greyed out). So I did the best solution for Windows -- REBOOT! Nada, same result. Out of sheer curiosity, I moved the installer to another USB port. This time the installation proceeded without the same error. And this really puzzled me. So post-installation, I did my research.

The error message is misleading and it will throw you off in the wrong direction. As it turns out, on the initial installation attempts wherein I failed, the installer was plugged to a USB 3.0 port.. to which the Windows 7 installer had no native drivers. This is the reason for the installation module asking for a driver that it did not have.

To successfully proceed with the install, the USB flash drive containing the installer needs to be plugged into a "legacy" USB 2.0 port that Windows 7 has native drivers for. If ever you encounter a similar problem, simply seek information from the hardware manual and locate the legacy USB ports and install from there.

RELATED: Build an Ultimate Boot USB

The solution was as simple as that.. But it is just as easy to miss it. Too much familiarity with the task often has its price.

Share:

HOW-TO: Locate VMware ESXi Hosts in Your Infrastucture

There are times when you have to operate within the constraints of the environment in which you operate in -- like when you have a workstation that requires multiple operating systems (as well as multiple applications) and all that's available to you for network configuration is dynamic host configuration protocol (or DHCP).

This becomes even more complicated if the operating system installed on your workstation is a hypervisor, like VMware ESXi. Locating your host in the network segment can become a challenge. Especially when there are scheduled maintenance work that requires your workstation to be shutdown or when you leave the office on a weekend only to return the following week facing a host that is assigned a different IP. In case you are wondering, I don't have control over the DHCP server to reserve an IP address.

Given that constraint, I have to adapt and discover some things to make my life easier, accept the challenge and work around it. Fortunately, I'm not alone in this boat. Others have faced similar issues and have developed tools to specifically address this.

For this particular issue, the appropriate software is called "VMware Scanner". And it functions just like typical IP Scanners.

VMware Scanner Initial Screen

Simply input the range of IP Addresses to scan and let the application work for you. The application is very quick in locating ESXi hosts.

VMware Scanner Result

RELATED: Create a USB VMware ESXi 5.X Installer

Working within your constraints is necessary sometimes. This is where adaptability and resourcefulness come into play.

Hope this tip helps you face the same dilemma I was in.

Share:

ERROR: Could not setup macAddress for ethernet0


I encountered the above error after performing a V2V procedure on Teradata Aster Queen.. I was also going to do the same for the Teradata Aster Worker, next. But I got stuck on this error and could not power on the Queen virtual machine. If you're wondering if I had tested them on the VMware Player first, yes I did.

Further reading on VMware documentation revealed that they introduced new policies for static MAC addresses to start only with the prefix 00:50:56:xx:xx:xx. Not so convinient. I have previously tried using automatically generated MAC addresses but the Aster Express cluster would not activate. So this time, I have tried using static ones. Not really sure if this was the cause, but I'm pretty sure it is one of the differences between the original virtual machines and the converted ones.

To get a better sense of what the error looks like, I preserved a screenshot for you.

Power On Error

If you can't see the image, the verbatim "Error Stack" is:

Failed to start the virtual machine.
Module DevicePowerOn power on failed.
Could not setup "macAddress" for ethernet0.
Invalid MAC Address specified.
00:0c:29:9d:7f:5d is not an allowed static Ethernet address. It conflicts with VMware reserved MACs.


The limitation (or change in policy) introduced in ESXi V5.5 has its advantages but if you are stuck with the above error, it ain't pretty. However, there is a workaround should you require the old behavior back.

First, turn on the SSH service on the ESXi host.. Then connect to it. Next, locate the data store where the virtual machine is stored and look for the .vmx file.

Edit this file and add the line:

ethernet0.checkMACAddress = "false"


It would be prudent to make a copy of the file for backup purposes prior to making any change, just in case. This is applying best practice and instilling the discipline.

After making the necessary change to the .vmx file, power on the virtual machine. It should proceed to boot without hitch. Do the same for the Aster worker machine.

Activate Success

RELATED: P2V (Physical to Virtual) Prep Work for Ubuntu

I was able to activate the Aster Express cluster after performing these steps. Not really sure if the preserved MAC addresses resolved my activation issues, but I'm pretty happy to be able to perform analytics on the cluster. I hope it helps you as well.

Share:

HOW-TO: Install Adblock on Raspberry Pi via Pi-Hole

Bandwidth is a precious resource in this digital age.. This might not be the case for everyone but in the Philippines where the cost of being connected is still through the roof, this statement is still true. Couple this with the fact that people want to be connected and online, and the mix gets a bit complicated.

Studies have shown that bandwidth (or network traffic) can be minimized by using adblock technology. Thus this resource could be better utilized by more important or more significant information to be consumed by the end user, not ads. A research has shown this to be by a factor of 25% to 40% (click here for reference). That is HUGE!

With that study and its statistics, it figures that one should be minimizing network traffic or find means and ways to reduce the non-significant content -- in the form of ads. One way to do this is with the use of Raspberry Pi (R-Pi). This is in fact a very cheap way to implement adblock, and you will see it is very simple to do.

This article aims to outline installation instructions over a popular R-Pi operating system OSMC. The installation procedure for OSMC has been discussed in the previous post. There has been a series of posts involving the use of Raspberry Pi in this site.

Prior to installing Pi-Hole, it would be good to browse its documentation and have a better understanding of how it does the adblock. Click here to go there.

The installation procedure itself is pretty simple and as automated as you want it to be. Just launch a PuTTY session to the R-Pi and run the command on the banner of the Pi-Hole website -- curl -L https://install.pi-hole.net | bash (or copy-n-paste this command).

Pi-Hole Install

It is as simple as it could get. Now the only thing that needs to be done is to configure the router to assign the R-Pi as the primary DNS server when it hands out DHCP IP addresses.

Related: Setup Caching DNS Server using TreeWalk

Once in a while, you may want to tickle your curiosity and find out how much traffic is blocked by Pi-Hole and you just open a browser and browse the admin console of Pi-Hole. It should be something like "http://RASPBERRY_PI_IP_ADDRESS/admin/".

Pi-Hole Statistics

On mine, it looks like this.. This statistic is after about less than an hour of having it installed. Do you have Pi-Hole installed? Share your story in the comments.

Share:

HOW-TO: Automated TV Series Downloads Using Raspberry-PI

If you have not read the previous guides in this series, now is the time to read them first -- Install KODI to Your Raspberry Pi and Install a PVR (SickGear) on Raspberry Pi. This pieces together bits and pieces of software that when configured correctly provides very powerful automation for repetitive tasks. If you are the type who likes to "set it and forget it" then this is for you.. And if not, it is not too late to leverage this technology.

DISCLAIMER: This post does not in any way intend to promote piracy. Instead, it intends to demonstrate the power of automation implemented in cheap hardware. At the same time it demonstrates the potential of the Raspberry-PI equipped with the right operating system, software and a little knowledge of Linux. Before proceeding, it pays to know the statutes, legalities and limitations as allowed by your local laws.

To start with, a lightweight torrent client is already installed together with OSMC. All that is needed to be done is configure it properly and start the service. One particular configuration that is of interest for automation purposes is the "blackhole directory" and its related context. This was initially discussed in Transmission BlackHole Directory post.

The only difference in the above post is the location of the configuration file. On OSMC, it is located in the home directory of the user "osmc". If you are logged in via remote SSH, change directory to "/home/osmc/.config/transmission-daemon/settings.json".

The following lines should be modified, if present, or added:
"watch-dir": "/media/USBDRV/.blackhole",
"watch-dir-enabled": true,
"download-dir": "/media/USBDRV/downloaded"

Note that "USBDRV" needs to be the name of the USB drive plugged to the Raspberry-PI; ".blackhole" is set as the blackhole directory of transmission; and likewise, "downloaded" is where the downloaded files are saved. These names are arbitrary and could be changed depending on how you want to name it.

As an option, the following lines could be added:
"incomple-dir": "/media/USBDRV/.incomplete",
"incomple-dir-enabled": true

The above addition means, while the torrent is being downloaded, the files will be saved in the incomple-dir. When the torrent is done downloading, the files will be moved to the download-dir configured. Take note of the settings above as they are important to SickGear configuration later.

Speaking of SickGear, open a browser and browse this URL: "http://RASPBERY-PI_IPADDRESS:8081/". Go to Gears -> Search Settings.. and under "Torrent Search" tab, tick "Search Torrents" and set the "BlackHole folder location" to the "watch-dir" setting above.

Search Settings | Torrent Search

What this does is when SickGear finds a torrent of interest from the internet, it will save it to the transmission blackhole directory. Transmission periodically scans this directory for .torrent files and loads it automatically for downloading.

Next, configure SickGear for automatic post-processing of downloaded files. Under "Post-Processing", set the "TV Download Dir" to the same setting as "download-dir" of transmission.

Post-Processing

SickGear periodically scans (and processes) files in this directory. And as you have probably guessed, SickGear will rename the files in this directory, index it, and copy/move it to the multimedia directory of your choosing. It could notify KODI of the presence of new episodes of your favorite TV series as well. And if you are into social media, a twitter account could be set to make SickGear automatically post updates of successful snatches and downloads.

RELATED: Queuing with Transmission BitTorrent Client

All you need to do is "Add Shows" to SickGear to complete the configuration and make it search for your favorite TV series from the internet.

Share:

HOW-TO: Install a PVR (SickGear) on Raspberry Pi

In the previous guide, we successfully installed OSMC on the Raspberry Pi. This is a very straight forward procedure to install a working operating system and media center. Adding more functionality to the Raspberry Pi is more complex than the initial operating system install.

OSMC works out of the box. Its wired network is set to DHCP from the previous steps we executed (if you ticked "configure network manually", this would not be the case). This allows the Raspberry Pi to be remotely configured, and even connect to the internet. However, this guide will require some knowledge of Linux and its filesystems.

Let's connect via SSH to the Raspberry Pi. If you dont have an SSH client, download PuTTY or any of its derivatives. The default username and password is: "osmc" and "osmc" respectively. Once a successful connection is made, you will have a screen similar to below.

Putty to OSMC

First thing to do is update the apt repository. This is done using the "apt-get update" command. WARNING: this command and others that follow, will fail if the OSMC has no internet connectivity.

apt-get update

I placed the bare command on the screenshot above to demonstrate that using it without "sudo" will result in permission errors. See the successful command execute when prefixed with a "sudo".

Next, install git. On the same terminal, execute "sudo apt-get install git".

install git
Having git, the command above will upgrade the version already installed. Otherwise, it will simply install.

Change directory to /opt (RUN: "cd /opt"). Then, use git to fetch the PVR files from the internet. Execute "git clone https://github.com/SickGear/SickGear.git sickgear".

git clone

Change the owner of the sickgear directory and its contents to user osmc, and group osmc (RUN: "chmod -R osmc:osmc sickgear"). This is important for the application not to run as the root user, but as another less-privileged user.

To finalize the configuration, create the file "/etc/default/sickgear". Add the following lines:
# COPY THIS FILE TO /etc/default/sickgear
SG_HOME=/opt/sickgear
SG_DATA=/opt/sickgear
SG_USER=osmc
SG_GROUP=osmc

To make the application automatically start on boot, [1] copy the file "/opt/sickgear/init-scripts/init.ubuntu" as "/etc/init.d/sickgear"; and [2] execute "sudo update-rc.d defaults sickgear".

Start sickgear with "sudo systemctl start sickgear". If there are no issues, sickgear should start. Should there be issues in starting, logs are located in the directory /opt/sickgear/Logs. Another way to view issues is "sudo journalctl -xn". The output will contain clue(s) as to why it did not start normally.

Related: Migrate Sickbeard to its Bricky Fork

Sickgear can automatically download, index and catalog files for your viewing pleasure. In the next article, we will tackle the configuration, and more advanced configuration of sickgear handshaking with transmission for automating downloads and post-processing of those downloaded files.

Share:

HOW-TO: Install KODI to Your Raspberry Pi

First, let me thank the generosity of those who appreciated the pimp-my-rig posts and bought me coffee. I am humbled by your kindness. If you, likewise, appreciate the articles posted in this site and want to do the same, please hit the buy me coffee link at the right.

The advent of Raspberry Pi as a small (tiny even) affordable computing platform for programming use has started a revolution even better than simply having a sandbox for programming. It has transformed to multiple use -- beginning with embedded systems, and expanded to lightweight Linux installs and more.

Raspberry Pi could serve as a media center as well -- KODI. KODI is the media center software that runs on OSMC which stands for Open Source Media Center. Often times, these names are interchanged.

If you bought a Raspberry Pi for this exact purpose and don't know how to go about with the installation steps, follow along as I will guide you on how this is done. For all intents and purposes, this guide will be based on a Windows platform to install the image to the SD card.

First, download all the necessary software and binaries. The OSMC Installer (download here) is in the link, as well as the OSMC images for public release. The OSMC Installer for Windows, Linux and MAC OS are available for download as appropriate to your own operating system. This installer is also able to download the latest version of OSMC, including the older versions previously released. I prefer to install using a downloaded image (faster in case you need to re-install).

Next, plug the SD card to the computer's USB port and allow the computer to load the appropriate drivers for it. Once that is done, run the "OSMC Installer" downloaded earlier.

Select "English" (or the applicable language wherever you're at). Select the hardware version of Raspberry Pi you have. Most likely this will be either a Raspberry Pi 2 or a Raspberry Pi 3. You will then have a similar screenshot as shown below.

OSMC Installer

Hit the triangle to proceed to the next screen. And either select a version from the dropdown, or use a locally downloaded image.

Choose OSMC Version

Hit the upper triangle to proceed.. Select "SD card" (default).

Select Media Device

Hit the upper triangle to proceed.. Select "Wired connection" (default).

Network Configuration

Hit the upper triangle again.. And select the proper SD or device. If there are multiple devices available, select the appropriate one or unplug the others. Otherwise, the data contained in the other devices will be lost if the wrong device is selected.

Select Install Drive

Then, accept the license agreement and wait for the image to be written to the SD card. After this is done, transfer the SD card to the Raspberry Pi and boot it. During first boot, OSMC will install itself on the SD card, reboot and you have a working OSMC with KODI media center.

Related: Create a USB VMware ESXi Installer

On the next article, I will outline how to install a PVR software on your KODI media center. Stay tuned.

Share:

HOW-TO: Remove "PLDTHOMEDSL" SSID From Router

If you are the kind of person who wants total control over devices you own, we share something in common. One of the things I noticed about PLDT's new router is that they have somehow locked the SSID prefix to "PLDTHOMEDSL" and they leave you to figure out the rest of the strings that follow.

I don't appreciate what they did with that.. Aside from not having control over the SSID, it opens up security holes in your wireless network. Why? It is because persons who scan the wireless network know that you have a PLDT router without having to take a second guess. And yes, there are vulnerabilities to the router that make it easy for outsiders to connect and break security protocols in place. I won't go into details, but I know for certain that there is and I guarantee that.

Just so you have an idea what I'm talking about, on the configuration interface of your router this is what it looks like (see screenshot below).

PLDTHOMEDSL Locked SSID

So why not rename the SSID instead? They locked the interface for you to be able to do it. But this post is here to discuss the workaround to it.

On the same web configuration interface, go to "Maintenance", and save (or "Backup") the current configuration to a file. For all intents and purposes, lets save this file to the Desktop (it will be named "config.img" by default).

Backup Settings to File

Open the config.img file with your favorite text editor. Look for the line that contains the string "WLAN_ROOT_SSID". On my editor it is on line #27 of the file.

WLAN_ROOT_SSID

Change the string between quotes to the SSID of your choosing. Save the file.

Related: Network Profiler and Analyzer

Head back to the web configuration interface and "Load Settings from File". Give it the config.img file that was just modified and hit "Upload". The router will then reboot to reflect the new settings.

Once the router reboots, its SSID will now be the new SSID you assigned. Be careful as any change you make to the configuration resets it back to "PLDTHOMEDSL" and you will have to redo this procedure.

Hope this helps.

Share:

TWEAK: Turbo-Charge Microsoft Excel

Yes, you are reading it right -- turbo-charge Microsoft Excel.

Please indulge me for a moment before judging the above statement.. I have been exposed to Microsoft Excel especially its PowerQuery and PowerPivot functionality in the past several weeks due to requirements of the new job. And one thing I noted is that both Excel 2013 and Excel 2016 are awful -- they take a while to load. Even with the operating system residing on the SSD drive (and where Microsoft Office is installed), doesn't make much of a difference.

This observation is definitely not hardware bottle-necked, as the enthusiast in me had examined the hardware aspect of things. The company I'm working for did not skimp on hardware as I was issued a work computer with a powerful Intel i7-5600U processor with adequate memory to boot.

CPU-Z i7-5600U

Don't get me wrong. Both PowerQuery and PowerPivot are excellent Excel features, not to mention the Data Model engine that these newer versions have. Those I have been using quite extensively for analytics and reports.

So I phoned a friend in order to ask what I could do to tweak Excel to perform better. The answer I got almost pushed me off my chair. It was to disable hardware graphics acceleration. Seriously??

As proof of concept, if you have Excel launch the application, then File -> Options -> Advanced and scroll a little bit down to "Display". Tick "Disable Hardware Graphics Acceleration".

Disable HW Graphics Acceleration

The above screen looks similar on both Excel 2013 and Excel 2016.

If you're not convinced, try loading megabyte-sized files with and without the tweak. It makes a lot of difference in loading times. Hardware acceleration translates to better performance. But in Excel linggo, surprisingly, it is quite the opposite.

Share:

HOW-TO: Automatically Disable WIFI on LAN Connectivity

Wifi networks are just about everywhere. In this digital age, being offline is tantamount to living in the stone age. Little do people know, the abundance of Wifi signals in the environment causes a lot of headaches. The signals coming from both the devices and the Wifi infrastructure cause a lot of unseen interference. Leaving devices with inherent wireless connectivity online, while unused, contributes to that phenomenon. As the interference increases, performance worsens.

If you ask me, I prefer to be connected wired rather than wireless. Wired connectivity is stable, and if you really want performance -- it is way faster. Imagine comparing the fastest wireless (Wireless N), at 300MBps with the fastest wired (Gigabit Ethernet) at 1GBps. Enterprise wired networks could go as fast as 10GBps. Not to mention, the 300MBps wireless speed varies over distance and the density of connected devices on the wireless infrastructure.

One such device is your average notebook. It has both wifi and wired connectivity. I previously wrote about putting preference of Wired connectivity over Wifi, if both are available. Now, I'd like to write about automatically shutting down the wireless interface when the wired interface is connected. It is also possible to automate the enabling of the wireless interface once the LAN is disconnected.

As I am still on Windows 7, the screenshots are based on the Windows 7 interface but the procedure is applicable to modern variants of Windows. Let's dive into the nitty gritty details.

Open the native Windows "Event Viewer" and browse to Windows Logs --> System. Create events of the LAN interface connecting and disconnecting by physically connecting and disconnecting the LAN cable. Pressing "Refresh" on the right panel will show the recent events. On my notebook, the EventIDs are #33 and #27 for connections and disconnections, respectively.

Highlight an EventID #33 and select "Attach Task To This Event.." (as seen on the screenshot below).

System Event Logs

Put an appropriate name to the Task. Description is optional, but put one in anyway. Next..

Create Basic Task

Nothing to do in the next Window as everything is greyed out.. Next..

Just Hit Next..

Accept the default action of "Start a program". Next..

Start a program

The program to start is "C:\Windows\system32\netsh.exe". For the arguments, add:
interface set interface "Wireless Network Connection" disable

NETSH.EXE

Hit Next.. and Finish.

Hit Finish

Run this task as "NTAUTHORITY\SYSTEM" and tick "Run with highest privileges".

Modify Settings

Do the same exact procedure for EventID #27, but this time it will automate the enabling of the wifi adapter. Change the netsh.exe arguments to:
interface set interface "Wireless Network Connection" enable

I have done this tweak successfully on an older Lenovo T420, a Lenovo X240, a Dell D620 and an Elitebook 820. All I watched for were EventID #33 and EventID #27 on the System Event Logs. Yours may be different. The events for docking the notebooks differ by models. Those could be added as triggers.


Share:

Subscribe for Latest Update

Popular Posts

Post Labels

100gb (1) acceleration (1) acrobat (1) adblock (1) advanced (1) ahci (1) airdrop (2) aix (14) angry birds (1) article (21) aster (1) audiodg.exe (1) automatic (2) autorun.inf (1) bartpe (1) battery (2) bigboss (1) binance (1) biometrics (1) bitcoin (3) blackberry (1) book (1) boot-repair (2) calendar (1) ccleaner (3) chrome (5) cloud (1) cluster (1) compatibility (3) CPAN (1) crypto (3) cydia (1) data (3) ddos (1) disable (1) discount (1) DLNA (1) dmidecode (1) dns (7) dracut (1) driver (1) error (10) esxi5 (2) excel (1) facebook (1) faq (36) faucet (1) firefox (17) firewall (2) flash (5) free (3) fun (1) gadgets (4) games (1) garmin (5) gmail (3) google (4) google+ (2) gps (5) grub (2) guide (1) hardware (6) how (1) how-to (45) huawei (1) icloud (1) info (4) iphone (7) IPMP (2) IPV6 (1) iscsi (1) jailbreak (1) java (3) kodi (1) linux (28) locate (1) lshw (1) luci (1) mafia wars (1) malware (1) mapsource (1) memory (2) mikrotik (5) missing (1) mods (10) mouse (1) multipath (1) multitasking (1) NAT (1) netapp (1) nouveau (1) nvidia (1) osmc (1) outlook (2) p2v (2) patch (1) performance (19) perl (1) philippines (1) php (1) pimp-my-rig (9) pldthomedsl (1) plugin (1) popcorn hour (10) power shell (1) process (1) proxy (2) pyspark (1) python (13) qos (1) raspberry pi (7) readyboost (2) reboot (2) recall (1) recovery mode (1) registry (2) rename (1) repository (1) rescue mode (1) review (15) right-click (1) RSS (2) s3cmd (1) salary (1) sanity check (1) security (15) sendmail (1) sickgear (3) software (10) solaris (17) squid (3) SSD (3) SSH (9) swap (1) tip (4) tips (42) top list (3) torrent (5) transmission (1) treewalk (2) tunnel (1) tweak (4) tweaks (41) ubuntu (4) udemy (6) unknown device (1) updates (12) upgrade (1) usb (12) utf8 (1) utility (2) V2V (1) virtual machine (4) VirtualBox (1) vmware (14) vsphere (1) wannacry (1) wifi (4) windows (54) winpe (2) xymon (1) yum (1) zombie (1)

Blog Archives

RANDOM POSTS