Showing posts with label how-to. Show all posts

HOW-TO: TaiG JailBreak for iOS 8.1.1

It's been a couple of months back since Apple released iOS8. I have not made the transition to it and stayed with iOS7 since my iPhone4S is rooted. I'd like to term a successful jailbreak as rooted -- simpler and easier to say (there is just a nicer ring to it). I just like the functionality of a "rooted" phone and the availability of Control Center button customizations that are only available from a "rooted" phone.

Last time I did this was way back to the early 2014 and used the evasi0n utility. This time TaiG is the utility that is able to jailbreak iOS8, particularly the iOS8.1.1 version.

The TaiG jailbreak utility requires the "Find My iPhone" feature to be turned off first. And although optional, turn off the passcode security feature of the phone (turn it back on once jailbreak is a success).

Plug the phone via USB and launch the TaiG utility executable. You may uncheck the 3K option if you wish, then hit the big green button on the screen. My initial attempt at this hit a snag -- Error -1004 -- which according to the TaiG website is an issue with the computer running the jailbreak.

TaiG JailBreak Utility

This really doesn't have anything to do with the computer running the utility. I tried two (2) things that "might" have resolved the issue for me. [1] I moved the USB cable to a USB3 port; and, [2] I turned off the passcode. I'm not exactly sure which solved it for me but either way I got the jailbreak that I need. Please note that I mentioned *might* and your mileage may vary.

Once successful, the device will restart twice. The first is mid-way through the spinning green circle at about 43% and the last when the injection is installed. You will then see the Cydia button on the second screen of the device signifying success.

iPhone 4S Rooted

As seen from the screenshot, my iPhone is running iOS8.1.1 and Cydia 1.1.16 is installed. It's way past midnight by the time I was done. But the TaiG utility got me the jailbreak I needed.


Share:

HOW-TO: Execute the evasi0n iOS7 Jailbreak

The long awaited jailbreak for iOS7 is out. If you have held back from upgrades due to the missing ability to jailbreak, then you'd probably jump the gun and download the jailbreak. Just to warn iPhone5 users out there, if you own a 64-bit phone (iPhone 5s and iPhone 5c) the current release of the evasi0n7 jailbreak will not work. You just have to wait a bit more for the 64-bit mobile substrate to be available then execute the jailbreak.

First of all, you need to download a copy of the evasi0n7 jailbreak. And, if you don't have a recent backup of your phone, hook it up to iTunes and do a backup. Be aware as this is more mandatory than optional. But if you want to risk it, you may proceed without one. It's your phone afterall.

If you are restoring to iOS7 from iOS6 or even iOS5, the backup is required. It will wipe your phone!

For me, I upgraded to iOS 7.0.4 from iOS 5.1.1. This was Apple closing its doors to any restores to iOS6 when they released iOS7. But it's not too late. I have an iPhone4S so this 32-bit phone was safe to "hack" using evasi0n7 jailbreak. I used the v1.0.2 from their website to jailbreak my iPhone4S.

Having the requirements above, upgrade to iOS 7.0.4 via iTunes. Jailbreak on "over the air upgrades" have been reported to fail so I didn't want to experience what others already did.

(I'm assuming that since you we're able to upgrade to iOS 7.0.4 -- like I did -- that you have an internet connection. The evasi0n7 jailbreak needs to connect to the internet to download some binaries.)

Once iOS7 is installed on the device, fireup the evasi0n7 jailbreak executable and follow the on-screen instructions. It will look similar to this:

Uploading Jailbreak Data

Uploading evasi0n App

The device will reboot three times -- first to inject the jailbreak, next after executing the evasi0n7 application and lastly after Cydia upacks.

Rebooting Device

All these take less than 30minutes to execute.

Lastly, restore your phone's latest backup after the jailbreak. Enjoy.

Share:

HOW-TO: Sync Calendar to iPhone (without iTunes)

Let's face it, many of you can't have iTunes installed on your work computers -- even to the point where the act of installing it will cost you your job. Some don't like them in their home computer, simply because it is one big piece of bloat. I share the same sentiment. The software often comes with added software that run together with it.

I have setup a virtual machine for iTunes purposes. That way if I need it to run, I just fire up the virtual box and use the software's function. This way it doesn't introduce vulnerabilities to my system. But that may be cumbersome to some. So how do you sync your calendar to your phone? Or sync the phone entirely to your machine without iTunes?

One of the ways to do this is via iCloud. iCloud can sync all of the contents of your iPhone or you could simply select particular data to sync. Download from the iCloud webpage.

Upon completion of the download, launch the software. It will ask for you to login. Use your apple ID credentials.

iCloud Sign In

Next, tick on the data you need to sync. For me, I only sync my calendar to the iPhone. So I simply tick "Calendars & Tasks with Outlook". This option uses the iCloud storage of your apple ID, so you can also track its usage from the iCloud interface.

Select Information to Sync

On your phone, make sure that the iCloud calendar is checked or selected. When you see a corresponding check mark next to the iCloud calendar, you should be all set. After a while you should be seeing calendar entries getting pushed to your iPhone. If you have set other iDevices you own to sync with iCloud, the calendar entries from Outlook will sync to those devices as well.

The downside to this? You lose the ability to sync the phone to your computer since it is now using iCloud for backup.

Share:

HOW-TO: Setup ISC Bind9 for Windows

On our guide to setting up a caching name server via Treewalk, it outlined the procedure to follow in configuring the Treewalk (a fork of bind) on Windows. However, the download link for Treewalk is no longer available and as it seems, development for it has stopped altogether.

You should look no further than bind itself, not its fork. ISC bind is still being actively developed and bugfixes are still being published for it. What deters users from using bind is it is a bit tricky to setup while treewalk is a simple install and run. So let's try to configure and install ISC bind.

First, download the Windows binaries of bind. As of this writing, the current production version is 9.9.1-P2. A zip file named bind991-p2.zip will be downloaded on your computer.

Extract this file under path C:\Windows\DNS\bin. This directory does not exist by default so you might want to create it first. Configuration files will also be created in C:\Windows\DNS\etc, and likewise this directory does not exist by default and will need to be created.

Create a file named.conf in the C:\Windows\DNS\etc directory. A sample configuration can be found here. On this sample configuration file, change the "directory" directive and replace the value /var/named to C:\Windows\DNS\etc. It should get you started.

From the above, it is obvious that this configuration is intended for Linux or Unix. The "logging" directive needs fixing as well. It is not applicable Windows implementations of bind. Drop the path, and just leave the filename.

Now, it is time to setup the service. Execute the command below in a privileged command prompt (note the space after the equal sign):

sc create bind9 binpath= C:\Windows\DNS\bin\bind.exe DisplayName= "Bind9 DNS Server" start= auto
sc start bind9

You should be getting a similar window as this one.

Using SC to Add Bind DNS Server Service

Checking the service, it should have started and properly setup to start with Windows even when rebooted. The service will automatically start.

Bind9 DNS Server Service

Now, try out the caching name server. You should be feeling the impact of faster performance and speedy DNS lookups as the DNS cache is built.

Share:

HOW-TO: Resolve "BOOTMGR is missing" Boot Error

Further experimentation(s) with BartPE and cloning sysprep-ed Windows 7 SP1 systems led me to further problems. My interest and expertise in these cloning mechanisms and hands-free installs are for Solaris and Linux, not Windows so I was scratching my head for a while trying to resolve the problem.

It is a bit difficult to find a working resolution on the internet so after a while I got tired of searching for a way to migitate the problem and resorted to trial and error. Below is the procedure that eventually worked for me.

The dreaded error:
BOOTMGR is missing.
Press ctrl+alt+del to restart

On the system that encountered this error insert the Windows 7 installation DVD. If you have a Windows 7 USB installer, that works just fine.

Either bootable media works. On the first screen that is presented, select the Language, Time and Currency and Keyboard input method. Then, click Next. You will be on a screen like the one below.

BOOTMGR is missing Boot Error

On the screen above, click on "Repair your computer". The built-in recovery software will try to detect the installed version(s) of Windows. Select the appropriate operating system from the list. Usually there is only one listed here just click on it to highlight the selection and click on Next.

Another window will open presenting system recovery options. Refer to the screenshot below.

BOOTMGR is missing Boot Error

Select command prompt (toward the bottom). And a command window will open.

Rebuild the bcd directory via "bootrec /rebuildbcd" on the command prompt. And restart your computer. This should resolve the "BOOTMGR is missing" boot error (The bootrec command is explained in greater detail on Microsoft: KB927392).

Executing the above procedure solved my problem. Discipline urged me to create a backup of my old boot configuration data (BCD), but I didn't do it anymore.

Just to be on the safe side, if you wish to save a backup of the BCD, you can execute "ren d:\boot\bcd d:\boot\bcd.old" prior to running "bootrec /rebuildbcd".

Share:

HOW-TO: Unblock Microsoft Outlook "Unsafe" Attachments

There are folks who send you mails disguised from persons you might know, but little do you know of the malicious content they send as attachment. In the name of security, Microsoft has started to put in place measures so that the average joe will not be able to potentially stumble on attachments that auto-execute when clicked. That is a good practice. And while that is not bad, they should also advise the end-user how to bypass such security when necessary.

This is not the case, however. Microsoft Outlook will block registry files, executable files, javascript files, scripts and other files that are potentially hazardous. This is a blanket rule that doesn't have an exception. So whenever you get sent an attachment that fits the rule, even if you are sure it will not cause any harm it gets blocked. And you will be getting a window just like below (from Microsoft Outlook 2007).

Unblock Microsoft Outlook Attachments

Error message will look like below (filename may differ):
Outlook blocked access to the following potentially unsafe attachments: attachment_filename.exe

How then do you access the attachment when you are sure of the sender and the attachment is confirmed to be safe? This is another classic scenario of functionality versus security. Follow the procedure below to be able to access the blocked attachment.

If Microsoft Outlook is open, close it. Then open the registry editor and browse to the below registry branch.

Locate the following key(s) depending on the version of Microsoft Outlook you have:
* Outlook 2000 [HKEY_CURRENT_USER\Software\Microsoft\Office\9.0\Outlook\Security]
* Outlook 2002 [HKEY_CURRENT_USER\Software\Microsoft\Office\10.0\Outlook\Security]
* Outlook 2003 [HKEY_CURRENT_USER\Software\Microsoft\Office\11.0\Outlook\Security]
* Outlook 2007 [HKEY_CURRENT_USER\Software\Microsoft\Office\12.0\Outlook\Security]
* Outlook 2010 [HKEY_CURRENT_USER\Software\Microsoft\Office\14.0\Outlook\Security]

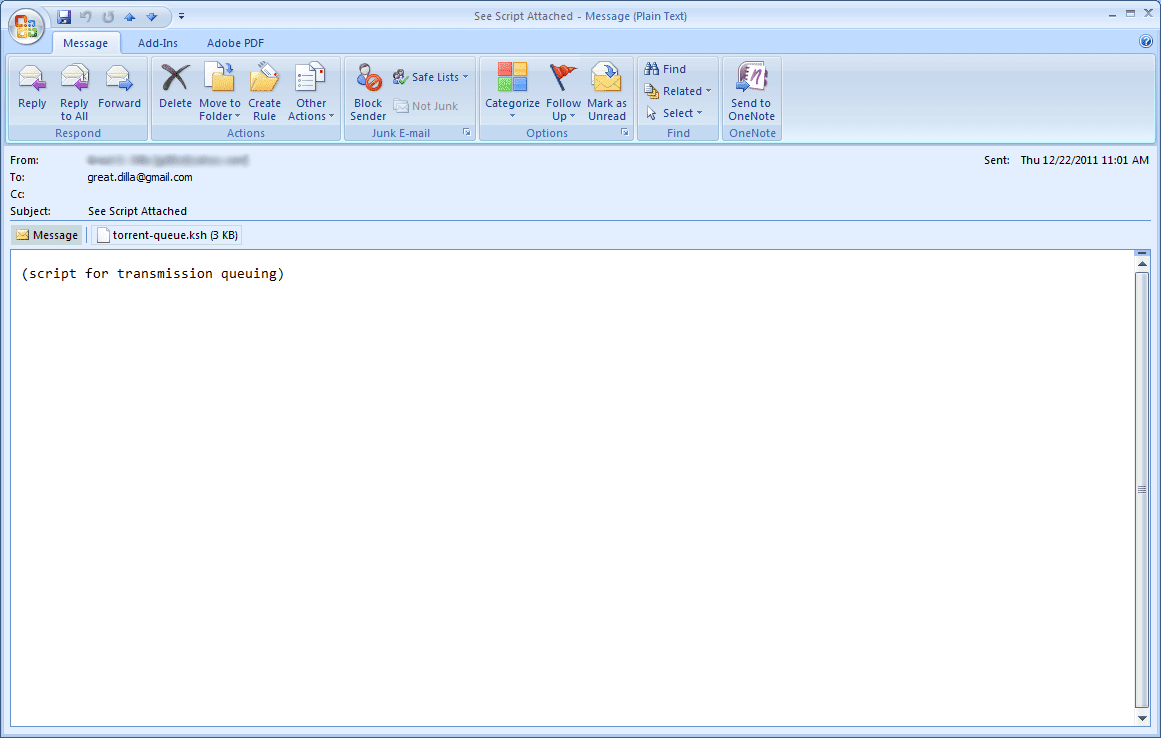
Look for the key "Level1Remove". If it does not exist create it as a string data type. Separate each file extension entry with semi-colons. Make sure to follow the syntax as this is case sensitive. As I use my email to archive scripts, I usually send a mail to myself with the script attached. So this is how it looks on my registry (see below).

Unblock Microsoft Outlook Attachments

After making the necessary changes above, launch Microsoft Outlook and re-open the email with the attachment(s) and you can now access the attachment.

Unblock Microsoft Outlook Attachments

There you go folks.. Another tweak to access blocked attachments. As a security measure especially on shared computers, once you add this and access the required attachment remove the registry entry Level1Remove. Just add it when you require access to blocked attachments in the future.

Share:

TIP: Backup Wireless Network Settings (Windows 7)

One of the many advantages of Windows 7 over its predecessors is the wide array of options in backing up the system. Already inherent in its line-up of tools is the capability to create its own repair disc. But the most overlooked capability, which I think is just as useful, is the capacity to backup wireless settings.

This feature can be beneficial to you in two ways -- a backup of the configuration and a way to share wireless network configuration to another computer. Since it can backup the wireless network security key, it also serves as a way to recall the that key.

In order to create a backup of the wireless settings, go to Start --> Control Panel --> Network and Sharing Center (if using the view by icons). If your Control Panel is displayed in Category view, choose Network and Internet --> Network and Sharing Center. A similar window like below is displayed.

Backup Wireless Network Settings Windows 7

Click on Manage wireless networks (on the top left column).

Backup Wireless Network Settings Windows 7

You will be shown a list of wireless network infrastructures or ad-hoc networks that your computer can connect to. Double-click the wireless network you wish to backup.

Backup Wireless Network Settings Windows 7

Next, click on "Copy this network profile to a USB flash drive".The backup process requires a USB flash drive (UFD) to write the configuration files to. If your computer doesn't have one, you may plug one in. Then, click "Next".

Backup Wireless Network Settings Windows 7

A few files will now be written on the UFD. The files "AUTORUN.INF" and "setupSNK.exe" are now present on the UFD, together with the directory "SMRTNTKY". These files contain the backup of the wireless network settings of the computer system.

You may choose to plug the UFD on another computer and run the executable "setupSNK.exe" to configure that computer to use the same wireless network settings as the original computer. This way you have imported the wireless network settings to another computer without having to do much work.

Backup Wireless Network Settings Windows 7

Since the UFD already contains a copy of the wireless network settings, it is a backup that you can secure in a safe place. You might be needing it one way or another in the future.

Share:

TWEAK: Streaming Video on PCH-C200 via MediaTomb

Now that you have your Popcorn Hour C-200 (PCH-C200) setup to automatically download movies via CouchPotato and download TV shows via SickBeard, all that it takes is to wait for the movie or TV show to become available on the jukebox. If you set-up notifications, then simply wait for the notification to arrive.

However, if you have different TV sets but only one C-200 jukebox, that presents a bit of a problem doesn't it? A very simple solution to this problem is to move the C-200 jukebox to the TV you want to watch at. Still, this solution is a bit cumbersome and will not work if two persons want to watch different content at the same time.

I'd assume that since you have CouchPotato and SickBeard working, you have a home network setup. You can use the same network to stream video from your C-200. You can use a DLNA server to stream digital content (video, movies and mp3) from your C-200 jukebox. To know more about DLNA (or Digital Living Network Alliance), here is what wikipedia has to say about it:

The Digital Living Network Alliance (DLNA) is a non-profit collaborative trade organization established by Sony in June 2003, and has more than 250 member companies in the mobile, consumer electronics, PC, and service provider industries. Alliance members have stated the common goal of using standards-based technology to make it easier for consumers to use, share and enjoy their digital photos, music and videos. As of January 2011, over 9,000 different devices have obtained "DLNA Certified" status, indicated by a logo on their packaging and confirming their interoperability with other devices. It is estimated that more than 440 million DLNA-certified devices, from digital cameras to games consoles and TVs, have been installed in users' homes.
-- taken from Wikipedia: DLNA

This can be done several ways and there are several software available to accomplish this. This article concentrates on MediaTomb. First of all download MediaTomb from its sourceforge download page. Consult the readme.txt file in the tar.gz file for dependencies.

I use the "local" package from the CSI interface to satisfy dependencies. The avilable mediatomb package (v0.12.1) from "local" doesn't work for me. But the older static version from sourceforge (v0.11) works. There is also another pre-compiled mediatomb v0.11 from the NMT repository. All v0.11 packages work on the C-200 jukebox.

The easier way is to download the mediatomb packaged binaries from the NMT repository. You can install this via the Community Software Installer (or CSI) using the "Install from Zip File" option.

Mediatomb will automatically start upon installation via CSI. It will also generate its default database and config file. Mediatomb needs to be stopped as the default config will not make it function properly. You will find the installation under /share/Apps/Mediatomb and the corresponding config file is /share/Apps/Mediatomb/.mediatomb/config.xml.

You will need to add the following lines to the config.xml file under tag <import>:

<magic-file>/share/Apps/Mediatomb/usr/share/file/magic</magic-file>
<filesystem-charset>ISO-8859-1</filesystem-charset>
<metadata-charset>ISO-8859-1</metadata-charset>

For better performance, look for the code <virtual-layout> and set the value to "disabled" (default is "builtin"). This is optional, but I find better performance out of this tweak.

After making the above changes, start mediatomb (using mediatomb.sh start). Then launch a browser and point to http://C200-IP:49152/ (replace C200-IP with the IP address of your C-200 jukebox). The default username and password to access the browser interface is mediatomb and mediatomb. You can change those defaults inside the config.xml file.

Browse the filesystem tree and add the paths that need to be added, scanned and/or monitored as media is added. Add to this configuration the paths of destination files for both SickBeard and CouchPotato. You can monitor errors via the log file. For my case I set Timed, Full, Recursive and every 14400 seconds on the directories/paths that I add for scanning/monitoring.

Streaming Video on Popcorn Hour C-200 (PCH-C200) via MediaTomb

The glitch I found on MediaTomb is that it displays duplicate entries of files on Windows Media Player 12 library. You can see this better illustrated by the screenshot below. As you can see, each episode of the TV show "Alphas" is listed twice.

Streaming Video on Popcorn Hour C-200 (PCH-C200) via MediaTomb

Aside from that, the icons displayed seem to be generic and not video specific. I don't find these glitches very significant as long as the functionality I want is there. This duplicate entry issue is not present when viewing media listings on the LG and Samsung DLNA-enabled TV. Seems to manifest only with Windows Media Player 12. On Windows notebooks, I tested the streaming functionality on Windows Media Player 12 library and VLC v1.1.19, using the Advanced Open option to open media files.

Share:

HOW-TO: Install CouchPotato on Popcorn Hour C-200 (PCH-C200)

From the previous article that discussed how to Install SickBeard on the Popcorn Hour C-200, we learned how to automate the search and download of our favorite TV shows. If there is SickBeard for TV shows, there must be another for Movies. You are right on the money and CouchPotato is the equivalent PVR for movies.

"CouchPotato is an automatic NZB and torrent downloader. You can keep a "movies I want"-list and it will search for NZBs/torrents of these movies every X hours. Once a movie is found, it will send it to SABnzbd or download the .nzb or .torrent to a specified directory." -- taken from the CouchPotato website.

Install. CouchPotato works well with the Popcorn Hour C-200 just like SickBeard. And, like SickBeard, CouchPotato needs the Community Software Installer (or CSI). Under the Applications tab, select couchpotato and install it to the C-200.

In case you haven't done so, both CouchPotato and SickBeard require the "local" package installed to be able to run. The "local" package is installed via CSI as well.

Configure. Access the web page of CouchPotato to be able to get to the configuration page. Launch your favorite browser, point to "http://C200-IP:5000/movie" (replace C200-IP with the IP address of your PCH-C200) and CouchPotato configuration is done by clicking on the gear icon (to the right of "Logs").

Under the "General" tab, nothing much to configure here. But perhaps if you wish to ignore NZBs (or torrents) with keywords in them, you might want to configure under "Ignore words". Think of this field as a blacklist of keywords. Or if you wish to make "Director's Cut" take precedence over other NZBs (or torrents), the same configuration can be put under the "Preferred" or "Required" words.

Install CouchPotato on Popcorn Hour C-200

The "Downloaders" tab will make you select between NZBs, torrents or both. I use blackhole directory for either NZB or torrent in my configuration. For TV shows, it is easier to configure with NZBs but large high definition movies are not very much available unless subscribed to a Usenet search provider. So torrents seem to be favorable here.

Install CouchPotato on Popcorn Hour C-200

On the "Providers" page you can configure CouchPotato with the Usenet index service provider to use. It is clear that this is for NZBs. And most of the usenet search providers for CouchPotato require subscription. Given that, this favors the use of torrents. If you are using torrents, thepiratebay.org is the default search service provider. No further configuration is necessary for torrents.

Install CouchPotato on Popcorn Hour C-200

For full automation, the "Renaming" tab can be set to configure the naming convention and also the "blackhole" and target directory where the movies will be stored. Here, be careful with the "Cleanup" option. When ticked, CouchPotato will automatically remove the unnecessary files downloaded with the video file. When you have reviewed the logs and verified CouchPotato works to your liking, you can tick this option.

Install CouchPotato on Popcorn Hour C-200

Extras enables or disables the automatic downloading of subtitles and trailers for the movies downloaded and processed by CouchPotato.

Install CouchPotato on Popcorn Hour C-200

Add Movies. After configuration, you can start adding movies for CouchPotato to search, download and post-process. So with SickBeard and CouchPotato, more functionality are added to your Popcorn Hour C-200 Network Media Jukebox. Visit us again soon as I will outline several steps to transform your NMJ to serve as a DLNA server.

Share:

HOW-TO: Install SickBeard on Popcorn Hour C-200 (PCH-C200)

"I know what I have, but I'm not sure what it is capable of." This cliche sounds familiar isn't it? I belong to this category, and it is highly probable that many others share the same fate. Thanks to the internet and the many forums and blogs that information is freely available to those who want to know more about their gadgets and what they are capable of.

If you have a Popcorn Hour C-200 (PCH-C200), there is more to the device than its intended purpose of being a Networked Media Jukebox (NMJ). There's more to the device than playing multimedia content -- it can download those too!

Sick Beard is a PVR for newsgroup users (with limited torrent support). It watches for new episodes of your favorite shows and when they are posted it downloads them, sorts and renames them, and optionally generates metadata for them. It currently supports NZBs.org, NZBMatrix, NZBs'R'Us, Newzbin, Womble's Index, NZB.su, TVTorrents and EZRSS and retrieves show information from theTVDB.com and TVRage.com. --taken from the official webpage of SickBeard

Install. You would be interested to know that this software can automate the downloads of your favorite TV Shows. And this is done automatically without you having to do anything. All that it takes is to properly configure SickBeard, add your favorite shows, and watch your favorite TV shows on the C-200.

For this install, you will be needing the Community Software Installer (or CSI). Under the Applications tab, select sickbeard and install it to the C-200. It is that simple.

Configure. Now that sickbeard is installed, configuration has to be done. It is important that you point sickbeard to the right directories -- the directory where it will monitor the downloaded TV files and, (optional) if you are using the blackhole method, point it to the blackhole directories of NZBget (usenet) or transmission (torrent).

Launch your favorite browser and point to "http://C200-IP:8081/home" (replace C200-IP with the IP address of your PCH-C200) and click on "Config". You can have several options here. The "General" tab is straight forward.

Under "Search Settings", I ticked "Download propers". And from here, I also choose "NZB Search" using the blackhole method. You can also set sickbeard to download via torrent and put the blackhole directory of the transmission client.

Install SickBeard on Popcorn Hour C-200

Next, configure the providers. Tick the providers that you want to utilize. You may change the order of the providers via drag-and-drop. Since I'm not really into backlogs, the "Sick Beard Index" and "Wombie's Index" are sufficient. Most of the other providers need subscription but if you have active subscriptions you may put the API keys in the appropriate forms on this page.

Install SickBeard on Popcorn Hour C-200

Post processing is also important if you want to automate the renaming of your favorite TV shows. This part of the automation process is needed if you want to add episode titles. You may also configure how the renaming would appear, including the separators and season folders. A word of caution in this part of the configuration, tick the box corresponding to "Keep Original Files", until you are really sure that SickBeard works or once SickBeard functionality has been tested.

Once "Keep Original Files" is unticked, post processing of downloaded files will delete or clean-up all of the other downloaded files and will retain only the .avi or .mkv file. This box comes ticked by default, so no need to worry.

The directory named in this part of the configuration is the directory where transmission or nzbget will download the files to. This is not the directory where your TV shows will be stored permanently. Think of it as a bucket where you will temporarily store the downloads -- sort of the "blackhole" folder of SickBeard.

Install SickBeard on Popcorn Hour C-200

With all the configuration done, it is time to add shows for SickBeard to download. Under the "Home" tab, is where you can "Add Shows". When adding shows, you are also asked where the episodes will be stored. Give this the path to folder where you want the episodes to be stored after post-processing. This should be a different directory than the "blackhole" folder above.

The addition will trigger SickBeard to search if any of the providers have indexed the added show, and you can see if SickBeard has downloaded the appropriate file (nzb or torrent) to the appropriate download client.

Also, you can view SickBeard logs from the web interface or on the C-200 itself. And aside from that, you can check if the TV show is scheduled to be aired soon.

Further tweaks can be done on the SickBeard installed on the C-200. Check out the "Notifications" tab under the "Config" menu and configure the notification options.

SickBeard takes care of the TV shows, but for Movies the equivalent software is CouchPotato. And the installation of CouchPotato is what we will outline next.

Share:

HOW-TO: Disabling Built-in Flash Player in Google Chrome

One of the biggest reasons I use Google's Chrome browser is the innate capability to translate content that is posted in a foreign language. This comes built into the browser itself and you don't have to do anything after installation. No other browser has this capability, to date.

Another reason, is Google Chrome is more secure than other browsers with its sandbox environment and what nots. Although this is subject to debate, I find this acceptable as it is and with that in mind, I use Chrome most of the time. There are still other functionality I find Mozilla's Firefox is better at, especially now that version 7 has better memory management.

While all these built-in functionality is great, there are exceptions to the rule. What am I pointing to? It is the Flash Player that is built-into Google Chrome. Did you know that Flash Player updates are included in Chrome system updates? Believe it.

That may not be a bad thing in itself, you may want to have control over how your browser behaves. And since you probably don't let Chrome monopolize your browsing behavior and we don't know which Flash Player takes priority and precedence, we can disable the built-in Flash Player and let the installed Flash Player take over.

Launch Google Chrome and type "about:plugins" (or "chrome://plugins") to the address bar. On the upper right you can click on the "plus" sign next to Details. This opens the plug-ins installed on the browser.

On my Chrome, I have 3 versions of Flash Player installed. And below is the screenshot of that.

Disabling Built-in Flash Player in Google Chrome

You can also see the versions of Flash Player plug-ins installed on the browser. And from the screenshot below you can see those information. From here, you can enable or disable the Flash Player plug-ins.

Disabling Built-in Flash Player in Google Chrome

I tend to think that the order in which the Flash Player plug-ins appear also indicates precedence but this is not confirmed. It is just a hunch. So there you go folks, disabling the built-in Flash Player in Google Chrome.

Share:

HOW-TO: Force Addon Compatibility with Firefox (again)

The fast release of Firefox major versions every six (6) or so weeks means add-ons have to keep pace with Firefox. What's more? Security fixes will be the reason for every major release. So if you wish to remain on the previous versions, you will be stuck with an insecure browser. You wouldn't want that would you?

Previously posted at pimp-my-rig is a tutorial to force add-on compatibility with Firefox. It still works. For third party add-ons that are installed via Program Files, like DivX, here is another tweak to force compatibility with Firefox. We tested it on Firefox 6.0 and it works just as well.

All those works, why post another procedure? Well, as the saying goes "there are a thousand ways to kill a cat" -- so does this tweak. With the release of Firefox 6.0, most addons will not be compatible. The above tweaks work for a variety of addons, here is another way to force compatibility check.

Open an Explorer window and browse to "%appdata%\Mozilla\Firefox\Profiles" (this is the default directory containing your Firefox user profile). Inside this directory will be another folder named xxxxxxxx.default (xxxxxxx is a string that will differ from computer to computer); and inside this is the extensions folder, which is the directory that contains the extensions or addons you have installed (refer to screenshot below).

Force Addon Compatibility Firefox

WinRAR can open those XPI files in the extensions folder. Once opened, you can edit the install.rdf files inside the archive.

Force Addon Compatibility Firefox

Just look for the string "<em:maxVersion>" and/or "</em:maxVersion>". Enclosed in these XML tags is the maximum version of Firefox that is compatible. Change it to "6.*" or "7.*" as you wish. Then save the file and update the XPI archive.

Restart Firefox and test the functionality of the addon. As of this writing, downloadthemall is tested to work using this tweak on Firefox 6.0.

So if you need the functionality of your addon try this out.

Share:

HOW-TO: Using Windows Anytime Upgrade

What is Microsoft's secret to the fast widespread adoption of Windows 7? Bundle it to computers sold. Unless you're building your own computer system, chances are you got a computer bundled with Microsoft's latest and greatest desktop operating system, Windows 7. Windows 7 was all that Vista was not. And Microsoft did it well -- marketing, bundling, benchmarketing and all.

However, the Windows 7 version that is bundled in notebooks and netbooks is the Windows 7 Starter edition -- the low-end crippled version. To get a comparison of each flavors of Windows see this article in Wikipedia. How then do you upgrade to a higher version of Windows 7 from the Starter that is stock in the notebook or netbook?

To answer the above question, you can use the "Windows Anytime Upgrade" to do a quick upgrade. This is installed by default your system. Access this program by pressing [WIN] key then type "anytime" on the program search bar. You may also click on the orb and then type "anytime" on the program search bar.

Using Windows Anytime Upgrade

Launch the program then select "Enter an Upgrade Key" (the bottom option), if you already have a key. Or choose the top option to go online and purchase an upgrade key. For this tutorial, we selected to 'Enter an Upgrade Key'.

The next screen will ask for an upgrade key.

Using Windows Anytime Upgrade

The program will then go online and verify the code from above. And the upgrade begins.

Using Windows Anytime Upgrade

The computer will automatically reboot and update Windows while shutting down. As shown in the screenshot above, it will take about 10minutes but in our experience it took about half an hour for the upgrade to complete.

Upon reboot, the Windows Anytime Upgrade will launch and show the new version of Windows. Our upgrade key gave us Windows 7 Home Premium.

Using Windows Anytime Upgrade

There you go. Effortless upgrade of your brand new Windows 7 notebook. The type of upgrade that doesn't need any installation media or USB device. The upgraded computer will have all the updates to the upgraded system already installed.

Share:

HOW-TO: Uploading Map(s) to a Garmin nuvi 255W

I have lived in the Philippines almost my entire life. But I don't know my way around quite that well. And to be honest, I haven't been around to many of the tourist destinations either. Most of you may have visited far more places than I have been to.

But thanks to technology, most of the places in the country can be visited with the help of a global positioning system or GPS device. I just acquired a Garmin nuvi 255W recently (thanks to my sister). But sadly, the Garmin nuvi unit came prepackaged with US and Europe maps. Not very applicable where I'm at. Here is how I uploaded a Garmin compatible map for the Philippines.

On the quest for knowledge on how to do this, I found three (3) working procedures on how this gets done: [a] via mass storage mode, [b] via Garmin's mapsource, and [c] via a proprietary software called cgpsmapper. I have only used the first two so I can only outline details about them.

Mass storage mode. This is the simplest procedure to execute. Plug the Garmin nuvi device to an available USB port. It is detected as a mass storage device (not a GPS device but don't worry) -- one for the internal memory of the unit and another for the SD card. So two drives will be added to Windows explorer.

You will not mistake one for the other as the drive for the internal memory gets the name Garmin and the SD card is named Removable Media. The Garmin drive referring to the device's internal memory has an icon of a blue triangle pointing up.

Download the openstreetmap image file from osmphil_garmin website. Make sure to download the compressed gmapsupp.img.

The file downloaded has name gmapsupp.img. This needs to be copied over to the \Garmin folder on the SD card of the GPS. If the folder \Garmin does not exist, create it. (NOTE: On newer Garmin models the equivalent folder for \Garmin is \Map.)

Now unplug the GPS unit from the USB port and check the map just copied.

Using mapsource. To be able to install Garmin mapsource, download training center and mapsource (Garmin software and updates). Then install training center, after which install mapsource.

Download the openstreetmap image file from osmphil_garmin website. Make sure to download the executable file for Mapsource. Once done downloading, install the .exe file downloaded.

Plug the Garmin nuvi to the USB port. Then, launch mapsource and select the (OSM_PHIL) from the dropdown, like the screenshot below.


Under the Transfer > Send to device and tick Maps. Wait for the prompt message stating success -- "The data was successfully sent". This is illustrated by the screenshot below (Unid ID blurred for my own safety).


Now unplug the GPS unit from the USB port and check the map just copied.

There you go folks, a Garmin compatible map has been uploaded to your GPS unit for use in the Philippines. I still haven't gone around to test the accuracy but it beats having a GPS in situations where you don't know which way to go.

This procedure is known to work with the Garmin nuvi devices. Let me know if this procedure doesn't work for your unit.

Share:

HOW-TO: Windows 7 on DELL D630 -- BlueTooth Woes

As previously mentioned in my post ReadyBoost with PCMCIA Adapter and Compact Flash, I did an upgrade on my DELL Latitude D630 to the latest (and greatest?) Windows 7 x64.

The upgrade went quite well and although the DELL website doesn't certify the D630 for Windows 7, I upgraded anyway with the assumption that I could use Windows Vista drivers. But this doesn't work out good in the end, as proven by the experience. Why? All the other drivers work, except for the Bluetooth drivers.

Here was where I got stuck. I downloaded the Windows Vista x64 driver from the D630 support page.

The installation took quite a bit of time as it had to unpack the bluetooth software, install the drivers, update firmware and a few other things. At the end of the installation it will ask for a reboot, accede to its demands.

After doing this, bluetooth software will launch but the bluetooth indicator light (a blue led with bluetooth logo to the right of the wifi light) would not turn on. And devices would not pair as they are not able to search for the notebook's bluetooth. This was where I started to search for another solution.

Bluetooth wasn't that big of a deal. But I have gadgets that communicate with the notebook, to either transfer files, notes and pictures or listening to music without cable clutter on a Bluetooth headset. So I wished I had bluetooth working.

So here I was again stuck at another problem that I could potentially turn into another pimp-my-rig post. As always, I would consult google regarding my problem hoping that somebody had already been to my situation and has found a working solution. But after sifting through posts for about painstaking 4hours and found nothing that worked, I decided to proceed on my own.

And here is the extra step that got the Bluetooth to work on the D630.

I downloaded the Toshiba Bluetooth software stack. Installed it and rebooted.

 Windows 7 on DELL D630 BlueTooth Woes


After reboot, there is now a bluetooth icon on the system tray. And I could enable/disable the bluetooth radio from there. Then, I tried pairing gadgets to the notebook and it works!

Share:

HOW-TO: ReadyBoost with PCMCIA Adapter + Compact Flash

I recently upgraded my relatively aging but still healthy Dell Latitude D630 notebook to Windows 7 (yeah, I jumped into the bandwagon but it's about time). And seeing that there is already a Service Pack 1 (SP1) out, this made sense to me. During the Windows XP era, it wasn't all good and stable until the SP1 came out. Let's hope history repeated itself here.

One thing that attracted me to the move was the all-improved Readyboost that 7 has. I have experienced the improvement on my desktop and it made sense to put the same to good use on my notebook. But hanging a USB flash drive (UFD) on a portable machine doesn't make sense at all. Good thing the D630 has a PCMCIA slot and I happened to have a PCMCIA card reader with 8GB of hi-speed compact flash media to boot.

But alas when I plugged it in to enable it for use of Readyboost, it wasn't compatible at all. How then do I enable Readyboost on the PCMCIA-CF card? Next thing I did was to ask my friend Google only to find out there are literally thousands (if not millions) of us facing the same dilemma.

Good thing I found this forum post on how to enable USB hdisk drives for ready boost. I tried it out and after a few trials (and errors), I got it to work.

As shown, make changes to the registry (NOTE: Changing the registry can render your computer unusable. You better know what you're doing!) like below. This is the registry key for my Sandisk Ultra PC Card Adapter with RiDATA 8GB 233x Lightning Series Compact Flash card.

ReadyBoost with PCMCIA Adapter and Compact Flash


After I made changes to the registry, I restarted explorer (using Start > Run > "tskill explorer"). Voila! The device can now be used for Readyboost!

ReadyBoost with PCMCIA Adapter and Compact Flash


Now explore the Readyboost-enabled card and see that it has the file ReadyBoost.sfcache which is used by Readyboost.

ReadyBoost with PCMCIA Adapter and Compact Flash


There you go. PCMCIA Adapter and compact flash media for Readyboost. I now have a Readyboost device on my notebook that is completely flushed and barely noticeable at all. Performancewise, I can feel a slight improvement in launching of applications which means Readyboost works.

If you want to tweak this further, you may want to hide the Readyboost drive in Windows Explorer. Google for "NoDrives" registry key.

Share:

HOW-TO: Remove Windows 7 Service Pack 1 Backup Files

Windows 7 SP1 has just gone live over a few days ago. If you haven't gone and downloaded the Service Pack yet, you may check it out here: Download Windows 7 SP1. However, for a "seamless" upgrade experience Microsoft has advised to upgrade to SP1 using the Windows Update (WU) module.

I have done the upgrade using WU, and instead of downloading almost a gigabyte (yes, it is a hefty 903.2MB for the x64 version) for x64 version the WU module downloaded just 87.2MB. I might have most of the updates already installed, so that advise made a little more sense after this experience.

The installation of SP1 also backs up several critical files of the non-SP1 version. As seen in the below screenshot, the backup is an additional 640MB on the drive. It is not that huge on a desktop, but for mobile folks with limited disk space you may choose to remove the backup files after some time.

Remove Windows 7 Service Pack 1 Backup Files


Understand, however, that once the backup files are removed SP1 could not be uninstalled.

There are several ways do to this. First is via the GUI. Launch the orb (or Start for Classic Shell users), and type "Disk Cleanup" on the search bar. The window launched is similar to the screenshot above. Tick the "Service Pack Backup Files" and click OK. All that is left is to wait for the prompt, and you're done.

For the savvy command-line admins, you may opt to use the command tool. Remember to launch the command tool using the "Run as Administrator" mode. Then execute:

dism /online /cleanup-image /spsuperseded


The above command executes and ends with:

Service Pack Cleanup operation completed. The operation completed successfully.


Too bad, I wasn't able to take a screenshot of the command line as I wasn't thinking about posting the procedure above. After remembering, it was too late. So whether on the command-line or the GUI, you may get rid of the service pack backup files and recover critical disk space.

In a future post, I will outline a procedure on how to slipstream the downloaded SP1 to the original ISO.

Share:

HOW-TO: No Subtitles on Egreat EG-M31B

Like most people, I rode the HD-craze and bought myself a NMT or HD-tank (whichever term tickles your fancy). The nice thing about the NMT is you can download videos for offline viewing. Having an NMT means the device itself can download the video, then when you return after some time you can enjoy relaxing while watching in comfort. HDMI is another bonus too, less cable clutter.

Another good thing to note is that subtitles can be downloaded for the videos. One very good source for it is opensubtitles.org. However, lately I discovered that not all subtitles are playable on the NMT. I was a bit perplexed at first but I got it to work after a few tweaks.

Just so I can give you a background of the problem, I own an Egreat EG-M31B NMT and it has the latest firmware. I downloaded the movie Sorcerer's Apprentice as requested by my sister. The good thing is that it came with its own subtitle file (which lessened the hassle). However, when I played the video on the NMT, there was no subtitle at all. Even if I pressed subtitles on the remote, I only get the exclamation point inside the yellow triangle -- meaning no subtitle file is found.

So I checked the directory of the video. The srt file is there and it is named appropriately. Next, I downloaded another subtitle file from opensubtitles.org. Then uploaded the file to the NMT and resumed playback, but still there was no subtitle. This time I was getting a bit impatient and pissed -- impatient that I wanted to watch the video and pissed that I might have purchased a lemon. One thing that kept bothering me is that other movies that have srt files are playing the subtitles. What was wrong with this one?

I opened the file in metapad to see if there was something amiss -- the format of the srt was fine. Then I decided to "save as" a different file. I saw that there was an option to save it to ANSI (or DOS text). Then I re-uploaded to the NMT. It prompted to overwrite the original srt file (which was 180k in size) with the new srt file (just 90k in size). Right there and then I thought this might be it. And when I played the video I saw the subtitles.

The Egreat EG-M31B could not play UNICODE srt files. It could play ANSI srt files. You can use notepad or my favorite text editor -- metapad -- to convert the UNICODE srt files to ANSI.

On notepad, open the srt file and choose "save as" and change the encoding to ANSI before clicking save (see screenshot below).

No Subtitles on Egreat EG-M31B


On metapad, open the srt file and re-encode the text under the "File" --> "File Format" --> "DOS Text" (see screenshot below).

No Subtitles on Egreat EG-M31B


I hope this solution also helps you in playback of videos with subtitles. I sure am glad to have chosen the right NMT and it is definitely not a lemon as I thought at first.

Share:

HOW-TO: Windows Media Player Cannot Access the File

Do you use your PC to play or view videos? After all the PC can be pretty robust when it comes to this functionality as the bundles of available player+codec software make a mutually potent combo to watch just about anything. However, the most common player available is Windows Media Player (or WMP). And it has its share of headaches, one of which is this error:

"Windows Media Player cannot access the file. The file might be in use; you might not have access to the computer where the file is stored, or your proxy settings might not be correct."


(or this screenshot below)

Windows Media Player Cannot Access the File


I got the above while trying to play an AVI file. No software install has been done in over a week, so this troubled me a bit. No recent changes to the system either. (Yeah, I'm one of those who believe in the saying: If it ain't broken, don't fix it.)

I have checked the permissions all the way to the root folder of the drive but it doesn't really help. I googled a bit, but came out empty.

Paranoia took over, so I scanned for viruses -- none. That didn't help either.

Luckily, I plugged in the Zalman 5.1ch headphones and was about to change the speaker settings from normal stereo to 5.1ch when the solution came. Try this:

(if using "Category" view try..)
Start --> Control Panel --> Hardware and Sound --> Sound

(if using "Icon" view try..)
Start --> Control Panel --> Sound


A pop-up will show stating certain enhancements are interfering with the program. Terminate? (Unfortunately, I wasn't able to take a screenshot as I wasn't aware that this WAS the solution to the problem. And, it is as tragic that I cannot duplicate the problem. So for now, the cause is unknown.) Click "Yes" to this pop-up.

I didn't realize this was the solution until I actually clicked on the AVI file again and it played this time. The procedure above brought back functionality of WMP. I hope it does the same for you.

Share:

HOW-TO: Make Windows 7 Boot Faster

Do you feel that your Windows 7 machine boots faster? If that is so, we share the same sentiments. But since our computer system is newer and more robust, we feel that it is due to the upgrade(s) made. And in due time boot time will degrade due to several factors including but not limited to hard drive fragmentation.

However, Windows 7 has built-in mechanisms and algorithms to make boot up faster -- by utilizing the available processors or cores. This is just one of the many ways to make Windows 7 boot faster. I'd say this is the easiest tweak to perform. Here's how..

Open the "Run.." diaglog window. Press [WIN] + [R] simultaneously. Doing so opens the "Run.." dialog window. Then type in "msconfig" (without quotes). You should see a similar window as below (see screenshot).

Make Windows 7 Boot Faster


Go to the "Boot" tab and select "Windows 7.." as seen above. If you do not have a multi-boot system this is selected by default.

Click on "Advanced options..." and another window will open (see below). Tick the check box next to "Number of processors:" then select the number of processors (or cores) that your system has. In my case, I got a Q9550 so I selected 4 (for 4 cores). This part is easy as Windows automagically identifies the maximum number of processors your system has. Just select the maximum number from the drop down list.


Make Windows 7 Boot Faster


Accept all changes.. Reboot if you wish so you can check the performance improvement.

Share:

Subscribe for Latest Update

Popular Posts

Post Labels

100gb (1) acceleration (1) acrobat (1) adblock (1) advanced (1) ahci (1) airdrop (2) aix (14) angry birds (1) article (21) aster (1) audiodg.exe (1) automatic (2) autorun.inf (1) bartpe (1) battery (2) bigboss (1) binance (1) biometrics (1) bitcoin (3) blackberry (1) book (1) boot-repair (2) calendar (1) ccleaner (3) chrome (5) cloud (1) cluster (1) compatibility (3) CPAN (1) crypto (3) cydia (1) data (3) ddos (1) disable (1) discount (1) DLNA (1) dmidecode (1) dns (7) dracut (1) driver (1) error (10) esxi5 (2) excel (1) facebook (1) faq (36) faucet (1) firefox (17) firewall (2) flash (5) free (3) fun (1) gadgets (4) games (1) garmin (5) gmail (3) google (4) google+ (2) gps (5) grub (2) guide (1) hardware (6) how (1) how-to (45) huawei (1) icloud (1) info (4) iphone (7) IPMP (2) IPV6 (1) iscsi (1) jailbreak (1) java (3) kodi (1) linux (28) locate (1) lshw (1) luci (1) mafia wars (1) malware (1) mapsource (1) memory (2) mikrotik (5) missing (1) mods (10) mouse (1) multipath (1) multitasking (1) NAT (1) netapp (1) nouveau (1) nvidia (1) osmc (1) outlook (2) p2v (2) patch (1) performance (19) perl (1) philippines (1) php (1) pimp-my-rig (9) pldthomedsl (1) plugin (1) popcorn hour (10) power shell (1) process (1) proxy (2) pyspark (1) python (13) qos (1) raspberry pi (7) readyboost (2) reboot (2) recall (1) recovery mode (1) registry (2) rename (1) repository (1) rescue mode (1) review (15) right-click (1) RSS (2) s3cmd (1) salary (1) sanity check (1) security (15) sendmail (1) sickgear (3) software (10) solaris (17) squid (3) SSD (3) SSH (9) swap (1) tip (4) tips (42) top list (3) torrent (5) transmission (1) treewalk (2) tunnel (1) tweak (4) tweaks (41) ubuntu (4) udemy (6) unknown device (1) updates (12) upgrade (1) usb (12) utf8 (1) utility (2) V2V (1) virtual machine (4) VirtualBox (1) vmware (14) vsphere (1) wannacry (1) wifi (4) windows (54) winpe (2) xymon (1) yum (1) zombie (1)

RANDOM POSTS