Showing posts with label SSH. Show all posts

TWEAK: Specify UserName to a KiTTY (or PuTTY) Session

As a *nix sysad, 99% of the time I work on terminals. There are a few exceptional scenarios where I would sit in front of a SunOS terminal and work on the console itself. In that 99%, SSH sessions are almost always the protocol involved. And as the workstations issued to *nix engineers are Windows-based, the SSH client of choice is either PuTTY or KiTTY.

They are basically the same in functionality and overall usability. I prefer to use KiTTY for the added functionality of being able to drag-n-drop a file to the KiTTY window to execute an SCP of the dropped file to the remote host, provided that pscp.exe or kscp.exe are in the same folder as the kitty.exe executable.

Both software can save sessions. And did you know that you can tweak the saved session so that you no longer have to key in the username for the specific session? Sure you can! And I will show you how.

In this example, I will use the KiTTY to connect to my Raspberry Pi with an address of 192.168.1.199. Normally, I would only save the IP address of the remote host, as shown below.
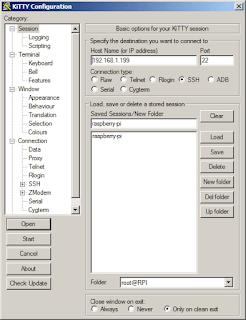
SSH Session

Then, down on the "Connection" > "Data", I would input the auto-login username.

This is where the tweak comes into play, as you can actually skip putting the auto-login username, and simply place that same username as part of the IP address or FQDN of the remote host, separated with the "@" sign, as shown below.
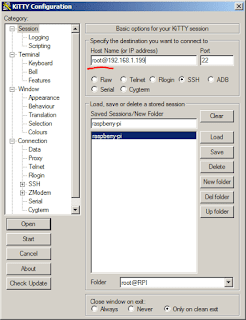
USERNAME@SSH Session

Launching the KiTTY (or PuTTY) session, you will only be asked for the password. And, if you are running pageant.exe with the corresponding private keys for the remote SSH server, a password-less SSH session is started. It saves you a lot of time having to repeatedly input usernames for future sessions to the same host.

 RELATED: Password-less SSH Windows to Linux

Despite the added functionality of KiTTY, PuTTY still ranks higher up in terms of usage. Give KiTTY a try if you want to try out the added functionality mentioned above.


Share:

TIP: Configure NGROK Tunnel with Supervisor

I use a Raspberry PI (RPI) at home. I have blogged several times about my adventures with the RPI and some automation that I programmed in. It is currently running a very lightweight and optimized version of Linux named DietPI. The RPI is cheap. It operates cheap, since it doesn't consume a lot of electricity meaning I could leave it running headless 24x7x365. The only time it reboots is if there are critical updates that require it.

Since it is running 24x7, the RPI could also serve as my SSH tunnel to my home network from the internet. I use ngrok to achieve this and forward the SSHD port to the tunnel server. Ngrok does not run in daemon-mode and the developer has expressed that this feature will not be built-into the software. But on Linux this is not a really problem.

A supervisor could handle the software and even restart it if necessary. This is how I did it on my RPI.

First, install supervisor and download the latest version of ngrok.
apt-get -y install supervisor

Download ngrok off its developer's website, https://ngrok.com/download. Choose Linux ARM. Extract the contents of the zip file and copy it to /usr/local/bin. While in the ngrok website, register and obtain an authtoken.

NGROK AuthToken

Next, generate the default ngrok configuration file by running:
/usr/local/bin/ngrok authtoken [putyourownauthtokenhere]

A configuration file will be generated in $HOME/.ngrok2/ngrok.yml. I modified this configuration file and copied it to /etc. The entire contents of my ngrok.yml is below.

NGROK Configuration ngrok.yml

On to supervisor configuration. Create the configuration file as follows:
[program:ngrok]
command=/usr/local/bin/ngrok start --all --config=/etc/ngrok.yml
autostart=true
autorestart=true
stopsignal=QUIT

Then, set supervisor to autostart at boot.
systemctl enable supervisor
systemctl start supervisor

To check the status of supervisor controlled daemons, run..
supervisorctl status

Check the dashboard on the ngrok website to see how you could connect to the tunnel from any internet connection.

 RELATED: Root Backdoor to VMware ESXi Host

The best part is: this configuration doesn't have to modify firewall configurations nor forward ports on the router.


Share:

HOW-TO: Install a PVR (SickGear) on Raspberry Pi

In the previous guide, we successfully installed OSMC on the Raspberry Pi. This is a very straight forward procedure to install a working operating system and media center. Adding more functionality to the Raspberry Pi is more complex than the initial operating system install.

OSMC works out of the box. Its wired network is set to DHCP from the previous steps we executed (if you ticked "configure network manually", this would not be the case). This allows the Raspberry Pi to be remotely configured, and even connect to the internet. However, this guide will require some knowledge of Linux and its filesystems.

Let's connect via SSH to the Raspberry Pi. If you dont have an SSH client, download PuTTY or any of its derivatives. The default username and password is: "osmc" and "osmc" respectively. Once a successful connection is made, you will have a screen similar to below.

Putty to OSMC

First thing to do is update the apt repository. This is done using the "apt-get update" command. WARNING: this command and others that follow, will fail if the OSMC has no internet connectivity.

apt-get update

I placed the bare command on the screenshot above to demonstrate that using it without "sudo" will result in permission errors. See the successful command execute when prefixed with a "sudo".

Next, install git. On the same terminal, execute "sudo apt-get install git".

install git
Having git, the command above will upgrade the version already installed. Otherwise, it will simply install.

Change directory to /opt (RUN: "cd /opt"). Then, use git to fetch the PVR files from the internet. Execute "git clone https://github.com/SickGear/SickGear.git sickgear".

git clone

Change the owner of the sickgear directory and its contents to user osmc, and group osmc (RUN: "chmod -R osmc:osmc sickgear"). This is important for the application not to run as the root user, but as another less-privileged user.

To finalize the configuration, create the file "/etc/default/sickgear". Add the following lines:
# COPY THIS FILE TO /etc/default/sickgear
SG_HOME=/opt/sickgear
SG_DATA=/opt/sickgear
SG_USER=osmc
SG_GROUP=osmc

To make the application automatically start on boot, [1] copy the file "/opt/sickgear/init-scripts/init.ubuntu" as "/etc/init.d/sickgear"; and [2] execute "sudo update-rc.d defaults sickgear".

Start sickgear with "sudo systemctl start sickgear". If there are no issues, sickgear should start. Should there be issues in starting, logs are located in the directory /opt/sickgear/Logs. Another way to view issues is "sudo journalctl -xn". The output will contain clue(s) as to why it did not start normally.

Related: Migrate Sickbeard to its Bricky Fork

Sickgear can automatically download, index and catalog files for your viewing pleasure. In the next article, we will tackle the configuration, and more advanced configuration of sickgear handshaking with transmission for automating downloads and post-processing of those downloaded files.

Share:

INFO: Root Backdoor to VMware ESXi Host

Administering the virtual infrastructure has been the focus of my administrative tasks as of late. It has been a challenge learning and understanding the technology at first. It comes with the same set of rules that govern physical machines, as well as extended technology (and imagination) -- really giving meaning to the acronym elastic sky x (or ESX). While the name might be gibberish, the technology it stands for is way, way interesting.

While ESXi is an advanced technology, it does have its own set of quirks and limitations. On top of this list is the root password protection. Never forget the root password, or else.. Although there are proven steps to "crack" (for the lack of a better word) the root password, it is far too complex for beginners.

On the VMware knowledge base site, we read this:

ESXi 3.5, ESXi 4.x, and ESXi 5.x
Reinstalling the ESXi host is the only supported way to reset a password on ESXi. Any other method may lead to a host failure or an unsupported configuration due to the complex nature of the ESXi architecture. ESXi does not have a service console and as such traditional Linux methods of resetting a password, such as single-user mode do not apply.

While reinstalling is not that long, it requires tedious re-configuration right after. So never forget the root password.. Again, never forget the root password.. But this statement is never fool-proof.

It helps to anticipate, so way before the forgetfulness hits you will need to setup a backdoor to the ESXi host -- passwordless SSH. And here's how to set it up.

First, you'll need to generate SSH keys. It is outlined in our previous article outlined for passwordless SSH. If you already have SSH keys in place, skip this step.

Next, you will need to copy the generated public key to the ESXi host. In order to do that, execute the command below:

cat ~/.ssh/id_rsa.pub | ssh root@[ESXi HOST] 'cat >> /etc/ssh/keys-root/authorized_keys'

Input the root password when prompted.

NOTE: Replace the string [ESXi HOST] with the fully qualified domain name of the ESXi host or its corresponding IP address.

There are other ways to do this as well. To me the above hits the spot in one line.

To verify, try to SSH to the ESXi host and see passwordless SSH do its wonders. If the above fails, make sure that the ESXi host is not in lockdown mode and/or its SSH service is running.

To increase security and protect the ESXi host from that backdoor, disable SSH service and/or put the host in lockdown mode. To turn on the backdoor, use the configuration controls via vSphere Server.

Just note that whenever an ESXi host experiences a configuration reset, the passwordless SSH settings are wiped out. Although this rarely happens, a backdoor needs to be setup again.

Share:

FAQ: PRNG is not SEEDED

"There’s No Such Thing As A Silly Question" -- does the cliche sound familiar? In this part of pimp-my-rig reloaded, technical questions are answered. Mail them to me and I will post the answers here. If you have a better answer, by all means share it with us.

Q: I was trying to help out a friend who was in a dilemma he had already resolved. While trying to scp to a host, he got the error message "PRNG is not SEEDED". Only the super-user root was able to scp, but he wanted drill down to the root of the problem. After all, who wants to execute scp as root, right?

He was able to successfully scp on other machines as himself, but on this particular machine he was only able to do it as the super-user, root. It is worthy to note here that ssh works, but scp does not.

A: When trying to run scp and you get an error message "PRNG is not SEEDED", you probably have an issue with the /dev/random and/or /dev/urandom devices on your system. These devices are created by default during system installation.

Check that proper permissions are present on random numbers generators. The correct permissions should be "others" must have "read" access to these devices. Below are the permissions on a working system:
# ls -l /dev/random /dev/urandom
crw-r--r-- 1 root system 39, 0 Jun 22 10:48 /dev/random
crw-r--r-- 1 root system 39, 1 Jun 22 10:48 /dev/urandom

To corrent, change them like below:
# chmod o+r /dev/random /dev/urandom 

Now stop and start the SSH daemon again, and retry if scp works.
# stopsrc -s sshd
# startsrc -s sshd

For unknown reasons, there are times when the files /dev/random and /dev/urandom are missing from the system. If this is the case, you will need to create them. Execute the following commands:
# stopsrc -s sshd
# mknod /dev/random c 39 0
# mknod /dev/urandom c 39 1
# randomctl -l
# ls -ald /dev/random /dev/urandom
# startsrc -s sshd

So far problems with s-commands I have encountered are related to the random generator character devices. I have encountered similar problems while trying to blank a forgotten root password and setting a new one on a Solaris machine.

You may further drill down on the cause of the problem by using strace or truss, whichever is applicable on your *nix system.

Share:

FAQ: More Secure Password-less SSH -- Windows to Linux

"There’s No Such Thing As A Silly Question" -- does the cliche sound familiar? In this part of pimp-my-rig reloaded, technical questions are answered. Mail them to me and I will post the answers here. If you have a better answer, by all means share it with us.

The password-less SSH procedure previously posted outlined the establishment of trusted logins from a Windows machine to a _nix machine. The set-up works and is very convinient to implement. However, it comes at the expense of security.

FAQ: Many would agree that an unprotected private key -- a private key with empty passphrase -- is less secure and thus exposes the account to a security threat. Not that this set-up is totally unsecure but once the private key is compromised, the account is completely vulnerable as access to it is open. Can we make the set-up a more secure then?

Protecting the private key with a passphrase is a very logical thing to do. Not only that, it is highly recommended especially on platforms or systems where security is a major concern. The private key then becomes useless without the passphrase to unlock it.

In order to accomplish this stunt, a similar set of software for the previous Windows to _nix password-less setup is required: putty.exe, puttygen.exe and pscp.exe, with the addition of pageant.exe. The tools mentioned can be downloaded off the author's website. Download the binaries enumerated.

Start off by launching puttygen.exe. This tool will generate the public and private key pairs needed for the password-less setup. This was done previously but this time, protect the private key with a passphrase. Press "Generate" and put a passphrase in the fields where it is required. Then, save the private and public keys.


Open putty.exe. Scroll down to Connection --> Data.. fill in the field "Auto-login username". For this example, the username used is "user" (fill this field with your username).


Scroll up to Session, fill up the necessary fields and save.

Open a command tool and using pscp.exe, copy the public key over to the home directory of user. The public key has to be translated to OpenSSH format, then has to be added to authorized_keys file.
user@host:~ > ssh-keygen -i -f PUBLIC_KEY >> $HOME/.ssh/authorized_keys


Now launch pageant.exe (or PuTTY authentication agent). No window will be opened but instead another icon will appear in the system tray. Right-click on this icon and select "Add Key" (see below).


Browse over to the path where the private key was saved. Key in the passphrase when prompted to do so.


(Skipping the above step will prompt the user for the password. When this happens, use the the password to the unix account not the passphrase to the private key.)

Right-click, again, on the pageant icon in the system tray and choose the session saved earlier in this guide. An ssh login will be initiated with the host without asking for a password.


There you go, a more secure password-less ssh from Windows to your _nix workstation. Access to the saved private key does not compromise security as it requires the passphrase to unlock the key. However, this introduces the dependence to pageant, where the passphrase is asked only once but password-less still.

Pageant will be void of keys each time it is launched. And, consequently, each time the private key is "added" to pageant, the passphrase will be asked to unlock the key.

Compare the password-less implementations and select which is easier, applicable and better suited for your use. Each has its own set of advantages and disadvantages.

Share:

FAQ: Password-less SSH -- Windows to Linux

"There’s No Such Thing As A Silly Question" -- does the cliche sound familiar? In this part of pimp-my-rig reloaded, technical questions are answered. Mail them to me and I will post the answers here. If you have a better answer, by all means share it with us.

Password-less SSH setups save time and hassle. It plays an important role especially when triggering scripts or copying files to a remote machine. Previous posts have outlined a few of the scenarios where the set-up can apply -- for the same account and for establishing trust between distinct accounts.

FAQ: There is another scenario where password-less ssh can apply. This scenario is very typical in support teams, as I have experienced, whereby a system administrator administers machines remotely from his Windows desktop. Can password-less ssh still apply?

Start off by downloading the necessary tools. For this trick to work, you will be needing the following software binaries: putty.exe, puttygen.exe and pscp.exe. The tools mentioned can be downloaded off the author's website. If you have them readily available, let us proceed.

Start off by launching puttygen.exe. This tool will generate the public and private key pairs needed for the password-less setup, similar to ssh-keygen.


Press "Generate" and help the software do its thing. Afterward, save the private and public keys. And when prompted with a warning for empty passphrase, confirm the save. As always, save the private key to a secure location, where only you can access it (as much as possible).


Open putty.exe. Scroll down to Connection --> Data.. fill in the field "Auto-login username". For this example, the username used is "user".


Scroll further down.. Under Connection --> SSH --> Auth. Point it to the path where the private key file was saved. This will be the private key to be used for password-less authentication.


Scroll up to Session, fill up the necessary fields and save.

Open a command tool and with pscp.exe, copy the public key over to the home directory of user. The public key has to be translated to OpenSSH format, then has to be added to authorized_keys file.
user@host:~ > ssh-keygen -i -f PUBLIC_KEY >> $HOME/.ssh/authorized_keys

Go back to putty.exe, load the saved session (double click the saved session) or click Open and see password-less ssh in action.


There you go. Password-less ssh from Windows to your _nix workstation. Give it a go and save yourself the hassle of presenting credentials again and again.

Share:

FAQ: Password-less SSH -- Two Distinct Accounts

"There’s No Such Thing As A Silly Question" -- does the cliche sound familiar? In this part of pimp-my-rig reloaded, technical questions are answered. Mail them to me and I will post the answers here. If you have a better answer, by all means share it with us.

FAQ: The previous FAQ outlined password-less ssh setup for a single account. Another scenario where password-less ssh can be set-up is on two distinct accounts. In this scenario, trust can be established one-way or two-way. Again, the question is: How can you set-up password-less ssh?

One-Way Trust. A very good application for this kind of set-up is one user account (username: user) and one application account (username: appl), where the user account is "trusted" by the application account.

Begin by generating the public and private key pair. Use ssh-keygen to generate keys. Just the same, do not use a passphrase for completely password-less logins to work.
user@host:~ > ssh-keygen -t rsa
Generating public/private rsa key pair.
Enter file in which to save the key (/home/user/.ssh/id_rsa):
Created directory '/home/user/.ssh'.
Enter passphrase (empty for no passphrase):
Enter same passphrase again:
Your identification has been saved in /home/user/.ssh/id_rsa.
Your public key has been saved in /home/user/.ssh/id_rsa.pub.
The key fingerprint is:
e8:3a:ad:11:d5:c5:89:7c:32:d6:3f:62:61:12:43:df user@host

You should be seeing the following files inside the .ssh directory (take note of the permissions):
user@host:~/.ssh > ls -la
total 17
drwx------ 2 user users  168 2008-09-09 14:42 .
drwxr-xr-x 9 user users  688 2008-09-09 14:34 ..
-rw-r--r-- 1 user users  622 2008-09-09 14:34 authorized_keys
-rw------- 1 user users 1675 2008-09-09 08:40 id_rsa
-rw-r--r-- 1 user users  396 2008-09-09 08:40 id_rsa.pub

With the public and private key pair generated, the contents of the public key (id_rsa.pub) need to be placed inside the authorized_keys file of the application account. First copy the public key over to the home directory of the application account (key in appl's password when asked):
user@host:~/.ssh > scp id_rsa.pub appl@remote:/home/appl
Password:
id_rsa.pub                                 100%  396     0.4KB/s   00:00

As user "appl", create the .ssh directory with permission 700 (drwx------). A safer and easier way to accomplish this is to generate the public and private key pair as well.

Then save the contents of user's public key to the authorized keys file.
appl@remote:~ > cat id_rsa.pub >> $HOME/.ssh/authorized_keys

On an initial set-up of password-less ssh the file id_rsa.pub can be copied to the file authorized_keys.
user@host:~ > cp id_rsa.pub $HOME/.ssh/authorized_keys

After doing the above steps, subsequent logins for user to appl (at host remote) will not ask for credentials. It will be password-less. One-way trust is established.

Two-Way Trust. As seen above one-way trust can be established by adding the contents of the user's public key to appl's authorized keys. To establish the two-way trust, appl's public key needs to be added to user's authorized keys -- the "reverse".

Generate a public and private key pair, if this has not been generated yet. Assuming that this was done in one of the steps above, all that needs to be done is to copy the public key to the home directory of user.
appl@remote:~/.ssh > scp id_rsa.pub user@host:/home/user
Password:
id_rsa.pub                                 100%  396     0.4KB/s   00:00

Likewise, save the contents of appl's public key to the authorized keys file.
user@host:~ > cat id_rsa.pub >> $HOME/.ssh/authorized_keys

Accomplishing the above steps establishes two-way trust between user and appl. If the accounts are in NIS (auto_home) or a centralized network share for home directories, trust between the accounts can be established from any machine.

In the next FAQ, the steps on password-less ssh from your Windows machine to your _nix machine will be outlined.

Share:

FAQ: Setup Password-less SSH

"There’s No Such Thing As A Silly Question" -- does the cliche sound familiar? In this part of pimp-my-rig reloaded, technical questions are answered. Mail them to me and I will post the answers here. If you have a better answer, by all means share it with us.

FAQ: The age of the use of telnet has gone past. Although it is still used in some applications, ssh seems to have become standard in remotely accessing hosts. However, trying to remotely access another machine (as yourself), you will be asked to present your credentials. This happens again and again. How then can you set-up password-less ssh?

There are several scenarios for password-less ssh. But this FAQ will only cover password-less remote access as the same user (or as yourself).

Begin by accessing a host using your own credentials. Check if the directory $HOME/.ssh already exists. If it exists, ensure that the directory permission is 700 (dwrx------). Otherwise, there is no need to worry as the directory will be created later with the proper permission.

Use ssh-keygen to generate your very own public and private key pair. Do not use a passphrase for completely password-less logins to work.
user@host:~ > ssh-keygen -t rsa
Generating public/private rsa key pair.
Enter file in which to save the key (/home/user/.ssh/id_rsa):
Created directory '/home/user/.ssh'.
Enter passphrase (empty for no passphrase):
Enter same passphrase again:
Your identification has been saved in /home/user/.ssh/id_rsa.
Your public key has been saved in /home/user/.ssh/id_rsa.pub.
The key fingerprint is:
e8:3a:ad:11:d5:c5:89:7c:32:d6:3f:62:61:12:43:df user@host

The above command "ssh-keygen -t rsa" initiated the creation of the key pair. The private key was saved in .ssh/id_rsa. This file is read-only and only for you. No one else must see the content of that file, as it is used to decrypt all correspondence encrypted with the public key, which is aptly named .ssh/id_rsa.pub.

NOTE: Generate the key pair file only once. Otherwise, subsequent re-generations of the key pair will invalidate other password-less set-ups already working for you.

With the public and private key pair generated, the contents of the public key (id_rsa.pub) need to be placed inside the authorized_keys file.
user@host:~/.ssh > cat id_rsa.pub >> authorized_keys

On an initial set-up of password-less ssh the file id_rsa.pub can be copied to the file authorized_keys.
user@host:~/.ssh > cp id_rsa.pub authorized_keys

After doing the above steps, subsequent logins will not ask for credentials. It will be password-less.

Aside from sparing yourself from the hassle of being asked a password for each login, password-less ssh can be deployed and has proven to be advantageous in a lot of situations.

In the next FAQ, the steps on password-less ssh for different users and/or different machines will be outlined.

Share:

Subscribe for Latest Update

Popular Posts

Post Labels

100gb (1) acceleration (1) acrobat (1) adblock (1) advanced (1) ahci (1) airdrop (2) aix (14) angry birds (1) article (21) aster (1) audiodg.exe (1) automatic (2) autorun.inf (1) bartpe (1) battery (2) bigboss (1) binance (1) biometrics (1) bitcoin (3) blackberry (1) book (1) boot-repair (2) calendar (1) ccleaner (3) chrome (5) cloud (1) cluster (1) compatibility (3) CPAN (1) crypto (3) cydia (1) data (3) ddos (1) disable (1) discount (1) DLNA (1) dmidecode (1) dns (7) dracut (1) driver (1) error (10) esxi5 (2) excel (1) facebook (1) faq (36) faucet (1) firefox (17) firewall (2) flash (5) free (3) fun (1) gadgets (4) games (1) garmin (5) gmail (3) google (4) google+ (2) gps (5) grub (2) guide (1) hardware (6) how (1) how-to (45) huawei (1) icloud (1) info (4) iphone (7) IPMP (2) IPV6 (1) iscsi (1) jailbreak (1) java (3) kodi (1) linux (28) locate (1) lshw (1) luci (1) mafia wars (1) malware (1) mapsource (1) memory (2) mikrotik (5) missing (1) mods (10) mouse (1) multipath (1) multitasking (1) NAT (1) netapp (1) nouveau (1) nvidia (1) osmc (1) outlook (2) p2v (2) patch (1) performance (19) perl (1) philippines (1) php (1) pimp-my-rig (9) pldthomedsl (1) plugin (1) popcorn hour (10) power shell (1) process (1) proxy (2) pyspark (1) python (13) qos (1) raspberry pi (7) readyboost (2) reboot (2) recall (1) recovery mode (1) registry (2) rename (1) repository (1) rescue mode (1) review (15) right-click (1) RSS (2) s3cmd (1) salary (1) sanity check (1) security (15) sendmail (1) sickgear (3) software (10) solaris (17) squid (3) SSD (3) SSH (9) swap (1) tip (4) tips (42) top list (3) torrent (5) transmission (1) treewalk (2) tunnel (1) tweak (4) tweaks (41) ubuntu (4) udemy (6) unknown device (1) updates (12) upgrade (1) usb (12) utf8 (1) utility (2) V2V (1) virtual machine (4) VirtualBox (1) vmware (14) vsphere (1) wannacry (1) wifi (4) windows (54) winpe (2) xymon (1) yum (1) zombie (1)

RANDOM POSTS