Showing posts with label virtual machine. Show all posts

TWEAK: Quantifiably Measure Boot Time Optimizations

If there is a word that first comes to mind when running virtual machines (VM), I would say "lean". Meaning, if the VM does not need to run a certain service, then, disable it; ensure that only the services required should be running. This will not only improve utilization but it does free up resources, thereby minimizing the probability of contention. If you are using cloud services, the pay-per-use model pays out the leaner the virtual machine.

On the flip side, knowing which services really do contribute to a big reduction to wastage is key. The question then: How do you quantifiably measure which optimizations give the most bang for your buck? Read on..

One thing to note, this tweak will only work on modern Linux operating systems with systemd. The old-school "init"-run systems will not be able to run the command, as the required binaries will not be present.

The above statement is the give-away to the command used. In order to do this, execute the command "sudo systemd-analyze plot > some-file.svg" on a terminal window. Then open the resulting output file, in this case "some-file.svg" in your browser. Prior to making tweaks, take a baseline measurement and see where optimizations can be applied. Subsequently, after another tweak, run the same command again to measure and compare the results with the baseline.

The added benefit of executing this procedure is that, you also get an idea of the time it takes to boot-up your virtual machine.
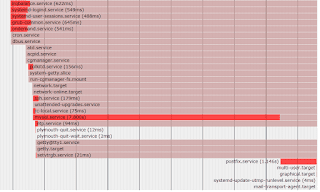
systemd-analyze plot

Having done this baseline measurement in my virtual machine, I now know that it takes ~16seconds to boot-up. And that, the postfix service is taking its time to start-up causing my virtual machine a few seconds delay to completely boot. Understandably, mysql.service takes a while to start causing an additional ~7secs to boot time. I really cannot disable that service but I could optimize elsewhere.

If I really don't require postfix running there. It would shave off ~1sec off the boot time. But really, ~16secs boot time is not bad.

Out of curiosity, I ran the same command in my AWS EC2 instance. The screenshot is below.

AWS EC2 systemd-analyze

It is amazing to see that the EC2 instance, with a MySQL database running, only takes ~8secs to boot-up. Now that is lean or what!

 RELATED: P2V (Physical to Virtual) Prep Work for Ubuntu

Go ahead and see if you can make tweaks in your environment. Let me know if this has helped by your comments and feedback.

Share:

TIP: Rename Ubuntu16 Interfaces Back to ethX

If you have been working on Linux for a while, you will probably be very used to interface names that are ethX (eth something). In Ubuntu16 LTS, this is no longer the case. There is a long debate about this issue as it seems, and eventually this is the result. This post does not intend to spark another debate, nor feed the flames. The intention is that if you want to revert back to the "legacy" behavior you can, of course. And here's how.

Before that, in order to have a better picture of what and why, this change was introduced in systemd V197 and the explanation is discussed in lengthy detail. Visit the link to be better informed regarding the change and why it was put forward.

As put forth:
Starting with v197 systemd/udev will automatically assign predictable, stable network interface names for all local Ethernet, WLAN and WWAN interfaces. This is a departure from the traditional interface naming scheme ("eth0", "eth1", "wlan0", ...), but should fix real problems.

The manifestation of this in a new install of Ubuntu16 LTS virtual machine is an interface named "ens192".

Ubuntu New Interface Naming

To put it back to the original naming convention, edit the file /etc/default/grub. Look for the line:
GRUB_CMDLINE_LINUX=""
 ... change it to:
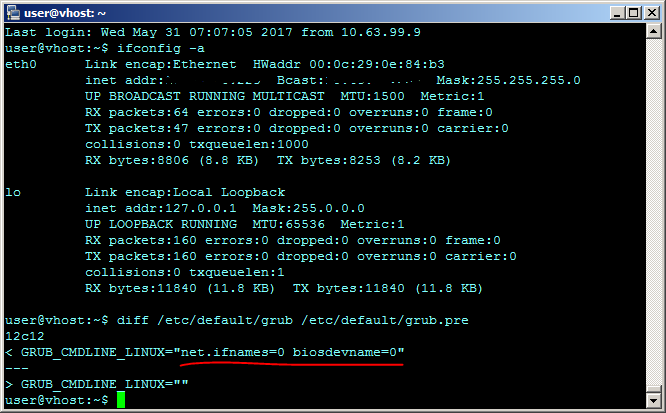
GRUB_CMDLINE_LINUX="net.ifnames=0 biosdevname=0"

Then execute, "update-grub" on a terminal. Next, edit the file /etc/network/interfaces and change all instances of ens192 (this the interface assigned to my virtual machine and may not be the same as yours).

WARNING! Do not reboot yet if you have no access to the console. You may permanently lose network connectivity as a result of this change! To make the change(s) take effect, reboot.

Executing the above steps, gave me back the network interface "eth0".

Ubuntu Legacy Interface Naming

Following best practice, I created a backup of the file /etc/default/grub prior to making the change. This is a screenshot of the diff between the current file and the file prior to the change.

Diff of Grub After Modification

 RELATED: P2V (Physical to Virtual) Prep Work for Ubuntu

I have not executed this on a virtual machine with multiple interfaces. My suggestion on how to execute this procedure on a host with multiple interfaces is to go about the change one interface at a time. So far, this suggestion has worked for a friend whom I gave this advise to.

Share:

HOW-TO: LAN Configuration of a Mikrotik Virtual Router

In the previous article, we discussed about the configuration of the Mikrotik router, with particular focus on connectivity and protection from unauthorized access. This time, we could start with specific services that it will provide to the local area network (LAN).

Configuring on the LAN side, requires that we prevent locking ourselves out of the router while executing changes. What does this mean? Any change that will potentially disconnect us from the router will be blocked. The router is smart enough to figure this out. In the Mikrotik linggo, the term used to refer to this is "safe mode". The name itself is very intuitive!

To enable safe mode, simultaneously press [CTRL]+[X] on the keyboard. The same set of hotkeys used for "cut" to those familiar with the Windows world. Upon enabling safe mode, the terminal prompt changes with the string ‹SAFE› appended to it. You will see that in the screenshot below.

Mikrotik SSH Safe Mode

To release safe mode, the same set of keys are used. Similarly, the prompt returns to normal and it shows that safe mode is no longer in effect.

Mikrotik SSH Safe Mode (Toggle)

Without further ado, let us configure the router to be able to perform DNS lookups for our network. This configuration forwards queries to Google's public DNS servers (8.8.8.8 and 8.8.4.4) at the same time caches the queries in the router's memory. Change the DNS servers to your own if Google's DNS servers are not desired.
/ip dns
set allow-remote-requests=yes cache-size=4098KiB servers=8.8.4.4,8.8.8.8

Next, let us prepare the network segments used on the LAN side by defining an IP pool. This will be used for DHCP services later. Let us assume a segment from 192.168.1.0/24.
/ip pool
add name=POOL1 ranges=192.168.1.11-192.168.1.239

Once the pool is defined, let's use that pool for DHCP services. This is done in two-parts. First, define the network segment.
/ip dhcp-server network
add address=192.168.1.0/24 comment=LOCAL_LAN dns-server=192.168.1.1 \
 domain=pimp-my-rig.local gateway=192.168.1.1 \
 ntp-server=NTP_SVR_IP_HERE wins-server=WINS_SVR_IP_HERE

Second, define the DHCP directive.
/ip dhcp-server
add add-arp=yes address-pool=POOL1 authoritative=yes disabled=no \
 interface=ether3 lease-time=1d name=DHCP1

This configuration will not be complete without assigning the LAN gateway IP address to an existing interface on the router. In this case, it is ether3.
/ip address
add address=192.168.1.1/24 comment=LOCAL_LAN interface=ether3 network=192.168.1.0

At this point, the router is able to provide communication between the devices in the local area network. It will be able to support devices that require dynamic host configuration protocol (or DHCP) for automatic configuration of IP addresses. Internet connectivity could not be established since the RFC1918 addresses (to which the 192.168.0.0/16 network belongs) are non-routable on the internet. What needs to happen is network address translation (or NAT). And the Mikrotik router is just as able to perform this task. We will discuss that in the next article.

 RELATED: Initial Configuration of a Mikrotik Virtual Router

For now the router is able to provide network connectivity to hosts within the LAN. It could provide DHCP addresses and cache DNS queries. Please note that all capitalized configuration keywords (e.g. POOL1, DHCP1 and LOCAL_LAN) can be replaced with your own naming convention(s).

Share:

HOW-TO: Initial Configuration of a Mikrotik Virtual Router

This year, I shifted technology specialization away from the infrastructure profession to data science, with more particular focus on data cleansing, mining, and archiving and warehousing. And necessities sometimes require application of my infrastructure background and experience. This is what I like about my new assignment -- never a boring day. Had the chance to work on selection of virtual routers, to which I ended up shortlisting two of them, namely, VyOS and Mikrotik.

Eventually, the pick ended up Mikrotik. And will be posting several notes on my adventure with Mikrotik Virtual Router. For all intents and purposes, this post pertains to VMware setup on x86 architecture. For now let us cover the initial setup.

After downloading the ISO from the Mikrotik website (obtain a license as well), prepare the virtual machine. On mine, I set it up with 2 vCPUs, 512MB of memory and 1GB of disk space. Remove other hardware from the initial configuration (e.g. Floppy Drive, USB ports, etc) that a network router will not have. The setup is pretty straight forward, so let's skip that part and assume it went well.

While on the Mikrotik website, download their utility application called "winbox". This will come in very handy to configure the router.

Other tutorials suggest to rename the network interfaces to WAN and LAN; others, ether1-gateway and ether2-local. On mine, I left them as is. So you don't get confused on my setup, ether1 is facing the ISP (my primary WAN link), ether2 is facing the backup WAN, and ether3 is facing my local area network. Please note that all my network interfaces use the vmxnet3 virtual network cards. You may add as many NICs as you need, but for me this is enough for my requirement.

Your ISP will probably give you both a /30 and /29 IP block. You will need that information. I cannot provide the particulars of my address blocks so for all intents and purposes, let us assume that to be 1.1.1.1/30. To make things easier to interpret, you may plug that information in an IP calculator to obtain more details that need to be added to the router configuration.

IPCALC IP Calculator

Assign that /30 IP address on the Mikrotik router. This is could be done a couple of ways.. First the winbox (GUI) way, IP » Addresses and put the IP address information and set it on interface ether1. Via CLI (terminal on winbox, or telnet, or SSH), /ip address add address=1.1.1.2/30 network=1.1.1.0 comment=WAN-PRI interface=ether1. The router will be reachable at its default address of 192.168.88.1/24 (username is "admin" without a password). Note that 1.1.1.2/30 (address) and 1.1.1.0 (network) were taken from the IP calculator, as seen above.

Next, secure and protect the router from external access by putting a password, turning off unnecessary services and putting firewall rules.

For my setup, I provided a password for admin then limited its access to the console. I created another password-protected username with full admin access but unlike admin its limits allow access from the LAN.
/user set admin password=PASSWORD address=127.0.0.1/32
/user add name=pimp-my-rig password=PASSWORD group=full address=192.168.0.0/16

After setting the admin password, you may choose to disable it. And use another administrative account in its place. Simply append the string "disabled=yes" to the line containing admin. This makes it harder for external hacks to your router especially since it is the router facing your ISP.

Unwanted Services. Access to the router is open by default. It needs lockdown to be secure. I also disabled services that I no longer need. You will see those below with the "disabled=yes" string appended.
/ip service
set telnet address=192.168.0.0/16 disabled=yes
set ftp address=192.168.0.0/16 disabled=yes
set www address=192.168.0.0/16 disabled=yes
set ssh address=192.168.0.0/16
set www-ssl address=192.168.0.0/16 disabled=yes
set api address=192.168.0.0/16 disabled=yes
set winbox address=192.168.0.0/16
set api-ssl address=192.168.0.0/16 disabled=yes

Execute a "print" to check the current configuration. You should see something similar.

Mikrotik Router Default Services

Firewall. Extend the protection to the built-in firewall. The rules I used are below.
/ip firewall filter
add chain=input action=tarpit protocol=tcp in-interface=!ether3 \
 comment="TARPIT connections not coming from LAN (ETH3)"
add chain=input action=drop in-interface=!ether3 \
 comment="DROP other traffic not comming from LAN (ETH3)"

Execute a "print" to check the current configuration. You should see something similar.

Mikrotik Router Initial Firewall

Rules are interpreted from top to bottom and the lesser rules there are the faster the router performs. Not to mention lesser resources are consumed. This should be pretty much lockdown the router while it allows configurations and customizations from the console or terminal sessions from the LAN interface. I will post configuration on the LAN side and services like DNS, DHCP, web-proxy and NTP in succeeding articles.

You may also opt to drop external traffic rather than tarpit. For more information regarding the action tarpit, refer to this excellent explanation from Wikipedia.

 RELATED: Install Adblock on Raspberry Pi via Pi-Hole

I am a CLI guy so I did my configuration mostly on the command line. Hope this helps you in getting your router up and running.

Share:

Subscribe for Latest Update

Popular Posts

Post Labels

100gb (1) acceleration (1) acrobat (1) adblock (1) advanced (1) ahci (1) airdrop (2) aix (14) angry birds (1) article (21) aster (1) audiodg.exe (1) automatic (2) autorun.inf (1) bartpe (1) battery (2) bigboss (1) binance (1) biometrics (1) bitcoin (3) blackberry (1) book (1) boot-repair (2) calendar (1) ccleaner (3) chrome (5) cloud (1) cluster (1) compatibility (3) CPAN (1) crypto (3) cydia (1) data (3) ddos (1) disable (1) discount (1) DLNA (1) dmidecode (1) dns (7) dracut (1) driver (1) error (10) esxi5 (2) excel (1) facebook (1) faq (36) faucet (1) firefox (17) firewall (2) flash (5) free (3) fun (1) gadgets (4) games (1) garmin (5) gmail (3) google (4) google+ (2) gps (5) grub (2) guide (1) hardware (6) how (1) how-to (45) huawei (1) icloud (1) info (4) iphone (7) IPMP (2) IPV6 (1) iscsi (1) jailbreak (1) java (3) kodi (1) linux (28) locate (1) lshw (1) luci (1) mafia wars (1) malware (1) mapsource (1) memory (2) mikrotik (5) missing (1) mods (10) mouse (1) multipath (1) multitasking (1) NAT (1) netapp (1) nouveau (1) nvidia (1) osmc (1) outlook (2) p2v (2) patch (1) performance (19) perl (1) philippines (1) php (1) pimp-my-rig (9) pldthomedsl (1) plugin (1) popcorn hour (10) power shell (1) process (1) proxy (2) pyspark (1) python (13) qos (1) raspberry pi (7) readyboost (2) reboot (2) recall (1) recovery mode (1) registry (2) rename (1) repository (1) rescue mode (1) review (15) right-click (1) RSS (2) s3cmd (1) salary (1) sanity check (1) security (15) sendmail (1) sickgear (3) software (10) solaris (17) squid (3) SSD (3) SSH (9) swap (1) tip (4) tips (42) top list (3) torrent (5) transmission (1) treewalk (2) tunnel (1) tweak (4) tweaks (41) ubuntu (4) udemy (6) unknown device (1) updates (12) upgrade (1) usb (12) utf8 (1) utility (2) V2V (1) virtual machine (4) VirtualBox (1) vmware (14) vsphere (1) wannacry (1) wifi (4) windows (54) winpe (2) xymon (1) yum (1) zombie (1)

RANDOM POSTS