Showing posts with label article. Show all posts

ARTICLE: SBSettings -- Manage iPhone Settings Better

There are numerouse reasons why people jailbreak or root their smart phones. One of the many reasons is -- to use applications they can't or aren't authorized to use otherwise. I share this sentiment with the many. And just like any tool, there are advantages as well as disadvantages. Just like the trade-off between functionality and security, the choice should be left to you, not made for you. After all, you were the one who paid for the device.

Let's discuss the jailbreak of the iPhone in particular. Regardless of your reasons, I know you are interested in the jailbreak to make more use of your iPhone, to install an application that makes more efficient use of the device. The particular application I'm referring to is SBSettings. If you have a jailbroken iPhone this application can be installed via Cydia.

SBSettings can turn communication features on or off by tapping the icon. A red icon means the feature is turned off while the green icon means the feature is turned on. The screenshot below best describes the state of the communication features.
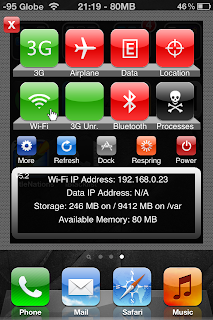
SBSettings Screenshot

As seen from above, SBSettings is a one-stop shop to turn on or off 3G, wifi, bluetooth or airplane mode. Otherwise, you would have to scroll through different screens to get all these done.
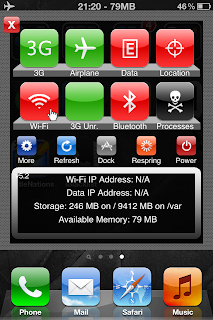
Airplane Mode

From the above screen you may power off or reboot the device as well. It can also be used to re-spring the device. So, SBSettings is a simple tool to get to many functions at once.
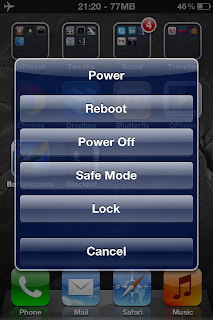
Power Options

Tapping the lowest right icon (Processes), lets you close applications. Think of it as your simplified task manager. As you can see, there are a lot of functionality SBSettings can offer without too much hassle.

iPhone Task Manager

I set my SBSettings to launch on a three-finger pinch. But it can be launched from different key stroke combinations.

And, did I mention it's free? So if you decide to jailbreak your iPhone, SBSettings is the next app to install.

Share:

INFO: What is a "Sticky Bit"?

At a recent job interview, I was asked this question. I was able to satisfactorily answer the question but failed to answer the follow-up question -- what is the difference between the sticky bit "t" (small letter) and the sticky bit "T" (bold letter)? This experience led me to improve my knowledge further. This post is dedicated to the experience I had, and to share the knowledge to those who quest for it.

What is the "Sticky Bit"? ("t" and "T"). The sticky bit is primarily used on shared directories with open permissions, such as /var/tmp and /tmp. Directories with open permissions (or publicly writable) present a lot of problems because users **CAN CREATE** files, **READ/EXECUTE** files owned by other users, and at the same time are **ALLOWED EDIT/REMOVE** privileges to files owned by other users.

With sticky bit set on publicly writable directories, users **CAN CREATE** files, **READ/EXECUTE** those files as well as files owned by other users, but are **NOT ALLOWED EDIT/REMOVE** privileges to files they don't own. The only exception to this is the super-user root which can edit or remove files.

In simple terms, sticky bit is used to indicate special treatment of certain directories. A directory for which the sticky bit is set restricts deletion or modification of files it contains. A file in a sticky bit set directory may only be removed, modified or renamed by a user who has write permission on the directory, and either owns the file, owns the directory, or is the super-user. This is useful for directories such as /tmp, which must be publicly writable, but should deny users permission to arbitrarily delete or rename the files of others.

It is worthy to note here that the directories with open permissions (or publicly writable) can be any arbitrary directory, not just limited to /tmp and /var/tmp. Its just that /tmp and /var/tmp exist by default on the system.

Which directory has sticky permissions? How do you identify a directory that has sticky bit set? To illustrate further see the example below.

user@host# ls -ld /sticky/directory
drwxrwxrwt  2   user   group   512   Jun 20 11:02  /sticky/directory

On the output of the "ls" command, see the "t" (on drwxrwxrwt)? That tells us that the sticky bit is set.
A "T" refers to when the execute permissions are OFF.
A "t" refers to when the execute permissions are ON.

How to set sticky bit permissions. The leading "1" in the "chmod" command sets the sticky bit.
user@host# chmod 1777 /sticky/directory (permissions for "other" have execute bit ON) 
drwxrwxrwt
user@host# chmod 1776 /sticky/directory (permissions for "other" have execute bit OFF)
drwxrwxrwT

The equivalent of the above commands in another syntax.
user@host# chmod o+t /sticky/directory
user@host# chmod o+x /sticky/directory
drwxrwxrwt        
user@host# chmod o+t /sticky/directory
user@host# chmod o-x /sticky/directory
drwxrwxrwT
Or..
user@host# chmod o=rwxt /sticky/directory
drwxrwxrwt        
user@host# chmod o=rwt /sticky/directory
drwxrwxrwT

There you go, more information regarding sticky bit. To my knowledge, sticky bit for files are not supported by any modern implementation of Unix or Linux. It is only significant and applicable to directories.

Share:

INFO: Google Plus Invites Now Open!

Google has re-enabled invitation for Google+ and since I have been previously invited, I am now part of the new social networking craze of Google. It is nice to see that I have friends who have added me to their circles as well.

Head over to Google+ and find out if you can register. Open your browser and key in this URL: http://plus.google.com.

Google Plus Invites Now Open

Make sure you read the terms of service. I have heard rumors of accounts getting banned due to Google+ misuse.

Share:

INFO: Metro Manila Traffic Navigator

Are you by any chance living or planning to live in the Philippines? Or do you plan to visit the Philippines? If you are, chances are you will visit or pass by Metro Manila. Traffic in Metro Manila is probably one of the worst in the world. Traffic will eat up much of your travel time.

Many have attempted to put in place solutions to decongest the Metro. And one that seems to be working is the color coding scheme -- where, depending on your license plates ending number, you are not allowed to enter major thoroughfares at certain periods of the day. But even though this scheme is in place, traffic seems to be a burgeoning problem that remains.

Another clever and intuitive solution that just surfaced is the traffic update website that TV5 and MMDA has brought into existence. This they dubbed the Metro Manila Traffic Navigator (BETA).

The website has a very nice and clean interface that is easy to use. The system view offers a glimpse of the major thoroughfares of the metro and the traffic update is color-coded. Green for light traffic, amber for moderate traffic and red for heavy traffic. It immediately makes sense at first glance.

Metro Manila Traffic Navigator


Also included are six major routes -- EDSA, Quezon Avenue, Espana, C5, Roxas Blvd and SLEX. Putting a monitoring system for roads with most volume of traffic is an excellent idea. The views of each line are broken down into sections, each with their own traffic conditions. And you can probably expect more coverage in the future.

Metro Manila Traffic Navigator


The "system view" as well as the "line views" update themselves every 10-15 minutes without any need to refresh the browser.

Not only that, you can also find a link to google maps link for each of the sections of the routes. Not bad.

What we're wishing for is a subscription for GPS traffic updates. On the road, it would be unwise to drive and glance at the site once in a while. Having the traffic updates sent to your GPS unit probably is the best solution. Were not aware of this kind of service currently being offered in Manila or anywhere else in the Philippines.

For now, check the site to plan out the less congested route to get to your destination. This beats having no information at all.

Taking the initiative to put up this traffic updates website is indeed a very good idea. Kudos to TV5 and MMDA for this service!

Share:

INFO: IT Graduates Not Well Trained

I didn't graduate from an IT course, nor is my degree IT related but my work is IT related. When I read this story, it definitely caught my attention. I can relate as most of my knowledge in IT, I didn't gain in school but rather from job experiences. But even though I graduated years ago, not much has changed.. or so it seems.

More on the story as published by PCWorld:
There is a disconnect between students getting high-tech degrees and what employers are looking for in those graduates.

Employers agree that colleges and universities need to provide their students with the essential skills required to run IT departments, yet only 8% of hiring managers would rate IT graduates hired as "well-trained, ready-to-go", according to a survey of 376 organizations that are members of the IBM user group Share and Database Trends and Applications subscribers.

The study found nearly 4 out of 10 respondents report that their IT hires are not sufficiently prepared to perform jobs within their companies, and another 44% say, at a minimum, that there are noticeable gaps in their skills.

The report indicates that organizations are ready to hire, with employers reporting they are seeking the following skills from higher-education institutions:

- 77% want schools to provide programming skills
- 82% seek database skills
- 76% would like schools to provide analysis and architectural skills
- 80% seek problem solving and technical skills

This skills gap apparently doesn't stop organizations from hiring professionals with little, if any previous experience. The survey found that nearly half of companies responding to the survey hire new IT employees straight out of school. Two-thirds of organizations do require at least some college internship experience among their hires, according to the study.

The study went on to note that 59% of respondents indicate that they are either currently hiring or planning to hire programmers and developers in the coming months; 43% are hiring systems programmers and systems analysts; 50% are hiring database professionals; 36% are hiring analysts and architects, and 27% seek supplication management talent.

A Network World story last year cited a Dice.com survey that said Java development supplanted IT security as the most difficult skill set for hiring managers to locate. Virtualization jobs, meanwhile, have become easier to fill, but hiring managers are increasingly having trouble finding talented software developers and C# programmers, according to the survey.

The top 10 list of most difficult positions to fill is as follows:

1. Java/J2EE
2. Security
3. Software Developer
4. SAP
5. Database Administrator
6. .NET
7. Oracle
8. SharePoint
9. C#
10. Active Federal Government Security Clearance

The last item on the list refers to tech professionals with the necessary federal security clearance to work for government agencies and government contractors, such as Lockheed Martin.

Published on: http://www.pcworld.com/businesscenter/article/220771/it_graduates_not_welltrained_readytogo.html

Share:

INFO: npackd -- Package Manager for Windows

Most of the operating systems I'm familiar with come with a package manager to simplify installs, uninstalls, and updates. Maybe I'm just used to *nix way of doing things and its command line. However, these operating systems have provided sysads the easier job of administration with just a few commands. It's logical and intuitive, especially from a support perspective.

In contrast, Microsoft and its Windows family of operating systems seem to be missing a similar tool. Even third parties have tried to design a radical solution and most have failed. But there seems to be a project ongoing to bridge the gap Microsoft failed to plug. This project is npackd (pronounced unpacked).

Npackd can be downloaded from its google code project hosting page. From its project page:

Npackd (pronounced "unpacked") is an application store/package manager/marketplace for applications for Windows. It helps you to find and install software, keep your system up-to-date and uninstall it if no longer necessary. You can watch this short video to better understand how it works. The process of installing and uninstalling applications is completely automated (silent or unattended installation and un-installation). There is also a command line based version of Npackd.

Npackd is a free Windows package manager that aids the user in discovering, installing, updating and uninstalling applications. From first use, it has already helped me discover a few programs that prove to be useful in the Windows environment.

When launched, the application will check its repository for updates. Then, it lists down the packages that are available from the repository including their respective versions. Also included in the list are the programs that are installed -- whether via npackd or through their own standalone installers -- and if an update is available.

npackd Package Manager for Windows

It only lists down installed programs that are available in its repository. If a program is installed but npackd is not "aware" of the program, it is not listed. The way it looks, npackd only lists opensource or free programs.

Since the list is quite long, npackd has a text box for searching for a particular application. Search begins as characters are typed in. Also part of the filtering mechanism are category listing as to whether the applications are installable, installed, updatable and a combination of two of those categories.

npackd Package Manager for Windows

Installing, updating and uninstalling are done via buttons on the toolbar. Also provided is a button that opens the default browser to the homepage of the particular application.

Npackd, in its current version, can only update and uninstall programs that it installed. Meaning, even if npackd is aware of the program, once it is installed via the program's standalone installer npackd cannot update nor uninstall it.

Multiple installations could not be done in one click. Installs must be done one at a time. This feature could be in the development wishlist and en-route for future releases. For me, this is really a good nice-to-have.

Like installing, updating is done in a single click. Still one at a time. Although here, instead of simply downloading the update the process involves uninstalling the old version, downloading the installer of the updated version and finally installing it.

Regardless of its limitations, npackd is a step in the right direction. I find it a really useful tool most especially a central point in administering software installations. As more people become aware of its existence, npackd will have more contributors, as well as developers.

Share:

ARTICLE: Flash Without Adobe Flash Player

Flash is making eye-candy on the web. It enabled some applications to interface with browsers. Even movies and clips are streamed online using flash. Dynamic contents are delivered via scripts to flash containers and displayed to the end user in a nice interface.

But did you ever notice why flash has not penetrated nor gained ground in the mobile world? Though it may be actively developed, flash content in the mobile arena is virtually non-existent. And one of the big reasons behind it is battery life. While flash may be dominating media and content delivery, it can dramatically shorten battery life and that would be detrimental to mobile devices.

And since Adobe dominates this arena for a while now, we can have another alternative to Flash -- DivX web player. While Adobe seems to be holding the de facto standard when it comes to flash, it is no longer the lone player in this field.

The DivX HiQ browser plugin (a component of DivX web player) enables playback of flash-based video and it promises better performance, better video quality and most of all better battery life. That is indeed good news for mobile users. We shall soon see if Divx delivers its promise.

There are a lot of limitations to DivX Web Player. Currently, it can only support movies and streaming media. In terms of browsers, Firefox 3.6 is supported while the later Firefox 4 is not and until Google Chrome 9. Starting from Google Chrome 10, the plug-in is no longer compatible. All these deficiencies are tantamount to the technological gaps that DivX Web Player needs to fill.

The browser used is Mozilla Firefox 4.0.1 and the plugins, the latest Flash Player V10.3.181.14 and DivX Web Player 2.1.1.94. The test video, the HD trailer of Iron Man streamed from YouTube at 1080P resolution.

I know the current DivX Web Player is not compatible with Firefox 4, but you can "force" it to be compatible. More on that in another post but this is how the trailer is streamed with DivX in Firefox.


.. while below is the screenshot with the Flash Player plugin.


While the video is streaming, the CPU usage is monitored in the background for comparison in terms of performance. And DivX delivered its promise here. CPU usage with the DivX plugin is lower compared to that with the Flash Player. This, in a larger picture, explains the shorter battery life when using flash based content.


DivX web player still has a lot of room to improve. But on the aspects it covers, like streaming movies or clips, it definitely gives Adobe Flash Player a run for its money.

Share:

INFO: What Exactly Happens in Facebook Every 20minutes

This demographic is really interesting. Click on thumbnail for a larger image.

(credits to the owner)


Share:

MODS: Popcorn Hour C-200 (PCH-C200) Heatsink Mod

My Egreat EG-M31B broke down over a month ago. When powering it up all the LED indicators light up but there is no display on the TV. There isn't much I can do about it and the internet doesn't offer any help on the matter. Eventually, I simply replaced the media player. I got myself a Popcorn Hour C200.

The C200, they say, is one of the best players around. And I concur. But it does come with its set of downsides -- it becomes hot over time and it needs a better cooling system. A network media tank (NMT) this expensive should not be skimped out on components.

The OEM heatsink is too small. After an hour of using the NMT, put your hand over the top cover and you would notice it is warm to the touch. How much more the heatsink itself!


Fortunately, I still have a Zalman ZM-NBF47 fanless northbridge heatsink. So I thought it would serve the purpose quite well. But first I tried to search if this heatsink is compatible with the C200. My quest to find answers came out empty. So I could be the first to try it out, the guinea pig -- my C200.

After trying several positions in fitting the heatsink, my assumptiom was right. My efforts proved to be very fruitful! The ZM-NBF47 fit the C200 very well (see picure below).


Before permanently mounting the heatsink to the C200's board, I compared the original OEM heatsink with the NBF47. Snapshot posted below.


To further improve the cooling modifications on my C200, I equipped it with a 60mm fan. I took it from an old RedFox heatsink that I kept way back from the Pentium III days. It still works and being a 12V .20A fan, it is whisper quiet. Just plugged it to the fan header provisioned on the C200 board.


The mods on the C200 made it cooler now and the top cover is no longer warm to the touch even if used for hours on end.

Share:

TWEAK: Filter Unread Emails in Gmail

I thought I'd share a few tricks on the use of Gmail and Google. This is no secret but for the benefit of those who don't know them yet, here goes.

Gmail. Did you know that the average individual would spend around 47 minutes a day checking emails? While if you are at work it would consume about 2 hours to sift through and read business related emails (reference material). Although that data is old, it still highlights the time it takes to read emails.

But while we're just average folks spending about an hour in front of the computer, it would be a good idea to cut down on that hour and spend it on more meaningful things rather than click thru emails. One step to be that efficient is to be able to see unread mails at a glance.

Outlook has this filter already in place. You can even customize search folders in outlook. But most users (me included) just browse through webmail. And this is where the challenge starts. Gmail doesnt have this filter; but Yahoo! Mail does.

However, I prefer Gmail over Yahoo! Mail. And while this is not a debate about the better mail service (and I would not want to start one), I use Gmail as a personal preference. One mailbox to make life simpler. Sadly, Gmail doesn't have this unread messages filter just yet. And it is about time for that feature.

While waiting for it, you can use a tweak for now. It is a simple tweak. Browse to your personal Gmail inbox and after logging in, key in "is:unread" on the search bar. You will then be presented with the unread messages only.

There you go, a filter for unread messages in Gmail. Since this is a really simple tweak, it wouldn't hurt to integrate that to the Gmail page as a button to click. Til then you may use the "is:unread" tweak.

Google Search. You probably have read about this tweak in the many webpages you have visited in the past but for the sake of those who haven't, here's a trick that puts Google's search engine algorithms to good use.

Google can be used to conduct a search for almost any file type, including Mp3s, PDFs, and videos. Open web directories are one of the easiest places to quickly find an endless quantity of freely downloadable files. It is a wonder in this age of security, that there still are webmasters failing to secure their web servers.

Try opening google.com (or click here). On the search bar, key in any of the following you are looking for.

To find music:
inurl:(htm|html|php) intitle:"index of /" +"parent directory" +size 
+(wma|mp3) "Justin Beiber"

To find videos:
inurl:(htm|html|php) intitle:"index of /" +"parent directory" +size 
+(mpg|wmv|avi) "Iron Man"

To find PDFs:
inurl:(htm|html|php) intitle:"index of /" +"parent directory" +size 
+(chm|pdf|doc) "Red Hat"


You can find just about anything -- given the right keywords. You can even view "unsecured" webcams. But I will leave it to you to find out how.

Share:

ARTICLE: Hard Drive Performance Tweaks

It is no secret that the hard drive is the slowest (and probably the least improving part) of the average desktop. Although the price per gigabyte has dropped significantly over the past few years, the transfer speed has not increased as equally in proportion.

And, as many of you already know, the fastest desktop can only go as fast as the slowest component -- which we know to be the hard drive. How then can you squeeze the best performance out of the slow hard drive? With tweaks of course. Here's how.

First, disable the index service and remove indexing of the drive contents. Open windows explorer and right click on drive C (Local Drive C:). Untick "Allow Indexing Service to index this disk for fast file searching" (ignore all files that cannot be changed). You will find a similar window like the one below.

Hard Drive Performance Tweaks


Next, disable file and directory access times. Each time a file is accessed, the access time is modified and this adds I/O to the drive. Disable it to increase throughput. Save the registry entry below and merge to your registry.

REGEDIT4

; NTFS tweaks
[HKEY_LOCAL_MACHINE\SYSTEM\CurrentControlSet\Control\FileSystem]
"NtfsDisableLastAccessUpdate"=dword:00000001

If you want to do it via command line, open a command window and key in:

FSUTIL behavior set disablelastaccess 1

The registry merging above requires a reboot. So the command line is the better alternative. But to make sure that the registry contains the change you may opt to do both. You may choose to reboot after defrag. See below.

And lastly, the most significant tweak of all.. Defrag your hard drive. This best works with buying a very useful tool -- Disktrix Ultimate Defrag. I'm not an affiliate of this company but their product simply works for me. So I endorse it.

Launch Ultimate Defrag.
1. Select Tools --> Options. Under High Performance, place a check next to include These File Types
2. Select Add and scroll down and add "*.EXE". Then Select Add again and add "*.DLL"
3. Under Archives, add *.MSI, *.MSP and *.CAB in a similar way .EXE was added but only for archives. I added extras like *.ISO, *.RAR and *.ZIP. But those are only my preferences.
4. Accept all changes. And on the main menu, select Defrag Method Consolidate
5. Tick "Respect High Performance" and "Respect Archive"
6. Tick "Put Directories Close To MFT"
7. Start defragmentation. This will take a while if run for the first time.

Hard Drive Performance Tweaks


After performing the above steps, reboot. Then you will note that your computer becomes a bit more responsive than before. Of course, you tweaked it this time!

Enjoy the speed boost.

Share:

ARTICLE: Microsoft Outlook Memory Usage

I'm a bit paranoid about what runs in my computers. So as a force of habbit, I would sometimes fire up TCP Viewer (from sysinternals) or the native task manager. Believe me, paranoia (not too much of it) has its own set of advantages. From task manager you can see what's running on your computer.. and more.

One of the many advantages it brought is this observation I recently had. While trying to monitor memory usage of an application for a client, I compared data using Hobbit (now known as Xymon) client on the host running Windows XP. And found a bit of disparity between data points. The data points I'm talking about here had no relation to the application I was monitoring. It was the memory usage of Microsoft Outlook that the client was running, aside from the application itself. The memory consumption from Microsoft Outlook jumped from 4MB to 16MB five minutes later (hobbit's data points are sent to the server every 5 minutes).

That experience and the curiosity it brought got me to dig deeper.. But no sooner after I left the client, I forgot all about it. So later when I got home, I sat in front of my notebook and launched the task manager, that brought me back to the experience earlier in the day. I ran Microsoft Outlook next (I'm using Microsoft Outlook 2007) to monitor its usage. And what better tool to use for this than the task manager. I do not need any more monitoring as the task manager offers that data in real time!

Right out, task manager presented me with information that Outlook consumes about 20MB of memory. The personal folders (.pst) file associated to it is 27.2MB in size. The memory consumption of Outlook is presented in the screenshot below.


I was intending to replicate the scenario I witnessed in my client's office but I had no idea what was being done on the monitored host. And even more puzzling, how do I replicate the sudden memory drop/increase that I saw Outlook do.

So I went on launching typical office applications, browsed the web, and opened files.. anything to replicate the observation earlier. But Outlook memory consumption remained pretty much the same.. Until at last I hit paydirt -- I minimized the Outlook window and boom.. memory drop!


I restored the window and saw the memory consumption return. Minimized and replicated the previous observations. This must be how I saw it from my client's office.

So then, if you are running low on memory and you are running Outlook it would be best to minimize it to free up more memory. Or better yet, if Outlook is "idle" or running in the background, minimize it to make more memory available to the current application in focus.

I hope that by relating this little experience of mine you can put it to good use.

Share:

ARTICLE: Dell Latitude D630 Sleep Hot-Key

I have been a Dell Latitude D630 user for over 3 years now. I have used it in my previous job; I use one personally; and I have been assigned another in my current employment. My experience with this device is what one can reasonably call "extensive" that I have grown to be very comfortable with it.. and even prefer it over other notebooks.

But if there is one thing I did not know about a D630, it is the elusive Sleep button.. You might share this ignorance with me and it is only until recently that I came to realize what or where it is. If it ever was documented in the manual, I have not discovered nor came across it, as I have not read the manual. (The one that came with my personal Dell D630 is still sealed. Hehehe..)

Whenever I configure the power options for my notebook, it has always made me wonder where the "Sleep" button is. Just so we are in the same page, below is "Power Options" panel. And that is the snapshot of how I configure mine.


To get to the above, open "Control Panel" --> "Power Options", in the classic Control Panel; while on the Categorized view, open "Control Panel" --> "Performance and Maintenance" --> "Power Options".

The "Advanced" tab contains the configuration panel similar to the screenshot above. Configure it to your liking.

Closing the lid should be self-explanatory. I set this to "Do Nothing". Again, this is my personal preference. You can go ahead with your own.

The power button is toward the top center of the keyboard. The largest button and should be obvious. I set this to "Standby" when pressed.

And lastly, for the "Sleep" button, I set this to "Hibernate". But there isnt a sleep button on a Dell Latitude D630! It is however a pressing of a combination of keys -- Fn + ESC. The [Fn] key is toward the bottom left, in between the CTRL and WIN keys. Pressing both keys Fn and ESC simulates the pressing of the sleep button and triggers hibernation.

The "Hibernate" option is not available unless "Enable hibernation" is ticked in the Hibernate tab of the Power Options panel.

Speaking of Hibernate, a shortcut can be created with target "rundll32 powrprof.dll, SetSuspendState" (SetSuspendState --> is case-sensitive). This shortcut used to be what I have on the Desktop, which I no longer have any use for. If Hibernation is not enabled, this shortcut executes a Standby instead.

There you go. I hope the discovery of this Sleep button or should I say Sleep Hot-key puts more functionality and more familiarity to your Latitude D630.

Share:

INFO: What is RSS?

What is RSS? Whenever I mention this three-letter acronym to most people, their brows would raise like I was born in another planet. Either that or they seem to think I'm a metally challenged retard. So hopefully by posting this, I will just refer them here instead and impart a thing or two about RSS and its practical use(s).

But what really is RSS? RSS is a generally accepted format of web content that is used by millions to keep track of website changes or updates. Webmaster, bloggers, or authors would publish syndicated content of their news, blogs, and other content as an RSS feed to whoever wants it.

These are the generally accepted meanings of the acronym -- RDF Site Summary, Rich Site Summary and Really Simple Syndication. Whichever of the those, when used, pertain to the same thing. RSS feeds are sometimes referred to as news feeds or just plainly a feed.

Think of RSS as a modern implementation of a bookmark. In the ways of the old, you would bookmark a website and regularly check it for updates. RSS in a similar manner is a bookmark to the website, but the biggest difference is you will not have to visit the website. All you need is for an RSS reader or RSS aggregator to do it for you. Instead of you coming to the site for information, it is instead delivered to you. It will make more sense when you start using to use it.

A variety of RSS readers or aggregators are available on the web. Some are free and some are not. We had to go through several of them to get a better feel of the functionalities and complexities of each. The most popular web aggregator is Google Reader.

To get a better feel or looks of an RSS feed, click here to sample a feed of pimp-my-rig reloaded.

What is RSS?

The above image is the icon for an RSS feed. Whenever you see that icon or its derivatives, it means the website is advertising its RSS feed available for you to subscribe. And the aggregator will automatically fetch updates for you without having to browse every bookmark. So now that you are aware of RSS feeds, grab an aggregator and start subscription to RSS feeds of bookmarked sites and see for yourself the influence of RSS.

Share:

ARTICLE: Unattended Windows XP Installation

Slipstreaming Service Pack 3 is a fairly simple and straight-forward task to do. With just a few strokes of the keyboard, slipstreaming is done. The distribution folder can now be used to install on a new machine Windows™ XP Professional with Service Pack 3 integrated.

However, a more advanced installation can be done. Providing default answers to the common questions the installation steps would ask. This way, routinary inputs from the user are skipped during install and an answer file could be used to provide them to the installation wizard -- the unattended install.

From the Microsoft™ website, download the SP3 Deployment Tools (filename: deploy.cab, md5 checksum 7f95cc11fed63e35ce93cc77380957ee). It contains a file "SETUPMGR.EXE" which will create an answer file based on the answers given to the wizard. Extract the file and run it.. (follow the snapshots)


Tick "Create New"..


Tick "Unattended setup"..


Select "Windows XP Professional"..


Select "User controlled" or "Hidden Pages". Once tested out the answer file can be modified to "Fully automated".


Next, select "Setup from a CD", as the answer file will be used in a CD later.


Then, accept the EULA and start filling out the necessary information for the default answers to the installation. If skipped, the install wizard will ask for the information during the GUI set-up of Windows™. This is why "Fully automated" is not selected as the default user interaction in the previous page of the setup manager.

If you are sure on the data to be entered, make sure to fill-up the required fields and select "Fully automated" as the user interaction.


Save the file as "unattend.txt". Remember where it is located as it is important for later use. Save it in a directory where it is easy to find, like drive "C:\".


Since we are to create an unattended CD installer, copy "unattend.txt" as "winnt.sif" to the directory "C:\XPCD\i386". The directory C:\XPCD, is assumed to be the directory where the contents of the original Windows XP install CD was copied to.

Re-Create the Install CD. Create the image of the install CD using either cdimage.exe or oscdimg.exe. The binaries can be taken from the Windows OEM Pre-installation Kit CD.
cdimage -l XPCD -b etfsboot.com -n -h C:\XPCD XPCD.iso

After creating the install CD image, XPCD.iso can be burned to a blank CD. To ensure that the install CD is working without hitch, installation can be tried on a virtual machine prior to finally burning it to a blank CD.

Share:

ARTICLE: You and Electrostatic Discharge (ESD)

What is ESD? ESD, short for electrostatic discharge, is the rapid discharge of static electricity from one conductor to another of a different potential. An electrostatic discharge can damage integrated circuits found in computer and communications equipment (definition taken from the webopedia computer dictionary). In fact, ESD can damage without the culprit knowing it.

Sometimes the term electrical overstress (or EOS) is synonymously used with ESD. EOS is an after-effect of ESD. It manifests as electrical hotspots visible only with the aid of a microscope or even a burnt area of a die, in a worse case scenario.

How then, is ESD and its awareness affect you? How is it related to electronics and the computer in particular? Read on as this article can brief you with knowledge on ESD, its causes, and how to prevent or avoid this natural occurring phenomenon.

Often times, if not always, this sticker, label or a variant of it is attached on electronics or computer parts and electronic accessories we buy. It is with a good reason why chips, electronics and computer parts sold, especially those with chips exposed, are tagged with these labels.

Most of the people around us are not aware of electrostatic discharge. As previously stated, this is a naturally occurring phenomenon very much like the revolution of the earth around the sun. ESD occurs on the atomic level, so allow me to delve into the realm of atoms very briefly.

An atom is composed of a nucleus of positively charged protons and uncharged neutrons. Freely revolving around them are almost weightless negatively charged electrons (refer to the diagram on the right). The protons and neutrons in an atom do not change, but the electrons can move from one atom to another. It is because of this reason that life exists and so does ESD.

ESD is primarily caused by the build-up of static electricity or static charge. Static electricity is created when electrons move back and forth between atoms. And when two objects that have different electrical potential or charge approach each other closely enough, this charge may pass from one object to the other in a fast electrostatic discharge. While this only lasts a microsecond or less, the peak discharge current can be several amperes and the peak power can be in the kilowatt range!

One cause of static electicity build-up leading to ESD is the triboelectric effect, in which certain materials become electrically charged after coming into contact or rubbing with a different material and then were separated. A very good example of this is combing or brushing your hair. And placing that comb or brush near torn pieces of tissue paper. The tissue paper gets attracted towards the charged comb. Sparks don't fly but electrostatic discharge occurred. Another would be walking on a carpet, then opening the car door. Be warned, carrying out an experiment with the last example could hurt.

ESD could also be induced. This occurs when an electrostatically charged body is simply placed near a conductive, but electrically neutral body. The mere presence of the nearby charged body causes electrical potential to redistribute themselves on the surface of the neutral body. Even though the object is still electrically neutral, regions of excess positive and negative charge develop, and a potentially damaging discharge may occur when one of these charged regions is suddenly grounded or when a nearby oppositely charged body is placed near it. Charged regions on the surfaces of plastic bags can cause ESD damage to nearby sensitive components via electrostatic induction.

Failures caused by ESD can happen in a number of different ways. The failure can exhibit one or more of the following signs: a short or burnout, resistor/metal fusing together a junction leakage, and a resistor-metal interface rupture. The failure via ESD could manifest immediately rendering a device worthless. Worse than this, a component may be partially damaged and weakened. In semiconductor linggo the failed device is referred to as "walking wounded". It may even remain within specification, but fail later when in use by a customer. It has been estimated that more than 80% of damaged devices may be discovered this way.

ESD can cause unseen damage to electronic devices. The chip or electronic part will still appear in mint condition but the insides already exhibit the damage. Check out a few screenshots of compromised devices upon closer inspection of a microscope.


Another shot of ESD..


The human body was originally the most common and damaging source of electrostatic discharge, thus the most common measurement of ESD sensitivity is by Human Body Model (HBM) electrostatic discharge. It is then proper that a person handling sensitive electronic equipment be aware of ESD and its detrimental effects. Since it is a naturally occurring phenomenon, it cannot be stopped but could be avoided or protective measures could be put in place to minimize its effects.

One of the most common practices in moving toward that goal is the use of a grounding material. The role of a grounding material is to release or discharge the potential before it builds to a harmful level. Another purpose would be to accept the discharge rather than it being released to an ESD sensitive device. Without grounding straps or grounding mats, it is recommended to often touch an unpainted part of a grounded metal surface before handling electrostatic sensitive devices.


ESD compliant clothing such as conductive shoes and smocks are worn by personnel in semiconductor and electronic manufacuring plants. Bunny suits are even required for stricter compliance in some assembly plants. Lining work areas with static dissipative material also prevents ESD.

So when the next opportunity to handle static sensitive devices present itself, remember what harm static electricity can do. Precautionary measures taken to prevent a destructive transfer of static will pay off in the end. We hope awareness of ESD will save you from future headaches.

Share:

ARTICLE: ACPI Uniprocessor to Multiprocessor HAL Upgrade

Dual-core systems abound nowadays that it is virtually impossible not to upgrade to them given the nice performance offering they promise. What's more, the sweet deals out there make them even more enticing. The question now is: Is it that easy to upgrade from a uniprocessor machine (single-core) to a multiprocessor machine (dual-core)?

It might seem that simple but one will run into complexities, especially to users running NT-based Windows XP or its modern variants. To answer the above question, upgrading the processor from a single core to a dual-core involves more than unplugging the old single-core processor and putting the new dual-core one in its place. That is just the first step.

That supposedly simple unplug-n-plug upgrade requires reinstalling Windows to load the appropriate Hardware Abstraction Layer (or HAL). But there is an easier way to upgrade HAL than a reinstall. Read on as this article will guide you into how to upgrade the HAL from a uniprocessor HAL to a multiprocessor HAL.

HAL Upgrade. Before the instructions on how the process is done, there is a requirement and it is a good thing the sole requirement can be downloaded off the internet. Since you are able to browse this article, you are also just as able to download the required program -- devcon.exe, which is in a zip file that you may download here (46,161 bytes; md5 checksum: 8B4D866B5B920B040A634D6B04096B10).

The downloaded zip file, devcon.zip (46,161 bytes), contains two binaries of devcon.exe. One binary for 32-bit (55,808 bytes) flavors of Windows and the other for 64-bit (92,672 bytes). This means the procedure can be used for all modern flavors of Windows whether it be 32-bit or 64-bit.


Extract the version applicable to your version of Windows. For our article we will use 32-bit version of Windows XP Professional Service Pack 2. Let us assume the workspace directory to be C:\HAL_UPGRADE. The same binary can be extracted to %WINDIR% or %WINDIR%\system32 as these directories belong to %PATH% environment variable and are automatically searched for executable binaries.

With the devcon.exe binary in place, all that is necessary is the upgrade script. Download the script and save as a .cmd file. For the purposes of this article, let us name the file/script HALupgrade.cmd.


Now all that is left is to execute the script and do a reboot. The script will automatically perform a reboot (devcon reboot) when it finishes execution.


Execute HALupgrade.cmd. The script takes less than five (5) minutes to execute. Allow your computer to reboot after it executes. Execution should get you a screenshot just like above.

After reboot, the Windows should be able to detect two cores. And device manager should be displaying the correct HAL loaded.


This script was tested on Windows XP Professional SP1/SP2 and Windows Server 2003 Standard SP1/SP2. Both operating systems are 32-bit x86 versions. Please let us know your success in using this procedure. Your feedback is highly appreciated.

Share:

ARTICLE: Slipstreaming Windows XP Service Pack 3

Have you ever had to install Windows XP on a number of computers? Did you also have to install the Service Pack 3 (SP3) after the install? That task seems easy but the job could be made simpler -- if SP3 is slipstreamed into the Windows XP install CD, two jobs can be cutdown to just one.

That is the purpose of this article, to illustrate the procedure of slipstreaming SP3 into the install CD. You do not need to be a rocket scientist to successfully get this done.

Requisites. The following are required to put together a custom Windows XP install CD slipstreamed with SP3:
* Windows XP install CD
* etfsboot.com or bbie.exe (download here)
* cdimage.exe (from Microsoft OPK)
* Windows XP Service Pack 3

Download etfsboot.com or create one from the install CD using bbie.exe.

Service Pack 3 needs to be downloaded from the Microsoft website. After downloading, copy/move the file to a location that is easy to get to in the command line. A good location for this would be the "C:\" directory. This is only temporary and the Service Pack file could be deleted after slipstreaming.

Slipsteaming. Start off by copying the entire contents of the install CD to the harddisk. For this guide, let us name the target directory C:\XPCD (this directory name can be changed to a name of your choice).

Then, open a command shell: Start --> Run.. --> "cmd.exe" (without quotes)

Execute on the command shell as seen from the screenshot below (click to enlarge):


Executing "WindowsXP-KB936929-SP3-x86-ENU.exe" with the switch /s instructs the file to integrate or slipstream the updates to the directory that follows the colon (:), in this case C:\XPCD -- the directory or distribution folder which contains the contents of the Windows XP Professional CD.

The Service Pack executable will then self-extract and proceed to patch the distribution folder, C:\XPCD. A window will prompt when SP3 slipstream is done.


Re-Create the Install CD. Create the image of the install CD using either cdimage.exe or oscdimg.exe. The binaries can be taken from the Windows OEM Pre-installation Kit CD.
cdimage -l XPCD -b etfsboot.com -n -h C:\XPCD XPCD.iso

After creating the install CD image, XPCD.iso can be burned to a blank CD. To ensure that the install CD is working without hitch, installation can be tried on a virtual machine prior to finally burning it to a blank CD.

I hope this article saves you time by cutting the job to a simple install directly to SP3. This tweak can be combined with adding SATA chipset drivers for better functionality.

Share:

ARTICLE: Limited Browsing (Internet Explorer Lockdown)

Microsoft Internet Explorer, MSIE or IE as it is popularly known, is the largest used and most commonly used browser. Embedding a browser to an operating system has been successful for a software giant like Microsoft. No wonder why most website designs and back-end code are geared toward better functionality and display in IE and not cross-browser friendly. This has been the trend for quite a while now. And while condoning it does not really solve the issue, for now let us accept the fact that IE is here to stay.

This article will not delve into criticisms of IE or its flaws. But instead, will tackle how to block access to certain websites. If you ask your system administrator about blocking a certain site, more often than not you will be told that is hard to do, even impossible. Read on as we share to you the trick on how to get it done.

For all intents and purposes, blocking access to a certain website takes into account basic knowledge of internet protocol, or IP (TCP/IP), and domain name system, or DNS. Before going deeper into the tips and tricks let us understand the underlying principles behind IP and DNS.

Internet Protocol (or IP) as defined by Wikipedia:
The Internet Protocol (IP) is a data-oriented protocol used for communicating data across a packet-switched internetwork.
IP is a network layer protocol in the internet protocol suite and is encapsulated in a data link layer protocol (e.g., Ethernet). As a lower layer protocol, IP provides the service of communicable unique global addressing amongst computers. This implies that the data link layer need not provide this service. Ethernet provides globally unique addresses except it is not globally communicable (i.e., two arbitrarily chosen Ethernet devices will only be able to communicate if they are on the same bus).


To keep the definition short, IP is an established protocol for data communication. It does the communication by packet encapsulation of datagrams in a manner very much similar to how mails get delivered -- with an address. For mails it is a shipping address or mail stop address while for IP it is an IP address -- a unique set of numbers that identify a certain member of a network.

On the other hand, based on Wikipedia's definition, DNS is:
The domain name system (DNS) stores and associates many types of information with domain names, but most importantly, it translates domain names (computer hostnames) to IP addresses. It also lists mail exchange servers accepting e-mail for each domain. In providing a worldwide keyword-based redirection service, DNS is an essential component of contemporary Internet use.


From the above, the most important function of DNS in browsing is to translate a fully qualified domain name (FQDN) to its appropriate IP address. Given those knowledge and brief definitions, it is time to discuss the tricks behind blocking websites.

Loopback Redirect. In fact, blocking a website can be a very easy thing to do. Given the knowledge of IP and DNS from the previous page, it is easy to trick the browser. What do we mean by this? The below example will illustrate the point better.

First of all, close all Internet Explorer browsers that are open. Launch a Windows Explorer window and try finding the file "hosts" (location: %WINDIR%\system32\drivers\etc). Try to create a new line to the end of the file and add this line:
127.0.0.1       www.microsoft.com
or
0.0.0.0 www.microsoft.com

Now, open an Internet Explorer window. Try to browse Microsoft's website: "http://www.microsoft.com". Are you able to browse the website?

The above example is one of the many ways to block a website from access by the local computer. What this trick does is to point the DNS entry of the website to the loopback IP 127.0.0.1, which is your local machine's IP. This trick is one of the many ways to block access to a certain website. However, if you wish to block a number of sites, the process could be tedious. Imagine trying to block more than a million sites on a bunch of computers to administer. What a task that would be!

Domain Blocking. In order to limit the browsing of a machine to a domain or two only, the system administrator does not have to block the whole DNS realm of the internet using the above method. There is a simpler way to accomplish the same goal.

The main gist of the tweak is to trick the browser to point to a bogus proxy (and port) -- one that does not exist. And for intranet sites, configure the browser to bypass the bogus proxy.

WARNING: Before proceeding, bear in mind that the procedure is destructive and can render the "guinea pig" computer browser-less, if not executed with caution.
* Open the Group Policy Object Editor. This can be done via Start --> Run... --> "gpedit.msc" (without quotes).
* On the group policy editor, browse to User Configuration --> Windows Settings --> Internet Explorer Maintenance --> Connection. A similar window like the one shown below should be open.


* Open the Proxy Settings Tab by double clicking on it. The Proxy Settings window will open. Tick all the boxes to Enable proxy settings, Use the same proxy server for all addresses and Do not use proxy server for local (intranet) addresses (see below). For the Address of proxy, key in an unused IP Address and a bogus port. For the Exceptions box, key in all the site resource URLs that the machine is allowed browsing access to. For multiple values, separate each value with a semi-colon.


* In order to make the policy changes permanent, restrict access to the Connection Tab of Internet Explorer. Browse to: User Configuration --> Administrative Templates --> Windows Components --> Internet Explorer --> Internet Control Panel (see below). Open the Disable the Connections page by double clicking it. The Properties page will open showing the current configuration.


* By default the Disable the Connections page is set to Not Configured. Set this to Enabled and click OK.

Close the Group Policy Object Editor. The changes made will manifest without requiring a reboot of the machine.

With the lockdown in place, try browsing your favorite websites. Most certainly when trying to access an external site, you are likely to get this:


Now, try browsing the intranet sites for the domain that was configured to bypass the proxy. The website should be accessed like before. Revisit the procedure if the website does not work.

Share:

ARTICLE: Windows XP on Your Brand New Laptop?

Is Windows Vista installed in your brand new laptop? If you hate the experience and you are interested in installing Windows XP, you have come to the right site for the instructions on how to get Windows XP installed instead.

Most OEM laptop makers provide the option to downgrade your laptop to Windows XP so obtain the media from them if they provide this option. Otherwise, now is the time to secure a legitimate copy of Windows XP install CD.

Assuming you have the install CD ready. Let us go through the process of slipstreaming the SATA chipset drivers into your Windows XP install CD so that it can be installed.

Requisites. In order to make the experience smooth, ensure that all the required utilities and software are readily available. The requirements are :
* Windows XP install CD
* etfsboot.com or bbie.exe (download here)
* cdimage.exe (from Microsoft OPK)
* mobile chipset SATA driver (download here)

Download etfsboot.com or create one from the install CD using bbie.exe.

Slipstream SATA Drivers. Assuming all the required software are intact, let us start the activities leading to the tweaking of the Windows XP install CD. Copy the entire contents of the install CD to the harddisk. For this guide, let us name the target directory C:\XPCD.

Open the intel chipset SATA driver (f6flpy32.zip) zip file. Extract the .sys and .inf files to the directory C:\XPCD\i386. Once done, it is time to modify the file txtsetup.sif.

* insert the following lines under the heading [HardwareIdsDatabase]:
[HardwareIdsDatabase]
PCI\VEN_8086&DEV_2922&CC_0106 = "iaStor"
PCI\VEN_8086&DEV_2929&CC_0106 = "iaStor"
PCI\VEN_8086&DEV_2822&CC_0104 = "iaStor"
PCI\VEN_8086&DEV_2821&CC_0106 = "iaStor"
PCI\VEN_8086&DEV_2829&CC_0106 = "iaStor"
PCI\VEN_8086&DEV_282A&CC_0104 = "iaStor"
PCI\VEN_8086&DEV_27C3&CC_0104 = "iaStor"
PCI\VEN_8086&DEV_27C1&CC_0106 = "iaStor"
PCI\VEN_8086&DEV_27C6&CC_0104 = "iaStor"
PCI\VEN_8086&DEV_27C5&CC_0106 = "iaStor"
PCI\VEN_8086&DEV_3A22&CC_0106 = "iaStor"
PCI\VEN_8086&DEV_2682&CC_0104 = "iaStor"
PCI\VEN_8086&DEV_2681&CC_0106 = "iaStor"

* insert the following lines under the heading [SCSI]:
[SCSI]
iaStor = "Intel(R) ICH9R/DO/DH SATA AHCI Controller"
iaStor = "Intel(R) ICH9M-E/M SATA AHCI Controller"
iaStor = "Intel(R) ICH8R/ICH9R/ICH10R SATA RAID Controller"
iaStor = "Intel(R) ICH8R/DH/DO SATA AHCI Controller"
iaStor = "Intel(R) ICH8M-E/M SATA AHCI Controller"
iaStor = "Intel(R) ICH8M-E/ICH9M-E SATA RAID Controller"
iaStor = "Intel(R) ICH7R/DH SATA RAID Controller"
iaStor = "Intel(R) ICH7R/DH SATA AHCI Controller"
iaStor = "Intel(R) ICH7MDH SATA RAID Controller"
iaStor = "Intel(R) ICH7M/MDH SATA AHCI Controller"
iaStor = "Intel(R) ICH10R SATA AHCI Controller"
iaStor = "Intel(R) ESB2 SATA RAID Controller"
iaStor = "Intel(R) ESB2 SATA AHCI Controller"

* insert the following lines under the heading [SourceDisksFiles.x86]:
[SourceDisksFiles.x86]
iaStor.sys = 1,,,,,,4_,4,1,,,1,4
iastor.inf = 1,,,,,,,20,0,0
iaAHCI.inf = 1,,,,,,,20,0,0

* insert the following lines under the heading [SCSI.Load]:
[SCSI.Load]
iaStor = iaStor.sys,4


Disable AHCI. Before starting the install AHCI needs to be disabled in the BIOS. Different laptop models have different ways of implementing this feature.

For my experience, this is done in a DELL Latitude D630. The same should be similar to DELL laptops. To disable AHCI, boot up and press F2 in the POST (power on self-test) to enter BIOS (or setup).
Onboard Devices --> SATA Operation --> ATA

For Compaq/HP laptops, boot up machine and press F10 to go to BIOS Setup.
System Configuration --> Device Configuration --> SATA Native Mode --> DISABLE

For Asus notebooks, boot up and go to the BIOS.
Advanced --> IDE Configuration --> SATA Operation Mode --> Compatible

For other notebooks please let me know so I can update this post.

Tweak the Install CD. Create the image of the install CD using either cdimage.exe or oscdimg.exe. The binaries can be taken from the Windows OEM Pre-installation Kit CD.

cdimage -l XPCD -b etfsboot.com -n -h C:\XPCD XPCD.iso

After creating the install CD, XPCD.iso can be burned to a CD and Windows XP can now install on your brand new laptop.

The same procedure can be done to add other drivers. Addition of drivers is not exclusive to only one. Several drivers can be added.

Share:

Subscribe for Latest Update

Popular Posts

Post Labels

100gb (1) acceleration (1) acrobat (1) adblock (1) advanced (1) ahci (1) airdrop (2) aix (14) angry birds (1) article (21) aster (1) audiodg.exe (1) automatic (2) autorun.inf (1) bartpe (1) battery (2) bigboss (1) binance (1) biometrics (1) bitcoin (3) blackberry (1) book (1) boot-repair (2) calendar (1) ccleaner (3) chrome (5) cloud (1) cluster (1) compatibility (3) CPAN (1) crypto (3) cydia (1) data (3) ddos (1) disable (1) discount (1) DLNA (1) dmidecode (1) dns (7) dracut (1) driver (1) error (10) esxi5 (2) excel (1) facebook (1) faq (36) faucet (1) firefox (17) firewall (2) flash (5) free (3) fun (1) gadgets (4) games (1) garmin (5) gmail (3) google (4) google+ (2) gps (5) grub (2) guide (1) hardware (6) how (1) how-to (45) huawei (1) icloud (1) info (4) iphone (7) IPMP (2) IPV6 (1) iscsi (1) jailbreak (1) java (3) kodi (1) linux (28) locate (1) lshw (1) luci (1) mafia wars (1) malware (1) mapsource (1) memory (2) mikrotik (5) missing (1) mods (10) mouse (1) multipath (1) multitasking (1) NAT (1) netapp (1) nouveau (1) nvidia (1) osmc (1) outlook (2) p2v (2) patch (1) performance (19) perl (1) philippines (1) php (1) pimp-my-rig (9) pldthomedsl (1) plugin (1) popcorn hour (10) power shell (1) process (1) proxy (2) pyspark (1) python (13) qos (1) raspberry pi (7) readyboost (2) reboot (2) recall (1) recovery mode (1) registry (2) rename (1) repository (1) rescue mode (1) review (15) right-click (1) RSS (2) s3cmd (1) salary (1) sanity check (1) security (15) sendmail (1) sickgear (3) software (10) solaris (17) squid (3) SSD (3) SSH (9) swap (1) tip (4) tips (42) top list (3) torrent (5) transmission (1) treewalk (2) tunnel (1) tweak (4) tweaks (41) ubuntu (4) udemy (6) unknown device (1) updates (12) upgrade (1) usb (12) utf8 (1) utility (2) V2V (1) virtual machine (4) VirtualBox (1) vmware (14) vsphere (1) wannacry (1) wifi (4) windows (54) winpe (2) xymon (1) yum (1) zombie (1)

RANDOM POSTS