ARTICLE: SBSettings -- Manage iPhone Settings Better

There are numerouse reasons why people jailbreak or root their smart phones. One of the many reasons is -- to use applications they can't or aren't authorized to use otherwise. I share this sentiment with the many. And just like any tool, there are advantages as well as disadvantages. Just like the trade-off between functionality and security, the choice should be left to you, not made for you. After all, you were the one who paid for the device.

Let's discuss the jailbreak of the iPhone in particular. Regardless of your reasons, I know you are interested in the jailbreak to make more use of your iPhone, to install an application that makes more efficient use of the device. The particular application I'm referring to is SBSettings. If you have a jailbroken iPhone this application can be installed via Cydia.

SBSettings can turn communication features on or off by tapping the icon. A red icon means the feature is turned off while the green icon means the feature is turned on. The screenshot below best describes the state of the communication features.

SBSettings Screenshot

As seen from above, SBSettings is a one-stop shop to turn on or off 3G, wifi, bluetooth or airplane mode. Otherwise, you would have to scroll through different screens to get all these done.

Airplane Mode

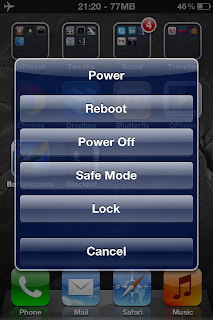
From the above screen you may power off or reboot the device as well. It can also be used to re-spring the device. So, SBSettings is a simple tool to get to many functions at once.

Power Options

Tapping the lowest right icon (Processes), lets you close applications. Think of it as your simplified task manager. As you can see, there are a lot of functionality SBSettings can offer without too much hassle.

iPhone Task Manager

I set my SBSettings to launch on a three-finger pinch. But it can be launched from different key stroke combinations.

And, did I mention it's free? So if you decide to jailbreak your iPhone, SBSettings is the next app to install.

Share:

FAQ: iPhone and "No Service" Problem

Q. I have an iPhone but it often displays "No Service". I have tried to switch to airplane mode and back but no go.

The only solution that works for me is to bounce the phone or power cycle it. This is the only solution that works but is very painful especially when you need to use the phone right away.

A. Chances are your phone has this display on screen (see below).


I have had my share of quarrels with the service provider and have been issued a different SIM card but that has not resolved anything. Not a single week passes that I don't get this "No Service" plague. As I'm running out of suspects, I couldn't help but point to the phone as the likely cause.

This problem can be attributed to the switching between 2G and 3G modes which the iPhone has difficulty handling. Could also be a bug in the iOS software. Like most of you I'm using an iPhone 4S with the not so latest iOS 5.1.1. Upgrading to iOS6 would be disastrous but that is an entirely different issue altogether.

To resolve this "No Service" issue, here's the workaround that I've done: turn off the SIM PIN. To do this, you need to go to Settings » Phone » SIM PIN » (tap) SIM PIN OFF.


After putting this setting, the "No Service" displayed on the phone recovered to regain the carrier signal and the phone could be used for its primary purpose of calling and sending SMS.

I have had this setting for over a couple of weeks now and the "No Service" phenomenon has not returned (and hopefully will not).

Turning off the SIM PIN is not very secure but that is what makes the phone "usable". I have been on the hunt for a working solution to this problem and found that many share the same problem or something similar. While this may not solve everyone's issues, I'm hoping that it will work for many.

Share:

FAQ: Logged on With a Temporary Profile

Q. For some strange reason, you get this notification from the system tray saying "You have been logged on using a temporary profile." All your desktop icons are gone, including your profile settings. With all this, you got the presence of mind to check your email and it is not even configured.

Don't panic when you see this. You old profile is still intact and retrievable.

A. Before starting, confirm that the notification is similar to the one below.

You have been logged on using a temporary profile

When you see this happen, restart your PC to release the locks on your profiles. This is really optional but Windows doesn't always release the files (or hives) of a profile, so just to be safe execute a reboot.

[1] Log on with the Administrator account (or another account with Administrative privileges).

[2] Delete the directory C:\Users\TEMP.

[3] Open the registry editor and browse this path: "HKEY_LOCAL_MACHINE\SOFTWARE\Microsoft\WindowsNT\CurrentVersion\ProfileList".

Here you will be seeing the two (2) similar SIDs. The SID will be the same except the other has ".bak" trailing it. Delete this branch of the registry.

NOTE:
To verify, check the value "ProfileImagePath" of the SIDs, they should be pointing to the same directory.

ProfileList

[4] Restart once again and then you're done. The original profile has been recovered.

Hope this helps.

Share:

HOW-TO: Sync Calendar to iPhone (without iTunes)

Let's face it, many of you can't have iTunes installed on your work computers -- even to the point where the act of installing it will cost you your job. Some don't like them in their home computer, simply because it is one big piece of bloat. I share the same sentiment. The software often comes with added software that run together with it.

I have setup a virtual machine for iTunes purposes. That way if I need it to run, I just fire up the virtual box and use the software's function. This way it doesn't introduce vulnerabilities to my system. But that may be cumbersome to some. So how do you sync your calendar to your phone? Or sync the phone entirely to your machine without iTunes?

One of the ways to do this is via iCloud. iCloud can sync all of the contents of your iPhone or you could simply select particular data to sync. Download from the iCloud webpage.

Upon completion of the download, launch the software. It will ask for you to login. Use your apple ID credentials.

iCloud Sign In

Next, tick on the data you need to sync. For me, I only sync my calendar to the iPhone. So I simply tick "Calendars & Tasks with Outlook". This option uses the iCloud storage of your apple ID, so you can also track its usage from the iCloud interface.

Select Information to Sync

On your phone, make sure that the iCloud calendar is checked or selected. When you see a corresponding check mark next to the iCloud calendar, you should be all set. After a while you should be seeing calendar entries getting pushed to your iPhone. If you have set other iDevices you own to sync with iCloud, the calendar entries from Outlook will sync to those devices as well.

The downside to this? You lose the ability to sync the phone to your computer since it is now using iCloud for backup.

Share:

HOW-TO: Confirm Free Memory Slots on your Server (Linux)

Often times, we system administrators let our fingers do the walking.. sometimes, literally. This is true for just about every activity involving administration. The only time when the system administrator meets face to face with the physical hardware they administer is when they need to replace failed parts or when upgrading hardware.

Upgrading though needs a few pre-requisites that need to be planned out in advance. Memory upgrades being an example, one needs to know what kind of memory is installed on the server, and if there are free memory slot(s). The last mentioned being a very important tidbit of information. A memory upgrade is not possible without free memory slots. This is a major gotcha that you need to avoid.

In the Linux world, this can be done in many ways. Let's discuss two of the more commonly used commands -- dmidecode and lshw.

Using dmidecode. Almost every linux box I have administered came with dmidecode installed by default. It is a rare encounter to find a box without dmidecode installed.

Launch a command terminal and run "sudo dmidecode --type memory". Running dmidecode by itself will spew out a lot of information regarding your machine. Putting the arguments "--type memory", singles out memory devices, keeping the needed info only.

Another argument that will limit the output to just memory listing is "-t 17". These commands will be showing a similar output as below.

dmidecode memory slot populated

As you can see from the above example, DIMM Slot #1 is populated with a 2GB DDR2-800 module. Even the part number and serial of the memory module is detected.

How about when the slot is empty? Take a look at the screenshot below for the output of dmidecode when a slot is empty.

dmidecode memory slot empty

Using lshw. Another very useful command is lshw. It will display all the installed hardware on the system. And just like dmidecode, you may choose to run it only to display or single out memory devices.

Launch a command prompt and run "sudo lshw". Adding "-C memory" or "-class memory" will limit the display to just the memory slots and modules.

lshw class memory

There you go, plan the memory upgrades properly given the above commands. They ensure not only having empty memory slots to fill, but also display the proper memory module to install. Given the above information, you can never go wrong with the upgrade.

Share:

FAQ: Re-Add/Return BigBoss Cydia Repository

Q: "I accidentally (or deliberately) deleted the BigBoss Cydia repository. I want it back and I can't do it. How do I put it back?"

I have heard this happen several times, have been asked the same several times, and have resolved them several times as well. This is more common on jailbroken Apple iPhones more than any other Apple gadgets I've seen. The solution to the problem may not be as hard as you expect it to be.

A: Follow along as pimp-my-rig post outlines a guide on how to return the BigBoss Cydia repository to your iDevice.

First, launch Cydia. Scroll down toward the middle of the Home screen and you will see "More Package Sources". It is just below "Upgrading and Jailbreaking Help". You should be seeing something similar to the below screenshot.

Cydia Home Screen

Tap on "More Package Sources". It should be showing you the BigBoss repository as one of the choices. The screen will be similar to the one below.

More Package Sources

Again, tap on "BigBoss". Then tap "OK" when prompted.

BigBoss Repository

That action will add BigBoss to Cydia repositories. If this happens to the ModMyI repository, or just about any other Cydia repository that is installed by default, the same procedure works.

Hope this helps you out.

Share:

HOW-TO: Create a USB VMware ESXi 5 Installer

Not all servers are created equal -- some have optical drives, some don't have. Given that, there might be times where you will be needing an alternative way of installing operating systems to that server. In the case of a VMware ESXi 5 hypervisor, the installer has a smaller footprint compared to most operating systems but, nevertheless, without any optical drive on the server the only other alternative is to install via USB.

This is not rocket science. USB installers are in fact a bit common nowadays. We have covered several how to's including the install of Windows 7 via USB. Aside from Windows, almost all flavors of Linux can be installed via USB, although the network install of Linux is the most prefered.

To create a USB installer, you will be needing the latest VMware ESXi ISO image from VMware. It needs a registered account to be able to download the ISO file. Register as it will be worth it.

Aside from the ISO file, you will also be needing the UNetbootin application. You may visit its sourceforge project page here. The current version of UNetbootin as of this writing is 5.81.

With the pre-requisites satisfied, launch UNetbootin. Tick on "Diskimage", select "ISO" on the dropdown (this is the default selection), and browse the location of the downloaded VMware ESXi 5 ISO file. You should have a Window similar to this (see below).

UNetbootin Start Window

Double check and ensure that the right USB drive is selected. Hit "OK" and watch UNetbootin build the USB installer.

UNetbootin Building

When UNetbootin installs the Bootloader (STEP#3), you will be asked to overwrite a file -- MENU.C32 -- accept that dialog. This is the only interaction that happens during the build. Everything else is automatic.

Upon completion, simply press "Exit". There is no need to reboot.

UNetbootin Done

The only caveat I have encountered on this build is that the USB drive used was formatted NTFS. This doesn't work so early on, you need to format the USB drive with a FAT32 filesystem. This solved a few headaches for me.

Share:

HOW-TO: Setup ISC Bind9 for Windows

On our guide to setting up a caching name server via Treewalk, it outlined the procedure to follow in configuring the Treewalk (a fork of bind) on Windows. However, the download link for Treewalk is no longer available and as it seems, development for it has stopped altogether.

You should look no further than bind itself, not its fork. ISC bind is still being actively developed and bugfixes are still being published for it. What deters users from using bind is it is a bit tricky to setup while treewalk is a simple install and run. So let's try to configure and install ISC bind.

First, download the Windows binaries of bind. As of this writing, the current production version is 9.9.1-P2. A zip file named bind991-p2.zip will be downloaded on your computer.

Extract this file under path C:\Windows\DNS\bin. This directory does not exist by default so you might want to create it first. Configuration files will also be created in C:\Windows\DNS\etc, and likewise this directory does not exist by default and will need to be created.

Create a file named.conf in the C:\Windows\DNS\etc directory. A sample configuration can be found here. On this sample configuration file, change the "directory" directive and replace the value /var/named to C:\Windows\DNS\etc. It should get you started.

From the above, it is obvious that this configuration is intended for Linux or Unix. The "logging" directive needs fixing as well. It is not applicable Windows implementations of bind. Drop the path, and just leave the filename.

Now, it is time to setup the service. Execute the command below in a privileged command prompt (note the space after the equal sign):

sc create bind9 binpath= C:\Windows\DNS\bin\bind.exe DisplayName= "Bind9 DNS Server" start= auto
sc start bind9

You should be getting a similar window as this one.

Using SC to Add Bind DNS Server Service

Checking the service, it should have started and properly setup to start with Windows even when rebooted. The service will automatically start.

Bind9 DNS Server Service

Now, try out the caching name server. You should be feeling the impact of faster performance and speedy DNS lookups as the DNS cache is built.

Share:

HOW-TO: Resolve 800B0100 Windows Update Error

It's been a while since I last ran Windows Update. And with the news of hacking and security breaches going around, it would be prudent to keep systems updated and patched. Not that someone would waste their time hacking into my system but it is a good practice to keep up to date just the same.

With that in mind, I discovered that I need to apply 37 patches to keep my system up to date. But only 31 of them applied and the other six (6) resulted in a weird error -- Windows Update 800B0100 Error code. Sure enough Microsoft had this in their knowledge base (at this link). However, performing those tasks did not resolve the problem.

For comparison and just so you also have an idea if we both have the same error, I get below screenshot of the Windows Update window.

800B0100 Windows Update Error

Googling the issue brings up countless other users who experienced the same issue. One after the other, the solutions and suggestions presented failed and failed. The only other probable solution that I have yet to perform is the re-install which I'd like to avoid as much as possible.

Before heading down this path, I decided to phone a friend -- a phone call which turned out to be one of the most valuable phone calls I will ever make. To cut it short, this procedure resolved the issue.

[1] Turn off Windows Update (execute "sc stop wuauserv" on a privileged command prompt). This temporarily disables Windows Update, but is not permanent and does not survive reboots.

[2] Browse the directory %WINDIR%\SoftwareDistribution\Download and delete all contents of this folder. NOTE: Delete the contents only, not the folder.

[3] Likewise, browse the directory %WINDIR%\SoftwareDistribution\DataStore. Under this directory there is a file called "DataStore.edb". Delete this file.

[4] Under the directory %WINDIR%\SoftwareDistribution\DataStore\Logs, delete all files. NOTE: Again, delete the contents only, not the folder.

[5] Download the Microsoft FixIt Update Repair tool (http://go.microsoft.com/?linkid=9665683). This fixit solution has both Default and Aggressive modes. Try Default mode first. Then reboot.

[6] Manually run Windows Update and see if the update error is gone. If not, re-run the procedure above and on step #5, run the tool in Aggressive mode. Then reboot.

In my experience, I had to run the fixit Update Repair Tool in aggressive mode before the problem went away.
Share:

FAQ: Resolve Windows Photo Viewer Rotation Error

So you got a smart phone.. What's cool about this gadget is the built in high resolution camera that can take pictures. Indeed, it is rare to find phones without these cameras built in. Smart phones have founds its niche in everyone's life, that one can't leave home without it.

The data inside them is useless without the ability to upload them to a computer, or a storage device for archiving or permanent storing. However, one could be taken by surprise to find pictures upside down. This is true for an iPhone 4/4S. How then does one rotate the uploaded photos when the built-in tool to rotate shows an error.

The Windows Photo Viewer that is built into Windows 7 could rotate pictures, but this is a hit or miss thing. About 50% of the time it will work as designed, but what about when it presents "Windows Photo Viewer can't save the changes to this picture because there's a problem with the picture's file properties." (see snapshot below)


There's nothing you can do about Windows Photo Viewer to force it to save the photo or picture. You have to use a third party utility to do this. The JPEG Lossless Rotator can do this job for you without any fuss. In fact, there are other utilities that can do the same, but I found this tool the easiest to use. It can also integrate with Explorer and you can simply right click on an image to rotate it.

This way once pictures are uploaded to the computer, just launch the JPEG Lossless Rotator application and browse to the folder containing the uploaded pictures and rotate away.


The application can also do it by batches. And you can see the thumbnails of each photo as they appear. Or click them one by one from Windows Explorer.

With the rotation issues resolved, go ahead and take pictures with that iPhone and rotate them after uploading.
Share:

HOW-TO: Resolve Freezing Acrobat Reader X

If you have been sharing documents for collaboration or information sharing, one cannot escape the use of Adobe Acrobat Reader to open the PDF files. PDF (short for Portable Document Format) is used due to its flexibility and independency from any operating system, hardware, or application used. You name it, you can probably use it.

For Windows desktops and notebooks, Adobe Acrobat Reader is the most commonly used to read PDF files. This is because PDF is a proprietary format owned and patented by Adobe. Sometime in July 2008, Adobe released the PDF as an open public patent, granting rights to use, make, sell implementations of PDF. Lately, their very own Acrobat Reader has been upgraded to version 10 -- Acrobat Reader X as they call it. While it is the best version, it is plagued with its own set of headaches. To top this list is the freezing of the application when it opens a PDF file.

When you open a PDF file, Adober Acrobat Reader will launch and open the PDF file but it will sit there and freeze for about 15-20 seconds. The application window will display the "(Not Responding)" tag and once the window is focused the cursor becomes an hour glass. This is the manifestation of the freezing.

The freezing goes away after about 15-20 seconds and Acrobat Reader will function normally after that. This is true regardless of any PDF file opened. But the commonality of the problem seems to be related to version 10 (or X) of Adobe Acrobat Reader.

To resolve this issue, launch Acrobat Reader X. Under Edit -> Preferences -> General, untick the option "Enable Protected Mode at Startup" (refer to screenshot).


Accept all changes and re-launch Acrobat Reader or re-open that PDF file you were previously trying to view. Notice the big change in responsiveness. The freezing is gone.

Another suggestion in addition to this tweak is to remove files from %appdata%\Adobe\Acrobat. In this directory you will see versions of Acrobat Reader. Delete everything except "10.0". That also solved some problems with freezing along with the disabling of protected mode at startup. Hope this helps.

Share:

TWEAK: Prefer Wired over Wireless Connection in Windows 7

How are you connected to the network or the intranet? Wired? Wifi? Both? Nowadays, it is no longer uncommon to find laptops or notebooks being used in modern offices. These devices are equipped to both be a workstation and a mobile platform at the same time. Its portability with matching punching and crunching power could give most desktops a run for its money.

Going back to the question above, how about if the laptop is connected wired and wireless to the local area network? Which connectivity takes precedence? The answer to this question seems insignificant.. but try transferring large files across the network -- you will then start to notice the difference in speed.

The previous generation networks were 100Mbps for wired (Fast Ethernet) and 54Mbps for wifi (Wireless G) -- the gap is a bit close. Today's generation of networks are 1Gbps for wired (Gigabit Ethernet) and 300Mbps for wifi (Wireless N) where the disparity is every evident. So when connected at the same time, it is important to prefer the faster Gigabit Ethernet over Wireless N.

To configure this to be the default behavior, open the Network Connections. You can get to this in a different number of ways. One, Start -> Search programs and files for "Network Connections" and open "View Network Connections" (under Control Panel). Another would be to right click on the network access icon on the system tray -> Open Network and Sharing Center -> Change adapter settings. Either of the above will get you to the window similar to below.

Network Connections


Press ALT to show the menu's and select Advanced -> Advanced Settings..


Network Advanced Settings


As you can see, the default behavior is Wireless Network Connection first, before Local Area Connection. If you notice the line above the list box, it says "Connections are listed in the order in which they are accessed by network services." The default preference is the wireless connection, which is usually the slower more unstable connection.

Notice too the arrows right next to the list box. From there, you can set the preferences. You can move Local Area Connection on top of the list so that the faster, more stable wired connection gets preference over wireless. This way, whenever both connections are present, wired gets priority over wireless.

Network Advanced Settings


Experiment on your end and see the difference in performance. In my experience, I got about 8.3MB/s copy speed over Wireless N compared to about 11MB/s on Fast Ethernet. Even the newer fatter wireless bandwidth could not cope with Fast Ethernet speeds in throughput. Gigabit finished quickest at about 54MB/s but this may be the harddrive limiting the speed.

I also believe this should be the default setting right out-of-the-box. Not sure why Microsoft configured Windows 7 to behave this way. Given that, I'm inclined to say Windows XP would have a similar behavior and a likewise similar tweak.

Share:

TWEAK: Faster Remote Desktop Connection

Remote Desktop Connection (or RDP in the sysad slang) is essential to administration of Windows-based machines. With the widespread adoption and migration to Windows 7, one could not help but notice the slowdown of RDP. The difference in performance between XP and Windows 7 is a bit broad.

This is made even more complex by most office networks still on the fast ethernet (or 100MBps) infrastructure. Or so I thought.. Even at gigabit Ethernet, the performance disparity is still huge. Let's tweak it then to raise the performance bar.

Making RDP perform faster is a two-fold tweak -- a tweaking on the network parameters and tweaking on the remote desktop application. I'd recommend reading and understanding the entire procedure before trying it out.

Network. The following changes to the network parameters improve performance of the network as a whole, not just limited to RDP. Open a command prompt with elevated privilege and run the following commands.

netsh interface tcp set global autotuninglevel=highlyrestricted
netsh interface tcp set global rss=disabled

In order to get a pre-tweak setting of the network parameters, try to run "netsh interface tcp show global" prior to executing the commands above. The same command can be used to validate the post-tweak settings. On my Windows 7 workstation, here is the post-tweak setting (see screenshot).

Faster Remote Desktop Connection

Remote Desktop Connection. Another way to tweak RDP for better performance is to remove most of the eye-candy that comes with Windows. Launch the Remote Desktop Connection application (or execute mstsc.exe on the Run box).

Before connecting to anything, click on options at the lower left corner of the RDP application window. Next, click the "Display" tab. Slide the Display Configuration to a smaller size. Under Colors, select "High Color (16 bit)" from the dropdown.

Faster Remote Desktop Connection

Now click the "Experience" tab and uncheck all of the settings to optimize performance.. Or simply select "Modem (56 Kbps)" from the dropdown menu. Yes, select Modem (56 Kbps) even though your LAN speed is faster and way better than 56 Kbps.

Faster Remote Desktop Connection

Now try to connect to a host using RDP and see the difference in speed and performance.
Share:

TWEAK: Performance Tip -- Exclude from AV Scan

When you have been using Windows-based computers long enough you will notice that performance degrades over time. There are a lot of causes to this and disk fragmentation is one of them. But little do users know that what contributes a lot to the degradation is the presence of the anti-virus. Add fragmentation to the mix and the performance decline worsens.

For an average user, however, running without an anti-virus is synonymous with suicide. The performance hit that's a consequence of the anti-virus is more acceptable than having to re-install the OS and recover the files. Anti-virus are created to behave with paranoia as the foremost consideration. And it will be very paranoid -- it will scan every file accessed; it will scan memory; it will scan as you boot; it will scan even when you're not doing anything!

Not everything that is in your computer can be infected by a virus. So it is wise to make your anti-virus a little bit smarter than it was programmed to be. What does this mean? It means, exclude files you know to be safe from being scanned. Plain text files are perfect candidates for this. Anything that is text-based (and don't automatically execute) are generally safe. Their extensions are .txt, .log and the like.

Aside from text-based files, multimedia files like mp3, avi, mp4 and mkv are generally safe, especially if they came from trusted sources. It is wise then to make the anti-virus skip them. Also, the anti-virus is not that friendly with Windows page file. It scans that too! Your computer system can perform better if that file is skipped from being scanned.

McAfee. With McAfee, this configuration is in the VirusScan Console under Tasks > On Access Scanner Properties.

Performance Tip: Exclude from AntiVirus Scan

Click on "All Processes" and get to the "Exclusions" tab. There is an Exclusions button that will allow you to control the behavior of the On-Access Scanner module.

Performance Tip: Exclude from AntiVirus Scan

ESET NOD32. With NOD32, this configuration can be set by pressing "F5" thus opening the Advanced Configuration menu.

Performance Tip: Exclude from AntiVirus Scan

Then go to Computer > Antivirus and antispyware > Real-time file system protection. Click on the Setup button and include all file system extensions.


Performance Tip: Exclude from AntiVirus Scan

For directory exclusions, go to Computer > Antivirus and antispyware > Exclusions and put the paths to be excluded from on access scans.

Performance Tip: Exclude from AntiVirus Scan

I get good performance from my computer when I set it up this way. There is always a drawing of lines between security and functionality. In the end, what matters is for you have to have your say in the matter.

Share:

FAQ: clock_gettime Error Compiling Xymon Client

"There’s No Such Thing As A Silly Question" -- does the cliche sound familiar? In this part of pimp-my-rig reloaded, technical questions are answered. Mail them to me and I will post the answers here. If you have a better answer, by all means share it with us.

Q. I recently received an email from a previous colleague asking for help regarding errors in compiling XYmon client on a machine running Fedora 13. Yes, the host is a bit old but since the application running is mission critical downtime is not acceptable and putting it under the microscope with a xymon client is a well-thought move.

To give you a better picture of the error, here are a few lines of the xymon client compile, after running "make -s".

(other lines snipped for brevity)
...
timefunc.c: In function âtimespec_textâ:
timefunc.c:140: warning: pointer targets in assignment differ in signedness
timefunc.c:187: warning: pointer targets in passing argument 2 of âaddtobufferâ differ in signedness
/var/tmp/xymon-4.3.7/include/../lib/strfunc.h:16: note: expected âchar *â but argument is of type âunsigned char *â
../lib/xymonclient.a(timefunc-client.o): In function `getntimer':
/var/tmp/xymon-4.3.7/lib/timefunc.c:67: undefined reference to `clock_gettime'
../lib/xymonclient.a(timefunc-client.o): In function `gettimer':
/var/tmp/xymon-4.3.7/lib/timefunc.c:55: undefined reference to `clock_gettime'
collect2: ld returned 1 exit statustfc
make[1]: *** [../client/xymon] Error 1
make: *** [common-client] Error 2

So as you can see, the error is fatal and compilation will not complete successfully. I have been through this error before and made notes of the things done to resolve.

A. Xymon was built to take into account regular expressions on things being monitored -- log files, directory sizes, etc, etc. These files can be monitored by classes and/or pattern matches that can be defined by regular expressions. And for xymon to function properly, the pcre-devel (PERL Compatible Regular Expressions) rpm has to be installed.

So install pcre-devel via yum.

[root@host /var/tmp] yum -y install pcre-devel
Loaded plugins: fastestmirror, presto, refresh-packagekit
Loading mirror speeds from cached hostfile
 * fedora: mirror.cse.iitk.ac.in
 * updates: mirror.cse.iitk.ac.in
Setting up Install Process
Resolving Dependencies
--> Running transaction check
---> Package pcre-devel.i686 0:7.8-3.fc12 set to be installed
--> Finished Dependency Resolution

Dependencies Resolved

================================================================================
 Package                   Arch         Version             Repository     Size
================================================================================
Installing:
 pcre-devel                i686         7.8-3.fc12          fedora        278 k

Transaction Summary
================================================================================
Install       1 Package(s)

Total download size: 278 k
Installed size: 0.9 M
Downloading Packages:
Setting up and reading Presto delta metadata
Processing delta metadata
Package(s) data still to download: 278 k
(1/1): pcre-devel-7.8-3.fc12.i686.rpm                    | 278 kB     00:02     
--------------------------------------------------------------------------------
Total                                           271 kB/s | 278 kB     00:02     

Running rpm_check_debug
Running Transaction Test
Transaction Test Succeeded
Running Transaction
  Installing     : pcre-devel-7.8-3.fc12.i686 [###########################] 1/1

Installed:
  pcre-devel.i686 0:7.8-3.fc12

Complete!

Once pcre-devel is installed, xymon client will compile with a few warnings that can be ignored. Do a "make install" after compile completes. Run the xymon client via "/home/xymon/client/runclient.sh start". The path /home/xymon is the path chosen when running "./configure.client" (or "./configure -client").

This step is optional, but I found that it solves some issues with other versions of Fedora/RedHat based systems. Before running ./configure, define the environment variable LIBRTDEF. Do it with command "export LIBRTDEF=-lrt"

In running xymon client, pcre-devel is more often than not a major dependency. So better install it before doing the compile.

Share:

HOW-TO: Determine if the SSD Supports TRIM

The gigantic technological leap SSD offered than conventional hard drives is nothing compared to the upgrade gap between a next generation processor or video card. It is bounds and leaps greater. Since its introduction over a year ago, SSDs have always been the talk of the town when it comes to raw performance.

This technology is, however, dependent on another technology that has to be supported by the operating system -- TRIM. Trim is the difference that makes conventional storage manage data better than SSDs. When data is written to a "virgin" cell of an SSD, it is a straight write but if the cell to be written has old junk (deleted data) the undergoing process is a read-modify-write. Imagine a heavily fragmented drive when a delete is performed, performance would suffer. And this questions the long-term performance of the SSD.

Windows 7 is where trim got introduced. The trim command reorganizes data to be written and also deletes junk data existing on the NAND cell. It scrubs junked data when a delete is performed so that when a write command is subsequently performed on a NAND cell, it is always "already" clean.

How then do you determine if your drive supports TRIM? You can use the software CrystalDiskInfo to determine and ensure that the SSD supports trim. Download the software from its webpage. I used the portable zipped version of the software.

This is how CrystalDiskInfo looks like (refer to screenshot).

How To Determine if the SSD Supports TRIM

As seen from the screenshot, the OCZ Vertex3 60GB SSD supports the TRIM feature. You may then tweak the OS to take advantage of the trim feature on the SSD.

On Windows 7, the command to use is "fsutil.exe behavior set DisableDeleteNotify 0". The feedback will be "DisableDeleteNotify = 0" (as seen below).

How To Determine if the SSD Supports TRIM

If your SSD supports TRIM, better make use of it so long term performance of your SSD will not suffer. Windows 7 supports trim, so might as well make it the default operating system. Here's a guide to migrate from the conventional drive to the SSD.

Share:

HOW-TO: Upgrade to SSD (the Faster Easier Way)

Guides from the net abound with procedures and guides on upgrading from a conventional hard drive to a faster and better SSD. The procedures involve creating a backup image of Windows 7 and restoring that same backup image to the SSD. Like many, I have tried to follow this procedure and it does not always end well. The backup image creation is the easy part but the restore does not always succeed. On my part, the backup image on the USB drive could not be restored to the SSD.

The only other alternative is to do a complete install of Windows 7 and this is even worse than the above procedure. That's what I thought too, until I recently found an easier way of doing things, and even better -- the tool to use is FREE!

The tool or software I'm referring to is the Aomei Partition Assistant (download here). You can download the Home Edition and it will work for your desktop or notebook. As of this writing, the latest version available is version 4.0.

Download the Aomei Partition Assistant and install it. No reboot required.

HOW-TO: Upgrade to SSD (the Faster Easier Way)

This guide was done using my notebook (Dell Latitude D630) so I connected the SSD to the notebook via a USB to SATA adapter. On a desktop, things are a bit simpler by just installing the SSD on a vacant SATA port.

Launch the application, then click on the system/boot drive. On a conventional install, the boot drive should have two (2) partitions. The reserved partition (usually 100MB in size) and the system partition (where Windows 7 is installed).

Click on the "reserved" (or System Reserved) partition and click on Copy Partition. A similar window like below is opened. Copy to the "Unallocated" drive which pertains to the SSD. Do the same for the system partition. You may opt to resize the system partition to fit the SSD. Then "Apply" the change.

HOW-TO: Upgrade to SSD (the Faster Easier Way)

You will be prompted to reboot. And before the operating system boots, the PreOS mode of Aomei kicks in to copy the partitions. Once done the computer will reboot. At this point, you can intervene and shutdown the computer to unplug the hard drive and replace it with the SSD.

I followed the same procedure outlined above. And I could feel the difference of the upgrade. Aomei Partition Assistant has made my upgrade easy, straight-forward and hassle-free.

This procedure can also be used to upgrade to a bigger faster drive or to a RAID volume, not just an SSD.

Share:

TWEAK: AHCI Plugin for BartPE

I was back to playing around with BartPE in order to sysprep-clone laptop drives with Windows 7. At first, I got stuck with the BOOTMGR is missing error but I knew I got stuck in this before and got to recall the solution I did.

The next error I faced was the dreaded blue screen of death (BSOD) with stop code 0x0000007B. I knew this was because of the AHCI mode of the SATA drives on the new generation intel chipsets on the laptop. I didn't want to go to WinPE 2.x or the Windows 7 based PE since it is difficult to dissect the innards of the .wim files, and I have working plugins for BartPE.

So I decided to create my own AHCI plugin. I downloaded the floppy image of the drivers from the intel download page. NOTE: Make sure to download the floppy image (filename starts with: f6flpy).

Extract the files inside the floppy image. Only two (2) files are required, namely iastor.inf and iastor.sys. Create a directory named iaahci inside the PEbuilder plug-in directory and copy the files there under directory files. Rename them to iaAHCI.inf and iaAHCI.sys respectively so they will not conflict with other intel RAID drivers.

If your PEBuilder directory is C:\PEBuilder, you should have the files iaahci.inf and iaahci.sys under C:\PEBuilder\plugin\iaahci\files. Open a command prompt (as Administrator) and compress iaAHCI.sys via makecab.

AHCI Plugin for BartPE

Copy the code below and save as a .inf file under C:\PEBuilder\plugin\iaahci directory. If copy-paste doesn't work for you, you can try to copy the code here: http://pastie.org/3437076.

; PE Builder v3 plug-in INF file
; - plugin for intel mobile ahci drivers
; - by tox (http://www.pimp-my-rig.com)
;

[Version]
Signature="$Windows NT$"

[PEBuilder]
Name="Intel (Mobile) AHCI Drivers"
Enable=1

[SourceDisksFiles]
files\iaAHCI.sy_=4
files\iaAHCI.inf=20

[SetValue]
"txtsetup.sif","SourceDisksFiles","iaAHCI.SY_", "1,,,,,,4_,4,1,,,1,4"
"txtsetup.sif","SourceDisksFiles","iaAHCI.inf", "1,,,,,,,20,0,0"
;(format)HardwareIdsDatabase -- "txtsetup.sif","HardWareIdsDatabase","SCSI\NVIDIA__Raid_Disk_20_____", """nvrd327r"""
"txtsetup.sif","HardWareIdsDatabase","PCI\VEN_8086&DEV_27C1&CC_0106", """iaAHCI"""
"txtsetup.sif","HardWareIdsDatabase","PCI\VEN_8086&DEV_27C5&CC_0106", """iaAHCI"""
"txtsetup.sif","HardWareIdsDatabase","PCI\VEN_8086&DEV_2922&CC_0106", """iaAHCI"""
"txtsetup.sif","HardWareIdsDatabase","PCI\VEN_8086&DEV_2929&CC_0106", """iaAHCI"""
"txtsetup.sif","HardWareIdsDatabase","PCI\VEN_8086&DEV_3A02&CC_0106", """iaAHCI"""
"txtsetup.sif","HardWareIdsDatabase","PCI\VEN_8086&DEV_3A22&CC_0106", """iaAHCI"""
"txtsetup.sif","HardWareIdsDatabase","PCI\VEN_8086&DEV_3B29&CC_0106", """iaAHCI"""
"txtsetup.sif","HardWareIdsDatabase","PCI\VEN_8086&DEV_3B2F&CC_0106", """iaAHCI"""
"txtsetup.sif","HardWareIdsDatabase","PCI\VEN_8086&DEV_3B22&CC_0106", """iaAHCI"""
"txtsetup.sif","HardWareIdsDatabase","PCI\VEN_8086&DEV_1C02&CC_0106", """iaAHCI"""
"txtsetup.sif","HardWareIdsDatabase","PCI\VEN_8086&DEV_1C03&CC_0106", """iaAHCI"""
;(format)SCSI.Load -- "txtsetup.sif","SCSI.Load","ql2200", "ql2200.SY_,4"
"txtsetup.sif","SCSI.Load","iaAHCI", "iaAHCI.SY_,4"
;(format)SCSI -- "txtsetup.sif","SCSI","rr2644", """HighPoint RocketRAID 2644x4 SAS"""
"txtsetup.sif","SCSI","iaAHCI", """Intel(R) Mobile Express Chipset SATA AHCI Controller"""

Now try rebuilding BartPE and use it on the laptop of your choice to sysprep the image. You can also use the built BartPE to rescue broken systems.

AHCI was the culprit of my BSOD and having the plugin above I was able to boot into a Windows XP based PE environment to do the cloning.

Share:

FAQ: Error Rebuilding sendmail.cf

"There’s No Such Thing As A Silly Question" -- does the cliche sound familiar? In this part of pimp-my-rig reloaded, technical questions are answered. Mail them to me and I will post the answers here. If you have a better answer, by all means share it with us.

Guides on the net suggest that you do not edit sendmail.cf by hand. First, make changes to sendmail.mc then rebuild sendmail.cf using the command: "m4 sendmail.mc > sendmail.cf". However, this command sometimes fails and before you know it you have unknowingly made changes to sendmail.cf -- the file is now 0 bytes. The error message is below:

[root@host mail]# m4 sendmail.mc > sendmail.cf
sendmail.mc:10: m4: cannot open `/usr/share/sendmail-cf/m4/cf.m4': No such file or directory

Things are pretty simple if you look at the error.. but it is very deceiving. Take a look at your sendmail.cf.

[root@host mail]# ls -la sendmail.cf
-rw-r--r-- 1 root root 0 Feb 18 10:02 sendmail.cf
Ooppss.. sendmail.cf is now zero bytes. You can rebuild sendmail.cf from sendmail.mc using m4, but you just executed the exact command to re-generate sendmail.cf ending in errors. Re-starting sendmail will make things worse. Sendmail will still work as it read sendmail.cf before the error. Restarting it will re-read the zeroed out sendmail.cf file.

I got stuck in this error before. And a colleague got stuck in it just recently.

The guides either forgot to mention that or assumed that it is installed and you will need to have installed the sendmail-cf rpm. How do you know that sendmail-cf is the required rpm? Take a closer look at the first few lines of sendmail.mc.

[root@host mail]# head sendmail.mc
divert(-1)dnl
dnl #
dnl # This is the sendmail macro config file for m4. If you make changes to
dnl # /etc/mail/sendmail.mc, you will need to regenerate the
dnl # /etc/mail/sendmail.cf file by confirming that the sendmail-cf package is
dnl # installed and then performing a
dnl #
dnl #     make -C /etc/mail
dnl #

So what you can do now is install sendmail-cf rpm.

[root@host mail]# yum -y install sendmail-cf
Loaded plugins: fastestmirror
Loading mirror speeds from cached hostfile
 * base: mirror.web.com.ph
 * extras: mirror.web.com.ph
 * updates: mirror.web.com.ph
Setting up Install Process
Resolving Dependencies
--> Running transaction check
---> Package sendmail-cf.x86_64 0:8.13.8-8.1.el5_7 set to be updated
--> Finished Dependency Resolution

Dependencies Resolved

================================================================================
 Package            Arch          Version                  Repository      Size
================================================================================
Installing:
 sendmail-cf        x86_64        8.13.8-8.1.el5_7         updates        306 k

Transaction Summary
================================================================================
Install       1 Package(s)
Upgrade       0 Package(s)

Total download size: 306 k
Downloading Packages:
sendmail-cf-8.13.8-8.1.el5_7.x86_64.rpm                  | 306 kB     00:00
Running rpm_check_debug
Running Transaction Test
Finished Transaction Test
Transaction Test Succeeded
Running Transaction
  Installing     : sendmail-cf                                              1/1

Installed:
  sendmail-cf.x86_64 0:8.13.8-8.1.el5_7

Complete!

Now re-run "m4 sendmail.mc > sendmail.cf" and it will be error free. You can safely make changes to sendmail.mc and generate sendmail.cf from that.

Share:

TIP: Firefox Speed Boost via Vacuum Places Improved Add-on

Firefox 10 was recently released to the public and Firefox continues its rapid release process.. And soon before we know it version 11 will be out. This trend will continue for as long as development goes. Firefox's market share is being taken away by Chrome mainly due to its faster startup and faster page rendering. While page render speed is subject to a lot of debates and discussions, there is significant improvements over Firefox's memory management and rendering speeds over previous versions.

For a few tweaks and features, pimp-my-rig has published quite a bit of them -- including but not limited to plugin checker, tuning and configuration, and forcing add-on compatibility. We also did a guide on getting a larger active tab.

Our primary reason for sticking it out with Firefox is the download them all plug-in. This add-on is not available for Chrome, and will likely stay the same in the long term. So it is of good reasoning for us to continue using Firefox, keeping it up to date, and secure. And also, tweaking it to get the most in terms of performance.

Lately, we found another tweak to make Firefox faster. If you have been a firefox user ever since, you will notice that Firefox would get hogged and slow down unlike when you first installed it. This is because its history, cache and data stores gets fragmented over time.

But there is an add-on that can solve this -- vacuum places improved. You can add the same on your Firefox and see it speed up.

Firefox Speed Boost via Vacuum Places Improved

For you to get a comparison of the before and after of this add-on, locate your profile and check the size of the file places.sqlite. To execute the vacuum, go to Tools -> Vacuum places.sqlite. You will be notified of a successful operation by a notification box on the system tray.

After doing the initial vacuuming, check places.sqlite it should have decreased in space. You will also notice that Firefox is also more responsive. For a regular everyday Firefox user, this improvement is very evident.

You can set Firefox to automagically do this for you after every X number of startups. It can be set in the add-on options. Our VPI is set to run every 30 startups.

Firefox Speed Boost via Vacuum Places Improved

Vacuum places improved is one very useful, pimp-my-rig recommended add-on to Firefox.

Share:

S/W: Mozilla Firefox 10 Released

Firefox is the award winning next generation browser from Mozilla. Firefox empowers you to browse faster, more safely, and more efficiently than with any other browser. Make the switch today - Firefox imports your Favorites, settings and other information, so you have nothing to lose. Stop annoying popup ads in their tracks with Firefox's built in popup blocker. View more than one web page in a single window with this time saving feature. Open links in the background so that they're ready for viewing when you're ready to read them. Built with your security in mind, Firefox keeps your computer safe from malicious spyware by not loading harmful ActiveX controls. A comprehensive set of privacy tools keep your online activity your business.

Following its rapid release process, Firefox version 10 is out. This major release includes and features security fixes. So if you don't want to lag behind and maintain an insecure browser, you would have to upgrade.

Mozilla Firefox 5

(Logos are copyrights of their respective owners.)

Seamless Experience. The enhancements to Firefox provide the best possible browsing experience on the Web. The new Firefox smart location bar, affectionately known as the "Awesome Bar," learns as people use it, adapting to user preferences and offering better fitting matches over time.

Better Performance. Firefox is built on top of the powerful new Gecko platform, resulting in a safer, easier to use and more personal product.

Better Security. Firefox raises the bar for security. The new malware and phishing protection helps protect from viruses, worms, trojans and spyware to keep people safe on the Web.

Download from www.mozilla.com/firefox. For a complete list of fixes and release notes, check this link.

One very nice feature with Firefox that we like is the plugin checker. It is nice to see the feature was not removed in this verison.

Of course this upgrade comes with sacrifices -- your add-ons will no longer be compatible. So while waiting for the add-ons to catch up with Firefox version 6.0 or higher, you can tweak them to be compatible. Chances are they will still work even with the newer versions of Mozilla Firefox.

If you are using DivX HiQ to play high definition video on Firefox, our feature outlining compatibility of Firefox with DivX web plug-ins still works on Firefox 6.0.

You will notice better memory usage from version 9, including this version. Firefox is faster and better but it is being overtaken by Google's Chrome browser. This release might change things.

Share:

TWEAK: Completely Diagnose System Problems in Minutes (Windows 7)

When it comes to diagnosing Windows problems, particularly the latest and greatest Windows 7, it is a bit difficult to really pinpoint the problem. There are 3rd party tools to use to get this done, but do you really have to resort to them? Not really.

If you're used to the XP-way of doing things, here's something new to Windows 7 that will attract you to upgrade. It is one of the many features of Windows 7 that I like. It is the "Resource and Performance Monitor". What does it do? It could tell you in a minute or two what is wrong with your system without resorting to 3rd party tools for a complete diagnosis.

To launch the "Resource and Performance Monitor", run "perfmon /report" on the Run box from the Start Menu. This command will open a window just like below.

Completely Diagnose System Problems in Minutes

Allow it to run and generate the report. It will then present a summary, like below.

Completely Diagnose System Problems in Minutes

I clicked on the Basic System Checks that failed. And it presented further explanations of the failure and what caused the system to flag a failure. Example for this run I clicked on the failed "Disk Check" and it gave me further details. After clicking on "Disk Check", I did a mouse over the Red Triangular Flag and it gave further information -- a disk volume is dirty.

Completely Diagnose System Problems in Minutes

Also, further down on the list tagged as "Security Center Check" the failure is related to my not running an anti-virus.

Completely Diagnose System Problems in Minutes

And, lastly, "System Service Checks" listed an "Abnormally Stopped System Service". It is related to the HomeGroup Provider. Like before, I can mouse over the red flag to obtain more information. It told me that the service returned an unexpected error code.

Completely Diagnose System Problems in Minutes

So in a matter of minutes, I found that there was something wrong with my Windows 7 system. And, I could resolve or mitigate the problem from the suggestions outlined by the tool. Rather than resort to a third party application, the Performance Monitor can provide a concise diagnosis and suggest resolutions. Kudos to Microsoft for putting this in Windows 7!

Try it out and see that it's time to upgrade to Windows 7.

Share:

HOW-TO: Resolve "BOOTMGR is missing" Boot Error

Further experimentation(s) with BartPE and cloning sysprep-ed Windows 7 SP1 systems led me to further problems. My interest and expertise in these cloning mechanisms and hands-free installs are for Solaris and Linux, not Windows so I was scratching my head for a while trying to resolve the problem.

It is a bit difficult to find a working resolution on the internet so after a while I got tired of searching for a way to migitate the problem and resorted to trial and error. Below is the procedure that eventually worked for me.

The dreaded error:
BOOTMGR is missing.
Press ctrl+alt+del to restart

On the system that encountered this error insert the Windows 7 installation DVD. If you have a Windows 7 USB installer, that works just fine.

Either bootable media works. On the first screen that is presented, select the Language, Time and Currency and Keyboard input method. Then, click Next. You will be on a screen like the one below.

BOOTMGR is missing Boot Error

On the screen above, click on "Repair your computer". The built-in recovery software will try to detect the installed version(s) of Windows. Select the appropriate operating system from the list. Usually there is only one listed here just click on it to highlight the selection and click on Next.

Another window will open presenting system recovery options. Refer to the screenshot below.

BOOTMGR is missing Boot Error

Select command prompt (toward the bottom). And a command window will open.

Rebuild the bcd directory via "bootrec /rebuildbcd" on the command prompt. And restart your computer. This should resolve the "BOOTMGR is missing" boot error (The bootrec command is explained in greater detail on Microsoft: KB927392).

Executing the above procedure solved my problem. Discipline urged me to create a backup of my old boot configuration data (BCD), but I didn't do it anymore.

Just to be on the safe side, if you wish to save a backup of the BCD, you can execute "ren d:\boot\bcd d:\boot\bcd.old" prior to running "bootrec /rebuildbcd".

Share:

Subscribe for Latest Update

Popular Posts

Post Labels

100gb (1) acceleration (1) acrobat (1) adblock (1) advanced (1) ahci (1) airdrop (2) aix (14) angry birds (1) article (21) aster (1) audiodg.exe (1) automatic (2) autorun.inf (1) bartpe (1) battery (2) bigboss (1) binance (1) biometrics (1) bitcoin (3) blackberry (1) book (1) boot-repair (2) calendar (1) ccleaner (3) chrome (5) cloud (1) cluster (1) compatibility (3) CPAN (1) crypto (3) cydia (1) data (3) ddos (1) disable (1) discount (1) DLNA (1) dmidecode (1) dns (7) dracut (1) driver (1) error (10) esxi5 (2) excel (1) facebook (1) faq (36) faucet (1) firefox (17) firewall (2) flash (5) free (3) fun (1) gadgets (4) games (1) garmin (5) gmail (3) google (4) google+ (2) gps (5) grub (2) guide (1) hardware (6) how (1) how-to (45) huawei (1) icloud (1) info (4) iphone (7) IPMP (2) IPV6 (1) iscsi (1) jailbreak (1) java (3) kodi (1) linux (28) locate (1) lshw (1) luci (1) mafia wars (1) malware (1) mapsource (1) memory (2) mikrotik (5) missing (1) mods (10) mouse (1) multipath (1) multitasking (1) NAT (1) netapp (1) nouveau (1) nvidia (1) osmc (1) outlook (2) p2v (2) patch (1) performance (19) perl (1) philippines (1) php (1) pimp-my-rig (9) pldthomedsl (1) plugin (1) popcorn hour (10) power shell (1) process (1) proxy (2) pyspark (1) python (13) qos (1) raspberry pi (7) readyboost (2) reboot (2) recall (1) recovery mode (1) registry (2) rename (1) repository (1) rescue mode (1) review (15) right-click (1) RSS (2) s3cmd (1) salary (1) sanity check (1) security (15) sendmail (1) sickgear (3) software (10) solaris (17) squid (3) SSD (3) SSH (9) swap (1) tip (4) tips (42) top list (3) torrent (5) transmission (1) treewalk (2) tunnel (1) tweak (4) tweaks (41) ubuntu (4) udemy (6) unknown device (1) updates (12) upgrade (1) usb (12) utf8 (1) utility (2) V2V (1) virtual machine (4) VirtualBox (1) vmware (14) vsphere (1) wannacry (1) wifi (4) windows (54) winpe (2) xymon (1) yum (1) zombie (1)

Blog Archives

RANDOM POSTS