

If you have not read the previous guides in this series, now is the time to read them first -- Install KODI to Your Raspberry Pi and Install a PVR (SickGear) on Raspberry Pi. This pieces together bits and pieces of software that when configured correctly provides very powerful automation for repetitive tasks. If you are the type who likes to "set it and forget it" then this is for you.. And if not, it is not too late to leverage this technology.
DISCLAIMER: This post does not in any way intend to promote piracy. Instead, it intends to demonstrate the power of automation implemented in cheap hardware. At the same time it demonstrates the potential of the Raspberry-PI equipped with the right operating system, software and a little knowledge of Linux. Before proceeding, it pays to know the statutes, legalities and limitations as allowed by your local laws.
To start with, a lightweight torrent client is already installed together with OSMC. All that is needed to be done is configure it properly and start the service. One particular configuration that is of interest for automation purposes is the "blackhole directory" and its related context. This was initially discussed in Transmission BlackHole Directory post.
The only difference in the above post is the location of the configuration file. On OSMC, it is located in the home directory of the user "osmc". If you are logged in via remote SSH, change directory to "/home/osmc/.config/transmission-daemon/settings.json".
The following lines should be modified, if present, or added:
Note that "USBDRV" needs to be the name of the USB drive plugged to the Raspberry-PI; ".blackhole" is set as the blackhole directory of transmission; and likewise, "downloaded" is where the downloaded files are saved. These names are arbitrary and could be changed depending on how you want to name it.
As an option, the following lines could be added:
The above addition means, while the torrent is being downloaded, the files will be saved in the incomple-dir. When the torrent is done downloading, the files will be moved to the download-dir configured. Take note of the settings above as they are important to SickGear configuration later.
Speaking of SickGear, open a browser and browse this URL: "http://RASPBERY-PI_IPADDRESS:8081/". Go to Gears -> Search Settings.. and under "Torrent Search" tab, tick "Search Torrents" and set the "BlackHole folder location" to the "watch-dir" setting above.
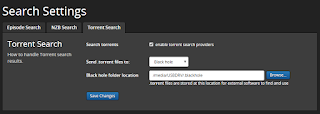
What this does is when SickGear finds a torrent of interest from the internet, it will save it to the transmission blackhole directory. Transmission periodically scans this directory for .torrent files and loads it automatically for downloading.
Next, configure SickGear for automatic post-processing of downloaded files. Under "Post-Processing", set the "TV Download Dir" to the same setting as "download-dir" of transmission.

SickGear periodically scans (and processes) files in this directory. And as you have probably guessed, SickGear will rename the files in this directory, index it, and copy/move it to the multimedia directory of your choosing. It could notify KODI of the presence of new episodes of your favorite TV series as well. And if you are into social media, a twitter account could be set to make SickGear automatically post updates of successful snatches and downloads.
RELATED: Queuing with Transmission BitTorrent Client
All you need to do is "Add Shows" to SickGear to complete the configuration and make it search for your favorite TV series from the internet.
DISCLAIMER: This post does not in any way intend to promote piracy. Instead, it intends to demonstrate the power of automation implemented in cheap hardware. At the same time it demonstrates the potential of the Raspberry-PI equipped with the right operating system, software and a little knowledge of Linux. Before proceeding, it pays to know the statutes, legalities and limitations as allowed by your local laws.
To start with, a lightweight torrent client is already installed together with OSMC. All that is needed to be done is configure it properly and start the service. One particular configuration that is of interest for automation purposes is the "blackhole directory" and its related context. This was initially discussed in Transmission BlackHole Directory post.
The only difference in the above post is the location of the configuration file. On OSMC, it is located in the home directory of the user "osmc". If you are logged in via remote SSH, change directory to "/home/osmc/.config/transmission-daemon/settings.json".
The following lines should be modified, if present, or added:
"watch-dir": "/media/USBDRV/.blackhole",
"watch-dir-enabled": true,
"download-dir": "/media/USBDRV/downloaded"
Note that "USBDRV" needs to be the name of the USB drive plugged to the Raspberry-PI; ".blackhole" is set as the blackhole directory of transmission; and likewise, "downloaded" is where the downloaded files are saved. These names are arbitrary and could be changed depending on how you want to name it.
As an option, the following lines could be added:
"incomple-dir": "/media/USBDRV/.incomplete",
"incomple-dir-enabled": true
The above addition means, while the torrent is being downloaded, the files will be saved in the incomple-dir. When the torrent is done downloading, the files will be moved to the download-dir configured. Take note of the settings above as they are important to SickGear configuration later.
Speaking of SickGear, open a browser and browse this URL: "http://RASPBERY-PI_IPADDRESS:8081/". Go to Gears -> Search Settings.. and under "Torrent Search" tab, tick "Search Torrents" and set the "BlackHole folder location" to the "watch-dir" setting above.

What this does is when SickGear finds a torrent of interest from the internet, it will save it to the transmission blackhole directory. Transmission periodically scans this directory for .torrent files and loads it automatically for downloading.
Next, configure SickGear for automatic post-processing of downloaded files. Under "Post-Processing", set the "TV Download Dir" to the same setting as "download-dir" of transmission.

SickGear periodically scans (and processes) files in this directory. And as you have probably guessed, SickGear will rename the files in this directory, index it, and copy/move it to the multimedia directory of your choosing. It could notify KODI of the presence of new episodes of your favorite TV series as well. And if you are into social media, a twitter account could be set to make SickGear automatically post updates of successful snatches and downloads.
RELATED: Queuing with Transmission BitTorrent Client
All you need to do is "Add Shows" to SickGear to complete the configuration and make it search for your favorite TV series from the internet.


