HOW-TO: Automated TV Series Downloads Using Raspberry-PI

If you have not read the previous guides in this series, now is the time to read them first -- Install KODI to Your Raspberry Pi and Install a PVR (SickGear) on Raspberry Pi. This pieces together bits and pieces of software that when configured correctly provides very powerful automation for repetitive tasks. If you are the type who likes to "set it and forget it" then this is for you.. And if not, it is not too late to leverage this technology.

DISCLAIMER: This post does not in any way intend to promote piracy. Instead, it intends to demonstrate the power of automation implemented in cheap hardware. At the same time it demonstrates the potential of the Raspberry-PI equipped with the right operating system, software and a little knowledge of Linux. Before proceeding, it pays to know the statutes, legalities and limitations as allowed by your local laws.

To start with, a lightweight torrent client is already installed together with OSMC. All that is needed to be done is configure it properly and start the service. One particular configuration that is of interest for automation purposes is the "blackhole directory" and its related context. This was initially discussed in Transmission BlackHole Directory post.

The only difference in the above post is the location of the configuration file. On OSMC, it is located in the home directory of the user "osmc". If you are logged in via remote SSH, change directory to "/home/osmc/.config/transmission-daemon/settings.json".

The following lines should be modified, if present, or added:
"watch-dir": "/media/USBDRV/.blackhole",
"watch-dir-enabled": true,
"download-dir": "/media/USBDRV/downloaded"

Note that "USBDRV" needs to be the name of the USB drive plugged to the Raspberry-PI; ".blackhole" is set as the blackhole directory of transmission; and likewise, "downloaded" is where the downloaded files are saved. These names are arbitrary and could be changed depending on how you want to name it.

As an option, the following lines could be added:
"incomple-dir": "/media/USBDRV/.incomplete",
"incomple-dir-enabled": true

The above addition means, while the torrent is being downloaded, the files will be saved in the incomple-dir. When the torrent is done downloading, the files will be moved to the download-dir configured. Take note of the settings above as they are important to SickGear configuration later.

Speaking of SickGear, open a browser and browse this URL: "http://RASPBERY-PI_IPADDRESS:8081/". Go to Gears -> Search Settings.. and under "Torrent Search" tab, tick "Search Torrents" and set the "BlackHole folder location" to the "watch-dir" setting above.

Search Settings | Torrent Search

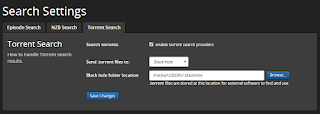
What this does is when SickGear finds a torrent of interest from the internet, it will save it to the transmission blackhole directory. Transmission periodically scans this directory for .torrent files and loads it automatically for downloading.

Next, configure SickGear for automatic post-processing of downloaded files. Under "Post-Processing", set the "TV Download Dir" to the same setting as "download-dir" of transmission.

Post-Processing

SickGear periodically scans (and processes) files in this directory. And as you have probably guessed, SickGear will rename the files in this directory, index it, and copy/move it to the multimedia directory of your choosing. It could notify KODI of the presence of new episodes of your favorite TV series as well. And if you are into social media, a twitter account could be set to make SickGear automatically post updates of successful snatches and downloads.

RELATED: Queuing with Transmission BitTorrent Client

All you need to do is "Add Shows" to SickGear to complete the configuration and make it search for your favorite TV series from the internet.

Share:

HOW-TO: Install a PVR (SickGear) on Raspberry Pi

In the previous guide, we successfully installed OSMC on the Raspberry Pi. This is a very straight forward procedure to install a working operating system and media center. Adding more functionality to the Raspberry Pi is more complex than the initial operating system install.

OSMC works out of the box. Its wired network is set to DHCP from the previous steps we executed (if you ticked "configure network manually", this would not be the case). This allows the Raspberry Pi to be remotely configured, and even connect to the internet. However, this guide will require some knowledge of Linux and its filesystems.

Let's connect via SSH to the Raspberry Pi. If you dont have an SSH client, download PuTTY or any of its derivatives. The default username and password is: "osmc" and "osmc" respectively. Once a successful connection is made, you will have a screen similar to below.

Putty to OSMC

First thing to do is update the apt repository. This is done using the "apt-get update" command. WARNING: this command and others that follow, will fail if the OSMC has no internet connectivity.

apt-get update

I placed the bare command on the screenshot above to demonstrate that using it without "sudo" will result in permission errors. See the successful command execute when prefixed with a "sudo".

Next, install git. On the same terminal, execute "sudo apt-get install git".

install git
Having git, the command above will upgrade the version already installed. Otherwise, it will simply install.

Change directory to /opt (RUN: "cd /opt"). Then, use git to fetch the PVR files from the internet. Execute "git clone https://github.com/SickGear/SickGear.git sickgear".

git clone

Change the owner of the sickgear directory and its contents to user osmc, and group osmc (RUN: "chmod -R osmc:osmc sickgear"). This is important for the application not to run as the root user, but as another less-privileged user.

To finalize the configuration, create the file "/etc/default/sickgear". Add the following lines:
# COPY THIS FILE TO /etc/default/sickgear
SG_HOME=/opt/sickgear
SG_DATA=/opt/sickgear
SG_USER=osmc
SG_GROUP=osmc

To make the application automatically start on boot, [1] copy the file "/opt/sickgear/init-scripts/init.ubuntu" as "/etc/init.d/sickgear"; and [2] execute "sudo update-rc.d defaults sickgear".

Start sickgear with "sudo systemctl start sickgear". If there are no issues, sickgear should start. Should there be issues in starting, logs are located in the directory /opt/sickgear/Logs. Another way to view issues is "sudo journalctl -xn". The output will contain clue(s) as to why it did not start normally.

Related: Migrate Sickbeard to its Bricky Fork

Sickgear can automatically download, index and catalog files for your viewing pleasure. In the next article, we will tackle the configuration, and more advanced configuration of sickgear handshaking with transmission for automating downloads and post-processing of those downloaded files.

Share:

HOW-TO: Install KODI to Your Raspberry Pi

First, let me thank the generosity of those who appreciated the pimp-my-rig posts and bought me coffee. I am humbled by your kindness. If you, likewise, appreciate the articles posted in this site and want to do the same, please hit the buy me coffee link at the right.

The advent of Raspberry Pi as a small (tiny even) affordable computing platform for programming use has started a revolution even better than simply having a sandbox for programming. It has transformed to multiple use -- beginning with embedded systems, and expanded to lightweight Linux installs and more.

Raspberry Pi could serve as a media center as well -- KODI. KODI is the media center software that runs on OSMC which stands for Open Source Media Center. Often times, these names are interchanged.

If you bought a Raspberry Pi for this exact purpose and don't know how to go about with the installation steps, follow along as I will guide you on how this is done. For all intents and purposes, this guide will be based on a Windows platform to install the image to the SD card.

First, download all the necessary software and binaries. The OSMC Installer (download here) is in the link, as well as the OSMC images for public release. The OSMC Installer for Windows, Linux and MAC OS are available for download as appropriate to your own operating system. This installer is also able to download the latest version of OSMC, including the older versions previously released. I prefer to install using a downloaded image (faster in case you need to re-install).

Next, plug the SD card to the computer's USB port and allow the computer to load the appropriate drivers for it. Once that is done, run the "OSMC Installer" downloaded earlier.

Select "English" (or the applicable language wherever you're at). Select the hardware version of Raspberry Pi you have. Most likely this will be either a Raspberry Pi 2 or a Raspberry Pi 3. You will then have a similar screenshot as shown below.

OSMC Installer

Hit the triangle to proceed to the next screen. And either select a version from the dropdown, or use a locally downloaded image.

Choose OSMC Version

Hit the upper triangle to proceed.. Select "SD card" (default).

Select Media Device

Hit the upper triangle to proceed.. Select "Wired connection" (default).

Network Configuration

Hit the upper triangle again.. And select the proper SD or device. If there are multiple devices available, select the appropriate one or unplug the others. Otherwise, the data contained in the other devices will be lost if the wrong device is selected.

Select Install Drive

Then, accept the license agreement and wait for the image to be written to the SD card. After this is done, transfer the SD card to the Raspberry Pi and boot it. During first boot, OSMC will install itself on the SD card, reboot and you have a working OSMC with KODI media center.

Related: Create a USB VMware ESXi Installer

On the next article, I will outline how to install a PVR software on your KODI media center. Stay tuned.

Share:

HOW-TO: Remove "PLDTHOMEDSL" SSID From Router

If you are the kind of person who wants total control over devices you own, we share something in common. One of the things I noticed about PLDT's new router is that they have somehow locked the SSID prefix to "PLDTHOMEDSL" and they leave you to figure out the rest of the strings that follow.

I don't appreciate what they did with that.. Aside from not having control over the SSID, it opens up security holes in your wireless network. Why? It is because persons who scan the wireless network know that you have a PLDT router without having to take a second guess. And yes, there are vulnerabilities to the router that make it easy for outsiders to connect and break security protocols in place. I won't go into details, but I know for certain that there is and I guarantee that.

Just so you have an idea what I'm talking about, on the configuration interface of your router this is what it looks like (see screenshot below).

PLDTHOMEDSL Locked SSID

So why not rename the SSID instead? They locked the interface for you to be able to do it. But this post is here to discuss the workaround to it.

On the same web configuration interface, go to "Maintenance", and save (or "Backup") the current configuration to a file. For all intents and purposes, lets save this file to the Desktop (it will be named "config.img" by default).

Backup Settings to File

Open the config.img file with your favorite text editor. Look for the line that contains the string "WLAN_ROOT_SSID". On my editor it is on line #27 of the file.

WLAN_ROOT_SSID

Change the string between quotes to the SSID of your choosing. Save the file.

Related: Network Profiler and Analyzer

Head back to the web configuration interface and "Load Settings from File". Give it the config.img file that was just modified and hit "Upload". The router will then reboot to reflect the new settings.

Once the router reboots, its SSID will now be the new SSID you assigned. Be careful as any change you make to the configuration resets it back to "PLDTHOMEDSL" and you will have to redo this procedure.

Hope this helps.

Share:

Subscribe for Latest Update

Popular Posts

Post Labels

100gb (1) acceleration (1) acrobat (1) adblock (1) advanced (1) ahci (1) airdrop (2) aix (14) angry birds (1) article (21) aster (1) audiodg.exe (1) automatic (2) autorun.inf (1) bartpe (1) battery (2) bigboss (1) binance (1) biometrics (1) bitcoin (3) blackberry (1) book (1) boot-repair (2) calendar (1) ccleaner (3) chrome (5) cloud (1) cluster (1) compatibility (3) CPAN (1) crypto (3) cydia (1) data (3) ddos (1) disable (1) discount (1) DLNA (1) dmidecode (1) dns (7) dracut (1) driver (1) error (10) esxi5 (2) excel (1) facebook (1) faq (36) faucet (1) firefox (17) firewall (2) flash (5) free (3) fun (1) gadgets (4) games (1) garmin (5) gmail (3) google (4) google+ (2) gps (5) grub (2) guide (1) hardware (6) how (1) how-to (45) huawei (1) icloud (1) info (4) iphone (7) IPMP (2) IPV6 (1) iscsi (1) jailbreak (1) java (3) kodi (1) linux (28) locate (1) lshw (1) luci (1) mafia wars (1) malware (1) mapsource (1) memory (2) mikrotik (5) missing (1) mods (10) mouse (1) multipath (1) multitasking (1) NAT (1) netapp (1) nouveau (1) nvidia (1) osmc (1) outlook (2) p2v (2) patch (1) performance (19) perl (1) philippines (1) php (1) pimp-my-rig (9) pldthomedsl (1) plugin (1) popcorn hour (10) power shell (1) process (1) proxy (2) pyspark (1) python (13) qos (1) raspberry pi (7) readyboost (2) reboot (2) recall (1) recovery mode (1) registry (2) rename (1) repository (1) rescue mode (1) review (15) right-click (1) RSS (2) s3cmd (1) salary (1) sanity check (1) security (15) sendmail (1) sickgear (3) software (10) solaris (17) squid (3) SSD (3) SSH (9) swap (1) tip (4) tips (42) top list (3) torrent (5) transmission (1) treewalk (2) tunnel (1) tweak (4) tweaks (41) ubuntu (4) udemy (6) unknown device (1) updates (12) upgrade (1) usb (12) utf8 (1) utility (2) V2V (1) virtual machine (4) VirtualBox (1) vmware (14) vsphere (1) wannacry (1) wifi (4) windows (54) winpe (2) xymon (1) yum (1) zombie (1)

RANDOM POSTS