ERROR: Could not setup macAddress for ethernet0


I encountered the above error after performing a V2V procedure on Teradata Aster Queen.. I was also going to do the same for the Teradata Aster Worker, next. But I got stuck on this error and could not power on the Queen virtual machine. If you're wondering if I had tested them on the VMware Player first, yes I did.

Further reading on VMware documentation revealed that they introduced new policies for static MAC addresses to start only with the prefix 00:50:56:xx:xx:xx. Not so convinient. I have previously tried using automatically generated MAC addresses but the Aster Express cluster would not activate. So this time, I have tried using static ones. Not really sure if this was the cause, but I'm pretty sure it is one of the differences between the original virtual machines and the converted ones.

To get a better sense of what the error looks like, I preserved a screenshot for you.

Power On Error

If you can't see the image, the verbatim "Error Stack" is:

Failed to start the virtual machine.
Module DevicePowerOn power on failed.
Could not setup "macAddress" for ethernet0.
Invalid MAC Address specified.
00:0c:29:9d:7f:5d is not an allowed static Ethernet address. It conflicts with VMware reserved MACs.


The limitation (or change in policy) introduced in ESXi V5.5 has its advantages but if you are stuck with the above error, it ain't pretty. However, there is a workaround should you require the old behavior back.

First, turn on the SSH service on the ESXi host.. Then connect to it. Next, locate the data store where the virtual machine is stored and look for the .vmx file.

Edit this file and add the line:

ethernet0.checkMACAddress = "false"


It would be prudent to make a copy of the file for backup purposes prior to making any change, just in case. This is applying best practice and instilling the discipline.

After making the necessary change to the .vmx file, power on the virtual machine. It should proceed to boot without hitch. Do the same for the Aster worker machine.

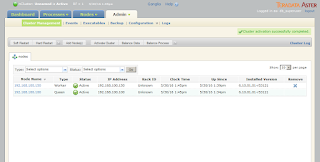
Activate Success

RELATED: P2V (Physical to Virtual) Prep Work for Ubuntu

I was able to activate the Aster Express cluster after performing these steps. Not really sure if the preserved MAC addresses resolved my activation issues, but I'm pretty happy to be able to perform analytics on the cluster. I hope it helps you as well.

Share:

HOW-TO: Install Adblock on Raspberry Pi via Pi-Hole

Bandwidth is a precious resource in this digital age.. This might not be the case for everyone but in the Philippines where the cost of being connected is still through the roof, this statement is still true. Couple this with the fact that people want to be connected and online, and the mix gets a bit complicated.

Studies have shown that bandwidth (or network traffic) can be minimized by using adblock technology. Thus this resource could be better utilized by more important or more significant information to be consumed by the end user, not ads. A research has shown this to be by a factor of 25% to 40% (click here for reference). That is HUGE!

With that study and its statistics, it figures that one should be minimizing network traffic or find means and ways to reduce the non-significant content -- in the form of ads. One way to do this is with the use of Raspberry Pi (R-Pi). This is in fact a very cheap way to implement adblock, and you will see it is very simple to do.

This article aims to outline installation instructions over a popular R-Pi operating system OSMC. The installation procedure for OSMC has been discussed in the previous post. There has been a series of posts involving the use of Raspberry Pi in this site.

Prior to installing Pi-Hole, it would be good to browse its documentation and have a better understanding of how it does the adblock. Click here to go there.

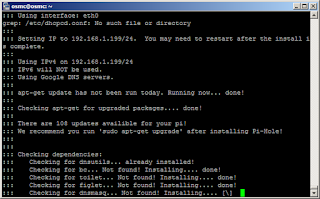
The installation procedure itself is pretty simple and as automated as you want it to be. Just launch a PuTTY session to the R-Pi and run the command on the banner of the Pi-Hole website -- curl -L https://install.pi-hole.net | bash (or copy-n-paste this command).

Pi-Hole Install

It is as simple as it could get. Now the only thing that needs to be done is to configure the router to assign the R-Pi as the primary DNS server when it hands out DHCP IP addresses.

Related: Setup Caching DNS Server using TreeWalk

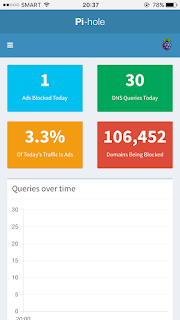
Once in a while, you may want to tickle your curiosity and find out how much traffic is blocked by Pi-Hole and you just open a browser and browse the admin console of Pi-Hole. It should be something like "http://RASPBERRY_PI_IP_ADDRESS/admin/".

Pi-Hole Statistics

On mine, it looks like this.. This statistic is after about less than an hour of having it installed. Do you have Pi-Hole installed? Share your story in the comments.

Share:

Subscribe for Latest Update

Popular Posts

Post Labels

100gb (1) acceleration (1) acrobat (1) adblock (1) advanced (1) ahci (1) airdrop (2) aix (14) angry birds (1) article (21) aster (1) audiodg.exe (1) automatic (2) autorun.inf (1) bartpe (1) battery (2) bigboss (1) binance (1) biometrics (1) bitcoin (3) blackberry (1) book (1) boot-repair (2) calendar (1) ccleaner (3) chrome (5) cloud (1) cluster (1) compatibility (3) CPAN (1) crypto (3) cydia (1) data (3) ddos (1) disable (1) discount (1) DLNA (1) dmidecode (1) dns (7) dracut (1) driver (1) error (10) esxi5 (2) excel (1) facebook (1) faq (36) faucet (1) firefox (17) firewall (2) flash (5) free (3) fun (1) gadgets (4) games (1) garmin (5) gmail (3) google (4) google+ (2) gps (5) grub (2) guide (1) hardware (6) how (1) how-to (45) huawei (1) icloud (1) info (4) iphone (7) IPMP (2) IPV6 (1) iscsi (1) jailbreak (1) java (3) kodi (1) linux (28) locate (1) lshw (1) luci (1) mafia wars (1) malware (1) mapsource (1) memory (2) mikrotik (5) missing (1) mods (10) mouse (1) multipath (1) multitasking (1) NAT (1) netapp (1) nouveau (1) nvidia (1) osmc (1) outlook (2) p2v (2) patch (1) performance (19) perl (1) philippines (1) php (1) pimp-my-rig (9) pldthomedsl (1) plugin (1) popcorn hour (10) power shell (1) process (1) proxy (2) pyspark (1) python (13) qos (1) raspberry pi (7) readyboost (2) reboot (2) recall (1) recovery mode (1) registry (2) rename (1) repository (1) rescue mode (1) review (15) right-click (1) RSS (2) s3cmd (1) salary (1) sanity check (1) security (15) sendmail (1) sickgear (3) software (10) solaris (17) squid (3) SSD (3) SSH (9) swap (1) tip (4) tips (42) top list (3) torrent (5) transmission (1) treewalk (2) tunnel (1) tweak (4) tweaks (41) ubuntu (4) udemy (6) unknown device (1) updates (12) upgrade (1) usb (12) utf8 (1) utility (2) V2V (1) virtual machine (4) VirtualBox (1) vmware (14) vsphere (1) wannacry (1) wifi (4) windows (54) winpe (2) xymon (1) yum (1) zombie (1)

RANDOM POSTS