ERROR: YUM -- Unfinished Transactions Remaining..

Linux is not perfect. Chances are when installing packages from repositories, some error will show up -- more commonly the conflict between packages. This prevents the install or update of the packages due to the conflicts. On rare occassions, there would be times when yum may fail to complete transactions. This is the time when you will see a similar error message as below:

There are unfinished transactions remaining. You might consider running yum-complete-transaction first to finish them.

.. or this screenshot with the error message..

yum-complete-transaction

Sometimes a modified version of the message appears in this manner:

There are unfinished transactions remaining. You might consider running yum-complete-transaction first to finish them.
The program yum-complete-transaction is found in the yum-utils package.

This latter message is a little bit more meaningful in that it gives you a clue that the executable "yum-complete-transaction" is supplied by the yum-utils rpm package. Install this rpm if required.

WARNING: Although yum itself is suggesting to run "yum-complete-transaction", do not run it. If you could avoid running it, do so. Running "yum-complete-transaction" without knowing what the previous transaction was may wipe out your whole system. It could be disastrous.

I know it is very inconvinient to have the error message show up in the yum transactions but if that is what's bothering you, take the safer mode and execute yum-complete-transaction with the argument "--cleanup-only". The exact command to execute is:

# yum-complete-transaction --cleanup-only

This way yum will never make any change to your system. Again, do not run yum-complete-transaction if you don't have a backup of your system. You may end up wiping the contents of your drive. I have seen this happen several times that I have learned my lesson -- from both my mistakes and the mistakes of others.

Share:

TIP: Taking Advantage of Virtual Hot Add Technology

As a system administrator, I could say virtualization is one of the best things that happened since sliced bread. This of course is in terms of utilization and the thin provisioning mechanism it entails. What usually happens is that, the guest operating system is tricked into believing that it has all that resource for itself; whereas, what actually happens is that it only is allocated a slice of it, and it will get the resource as necessary.

This is neat technology. The other side of the coin is that you may allocate a thick provisioned resource but at a fraction of its entirety. What does this mean? The short term -- skimping -- I use this when I can't estimate the exact requirement of an application. I rely on the "hot add" technology of virtualization to allocate the final pieces of the architecture when more accurate information is available. In the virtualization lingo, the terms "hot add" and "hot plug" are often used interchangably and likely pertain to the same thing.

Modern operating systems play a big role in this "hot add" technology. For example, in the Linux world once the application has been tested and it was later found to be CPU-bound, just hot add more cores. Not really that interesting, right? But wait, you can do this without having to reboot the virtual machine -- NO DOWNTIME! Adding virtual CPUs while it is running -- now that's cool stuff! This of course assumes that the hot add feature has been turned on.

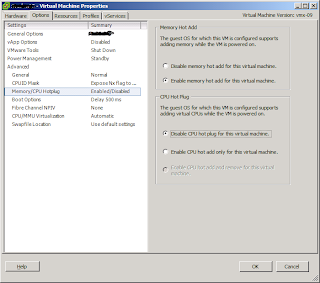
This is how its done on the VMware side of things.

Enable Hot Add

The same can be done to memory -- once a guest is identified to be memory-bound -- just hot add more memory.

A recent experience taught me that this doesn't always work. It works for CPU hot plug, but for memory hot add it doesn't. I'm using the recent version of RHEL 6.4 x86_64 and CentOS 6.4 x86_64. Both of these operating systems don't work well with memory hot add, but their older versions used to work.

Executing a memory hot add on a RHEL/CentOS 6.4 guest, this error appears:

------------[ cut here ]------------
WARNING: at arch/x86/mm/init_64.c:701 arch_add_memory+0xe2/0x100() (Not tainted)
Hardware name: VMware Virtual Platform
Modules linked in: vsock(U) vmci(U) autofs4 sunrpc ipv6 ipt_REJECT ppdev parport_pc parport microcode vmware_balloon e1000 shpchp sg i2c_piix4 i2c_core ext4 mbcache jbd2 sd_mod crc_t10dif sr_mod cdrom mptsas mptscsih mptbase scsi_transport_sas pata_acpi ata_generic ata_piix dm_mirror dm_region_hash dm_log dm_mod [last unloaded: nf_conntrack]
Pid: 25, comm: kacpi_notify Not tainted 2.6.32-358.2.1.el6.x86_64 #1
Call Trace:
 [] ? warn_slowpath_common+0x87/0xc0
 [] ? warn_slowpath_null+0x1a/0x20
 [] ? arch_add_memory+0xe2/0x100
 [] ? add_memory+0xb7/0x1c0
 [] ? acpi_memory_enable_device+0x95/0x12b
 [] ? acpi_memory_device_add+0x118/0x121
 [] ? acpi_device_probe+0x50/0x122
 [] ? driver_probe_device+0xa0/0x2a0
 [] ? __device_attach+0x0/0x60
 [] ? __device_attach+0x0/0x60
 [] ? __device_attach+0x53/0x60
 [] ? bus_for_each_drv+0x64/0x90
 [] ? device_attach+0xa4/0xc0
 [] ? bus_probe_device+0x2d/0x50
 [] ? device_add+0x527/0x650
 [] ? pm_runtime_init+0xcb/0xe0
 [] ? device_register+0x1e/0x30
 [] ? acpi_add_single_object+0x837/0x9e8
 [] ? acpi_ut_release_mutex+0x63/0x67
 [] ? acpi_bus_check_add+0xe0/0x138
 [] ? acpi_os_execute_deferred+0x0/0x36
 [] ? acpi_bus_scan+0x3a/0x71
 [] ? acpi_bus_add+0x2a/0x2e
 [] ? acpi_memory_device_notify+0xa6/0x24f
 [] ? acpi_os_execute_deferred+0x0/0x36
 [] ? acpi_bus_get_device+0x2a/0x3e
 [] ? acpi_bus_notify+0x4b/0x82
 [] ? acpi_os_execute_deferred+0x0/0x36
 [] ? acpi_ev_notify_dispatch+0x64/0x71
 [] ? acpi_os_execute_deferred+0x29/0x36
 [] ? worker_thread+0x170/0x2a0
 [] ? autoremove_wake_function+0x0/0x40
 [] ? worker_thread+0x0/0x2a0
 [] ? kthread+0x96/0xa0
 [] ? child_rip+0xa/0x20
 [] ? kthread+0x0/0xa0
 [] ? child_rip+0x0/0x20
---[ end trace 081e3b980cb5c943 ]---
ACPI:memory_hp:add_memory failed
ACPI:memory_hp:Error in acpi_memory_enable_device
acpi_memhotplug: probe of PNP0C80:00 failed with error -22

 driver data not found
ACPI:memory_hp:Cannot find driver data

You will see the above error message when the command "dmesg" is executed on a terminal window. This seems to be a bug in the kernel module for memory hot add.

This is a bug that I hope gets fixed in future versions of the Linux kernel. If you rely on memory hot add feature, please be aware of this limitation on the new versions of RHEL and CentOS. It seems to be rooted to the kernel code so most likely all other flavors of Linux are in the same boat.

The Windows operating system doesn't seem to have this problem. Hot plug of virtual CPUs and hot add of memory works without any problem.

Share:

ERROR: TOO MANY USER/GDI objects are being used..

Multi-tasking is a function of the computer.. Humans (to a certain degree) are not capable of multi-tasking. It was handed a "busted" verdict when a subject was made to drive while being on the phone on an interview on the show Mythbusters. The subject miserably failed. Studies have also disclosed that people manifest severe interference when performing even the simplest of jobs at the same time. But I'm not about to introduce you to a subject of debate though.

My computer performs the multi-tasking for me -- that is what it is designed for. Given that, I expect it to perform the tasks I otherwise would not be able to complete by myself. It is a pain if the computer's technical limitations limit that possibility. Please allow me to share the experience and how I was able to tweak it.

Apparently, Windows has an inherent limitation on the so-called "user objects" and "GDI objects". This has something to do with how the operating system handles resources on demand. To give you an idea how I discovered this, it is due to this error on one of the applications I use to multitask.

TOO MANY USER/GDI objects are being used by applications!

Initially, I thought this was due to exhausting the 4GB RAM installed in my notebook. So I got me an additional 4GB module to beef it up. And the result? It is still the same. I really can't complain about having more memory but this intrigued me to investigate further.

I found a post related to the USER and GDI objects and how it is tested. It showed that the limit set by default numbers to 10,000. Is that huge? It appears so. But you can hit that wall easily -- even on Windows 7!

In order to illustrate, you may scour the internet to download sysinternals "testlimit.exe" or its 64bit equivalent if you're running a 64bit system. See the output below.

testlimit64.exe

The question then is, is it tweakable? I asked this same question and the short answer is "YES". It requires a registry hack though.

WARNING: Before you proceed any further, know that registry changes can potentially damage your computer system. I will not be held accountable and responsible for the outcome of this hack.

Now that you have been warned, the registry key is found in this branch: HKLM\SOFTWARE\Microsoft\Windows NT\CurrentVersion\Windows. The keys are "GDIProcessHandleQuota" and "USERProcessHandleQuota". These keys are set to their default value of "2710" (hexadecimal). This 2710 translates to 10,000 in native decimal form.

In my system, I changed these keys to 8000 (hexadecimal) or 32768 in human readable numeric terms. The testlimit output follows below.

testlimit64.exe

After the above tweaks in the registry, I have not encountered the same error in the past several weeks.

Further checks to the value of these keys indicate that the theoretical maximum is 10,000 (hexadecimal) or 65536 with huge, bold font warnings about hitting maximum may cause system instability. However, I have proven to myself that the value I set above works for me. Your mileage may vary.

Share:

TIP: PHP Install/Upgrade "Sanity Check"

I used to be a meticulous configure, compile and make installer of packages -- the old school Linux way of doing things. I customize to take advantage of the CPU optimizations to squeeze every bit of performance from the processor and any of the available resources the server has. And usually, the source is more updated than the pre-packaged binaries available for install.

Nowadays, largely due to the virtualization technology, I left that practice and settled for pre-packaged repo-based RPM binaries. I found this to be less hassle and takes less time to complete. What's more? Dependencies are automatically installed and most of all upgrading the packages takes even less effort. It takes a bit of time and exposure to finally settle to this practice. To be honest, it was a bit difficult at first.

Still, the discipline involved in the installs and upgrades are there. This is more valuable than anything else. I got to practice this habbit of post-upgrade checks and I am thankful for putting the effort early on to develop this skill.

Lately, a request was made to install PHP modules to take advantage of built in libraries. The repository already had upgraded versions of the PHP binaries and I was forced to upgrade due to this. The repo-based RPM install saved me. After yum completed the installs, the sanity check was to run "php -m" to see if all of the modules run intact. It showed errors on the pdo_oci.so module. The exact error is below:

PHP Warning:  PHP Startup: Unable to load dynamic library '/usr/lib64/php/modules/oci8.so' - libclntsh.so.12.1: cannot open shared object file: No such file or directory in Unknown on line 0
PHP Warning:  PHP Startup: Unable to load dynamic library '/usr/lib64/php/modules/pdo_oci.so' - libclntsh.so.12.1: cannot open shared object file: No such file or directory in Unknown on line 0

The shared object pdo_oci.so is dependent on the oracle client libraries. So after downloading the RPM off the oracle website, and installing the dependency was resolved. The extra step that needed to be done was to include the new oracle client libraries to the global LD_LIBRARY_PATH of the system.

This was via creating the file /etc/ld.so.conf.d/oracle12-client.conf. The file needed to contain the path "/usr/lib/oracle/12.1/client64/lib" (the path to the newly installed oracle client libraries). To make things easier, run this on the a terminal.

echo /usr/lib/oracle/12.1/client64/lib > /etc/ld.so.conf.d/oracle12-client.conf

After completing the above steps, execute "ldconfig -v" and see if the new oracle client libraries got included by the library dependency resolver.

Running "ldd /usr/lib64/php/modules/pdo_oci.so" displayed all of the dependent libraries present without any missing ones.

# ldd /usr/lib64/php/modules/pdo_oci.so
        linux-vdso.so.1 =>  (0x00007ffffa754000)
        libclntsh.so.12.1 => /usr/lib/oracle/12.1/client64/lib/libclntsh.so.12.1 (0x00007fd40e195000)
        libc.so.6 => /lib64/libc.so.6 (0x00007fd40de01000)
        libnnz12.so => /usr/lib/oracle/12.1/client64/lib/libnnz12.so (0x00007fd40d6eb000)
        libons.so => /usr/lib/oracle/12.1/client64/lib/libons.so (0x00007fd40d4a7000)
        libdl.so.2 => /lib64/libdl.so.2 (0x00007fd40d2a3000)
        libm.so.6 => /lib64/libm.so.6 (0x00007fd40d01e000)
        libpthread.so.0 => /lib64/libpthread.so.0 (0x00007fd40ce01000)
        libnsl.so.1 => /lib64/libnsl.so.1 (0x00007fd40cbe8000)
        librt.so.1 => /lib64/librt.so.1 (0x00007fd40c9df000)
        libaio.so.1 => /lib64/libaio.so.1 (0x00007fd40c7de000)
        libclntshcore.so.12.1 => /usr/lib/oracle/12.1/client64/lib/libclntshcore.so.12.1 (0x00007fd40c28e000)
        /lib64/ld-linux-x86-64.so.2 (0x0000003ddc200000)

Executing "php -m" again displayed all the modules used by PHP but without any warnings this time. The discipline of running post-upgrade sanity checks always pays off. It is a habbit that is hard to develop but a practice that is required of every hard-core system administrator.


Share:

TIP: Linux Virtual Machine Performance Tweaks

The advent of virtualization, changed many rules of technology -- what may apply to the physical world could be detrimental to its virtual equivalent. This is likewise true in terms of performance. Optimizing the performance of one virtual machine impacts the performance of others. In the end, tweaking for performance not only pays off big time, but does that in magnitudes of two-, three-fold or even more.

The above statements are true due to sharing of resources in the hypervisor level. If resources are freed by performance tweaks, it makes them available to others waiting for the same resource to be available for use.

The first of these tweaks is to ensure that the disk used by the virtual machine is aligned. Why is this important? To better understand the underlying infrastructure of the virtual filesystem, refer to the screenshot. (Illustration from http://www.yellow-bricks.com)


As seen from the diagram, the misalignment of the array, to the virtual filesystem, and, to the guest disk is very, very significant. A big performance degradation will occur due to the misalignment. What happens here is that, what could be seen as a single I/O operation on the guest operating system could end up as multiple I/O operations on the physical disk or array.

Translate the above performance degradation to multiple virtual machines and you see the drift. According to VMware (Reference):
The degree of improvement from alignment is highly dependent on workloads and array types. You might want to refer to the alignment recommendations from your array vendor for further information. 

Still, I/O could be a potential performance bottleneck if the disk alignment is not kept in check.

While on the same topic of I/O bottlenecks, Linux virtual machines could benefit from the proper I/O scheduler. Again, this is another arena where the physical rules and virtual rules differ.

Modern Linux kernels default to the "completely fair queuing" (or CFQ) scheduler. This is how the kernel deals with optimizing I/O. It re-orders I/O in such a manner that when the head moves across the platter, it does that in an orderly, sequential manner rather than moving back and forth to complete requests. The best illustration to this is an elevator, where it drops people to floors in an orderly sequential manner. Instead of dropping passengers as they push the corresponding floor buttons, what happens is the elevator drops people off at 2, then 5, then 6, before going to 11. The kernel has different methods of doing this.


Imagine that the hypervisor has its own elevator, the guest has its own elevator and the array has its own. When the guest performs that optimization, the hypervisor does the same, and the array does the same. Who then decides what is the best re-ordering or optimization? The hypervisor has no insight on the guest operating system (this time a Linux machine), meaning it can't tell the method used for optimization, or how they got re-ordered, if they indeed got re-ordered or why it came to that decision.

This kernel optimization has no impact on the virtual environment and in some situations could have a negative effect. Why? The hypervisor has no way of telling how long an I/O has been outstanding or how it got re-ordered and why it was that way on the guest level. Add the hypervisor elevator and that adds further latency to the already outstanding I/O request.

It would be best to leave all optimizations on the hypervisor level and turn off the elevator on the kernel level. This is done by having the string "elevator=noop" on the kernel line of the grub.conf file of Linux. The other way of turning it off is by choosing the noop scheduler, as recommended by VMware.

This is the default setting.
# cat /sys/block/[DEVICE]/queue/scheduler
noop deadline anticipatory [cfq]
Change it for every [DEVICE].
# echo noop > /sys/block/[DEVICE]/queue/scheduler
# cat /sys/block/[DEVICE]/queue/scheduler
[noop] deadline anticipatory cfq

If you have screensavers running, those are detrimental to the performance of virtual machines. Disable them at once. I have seen a virtual machine with a load of 5.0 reduced to 0.0 simply by disabling the screensaver!

The other tweak you could perform is to change to runlevel 3. Running on a GUI (runlevel 5), consumes a lot of resources that would otherwise be free if running at runlevel 3.

Permanently change it on the file /etc/inittab.
id:3:initdefault

By tweaking, you squeeze the best performace out of your current infrastructure and free up resources otherwise sapped by useless unnecessary processes or simple misconfigurations. The combination of the tweaks above may yield better results than applying one tweak alone.

Share:

FAQ: Cloned Linux Virtual Machine with Boot Errors

Q. While working on a few cloned RHEL virtual machines just a few days ago, I encountered a weird error that almost stopped me dead on my tracks. I was expecting the tasks to be a breeze since cloning via virtual machine templates is as easy as click, click, click.

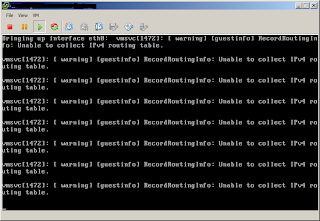
As it turned out, what was supposedly a few clicks was more complex than what I thought. The clone virtual machines simply refused to boot. To give you a better understanding of the error see the screenshot below.


Opening the console of the virtual machine, the repeated errors prompted are:
vmsvc[xxx]: [ warning] [guestinfo] RecordRoutingInfo: Unable to collect IPV4 routing table.

The messages above are repeated at about every minute.. And, worse, the boot sequence is stuck at this phase and will not proceed.

After exhausting my patience waiting for the host to boot up, I gave up and resorted to shutting down the virtual machines to figure out what was wrong. The VMware logs didn't give a clue what was wrong. Even RedHat forums didn't have information regarding the error.

What was striking was the "vmsvc" string, indicating this was somewhat VMware configuration related or a service related to VMware. This was happening to a RHEL Linux virtual machine. So I tried a different flavor of Linux -- CentOS. Same result. But for Windows Server 2003, it was not.

Google search came out with this same exact error message on the VMware Knowledge Base (KB #2048572). Executing the procedure in the resolution part did not help either.

It only applied when the guest operating system's time is ahead of the host. But that gave me a further clue -- how about if the time of the cloned guest is too far off from the host ESXi host? (Afterall it was converted to a template a while back. And it was not selective, as every cloned machine displayed this manifestation.)

It turned out this was the case. I decided to disable time synchronization completely between the host ESXi and guest RHEL virtual machine.. Bingo error gone.

A. To completely disable the time sync between the host ESXi hypervisor and the guest RHEL virtual machine, simply shutdown or power off the guest virtual machine and edit the .vmx configuration file. Add the following lines, if they don't exist:
tools.syncTime = "0"
time.synchronize.continue = "0"
time.synchronize.restore = "0"
time.synchronize.resume.disk = "0"
time.synchronize.shrink = "0"
time.synchronize.tools.startup = "0"
time.synchronize.tools.enable = "0"
time.synchronize.resume.host = "0"

It helps to enable SSH on the ESXi server and use vi to make changes to the guest .vmx file. After adding the above lines, problem was solved and subsequent clones were easier.

The only task left to be done was to convert the template to a VM, make the same changes and re-template. This was a very fruitful learning experience.

Share:

HOW-TO: Migrate Sickbeard to its Bricky Fork

The demise and take down of most Usenet premium providers left most of its followers with lesser and lesser options by the day. Not only its followers feel the grunt as a result, but its service dependent software as well. One of the end services I use myself is Sickbeard.

Sickbeard is my choice in automated download of TV series that I follow and watch. The best feature is the automatic download of episodes that you program it to automatigically download for you. Another neat feature is it notifies you of this download through your PC, phone or twitter (and other social media) services. But Sickbeard relies heavily on Usenet as it has limited torrent support.

Due to the above limitation, it forked to its bricky counterpart -- Sickbeard with better torrent support. The screenshot below is for the original version of Sickbeard.


I have a Popcorn Hour C-200 (touted as one of the best media players out in the market during its time). The outstanding feature of this media player is it could run Sickbeard -- meaning not only could it play the TV series, it could download and manage them automatically as well. This part was discussed in detail on our previous article on "Install Sickbeard on Popcorn Hour C-200".

The above link is used to install the original main Sickbeard version, the one with limited torrent support. To install the bricky fork, the above "HOW-TO" still applies. Just choose not to start Sickbeard after the install.

It is important (or should I say very important) to have a shell to the C-200 for the next steps to work. This could be done via BusyBox or LTU (Linux Terminal Utilities). Checkout the links on how that is done then follow the procedure below:

[1] Open a terminal connection via PuTTY or another utility. Browse the directory /share/Apps/sickbeard. All the other steps below will discuss about changes to files and directories relative to this path.

[2] Remove the directory .git. Do this so the bricky fork will not conflict with the original midgetspy version of sickbeard. I also removed the file .gitignore but this seems irrelevant. You may opt to remove it in this step.

[3] On the same directory /share/Apps/sickbeard, is the file setup.sh. Look for the line:
git clone git://github.com/midgetspy/Sick-Beard.git SB
.. change it to this line:
git clone git://github.com/bricky/Sick-Beard.git SB

[4] Remove the directory autoProcessTV under /share/Apps/sickbeard. If you don't want to remove it, you may choose to rename it instead. Any arbitrary name aside from the original name will do.

[5] Execute setup.sh on the command line. Either of these commands will work:
/share/Apps/sickbeard/setup.sh install
.. or
cd /share/Apps/sickbeard; ./setup.sh install

[6] Once the git clone is complete, run this:
/share/Apps/AppInit/appinit.cgi start sickbeard

The obvious difference between the two versions is the availability of more torrent search engines for the bricky fork. If you browse to the "Search Providers" portion of the configuration you will see more options for bricky fork than the original.


As seen from the above screenshot, there are more providers available for this fork of Sickbeard. I hope this post helps you get more from Sickbeard.


Share:

INFO: RHEL Cluster -- Luci Installation Error

I have had the chance of administering and maintaining several implementations of Red Hat Cluster, but I never really had the chance to build one from scratch. So a chance presented itself recently and I bumped into several unforgettable experiences along the way. It roused my inquisitive nature and fruitful learnings were gleaned off the obstacles. One of them was with the initial install of luci (and ricci).

The easiest way to configure a Red Hat Cluster is via luci (and ricci), especially for a RHEL Cluster noob like me. I couldn't argue with that statement. It is easier, although I would love to go a little deeper and understand the command line equivalents of the web based configurations done. So I got to install luci after configuring ricci.

To initialize the luci configuration, I ran this command:
[root@vhost ~]# /usr/bin/paster make-config luci /var/lib/luci/etc/luci.ini --no-default-sysconfig --no-install

However, the result was not as expected. And a configuration file was not created. The errors are below:
[root@vhost ~]# /usr/bin/paster make-config luci /var/lib/luci/etc/luci.ini --no-default-sysconfig --no-install
Distribution already installed:
  luci 0.26.0 from /usr/lib/python2.6/site-packages
Traceback (most recent call last):
  File "/usr/bin/paster", line 9, in 
    load_entry_point('PasteScript==1.7.3', 'console_scripts', 'paster')()
  File "/usr/lib/python2.6/site-packages/paste/script/command.py", line 84, in run
    invoke(command, command_name, options, args[1:])
  File "/usr/lib/python2.6/site-packages/paste/script/command.py", line 123, in invoke
    exit_code = runner.run(args)
  File "/usr/lib/python2.6/site-packages/paste/script/appinstall.py", line 68, in run
    return super(AbstractInstallCommand, self).run(new_args)
  File "/usr/lib/python2.6/site-packages/paste/script/command.py", line 218, in run
    result = self.command()
  File "/usr/lib/python2.6/site-packages/paste/script/appinstall.py", line 295, in command
    self.distro, self.options.ep_group, self.options.ep_name)
  File "/usr/lib/python2.6/site-packages/paste/script/appinstall.py", line 234, in get_installer
    'paste.app_install', ep_name)
  File "/usr/lib/python2.6/site-packages/pkg_resources.py", line 2229, in load_entry_point
    return ep.load()
  File "/usr/lib/python2.6/site-packages/pkg_resources.py", line 1947, in load
    if require: self.require(env, installer)
  File "/usr/lib/python2.6/site-packages/pkg_resources.py", line 1960, in require
    working_set.resolve(self.dist.requires(self.extras),env,installer))
  File "/usr/lib/python2.6/site-packages/pkg_resources.py", line 550, in resolve
    raise VersionConflict(dist,req) # XXX put more info here
pkg_resources.VersionConflict: (WebOb 0.9.6.1 (/usr/lib/python2.6/site-packages), Requirement.parse('WebOb>=0.9.7'))

The "python-webob-0.9.6.1-3.el6.noarch" RPM was properly installed but it looks like the package it is looking for is versions higher. As checked, the python-webob package available is already installed.

I also tried several versions of python-webob packages from several known repositories. Only to fail with the same errors above.

It turns out the "python-repoze-who-friendlyform.noarch" package is in conflict with other repositories. When installing luci, install from the base repository only. Disable EPEL and other enabled repositories.

[root@vhost ~]# yum -y install luci
Loaded plugins: fastestmirror, security
Loading mirror speeds from cached hostfile
Setting up Install Process
Resolving Dependencies
--> Running transaction check
---> Package luci.i686 0:0.26.0-37.el6.centos will be installed
--> Processing Dependency: python-repoze-who-friendlyform for package: luci-0.26.0-37.el6.centos.i686
--> Running transaction check
---> Package python-repoze-who-friendlyform.noarch 0:1.0-0.3.b3.el6 will be installed
--> Finished Dependency Resolution

Dependencies Resolved

============================================================================================================
 Package                                 Arch            Version                        Repository     Size
============================================================================================================
Installing:
 luci                                    i686            0.26.0-37.el6.centos           base          553 k
Installing for dependencies:
 python-repoze-who-friendlyform          noarch          1.0-0.3.b3.el6                 base           13 k

Transaction Summary
============================================================================================================
Install       2 Package(s)

Total download size: 566 k
Installed size: 2.2 M
Downloading Packages:
(1/2): luci-0.26.0-37.el6.centos.i686.rpm                                            | 553 kB     00:00 ... 
(2/2): python-repoze-who-friendlyform-1.0-0.3.b3.el6.noarch.rpm                      |  13 kB     00:00 ... 
------------------------------------------------------------------------------------------------------------
Total                                                                       4.9 MB/s | 566 kB     00:00     
Running rpm_check_debug
Running Transaction Test
Transaction Test Succeeded
Running Transaction

  Installing : python-repoze-who-friendlyform-1.0-0.3.b3. [                                           ] 1/2
  Installing : python-repoze-who-friendlyform-1.0-0.3.b3. [##                                         ] 1/2
  ...
  Installing : python-repoze-who-friendlyform-1.0-0.3.b3. [########################################## ] 1/2
  Installing : python-repoze-who-friendlyform-1.0-0.3.b3.el6.noarch                                     1/2 
  Installing : luci-0.26.0-37.el6.centos.i686 [                                                       ] 2/2
  Installing : luci-0.26.0-37.el6.centos.i686 [#                                                      ] 2/2
  ...
  Installing : luci-0.26.0-37.el6.centos.i686 [###################################################### ] 2/2
  Installing : luci-0.26.0-37.el6.centos.i686                                                           2/2 

  Verifying  : luci-0.26.0-37.el6.centos.i686                                                           1/2 
  Verifying  : python-repoze-who-friendlyform-1.0-0.3.b3.el6.noarch                                     2/2 

Installed:
  luci.i686 0:0.26.0-37.el6.centos                                                                          

Dependency Installed:
  python-repoze-who-friendlyform.noarch 0:1.0-0.3.b3.el6                                                    

Complete!
[root@vhost ~]# /usr/bin/paster make-config luci /var/lib/luci/etc/luci.ini --no-default-sysconfig --no-install
Distribution already installed:
  luci 0.26.0 from /usr/lib/python2.6/site-packages
/usr/lib/python2.6/site-packages/tw/core/view.py:223: DeprecationWarning: object.__new__() takes no parameters
  obj = object.__new__(cls, *args, **kw)
Creating /var/lib/luci/etc/luci.ini
Now you should edit the config files
  /var/lib/luci/etc/luci.ini
[root@vhost ~]# service luci start
Adding following auto-detected host IDs (IP addresses/domain names), corresponding to `host.localdomain' address, to the configuration of self-managed certificate `/var/lib/luci/etc/cacert.config' (you can change them by editing `/var/lib/luci/etc/cacert.config', removing the generated certificate `/var/lib/luci/certs/host.pem' and restarting luci):
(none suitable found, you can still do it manually as mentioned above)

Generating a 2048 bit RSA private key
writing new private key to '/var/lib/luci/certs/host.pem'
[  OK  ]
Start luci...
Point your web browser to https://host.localdomain:8084 (or equivalent) to access luci

So after reinstalling the luci package from the base repo (from the ISO itself), I was able to successfully initialize luci and continue with the cluster configuration.


Share:

INFO: Plants VS Zombies 2 FREE!

Were you addicted to "Plants vs Zombies"? Or are you aware that it even exists? If this is the first time you have heard about it, it's about time as the game is free. The game could be downloaded off the apple store for free!

The screenshot below will tell you that I'm not kidding. It is taken today off of my iPhone. It is not often that this game is offerred for free. Right now the old version of the game is not free and costs US$0.99. Not sure how much the new version will be when it sells.


The game has been installed on my iPhone (screenshot below). I haven't played it yet as I'm excited to let everyone know that the game is free.


So what are you waiting for? Download the game for free and try it out for yourself.


Share:

HOW-TO: Monitor Hard Drive Health

If there is one thing I know for sure as a system administrator -- it is disaster strikes when you least expect it. This is true for just about every aspect of the sysad job. But this is likewise very true for life outside the professional arena. Your computer can have a disaster when you least expect it. This is why it is important to monitor your own computer. And if monitoring is not enough, ensure that it alerts you as well.

I decided to post this article due to a recent experience that saved me from what could have been a potentially big headache. I started noticing my computer freezing at odd times when I'm in the middle of doing something. It irritated me a lot of times but I was just busy finishing up some work to really mind the problem. So I ended up ignoring it to focus on more important things that I need to finish.

Just last week my computer froze and it just simply will not respond for a while. The drive activity LED was flashing indicating a busy drive. I wasn't doing anything so initially, I suspected it to be a virus. Nothing suspicious was running on the task manager and it would happen from time to time -- frequent enough to warrant my attention this time.

I had Acronis Drive Monitor (download here) installed before. I simply stopped it from starting since some startup analyzer suggested I disable it. I decided to run it this time.

I was a bit surprised at what I saw as the drive monitor alerted that something was critical about the health of my hard drive. The screenshot below has the details.


As you can see from the screenshot, it rated my drive health at 60%. The S.M.A.R.T. attributes of my drive triggered the drive monitor alerting me of the criticality of the situation.

As checked, the "Reallocation Event Count" on my hard drive was through the roof. Further research on this attribute indicated my drive had a lot of bad sectors (thus the reallocation events). And it indicated the imminent failure of the hard drive. The same drive monitor has the S.M.A.R.T. parameters tab. See below.


As seen from the status, it indicated that my drive was failing. So without further ado, I commissioned another drive and copied the contents of the failing drive to it. The drive monitor saved me from a potentially difficult situation. I wasn't much concerned about losing the hard drive, but more of the data in it.

If you have not installed the Acronis Drive Monitor, download the software and install it on your computer. It is freely available from the Acronis website as indicated above. Just let it run in the background and it will alert you of potential problems before they happen. You will not regret using this software.


Share:

HOW-TO: Kill Zombie Processes with Parent ID (PID) of 1

As a system administrator, we are often briefed on the careful use of the "kill" command. Indeed to use this command, you need to know what you're doing.. you really really need to know what you're doing. Seasoned system administrators would often talk about the first time they used this command and the racing heart rate before hitting the execute key.

It's not that bad though. Like all critical things this command could be the "last-resort" tool you need to resolve a complex issue -- in case of fire break glass thing, sort of. But the "kill" command doesn't always work. I'd say about 99% of the time it will. You need to be a seasoned system administrator long enough to encounter this problem as it doesn't come along very often.

I decided to post this solution since last week, I encountered a runaway samba (smbd) process. Samba had to be stopped but instead of it gracefully shutting down, only the parent process did and left behind a lot of child processes. They in turn became zombie processes -- about 257 of them.

It would not have mattered much, but the load on the server increased to match the number of zombie processes. In a matter of seconds, it became a critical problem that need to be dealt with. To illustrate the criticality of the situation, here are a couple of indicators.

[root@vhost ~]# ps -ef | grep smbd | wc -l
257
[root@vhost ~]# uptime
15:18:09 up 95 days,  5:04,  6 users,  load average: 257.91, 257.98, 255.54

When ps is executed, it returned smbd processes that had a parent ID (PID) of 1 -- zombie processes.

[root@vhost ~]# ps -ef | grep smb | tail
nobody   31590     1  0 12:29 ?        00:00:00 smbd -D
nobody   31705     1  0 11:55 ?        00:00:00 smbd -D
nobody   31743     1  0 14:31 ?        00:00:00 smbd -D
nobody   32049     1  0 12:19 ?        00:00:00 smbd -D
nobody   32415     1  0 12:04 ?        00:00:00 smbd -D
nobody   32484     1  0 14:25 ?        00:00:00 smbd -D
nobody   32508     1  0 13:35 ?        00:00:00 smbd -D
nobody   32511     1  0 12:04 ?        00:00:00 smbd -D
nobody   32535     1  0 13:22 ?        00:00:00 smbd -D
nobody   31599     1  0 11:51 ?        00:00:00 smbd -D
[root@vhost ~]# kill -9 31599

Killing any of the smbd processes didn't do much. Server load is holding steady at 257 and none of the smbd processes get terminated.

Once a process becomes a zombie process (or with a PID of 1), there is no amount of "kill" that could terminate it. The only other known way to terminate the zombie process is to do a host reboot. You and I both know this is to be avoided as much as possible.

The other way to do it is not known to many. Only a handful of system administrators that I personally know, knew how to use this command. The command is "telinit". This is the alternative to rebooting the server. To kill the zombie process(es) or processes with PID of 1, execute "telinit u" or "telinit U". Executing the command "telinit u" makes init (the process with ID 1) restart, or as the man pages state it, re-execute, without having to reboot the host.

Once this was done, an immediate impact of decrease in server load was felt. Also, the smbd processes that used to be zombies are now gone.

[root@vhost ~]# uptime
15:21:22 up 95 days,  5:07,  6 users,  load average: 49.06, 184.80, 229.74

About 5 minutes after execution of telinit. The load has re-stabilized.

So if a fellow administrator asks you if you know how to kill a zombie process, let them know that you belong to those handful of seasoned system administrators who don't consider reboot a solution to terminate a zombie process.

I have asked this question in several interviews so far only a few got it right. And I consider it major point in hiring.


Share:

INFO: NetApp iSCSI to VMware Virtual Infrastructure

iSCSI, the implementation of the SCSI protocol over internet packets, is one of the cheapest (if not the cheapest) forms of connectivity to an external storage. It is a form of transmitting data from host to storage, and back, over the IP network. It is cheap since putting up a fiber channel infrastructure will cost more. But nowadays almost every infrastructure already has fiber with 10gigabit connectivity.

iSCSI enables the transmission of SCSI commands over IP-encapsulated packets. This allows organizations to consolidate storage and gain better utilization, not to mention this is easier to manage and backup. The protocol gives hosts an "illusion" that the storage is directly or locally attached to while in reality it sits somewhere else.

The biggest implementation of iSCSI that I have seen so far is its use for disaster recovery (or DR) purposes. On the VMware infrastructure, iSCSI can be utilized where there is a need to share disks or LUNs. And it is easily implemented since most servers nowadays come with adequate number of network interfaces. And it is independent of any physical hardware as long as everything is connected via IP.

The same implementation of NetApp iSCSI is used in the virtual infrastructure that I administer. Everything works after having introduced the LUNs and assigning IP addresses. And it sticks to the notion of keeping everything simple so it is easier to manage. However, during my research of best practice(s) of VMware infrastructure with NetApp storage via iSCSI, a community post in the VMware forums and NetApp community suggested that the NetApp virtual storage console plugin for vSphere needs to be installed.

True enough when the VSC plugin was installed, its interface showed alerts on the screen. Below is a screenshot of what it looks like.


Apparently, although it works after configuration, the settings are not that optimal. It needs further tweaking and the VSC interface itself can tweak the settings for optimal multipath settings, optimal active-active configuration, failover settings, etc.


Correcting or applying the right settings to the current environment is easy. It all it takes is to right click the alert icon and select "Set Recommended Values..".


It will then ask which of the recommended values are applied. All the needed options are ticket by default. The interface also displays what settings it changes.


When the recommended values are applied, the interface immediately changes from "Alert!" to "Normal". But reboot is still required as shown on the Status where it says "Pending Reboot".

After rebooting the ESXi host, the optimal settings are applied. The VSC interface on the vSphere Client application window confirms this.

To ensure that the guest machines are not impacted by the change, it is recommended to put the ESXi host in maintenance mode. It is easy to do since vMotion is there to ensure no downtime is incurred. This is the same route I applied. It also allows you to immediately reboot after applying the resolutions suggested by the virtual storage console.

After applying the tweaks, you will notice faster access to the storage infrastructure from the guest machines. If you have a similar infrastructure, install the VSC plugin and the benefits pay off immediately.

Share:

HOW-TO: Prep Work for Linux P2V (Physical to Virtual)

Virtualization is the technology trend that is "in" nowadays. It is debatable whether the money you save in hardware costs (and other variable costs) can equate or best the savings of whatever virtualization technology deployed or implemented. But that is beyond the point of this article.

Physical to virtual (otherwise known as P2V) is the process of converting a baremetal host to a virtual equivalent. For Linux hosts, there is only one way to do this. P2V is done from a Windows host that has the VMware Standalone Converter installed. The best way to do this without downtime is to do your homework prior to. Prep work is vital in a production environment.

The quickest way to avoid downtime is to choose to shutdown the physical machine and boot the virtual machine when conversion (or P2V) is done. This is via checking a tick box during the conversion process. However, in my experience the virtual machine doesn't always boot after the conversion. How then do we ensure that the virtual machine boots up after conversion?

One key strength of VMware is its virtual machines (and their corresponding drivers) are assigned or given a generic set of hardware. The hardware on the VMs are as generic as possible for maximum compatibility. This enables the VM to migrate (or vMotion) to compatible architectures with least impact or even no impact at all. The end-user will not even feel the vMotion occur or experience any glitch while the machines migrate from one ESXi host to the other. While a continuous ping is done it might drop one or two packets while a vMotion is going on but that really is not felt by the user most of the time.

Given the above, one way to ensure a successful P2V is that hardware specific limitations do not exist on the virtual machine (or VM). What then are hardware specific limitations? The MAC address is one. Virtual machines are automatically assigned a different MAC address than the one on the physical host. If the MAC address is hard-wired, then obviously the resulting Linux VM will not like it.

On Fedora flavors of Linux as well as its Community operating system counterpart, there are two locations where the MAC address is hard-wired or hard-coded. The file /etc/udev/rules.d/70-persistent-net.rules contain the hard-coded MAC address. As seen from the screenshot below, the host has two (2) network interface cards, and CentOS has detected them all and assigned them names eth0 and eth1. Their corresponding MAC addresses are also listed. This way the OS knows which NIC is assigned what name.


Sometimes, the files ifcfg-eth0, ifcfg-eth1 -- located in /etc/sysconfig/network-scripts -- also contain the hard-coded MAC addresses. This is another way for the OS to know the particular NIC has been assigned a corresponding device name. Below are entries for the file ifcfg-eth0.


On both of the above scenarios, you may choose to delete the lines containing the MAC addresses or place a hash (#) in the beggining of the line to make the OS ignore them.

Other times, the VM refuses to boot due to a missing module in the initrd file. And the solution could vary between scenarios. Still, it helps to do your homework prior to so you can minimize downtime and anticipate headaches that may come your way.


Share:

INFO: Root Backdoor to VMware ESXi Host

Administering the virtual infrastructure has been the focus of my administrative tasks as of late. It has been a challenge learning and understanding the technology at first. It comes with the same set of rules that govern physical machines, as well as extended technology (and imagination) -- really giving meaning to the acronym elastic sky x (or ESX). While the name might be gibberish, the technology it stands for is way, way interesting.

While ESXi is an advanced technology, it does have its own set of quirks and limitations. On top of this list is the root password protection. Never forget the root password, or else.. Although there are proven steps to "crack" (for the lack of a better word) the root password, it is far too complex for beginners.

On the VMware knowledge base site, we read this:

ESXi 3.5, ESXi 4.x, and ESXi 5.x
Reinstalling the ESXi host is the only supported way to reset a password on ESXi. Any other method may lead to a host failure or an unsupported configuration due to the complex nature of the ESXi architecture. ESXi does not have a service console and as such traditional Linux methods of resetting a password, such as single-user mode do not apply.

While reinstalling is not that long, it requires tedious re-configuration right after. So never forget the root password.. Again, never forget the root password.. But this statement is never fool-proof.

It helps to anticipate, so way before the forgetfulness hits you will need to setup a backdoor to the ESXi host -- passwordless SSH. And here's how to set it up.

First, you'll need to generate SSH keys. It is outlined in our previous article outlined for passwordless SSH. If you already have SSH keys in place, skip this step.

Next, you will need to copy the generated public key to the ESXi host. In order to do that, execute the command below:

cat ~/.ssh/id_rsa.pub | ssh root@[ESXi HOST] 'cat >> /etc/ssh/keys-root/authorized_keys'

Input the root password when prompted.

NOTE: Replace the string [ESXi HOST] with the fully qualified domain name of the ESXi host or its corresponding IP address.

There are other ways to do this as well. To me the above hits the spot in one line.

To verify, try to SSH to the ESXi host and see passwordless SSH do its wonders. If the above fails, make sure that the ESXi host is not in lockdown mode and/or its SSH service is running.

To increase security and protect the ESXi host from that backdoor, disable SSH service and/or put the host in lockdown mode. To turn on the backdoor, use the configuration controls via vSphere Server.

Just note that whenever an ESXi host experiences a configuration reset, the passwordless SSH settings are wiped out. Although this rarely happens, a backdoor needs to be setup again.

Share:

Subscribe for Latest Update

Popular Posts

Post Labels

100gb (1) acceleration (1) acrobat (1) adblock (1) advanced (1) ahci (1) airdrop (2) aix (14) angry birds (1) article (21) aster (1) audiodg.exe (1) automatic (2) autorun.inf (1) bartpe (1) battery (2) bigboss (1) binance (1) biometrics (1) bitcoin (3) blackberry (1) book (1) boot-repair (2) calendar (1) ccleaner (3) chrome (5) cloud (1) cluster (1) compatibility (3) CPAN (1) crypto (3) cydia (1) data (3) ddos (1) disable (1) discount (1) DLNA (1) dmidecode (1) dns (7) dracut (1) driver (1) error (10) esxi5 (2) excel (1) facebook (1) faq (36) faucet (1) firefox (17) firewall (2) flash (5) free (3) fun (1) gadgets (4) games (1) garmin (5) gmail (3) google (4) google+ (2) gps (5) grub (2) guide (1) hardware (6) how (1) how-to (45) huawei (1) icloud (1) info (4) iphone (7) IPMP (2) IPV6 (1) iscsi (1) jailbreak (1) java (3) kodi (1) linux (28) locate (1) lshw (1) luci (1) mafia wars (1) malware (1) mapsource (1) memory (2) mikrotik (5) missing (1) mods (10) mouse (1) multipath (1) multitasking (1) NAT (1) netapp (1) nouveau (1) nvidia (1) osmc (1) outlook (2) p2v (2) patch (1) performance (19) perl (1) philippines (1) php (1) pimp-my-rig (9) pldthomedsl (1) plugin (1) popcorn hour (10) power shell (1) process (1) proxy (2) pyspark (1) python (13) qos (1) raspberry pi (7) readyboost (2) reboot (2) recall (1) recovery mode (1) registry (2) rename (1) repository (1) rescue mode (1) review (15) right-click (1) RSS (2) s3cmd (1) salary (1) sanity check (1) security (15) sendmail (1) sickgear (3) software (10) solaris (17) squid (3) SSD (3) SSH (9) swap (1) tip (4) tips (42) top list (3) torrent (5) transmission (1) treewalk (2) tunnel (1) tweak (4) tweaks (41) ubuntu (4) udemy (6) unknown device (1) updates (12) upgrade (1) usb (12) utf8 (1) utility (2) V2V (1) virtual machine (4) VirtualBox (1) vmware (14) vsphere (1) wannacry (1) wifi (4) windows (54) winpe (2) xymon (1) yum (1) zombie (1)

Blog Archives

RANDOM POSTS