HOW-TO: Install LLTD Protocol on Windows XP SP3

The reason I'm making this article is to make file sharing possible between Windows XP and Windows 7 computers. Although I'm not exactly sure if this was the reason behind the successful file sharing between computers, it probably contributed to the success.

Link Layer Topology Discovery (or LLTD) is not installed in Windows XP by default. It has to be installed to the target computer to enable the protocol. According to the microsoft website:
This package contains the Link Layer Topology Discovery (LLTD) responder. The network map on a computer running Windows Vista shows a graphical view of the computers and devices on your network and how they are connected by using the LLTD protocol. The LLTD responder must be installed on a computer running Windows XP before it can be detected and appear on the network map. After you install this item, you may have to restart your computer.


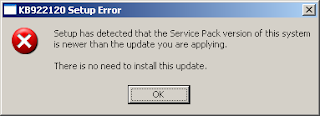
However, KB922120 (LLTD) is intended for Service Pack 2 (SP2) and it will not install on a computer with Service Pack 3 (SP3) installed. This error will appear when trying to install KB922120 on a computer with SP3 update (see screenshot).

Install LLTD Protocol on Windows XP SP3


Not to worry, the LLTD protocol can still be installed. Download KB92210 (WindowsXP-KB922120-v5-x86-ENU.exe) from microsoft webpage, or search for lltd and you will easily find the resource where it can be obtained. Validation is required to acquire the file.

Extract the file to a directory of your liking. For this article, we will extract the file to a directory named D:\922120. To extract, open a command terminal and execute:
> WindowsXP-KB922120-v5-x86-ENU.exe -x

The files included in the KB922120 update will then be present in D:\922120. Now copy the following files to their respective target directories:
> rspndr.sys (D:\922120\SP2QFE) --> %WINDIR%\system32\drivers
> rspndr.exe (D:\922120\SP2QFE) --> %WINDIR%\system32
> rspndr.inf (D:\922120\SP2QFE\IP) --> %WINDIR%\inf

When the files have been copied, execute:
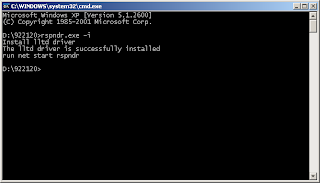
> rspndr.exe -i


You will be getting a terminal window similar to one below (see screenshot).

Install LLTD Protocol on Windows XP SP3


Link Layer Topology Discovery protocol should be enabled after this. If you check on of your network interfaces, the LLTD protocol should show up in its properties.

Install LLTD Protocol on Windows XP SP3


If you see a similar screenshot as above, LLTD is installed. There you go, installing LLTD on your Windows XP SP3 computer.

Share:

HOW-TO: Resolve Java Install Problem

For no apparent reason Java got corrupted in my machine. One can fully expect this as when Java updates itself, it leaves a significant amount of "junk" from the old version. It will still work.. But for some unknown and unexplainable reason, it doesn't work now. So the quest to put its services back begins..

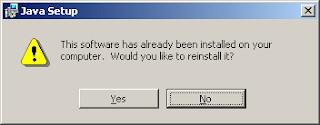
I uninstalled the Java software from the "Add/Remove Programs" menu of the control panel and it was "uninstalled" as expected. So I downloaded the latest and greatest version off its website.. And, while trying to re-install it, I realized that was not the case -- Java was still installed (as seen on the screenshot below).

Resolve Java Install Problem


And while clicking "Yes", I got prompted with another error:

This action is only valid for products that are currently installed.

The second error made more sense as I had intentionally uninstalled the software. But why does the installer think that Java is still installed? It is due to a registry entry that got left over from the previous Java installation (which the uninstall did not get rid of).

As "Administrator" or a user that is a member of the "Administrators" group, open the registry editor and browse over to this key and delete it:

HKEY_LOCAL_MACHINE\SOFTWARE\JavaSoft\Java Runtime Environment

or save the code below as a .reg file and merge to your registry..

;--- start of code ---
Windows Registry Editor Version 5.00

[-HKEY_LOCAL_MACHINE\SOFTWARE\JavaSoft\Java Runtime Environment]
;--- end of code ---

Then try to re-install Java. It should now be able to install without hitch.

The uninstaller should have taken care of this simple problem. And for a widely used software like Java a simple matter like this should not add to your headaches.

Share:

HOW-TO: Resolve Error 619 Dial-in Message

Wireless broadband technology using USB modems are entering the mainstream market. And with the widespread adoption of the local cellular carriers/providers and the accompanying marketing and competition, its reach is gaining ground not to mention prices dropping. The many advantages include pre-paid on-demand kits.

For many who have wired broadband kits, the USB modem broadband can serve as backup broadband in cases of trouble with the wired broadband. The mobility it offers is another big bonus; and, where wired broadband has no reach, the wireless broadband can as long as there is cellular network coverage.

Imagine this: Upon buying the modem, you test it out, install the packaged software and try to connect.. Just PERFECT! You are able to browse. Then you go home.. plug the USB modem back in.. and ERROR! You go back to the store and they can't figure it out as well. It may not be that easy as you thought it was..

However, one may run into a similar scenario above when trying to connect (or dial-in) to the wireless network -- its "Error 619: A connection to the remote computer could not be established, so the port used for this connection was closed." (below is a screenshot of the error message). And while trying to resolve it, googling the error returned thousands of results and it seems this error is very common.

Resolve Error 619 Dial-in Message


I tried to be more specific with the searching by indicating the Huawei E220 modem I have but it seems there are many of us who are in the same boat. So it seems the problem is more serious than I thought.

While most forums indicate that this is a problem with the APN setting of the mobile network, I encountered a simple solution while trying to resolve the problem -- I tried to move the modem on to other USB ports.. and Eureka! after plugging to the third port I was able to connect. It is not the APN as I was using the "Dynamic" setting (see below).

Resolve Error 619 Dial-in Message


So I tried replicating the problem.. When installing "Mobile Partner" (or the applicable software for your USB modem), note the USB port you plugged the modem into. When dialing in to the mobile network, ensure that the modem is plugged to the same USB port used when installing "Mobile Partner". Doing this I had not encountered the same "Error 619" even though I had the APN settings set to "Dynamic".

I hope this simple solution it helps you out in your dilemma.

Share:

HOW-TO: Setup BlackBerry Level 1 Messages

Having a BlackBerry (or BB) is both a boon and a bane. You won't have reasons of saying you haven't read mails as your emails are automagically forwarded to your mobile device. On the other hand, you are virtually connected as long as there is cell coverage or wifi.

Given that, let us make the most of the many advantages of the BB -- Level 1 messages. But first, what are Level 1 messages exactly? Level 1 messages are mails forwarded (or "filtered") as important messages. This functionality is quite useful! It can be used to separate or filter important emails from ordinary ones. Or if you work for a support team, you can use it to filter alert mails from your monitoring systems.

Download the BlackBerry Desktop Manager. Upon install and the subsequent reboot (unfortunately you cannot bypass this reboot), launch the BB desktop manager. Version 5 will have a similar screenshot as below.

Setup BlackBerry Level 1 Messages


Connect the BB via USB and authenticate if required. Once status is "Online", click on "Email Settings".

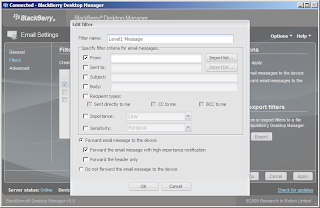
Get to the filters tab and click new. On the "From" field, input the source email address. For company mail you can use the wildcard (*) for *@yourcompany.com or import a list from your outlook contacts.

Toward the bottom of the window tick "Forward the email message with high importance notification". The filtered message then becomes a Level 1 message. You will be seeing screen similar to the one below.

Setup BlackBerry Level 1 Messages


Accept the changes and all that is necessary is to change the alert profile for Level 1 Messages, both in the holster and out.

The first time I tried this out, it wasn't all that perfect. But L1 Messages worked wonders for me after fine tuning -- I set an audible alert tone only upon receipt of an L1 message.

Hope this article helps you out as well.

Share:

INFO: Adobe Acrobat Reader Potential Exploit

News spreading around that there exist a zero-day exploit on the popular PDF application Acrobat Reader abound. This vulnerability is acknowledged by Adobe and their security bulletins and advisories site has it logged. And while a patch has been released by Abode to address the exploit, their download site seems to have lagged from that.

While users may have patched (or the unaware have already been patched by automatic updates), newly installed computers or those that do not have any PDF readers installed are still potentially vulnerable. This is because the binary available for download off Adobe's website is still the unpatched version.

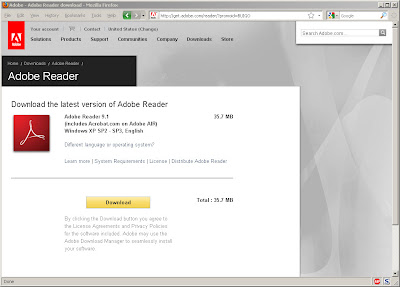
Adobe Acrobat Reader Potential Exploit


As seen from the screenshot above, the version available for download is 9.1. While the latest updates that patch the zero-day exploit is 9.1.2.

If you do not install Adobe's Acrobat Reader you are in better shape than others. But to the common non-IT people, the default PDF application that installs is Acrobat. And installing the unpatched version poses a threat to the unwilling innocent victim.

So if you happen to have version 9.1 or the older 8.1.4 or 7.1.1 it is time to click that update button and save yourself from the threat.

Having the update/patch available is good. But making the available downloadable binary the patched version is the better scenario. It should not be that hard to do for a company like Adobe.

Share:

HOW-TO: Firefox Javascript Security Hole Stopgap Measure

Firefox 3.5 may be the greatest and latest release but it has its share of security holes. Hackers have posted the code and instructions on how to exploit the critical security hole in the popular browser, so until it is patched it literally leaves millions of users exposed to the threat.

The security hole is introduced with the addition of Tracemonkey, a javascript engine known to speed up javascript rendering in this version of Firefox.

There is no need for you to downgrade to Firefox 3.0. The same website referenced above illustrates the procedure on turning Tracemonkey feature off.
  • open a new tab;
  • type “about:config” and hit enter;
  • read the warning and heed its wisdom;
  • enter “jit” in the filter field;
  • change the value of “javascript.options.jit.content” to enable (true) or disable (false) TraceMonkey for JavaScript in Web content;
  • change the value of “javascript.options.jit.chrome” to enable (true) or disable (false) TraceMonkey for JavaScript in XUL/chrome.

While Mozilla is tackling the issue and trying to address the security hole with a patch/upgrade, it is advisable to plug the hole by disabling Tracemonkey. This thus downgrades the 3.5 to the 3.0 javascript rendering speeds. Believe me with millions (even billions) of websites out there, disabling the Tracemonkey engine is well worth the trade-off for now.

And with the millions of users who have downloaded Firefox 3.5 since its release, imagine the potential targets of malicious javascript code.

It is true, functionality should take precedence over security. But in this case it is prudent to prioritize security given the powerful functionality javascript has and what it can do, most especially when exploited. You can be the next unwilling victim!

With their track record, Mozilla should be able to come up with a fix soon.

Share:

TWEAK: Force Firefox Add-on Compatibility

With the release of best, greatest and latest Firefox 3.5 (download here), the temptation to upgrade is very appealing. However, as Firefox thrives with the availability of millions of customizations -- in the form of add-ons -- one will have to be careful as not all of your add-ons are compatible.

How then can you upgrade to the latest and greatest version of Firefox without having to sacrifice missing add-ons? Can you force your add-ons to install (at least) and check functionality with Firefox? The answer is yes, that's exactly what you need to do and here's how.

First, download the add-on to your hard drive. Right-click on the "install" button and choose "Save Link As.." (or another name for it). You will be downloading a file with .xpi as extension. And, chances are, it will not be recognized by Windows.

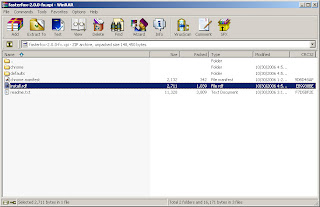
Next, open the .xpi file with your favorite archive program. WinRAR and 7Zip are tested to work, so use either one. Extract the file install.rdf inside that .xpi archive. It is advisable to save the .xpi file on the Desktop for ease of use later.

Force Firefox Add-on Compatibility


For our procedure we will play around with FasterFox add-on which is compatible only up until Firefox 2.0.XX versions. So this will never install with Firefox 3.XX.

(NOTE: This add-on was chosen for the purposes of illustration only. But if you want to use it, by all means do so.)

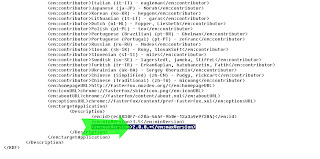
Open install.rdf in your favorite text editor. Look for the string "maxVersion" (see below) and change the value to 3.5. Save the file and re-insert it to the .xpi archive.

Force Firefox Add-on Compatibility


Launch Firefox and drag the .xpi file from your Desktop to the Firefox window. It will then install and prompt you to restart Firefox. Once restarted, viola! your add-on is now installed. This, of course, does not guarantee that your favorite add-ons will work exactly as expected. It just allows them to install. Others may work and others may not. Therefore, use this guide at your own risk.

But if your add-on is compatible with Firefox 3, chances are it will be compatible with Firefox 3.5. Again, no guarantees.

Share:

ARTICLE: Hard Drive Performance Tweaks

It is no secret that the hard drive is the slowest (and probably the least improving part) of the average desktop. Although the price per gigabyte has dropped significantly over the past few years, the transfer speed has not increased as equally in proportion.

And, as many of you already know, the fastest desktop can only go as fast as the slowest component -- which we know to be the hard drive. How then can you squeeze the best performance out of the slow hard drive? With tweaks of course. Here's how.

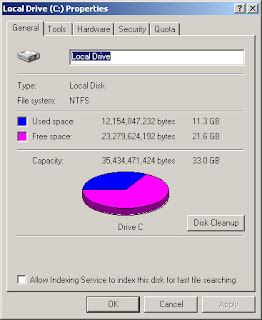
First, disable the index service and remove indexing of the drive contents. Open windows explorer and right click on drive C (Local Drive C:). Untick "Allow Indexing Service to index this disk for fast file searching" (ignore all files that cannot be changed). You will find a similar window like the one below.

Hard Drive Performance Tweaks


Next, disable file and directory access times. Each time a file is accessed, the access time is modified and this adds I/O to the drive. Disable it to increase throughput. Save the registry entry below and merge to your registry.

REGEDIT4

; NTFS tweaks
[HKEY_LOCAL_MACHINE\SYSTEM\CurrentControlSet\Control\FileSystem]
"NtfsDisableLastAccessUpdate"=dword:00000001

If you want to do it via command line, open a command window and key in:

FSUTIL behavior set disablelastaccess 1

The registry merging above requires a reboot. So the command line is the better alternative. But to make sure that the registry contains the change you may opt to do both. You may choose to reboot after defrag. See below.

And lastly, the most significant tweak of all.. Defrag your hard drive. This best works with buying a very useful tool -- Disktrix Ultimate Defrag. I'm not an affiliate of this company but their product simply works for me. So I endorse it.

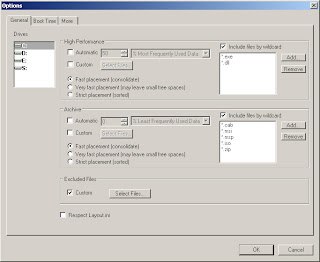
Launch Ultimate Defrag.
1. Select Tools --> Options. Under High Performance, place a check next to include These File Types
2. Select Add and scroll down and add "*.EXE". Then Select Add again and add "*.DLL"
3. Under Archives, add *.MSI, *.MSP and *.CAB in a similar way .EXE was added but only for archives. I added extras like *.ISO, *.RAR and *.ZIP. But those are only my preferences.
4. Accept all changes. And on the main menu, select Defrag Method Consolidate
5. Tick "Respect High Performance" and "Respect Archive"
6. Tick "Put Directories Close To MFT"
7. Start defragmentation. This will take a while if run for the first time.

Hard Drive Performance Tweaks


After performing the above steps, reboot. Then you will note that your computer becomes a bit more responsive than before. Of course, you tweaked it this time!

Enjoy the speed boost.

Share:

TECH: Prototype Nokia Phone Recharges Without Wires

Yes.. You have read the title right: "Prototype Nokia phone recharges without wires".

Pardon the cliche, but it's one of the holiest of Holy Grails of technology: Wireless power. And while early lab experiments have been able to "beam" electricity a few feet to power a light bulb, the day when our laptops and cell phones can charge without having to plug them in to a wall socket still seems decades in the future.

Nokia, however, has taken another baby step in that direction with the invention of a cell phone that recharges itself using a unique system: It harvests ambient radio waves from the air, and turns that energy into usable power. Enough, at least, to keep a cell phone from running out of juice.

While "traditional" (if there is such a thing) wireless power
systems are specifically designed with a transmitter and receiver in mind, Nokia's system isn't finicky about where it gets its wireless waves. TV, radio, other mobile phone systems -- all of this stuff just bounces around the air and most of it is wasted, absorbed into the environment or scattered into the ether. Nokia picks up all the bits and pieces of these waves and uses the collected electromagnetic energy to create electrical current, then uses that to recharge the phone's battery. A huge range of frequencies can be utilized by the system (there's no other way, really, as the energy in any given wave is infinitesimal). It's the same idea that Tesla was exploring 100 years ago, just on a tiny scale.

Mind you, harvesting ambient electromagnetic energy is never going to offer enough electricity to power your whole house or office, but it just might be enough to keep a cell phone alive and kicking. Currently Nokia is able to harvest all of 5 milliwatts from the air; the goal is to increase that to 20 milliwatts in the short term and 50 milliwatts down the line. That wouldn't be enough to keep the phone alive during an active call, but would be enough to slowly recharge the cell phone battery while it's in standby mode, theoretically offering infinite power -- provided you're not stuck deep underground where radio waves can't penetrate.

Nokia says it hopes to commercialize the technology in three to five years.

Source: Yahoo! Tech

Now imagine harnessing this power technology for other uses.. like notebooks (power on the go), portable gaming consoles, PDAs.. The possibilities seem endless.

Share:

ARTICLE: Microsoft Outlook Memory Usage

I'm a bit paranoid about what runs in my computers. So as a force of habbit, I would sometimes fire up TCP Viewer (from sysinternals) or the native task manager. Believe me, paranoia (not too much of it) has its own set of advantages. From task manager you can see what's running on your computer.. and more.

One of the many advantages it brought is this observation I recently had. While trying to monitor memory usage of an application for a client, I compared data using Hobbit (now known as Xymon) client on the host running Windows XP. And found a bit of disparity between data points. The data points I'm talking about here had no relation to the application I was monitoring. It was the memory usage of Microsoft Outlook that the client was running, aside from the application itself. The memory consumption from Microsoft Outlook jumped from 4MB to 16MB five minutes later (hobbit's data points are sent to the server every 5 minutes).

That experience and the curiosity it brought got me to dig deeper.. But no sooner after I left the client, I forgot all about it. So later when I got home, I sat in front of my notebook and launched the task manager, that brought me back to the experience earlier in the day. I ran Microsoft Outlook next (I'm using Microsoft Outlook 2007) to monitor its usage. And what better tool to use for this than the task manager. I do not need any more monitoring as the task manager offers that data in real time!

Right out, task manager presented me with information that Outlook consumes about 20MB of memory. The personal folders (.pst) file associated to it is 27.2MB in size. The memory consumption of Outlook is presented in the screenshot below.


I was intending to replicate the scenario I witnessed in my client's office but I had no idea what was being done on the monitored host. And even more puzzling, how do I replicate the sudden memory drop/increase that I saw Outlook do.

So I went on launching typical office applications, browsed the web, and opened files.. anything to replicate the observation earlier. But Outlook memory consumption remained pretty much the same.. Until at last I hit paydirt -- I minimized the Outlook window and boom.. memory drop!


I restored the window and saw the memory consumption return. Minimized and replicated the previous observations. This must be how I saw it from my client's office.

So then, if you are running low on memory and you are running Outlook it would be best to minimize it to free up more memory. Or better yet, if Outlook is "idle" or running in the background, minimize it to make more memory available to the current application in focus.

I hope that by relating this little experience of mine you can put it to good use.

Share:

HOW-TO: Microsoft DirectShow Vulnerability Exploit

Microsoft says hackers are targeting a security flaw in the DirectX feature of Windows. According to Microsoft, attackers are using malicious QuickTime videos to exploit the bug. From the security advisory:
Microsoft is investigating new public reports of a new vulnerability in Microsoft DirectX. The vulnerability could allow remote code execution if user opened a specially crafted QuickTime media file. Microsoft is aware of limited, active attacks that use this exploit code. While our investigation is ongoing, our investigation so far has shown that Windows 2000 Service Pack 4, Windows XP, and Windows Server 2003 are vulnerable; all versions of Windows Vista and Windows Server 2008 are not vulnerable. Microsoft has activated its Software Security Incident Response Process (SSIRP) and is continuing to investigate this issue.


According to security bulletin KB971778, one of the workarounds is to delete the registry subkey: HKEY_CLASSES_ROOT\CLSID\{D51BD5A0-7548-11CF-A520-0080C77EF58A}.

The quickest copy-n-paste procedure is to open a command terminal (Start --> Run.. --> "cmd"). Copy and paste the commands below..

First backup the registry subkey before deleting it (execute this in the command terminal)..
reg export HKEY_CLASSES_ROOT\CLSID\{D51BD5A0-7548-11CF-A520-0080C77EF58A} QuickTime.reg

It follows that the newly created file QuickTime.reg is the backup. Then upon successful backup, delete the subkey (execute this in the command terminal as well)..
reg delete HKEY_CLASSES_ROOT\CLSID\{D51BD5A0-7548-11CF-A520-0080C77EF58A}

Confirm deletion when prompted.


Although this procedure will not correct the underlying vulnerability, it is a workaround to mitigate the threat and block the potential attack.

Having a backup of the registry subkey will make it easier to revert the change when a permanent patch is available.

Share:

Everybody, Somebody, Anybody, and Nobody

This is a little story about four people named Everybody, Somebody, Anybody, and Nobody.

There was an important job to be done and Everybody was sure that Somebody would do it.

Anybody could have done it, but Nobody did it.

Somebody got angry about that because it was Everybody's job.

Everybody thought that Anybody could do it, but Nobody realized that Everybody wouldn't do it.

It ended up that Everybody blamed Somebody when Nobody did what Anybody could have done.

(The above is a short story I accidentally found in an archive of files from long ago. Credits to the original author.)

Share:

HOW-TO: Post YM Status Icon in Forums

I used to trade (mostly sell) stuff online and in forums. And for practicality sake, it is important for me to be reachable most of the time. Giving up your email address online has its pros and cons but face it, you would think twice about giving away your mobile number.

So is there another alternative to getting reached and notifying the buyer you are reachable? YM has been one of the popular chat systems since its inception and it is widely used. And I have been intrigued by forum posts with icons showing the user is online. And I assume you would like to put your own online or offline status just as I am.

This is really simple to do. To get straight to the point, below is the code. On some forums the syntax may be different but the URL is pretty much the same.

[img]http://opi.yahoo.com/online?u=YOUR_YM_ID_HERE&m=g&t=14[/img]


Replace the string "YOUR_YM_ID_HERE" with your Yahoo ID and it will show your YM status as an icon or image on your post.

The images should look like the ones below. First offline:


... then online.


There you go, YM status as icon on your post.

Share:

HOW-TO: dwwin.exe - DLL Initialization Failed

Have you ever noticed this error message pop-up each time you shutdown or reboot your computer? Although shutdown proceeds and the message seems harmless (and in fact it does not give a clue of anything wrong), it is still a nuisance to get such especially on shutdown sequence.

This article will discuss the weird solution to such error message.. I say "weird" because the error message does not give a clue and the solution to it seems unrelated at all. You will get to know it soon. Read on..

I could not capture a screenshot of the pop-up message but since you are here, you might have searched for this cos you might have encountered it and got curious. Don't worry, when I first encountered it we probably shared the same puzzled expression and curiousity.

However, I can share the event message with you. If you take a look at the application event logs of your machine you should be able to see something similar (see screenshot below) -- Event ID: 26. Completely clueless, I went to search in the internet for a possible solution.. And unfortunately, did not find any.


However, a friend has already encountered the same and with his permission I am posting the solution here.

Believe it or not, the error has something to do with Adobe Acrobat Reader. So launch the reader and go to:
"Edit"
--> "Preferences"
----> "Internet"
(untick "Display PDF in browser")


Execution will cause Acrobat Reader to repair itself and the pop-up message will no longer haunt you when executing a reboot or shutdown.

Share:

ARTICLE: Dell Latitude D630 Sleep Hot-Key

I have been a Dell Latitude D630 user for over 3 years now. I have used it in my previous job; I use one personally; and I have been assigned another in my current employment. My experience with this device is what one can reasonably call "extensive" that I have grown to be very comfortable with it.. and even prefer it over other notebooks.

But if there is one thing I did not know about a D630, it is the elusive Sleep button.. You might share this ignorance with me and it is only until recently that I came to realize what or where it is. If it ever was documented in the manual, I have not discovered nor came across it, as I have not read the manual. (The one that came with my personal Dell D630 is still sealed. Hehehe..)

Whenever I configure the power options for my notebook, it has always made me wonder where the "Sleep" button is. Just so we are in the same page, below is "Power Options" panel. And that is the snapshot of how I configure mine.


To get to the above, open "Control Panel" --> "Power Options", in the classic Control Panel; while on the Categorized view, open "Control Panel" --> "Performance and Maintenance" --> "Power Options".

The "Advanced" tab contains the configuration panel similar to the screenshot above. Configure it to your liking.

Closing the lid should be self-explanatory. I set this to "Do Nothing". Again, this is my personal preference. You can go ahead with your own.

The power button is toward the top center of the keyboard. The largest button and should be obvious. I set this to "Standby" when pressed.

And lastly, for the "Sleep" button, I set this to "Hibernate". But there isnt a sleep button on a Dell Latitude D630! It is however a pressing of a combination of keys -- Fn + ESC. The [Fn] key is toward the bottom left, in between the CTRL and WIN keys. Pressing both keys Fn and ESC simulates the pressing of the sleep button and triggers hibernation.

The "Hibernate" option is not available unless "Enable hibernation" is ticked in the Hibernate tab of the Power Options panel.

Speaking of Hibernate, a shortcut can be created with target "rundll32 powrprof.dll, SetSuspendState" (SetSuspendState --> is case-sensitive). This shortcut used to be what I have on the Desktop, which I no longer have any use for. If Hibernation is not enabled, this shortcut executes a Standby instead.

There you go. I hope the discovery of this Sleep button or should I say Sleep Hot-key puts more functionality and more familiarity to your Latitude D630.

Share:

FAQ: Enable AHCI on Intel Chipset (ver 2.0)

"There’s No Such Thing As A Silly Question" -- does the cliche sound familiar? In this part of pimp-my-rig reloaded, technical questions are answered. Mail them to me and I will post the answers here. If you have a better answer, by all means share it with us.

After having been successful in enabling AHCI on my D630s ICH8M chipset way back, I recently got hit by a Virut.NBL virus and had to re-install Windows XP PRO. To my surprise, the 79im05ww.exe (from its IBM resource page) is no longer available. AHCI has been important to me especially native command queuing or NCQ. Is there another workaround to it?

Searching around, it got me to the 79im05ww's upgrade -- the 7zim57ww.exe. Having found the replacement or should I say upgrade, I proceeded to download it.

I outlined the procedure below, as I had enabled AHCI on my Dell Latitude D630.

As outlined in the previous article, extract the file to C:\DRIVERS\WIN\SATA.


Replace every instance of DEV_27C5 with the ones below, depending on your chipset (if you have the ICH7M southbridge or I/O controller, skip this step). The target file is C:\DRIVERS\WIN\SATA\PREPARE\IMSM_PRE.inf:
ICH6R ==> DEV_2652
ICH6M ==> DEV_2653
ICH7R ==> DEV_27C1
ICH7DH ==> DEV_27C1
ICH7M ==> DEV_27C5
ICH8M ==> DEV_2828 or DEV_2829 (Check the value in device manager)


This procedure is similar to the one outlined in the previous article. So after making the necessary changes to the IMSM_PRE.inf file, execute C:\DRIVERS\WIN\SATA\PREPARE\INSTALL.CMD. Reboot the computer after install.cmd executes.

After reboot, do exactly as Step #6 to Step #8 of "Enable AHCI on Intel Chipsets". After the second restart/reboot, AHCI will be enabled.

I hope this post answers queries to the mails regarding the now missing but upgraded 79im05ww.exe.

Share:

HOW-TO: Block Yahoo! Messenger Ads

One of the many obstacles facing the information technology growth in the Philippines is the high cost of ADSL or any other form of internet connectivity. It is starting to improve but not to the point where the averate "Juan" can afford to connect his home to the world. Make it worse by buying and paying for this much bandwidth without CIR, and actually getting only half that bandwidth, at best.

It is not surprising then that there are people who squeeze the last bit of bandwidth they can. And this could come in the form of ad blocking. Believe it or not, 30%-50% of your bandwidth consumption is attributed to ads without you knowing it.

For this article let us stop ads for the popular messenging platform, the Yahoo! Messenger (or YM). Follow along as we discuss how to stop ads from stealing precious bandwidth and still enjoy the functionality of YM.

The trick to blocking ads is by IP redirection or loopback restriction. The usual location of the file containing the address of the ad server is in C:\Program Files\Yahoo!\Messenger\Cache and the file is urls.xml.

Inside the file you will see lines similar to these:
href="http://insider.msg.yahoo.com/client_ad.php?p=206910" id="Messenger Ad"
href="http://insider.msg.yahoo.com/client_ad.php?p=81092" id="Messenger Idle Ad"


From that you can deduce that ads come from the ad server insider.msg.yahoo.com. You can now block that address via loopback restriction.

Edit the file %WINDIR%\system32\drivers\etc\hosts with notepad (or your favorite text editor). Then append any of the following lines:
127.0.0.1       insider.msg.yahoo.com
0.0.0.0 insider.msg.yahoo.com


Restart YM and upon restart, you will see something similar to the window below. This is a screenshot from YM version 9.0.0.2128.


Seeing the above means your YM is now ad-free. Enjoy.

Share:

FAQ: Restore Missing "Run" from Start Menu

"There’s No Such Thing As A Silly Question" -- does the cliche sound familiar? In this part of pimp-my-rig reloaded, technical questions are answered. Mail them to me and I will post the answers here. If you have a better answer, by all means share it with us.

FAQ: The "Run" entry in the Start menu is a very handy tool. Have you ever experienced loosing the "Run" option from the Start menu? Well one question recently received is regarding such a scenario. There are several reasons as to why this happened.. but only one very apparent symptom is like the screenshot below.


As previously stated, there are several reasons why the "Run" entry is missing from the Start menu. Let us start with the first restriction.

Explorer Policy Restriction. One reason is the restriction in the explorer policy.

[1] Open the registry editor.

[2] Go to: HKEY_CURRENT_USER\Software\Microsoft\Windows\CurrentVersion\Policies\Explorer and change the value of "NoRun" to "0". Otherwise, deleting it serves the same purpose.

Logout and then log back in for the change to take effect.

Group Policy Restriction. Another reason for the missing "Run" entry in the Start menu is the Group Policy in effect on the machine.

[1] Open the Group Policy Editor.

[2] Under "User Configuration" -> "Administrative Templates" -> "Start Menu and Taskbar", set the value of "Remove Run menu from Start Menu" to "Disabled" or "Not Configured".

Unlike the Explorer restriction, you will not need to logout for the change to take effect. The "Run" entry will re-appear after both of the changes above.


Start Menu Customization. One more possible reason is previously applied customization(s) to the Start menu.

[1] Right Click on Start menu, then select Properties.

[2] On the ensuing window that opens click "Customize". And go to the "Advanced" tab.

[3] Scroll down toward the bottom of "Start menu items". The item "Run Command" should be ticked (like below).


Realizing the value of the "Run" entry in the Start menu is what brought you here. I am a strong believer in the significance of functionality over "security". We should all have "Run" in the Start menu.

I hope this helps your predicament.
Share:

INFO: What is RSS?

What is RSS? Whenever I mention this three-letter acronym to most people, their brows would raise like I was born in another planet. Either that or they seem to think I'm a metally challenged retard. So hopefully by posting this, I will just refer them here instead and impart a thing or two about RSS and its practical use(s).

But what really is RSS? RSS is a generally accepted format of web content that is used by millions to keep track of website changes or updates. Webmaster, bloggers, or authors would publish syndicated content of their news, blogs, and other content as an RSS feed to whoever wants it.

These are the generally accepted meanings of the acronym -- RDF Site Summary, Rich Site Summary and Really Simple Syndication. Whichever of the those, when used, pertain to the same thing. RSS feeds are sometimes referred to as news feeds or just plainly a feed.

Think of RSS as a modern implementation of a bookmark. In the ways of the old, you would bookmark a website and regularly check it for updates. RSS in a similar manner is a bookmark to the website, but the biggest difference is you will not have to visit the website. All you need is for an RSS reader or RSS aggregator to do it for you. Instead of you coming to the site for information, it is instead delivered to you. It will make more sense when you start using to use it.

A variety of RSS readers or aggregators are available on the web. Some are free and some are not. We had to go through several of them to get a better feel of the functionalities and complexities of each. The most popular web aggregator is Google Reader.

To get a better feel or looks of an RSS feed, click here to sample a feed of pimp-my-rig reloaded.

What is RSS?

The above image is the icon for an RSS feed. Whenever you see that icon or its derivatives, it means the website is advertising its RSS feed available for you to subscribe. And the aggregator will automatically fetch updates for you without having to browse every bookmark. So now that you are aware of RSS feeds, grab an aggregator and start subscription to RSS feeds of bookmarked sites and see for yourself the influence of RSS.

Share:

Subscribe for Latest Update

Popular Posts

Post Labels

100gb (1) acceleration (1) acrobat (1) adblock (1) advanced (1) ahci (1) airdrop (2) aix (14) angry birds (1) article (21) aster (1) audiodg.exe (1) automatic (2) autorun.inf (1) bartpe (1) battery (2) bigboss (1) binance (1) biometrics (1) bitcoin (3) blackberry (1) book (1) boot-repair (2) calendar (1) ccleaner (3) chrome (5) cloud (1) cluster (1) compatibility (3) CPAN (1) crypto (3) cydia (1) data (3) ddos (1) disable (1) discount (1) DLNA (1) dmidecode (1) dns (7) dracut (1) driver (1) error (10) esxi5 (2) excel (1) facebook (1) faq (36) faucet (1) firefox (17) firewall (2) flash (5) free (3) fun (1) gadgets (4) games (1) garmin (5) gmail (3) google (4) google+ (2) gps (5) grub (2) guide (1) hardware (6) how (1) how-to (45) huawei (1) icloud (1) info (4) iphone (7) IPMP (2) IPV6 (1) iscsi (1) jailbreak (1) java (3) kodi (1) linux (28) locate (1) lshw (1) luci (1) mafia wars (1) malware (1) mapsource (1) memory (2) mikrotik (5) missing (1) mods (10) mouse (1) multipath (1) multitasking (1) NAT (1) netapp (1) nouveau (1) nvidia (1) osmc (1) outlook (2) p2v (2) patch (1) performance (19) perl (1) philippines (1) php (1) pimp-my-rig (9) pldthomedsl (1) plugin (1) popcorn hour (10) power shell (1) process (1) proxy (2) pyspark (1) python (13) qos (1) raspberry pi (7) readyboost (2) reboot (2) recall (1) recovery mode (1) registry (2) rename (1) repository (1) rescue mode (1) review (15) right-click (1) RSS (2) s3cmd (1) salary (1) sanity check (1) security (15) sendmail (1) sickgear (3) software (10) solaris (17) squid (3) SSD (3) SSH (9) swap (1) tip (4) tips (42) top list (3) torrent (5) transmission (1) treewalk (2) tunnel (1) tweak (4) tweaks (41) ubuntu (4) udemy (6) unknown device (1) updates (12) upgrade (1) usb (12) utf8 (1) utility (2) V2V (1) virtual machine (4) VirtualBox (1) vmware (14) vsphere (1) wannacry (1) wifi (4) windows (54) winpe (2) xymon (1) yum (1) zombie (1)

Blog Archives

RANDOM POSTS