HOW-TO: Check Apple iPhone Battery Health

Apple, in a recent press statement, admitted to throttling its devices performance when it detects battery health in decline. In addition, the same statement also indicated the company's commitment to support its customers and improving after sales support. Replacement batteries will be available for a fraction of its original cost -- $29 from $79. I'm an Apple iPhone user myself, and while we await for further news on this matter the question is: "When do you avail of this replacement program?"

Batteries degrade over time. This is a known fact. If you want to know further facts as to why this happens, I would suggest to watch the PBS Nova documentary entitled "Search for the Super Battery" or read about "dendrites" (related to batteries).

The purpose of this article is to inform you on how to check your Apple iPhone battery health. It is not limited to Apple iPhones, but applies to other Apple devices as well -- like iPads and iPad Minis (these are the ones I have tested the app on) -- and (maybe) other Apple devices.

The App to install is "Battery Life". It is available on the App store. There is a free version and a PRO version. The free one has all the features needed to be informed.

Battery Life Screenshot at 83%: Good

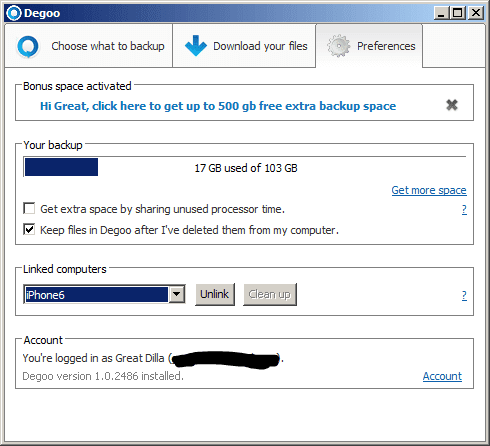
Launching the applicaton, you already have a view of the overall health of your device's battery. On my 2-year-old iPhone6, the battery health as indicated in the screen is 83% and the application still considers that as good condition.

Battery Life Raw Data

To get more information on battery health, tap on the upper left menu icon (multiple stacked horizontal lines) and select "Raw Data". There it indicates the overall capacity of the battery, and likewise indicates its degraded capacity. The current charge capacity, too, is also indicated based on the degraded battery capacity.

RELATED: Sync Calendar to iPhone (without iTunes)

There you go. Being better informed will help you decide and verify if it is time to change batteries. Do you also have friends who might benefit from this information? Click the share button below to help them.

Share:

INFO: Clear Anaconda (Conda) Cached Packages

One of the things that boosted my productivity in the development of Python scripts is having been introduced to the jupyter notebook development environment. If you have not been introduced to jupyter (or ipython) notebooks, you might want to take a look at it and see how it could be used in your working environment.

I am using it most of the time that in order for me to quickly launch the jupyter environment on my computer, I integrated it as part of the right-click context of my desktop. You may want to check out the post I created for it titled, Customized Right-Click Menu.

Just recently, I noticed a growing disk size on the system drive of my notebook. The SSD originally installed in it has limited space, so I could not help but notice the change. SSDs are pretty much "limited" in size, as the price-per-gigabyte has not gone up to pace with the economies of scale unlike its spinning cousin. Given that, I need to control the usage.

One of the culprits to the disk hogging is the Anaconda3 (jupyter notebook is part of Anaconda) installed. I originally installed the full-suite, rather than the lean Miniconda3. Lesson learned on that aspect but I'm too lazy to re-install and reconfigure the packages. Over time, Anaconda3 updates are installed, but the original packages downloaded are still cached and need to be cleaned.

This is the default behavior, and the only rational that could explain this is that if you need to backout of an updated package, the cached package previously installed still exists. These pile up over time and need to be manually deleted.

The command to execute on a privileged terminal, is:
conda clean --packages
And executing takes you to a view similar to the image below.

conda clean --packages

As you can see from the screenshot, 1.15GB of downloaded packages are sitting by waiting to be cleaned. Simply press "Y" and the process completes. The answer to that question is almost always "Y" so the command could be modified to non-interactive.
conda clean --packages --yes
Pressing "Y" to continue the image above brings..


Note that this will only remove the cached packages and not remove the installed packages.

RELATED: Customized Right-Click Menu

You may also set a task to automatically do this for you periodically, as another alternative (set it and forget it). The non-interactive option comes in handy in this scenario. Hope this helps 'conda users in squeezing more space from their SSD drives.

Share:

HOW-TO: Errors Updating PiHole DNS Cache

I personally use pihole to block ads, phishing and malicious websites (more leaning toward the latter), from access in my home network. This software can be easily setup on a Raspberry PI, and a little knowledge about good ol' Linux. On my setup I use pihole in tandem with the DietPI operating system (kudos go to Darwin Sonza for suggesting DietPI). This combo brings about faster internet access, since frequent DNS lookups are handled (and cached) by pihole at the same time dietpi limits write IOPs to the SD card, preserving its useful life.

In case you are interested in setting up your own Raspberry PI with pihole, checkout the previous post Install Adblock on Raspberry Pi via PiHole. In order to benefit further, pihole needs to be regularly updated much like dietpi. However, the recent update of pihole broke on my setup. And, here's the solution to the problem, if ever you encounter it yourself.

Just so you have an idea what the problem is or how to replicate it, I ran the command "pihole -up" to initiate a pihole update. This command ended up with the error message: "Error: Could not update local repository. Contact support."

The complete message is captured by the screenshot below, including messages prior to that error.

Error: Could not update local repository. Contact support.

If you are hit by the same message, on the command line, execute the following:
rm -R /var/www/html/admin
git clone https://github.com/pi-hole/AdminLTE /var/www/html/admin
pihole -r

After these commands are ran, you see a similar window like below.

PiHole Update Complete!

The Raspberry PI is a very useful tool in my home network. I have also used it as a PVR for downloading my favorite TV series.

SUGGESTED: Introduction to Raspberry PI (Udemy)

Is there a better solution to the above? Or perhaps another way to solve the issue? I always am on the lookout for those. Kindly share them in the comments section below.

Share:

TIP: 100 Gigabytes of Cloud Storage for Free

Have you recently had a drive failure? How painful was it to lose files? How about pictures, or should I say memories of you and your loved ones frozen in time and preserved by digital means? It is a tough pill to swallow, don't you agree? If you knew of a simple way to preserve them, would you turn back time to do this? I would. And, I will suggest a means to do it.

This "means" can be installed to preserve digital memories as it works on both your notebook and your mobile device (tablet or phone). This "means" that I'm mentioning is Degoo. Its initial offering is 100GB and it could expand to as much as 600GB of cloud storage. The best part of it is, the service is provided for FREE!

This is how it looks on my notebook.

Degoo Settings (Windows)

As you can see from the interface below, the restore can be initiated by downloading the individual file -- restores can be done at file level. You may also choose folders to backup. The default cycle is set to monthly frequency. Manual override is available so if you want to execute a backup on-demand, it is just one click away.

The caveat I'm seeing (and shown on the screenshot below), is that the filename of the photo is derived from the datestamp of when it was taken. This happens if I want to restore photos on my notebook, instead of the phone.

Degoo Recovery (Windows)

As mentioned, it is available for phones. I have tested the iOS version, and the interface screenshot is below. The restore interface has thumbnails of the images this time, not just the filenames of the photos. It is much easier to restore the particular photo you need, given a preview.

Degoo iOS

You may set it so that, Degoo doesn't have to delete files you have removed on your notebook or phone. Also, the free service is good for two (2) devices. I have tried it with three (3) and the third one added failed to execute the back-up.

RELATED: Huge Discounts on Python Courses at Udemy

The initial 100GB may not be much. But if you share Degoo with your friends, you may end up with more cloud storage for your photos. You both get 3GB for every successful referral. Executing back-ups may not be worth your time now. But do you really have to wait until an unforeseen disaster strikes?

Share:

TIP: Learn Advanced Python Course for Free

There are two-things most notable about opensource software -- active development from a community of users, and, the benefit of using something that comes free. However, the learning curve varies since the actual training itself (the immersion process) comes at a price. Sometimes discounted, but still with a price tag. Like the course that got me started with Python -- Complete Python Bootcamp: from Zero to Hero. Time and time again, you will hear me say this is what I highly recommend as a starting point.

In order to advance the building of knowledge and the immersion process of using Python, load up on advanced courses. One advanced course is being offered for free in Udemy. It is the course Learn Advanced Python. I haven't taken this course yet, but I enrolled since it is being offered for free!

I have included a screenshot of what I'm seeing on screen from the link I posted above. Or simply click this thumbnail to follow the link. Go ahead as the embedded coupon code might expire soon.

Learn Advanced Python

Completing a course in Udemy, comes with a certificate that you can use for credentials. In order to whet your appetite on what to expect, below is the course description:

Python is one of the most widely used high level programming language. The language stresses on code readability and due to its syntax and implementation a programmer has to write lesser code as compared to other languages such as C++ and Java. The language supports multiple style like functional programming, object oriented or imperative style. The memory management is done automatically and has many standard libraries available for python programmer.

Learning a programming language is always an uphill ride but as luck would favor us python was designed to be easily learnt by a novice programmer. Python code is readable and with a little knowledge a developer can learn many things just by looking at the code. It executes read evaluate print loop which gives developer a chance to play around with code and experiment. Also the standard library offers you a lot of functionalities which lets you execute complex functionalities with ease.

Learning python opens up many doors for python developers in the world of programming. Python has an object oriented approach which is preferred by many leading languages such as C#, Ruby, JavaScript, Perl etc. So once you get comfortable with the concepts of python you can switch to any other object oriented language and the only thing you will have to learn is the syntax of language.

To create a product which stands out amongst the crowd, you can develop it in any language. But there are certain constraints like time and budget which can’t be overlooked. This is where the choice of language decides the fate of the project and if project is big the company also might get affected. Python is a good choice for startups as it allows quick development and the amount of code is less as compared to c, java etc. Python can scale the most complex application effortlessly and can be handled by a small team effectively. Python also has a very reliable support team to solve your queries.

A python developer can rarely get stuck as there are large number of resources available which keeps on getting updated. It has a huge standard library which provides inbuilt functionality which is why some known applications are built on Python.


RELATED: Huge Discounts on Python Courses at Udemy

Hope this gets you going in your quest to add Python in your everyday go-to tools for the trade. Share with your friends who also want to learn and benefit from Python. If you wish to keep up to date with free and discounted Python courses by using the subscribe link in the right panel of the webpage.

Share:

TIP: Bulk Rename Files Using Power Shell

I recently wrote about some discounted Python courses in Udemy. In it is a highly recommended course that many beginners who want to learn Python will benefit from -- the Complete Python Bootcamp: Go From Zero to Hero. A factor which I consider makes the most impact in this course is the availability of Python code, where the user could build upon. The course author shared these in the form of jupyter notebooks.

Not only will the student be able to learn Python, but have them in an easy to share or collaborate development environment (jupyter notebooks). I volunteered to download it for a friend and what easy way to do it than the Firefox plugin, Download Them All (DTA).

DTA has this thing called fast filtering. And it will download pretty much all of the notebooks needed for the course without having to click them one by one.

Download Them All Fast Filter

The thing is, when DTA downloaded the files, the extension was changed from the original .ipynb to .html. DTA appended a .html extension to the downloaded file. The question is: Is there a way to do bulk renames of these files so I don't have to do it one by one as well?

Download Them All Renamed Files

It turns out the answer to the question above is built into the Windows Operating System -- Power Shell. So launch Power Shell, the change directory to the location of the downloaded notebook files. And execute: dir *.html | rename-item -NewName {$_.name -replace {".html",""}

Bulk Rename Using Power Shell

The above command will remove the string ".html" from the filenames of all files in the present working folder. In effect, renaming all the files to the original names from the course author's website. Now I could copy the files for my friend, and at the same time keep a copy for myself for future use.

RELATED: Huge Discounts on Python Courses at Udemy

This solution is not limited to the above scenario only. It could be applied to several others and that is happened to be a perfect example. If you have a another solution, or a better solution, please share it in the comments section below.

Share:

TIP: Huge Discounts on Python Courses at Udemy

One of the many tools I use for automating my everyday tasks as a sysad is Python.. Be it for executing backups, routine checks, collecting and rotating logs from legacy devices or automation as a hobby, Python has in one way or another been deployed. Now that I shifted careers to a data science, Python is still the language of choice for ETL, data mining, data cleansing and blending, and, even the convoluted advanced machine learning and deep learning coding.

I once shied away from Python due to the inconsistencies between version 2 and version 3. What works on v2, might break on v3 but like I got the hang of it, you will too -- to the point of having both versions available on a virtualenv (virtual environment). Python has helped me a lot not only in job functions as well as my hobbies. To name one, you may automate the download of your favorite TV series episodes using a Python-based software called "Sickrage". I wrote about how to set this up on a Raspberry Pi in this article. Not only that, it takes care of renaming the files according to episode titles and tracks the episodes I have already viewed. Take it for a spin.

It goes without saying that Python has gone a long way in helping me in my professional career and everyday life. The sad thing is that Python coding is not taught in school. That does not mean you will not be able to find a course that could help out in learning how to code in Python.

The course that has helped me out is "Complete Python Bootcamp: Go from zero to hero in Python". This course is currently on sale for $15 at Udemy, from the usual price of $195. That is a 92% discount!

Complete Python Bootcamp

Should you want to take advantage of this offering, click this link to take you there.

This way, you may learn Python at your own free time at your own pace. If you are looking for a programming language to learn, or looking for another scripting language to learn, this is one of them I would highly recommend.

RELATED: Automated TV Series Downloads Using Raspberry-PI

I hope this tip helps you learn Python. If you have seen another discounted course, share it with us through the comments below. Or if you're interested in other Python courses in Udemy, check this link. To help others learn who want to learn Python, click the share button below.

Share:

TIP: Quickly Identify Unknown Devices

Those that have gone through the experience of setting up their own home computer or notebooks, or perhaps, recovering from an unwanted drive failure may have experienced this. After installing the Windows operating system, what comes next? Drivers! Even after going through an extensive checklist of drivers from the manufacturer's website, you get the dreaded "Unknown Device".

Below I have a screenshot of the device manager window. This might not be the exact look of what you will see on your computer, but you get the gist of what I'm talking about.

Unknown PCI Device

What happens next? You try to identify the device and install the proper driver for it -- in other words, trial and error (not error and error, I hope). But this consumes a lot of time.

A good friend of mine suggested that I use the tool he uses in his day-to-day computer setups. He is an overclocker and a known PC enthusiast in the Philippines, who goes by the monicker "xzulu".

The tool he is using is PCI-Z. It is known to work on any version of Windows, even Server editions. Best of all, this tool is FREEWARE. You may download a copy of this tool from the developers website.

In relation to the listed unknown device in the screenshot above, I ran this tool and identified that the "RTS5227 PCI Express Card Reader" on my notebook does not have its driver installed. I now have a clear direction on how to resolve this issue.

PCI-Z Screenshot

After downloading the recommended driver from the manufacturer's website, I installed it for the card reader on my notebook and the problem is resolved. This was a very quick fix.

RELATED: Network Profiler and Analyzer

I hope this tip helps you save time in resolving driver issues for unknown devices on your computer. If you have a better solution, I would love to hear about it. Let me know by leaving a comment.

Share:

FAQ: Errors After Deleting SWAP Logical Volume

I was setting up CentOS7 in order to orient myself with SELinux and be comfortable with using it. If you have been an avid follower of my articles, most of the recent ones have been revolving around Ubuntu16 LTS. I really didn't prepare and think much about the requirements for the initial setup and what was required. I simply followed my intuition -- experience has always been reliable and LVM is flexible when it comes to disk requirements.

That flexibility was put into context by this recent setup. Due to missed preparations and mis-calculated assumptions, I had to modify the disk partitioning and took the easiest way out, which is to sacrifice swap. After all, performance would not be very good if a virtual machine started swapping. As it turns out, I dug myself a hole.

At first, the VM took a really long while to boot-up, and eventually error'ed out. The error message started with, "WARNING: Could not boot." Fortunate for me, I was able to take a screenshot to share.

WARNING: Could not boot.

Maybe I was cloning VM templates long enough that I'm entirely new to this kind of scenario. I could simply rebuild the swap logical volume and do away with the problem but "what if" I encounter this again in the future? I knew I have to know how to solve this problem (and share the solution found).

I knew that only swap was missing and Linux will work without it. So I simply pressed [CTRL]+[D] and the VM continued to boot-up. The clue to the solution was in the next message shown -- "Warning: You might want to regenerate your initramfs." So I did proceed my research this route (Assumption: maybe swap was hard-coded in initramfs).

Warning: You might want to regenerate your initramfs

To regenerate the initramfs files run "dracut --force --regenerate-all" (NOTE: You might want to take a copy of the files contained in /boot prior to executing this command). After reboot, same thing.

Most of the Google searches returned topics related to Cobbler and Kickstart.. but some of them mentioned checking /etc/grub.conf. However, grub.conf is no longer in /etc but is in /boot/grub2 and under a different name "grub.cfg". So I checked that file, and swap is in fact hard-coded in grub.cfg. And once removed, will resolve the error.

But modifying grub.cfg is dangerous. It can however, be generated using the command grub2-mkconfig and the template files are found in /etc/grub.d and the file /etc/default/grub. Modifications can be done in /etc/default/grub, then re-generate the grub configuration file and dracut command above can do the rest. The commands are shown on the screenshot of the console below.

dracut --force --regenerate-all

After these modifications the virtual machine booted, and was quick to the login prompt, if I may add. Now, I have a sandbox VM in my laptop that I could do experiments with.

RELATED: FAQ: Cloned Linux Virtual Machine with Boot Errors

If it so happens that you deleted the swap logical volume and found yourself in the same exact scenario I was in, this is one solution. If you have any other solution(s), please share. I'm interested to learn other ways to do this.

Share:

HOW-TO: Boot to Recovery/Rescue Mode

Booting to Recovery mode or Rescue mode is important. This is primarily due to the single most important reason -- nobody can predict an impending disaster. And this is why infrastructure personnel like me have jobs.

Below I have a screenshot of one of the many reasons that you might want to boot in Recovery mode. The error being "VFS: Unable to mount rootfs on unknown-block(0,0)". The cause for this error is another topic altogether, but this error needs the intervention of a system administrator.

VFS: Unable to mount rootfs

The error can manifest on a baremetal set-up or a virtual machine. The screenshot is on an Ubuntu LTS 16.04 guest running on VMware ESXi v5.5. The guest operating system simply won't boot no matter what.

First restart and interrupt the boot process and modify some boot options. Look for the line containing "linux" and at the end of the line, append "systemd.unit=recovery.target" (NOTE: Both rescue.target and recovery.target works). Then press F10 to boot.

systemd.unit=recovery.target

Modifications above will interrupt the boot process to allow recovery mode of other installed kernel images, otherwise not shown on the boot menu. When presented with that menu, select a recent kernel image a few versions down from the current unbootable one. Make sure to select the option with "(recovery mode)" in it. Otherwise, just input the root password when on the recovery console when prompted.

On the console terminal, remove the unbootable kernel image (or force a reinstall), or execute other applicable steps/procedures to successfully boot the system. Hope this tip helps in accessing the recovery mode or rescue mode the next time a need for it arises.

RELATED: Quantifiably Measure Boot Time Optimizations

Do you have another way to access the recovery mode? Please share it on the comments below.

Share:

TWEAK: Customized Right-Click Menu

I often get asked by colleagues how I setup a customized right-click menu for my Desktop. Don't get me wrong, I still use the notebook that the company issues but I ask for limited administrative privileges to be able to customize the notebook to my working style as I like to access my often used software on the right-click menu. It is a quick access menu and you will see how it looks in a bit.

Other than this "menu", I also leave my desktop with very minimal contents, icons, or shortcuts. This makes access my Desktop quick and very responsive. If you feel like your computer is bogging down, try removing stuff from your Desktop (trust me, it goes a long way).

For you to have an idea what I'm talking about, here's a screenshot of my Desktop.

Right-Click Custom Menu

The question then is: How did I add several lines to the right-click menu? Good question, read on as I will outline how this gets done.

WARNING! This involves making changes to the registry and could potentially end up in disaster. Proceed at your own risk!

Now that you have ample warning, open the registry editor.. Head down to "HKEY_CLASSES_ROOT\Directory\Background\shell" or "HKCR\Directory\Background\shell". This requires Administrator privileges, so if you don't have it on your notebook, ask for it first. Otherwise, this will not work for you.

Right-click on "shell", and select "New" --> "Key". Name this key with what you want to appear on the right-click menu. In my case, I used the key "anaconda update" specifically for updating my anaconda3 install in my notebook.

Next, right-click on the newly created and key create another key. This time name it "command" (do not use any other name). On the data pane, fill up the "(Default)" field with the command used to run the created key. In my example above, commands specific to "anaconda update" -- "conda update --all --yes".

You should have something similar to the screenshot below. I already have several entries in my Desktop so the existing Keys on your registry might appear different. In my set-up, I also added another key to launch "jupyter notebook" with the same command among several additions.

Regedit HKCR\Directory\Background\shell

The change takes effect immediately, so check by right-clicking your Desktop and see the menu appear. If it doesn't appear, re-check the steps executed.

RELATED: TOO MANY USER/GDI objects are being used..

This setup has also helped me a lot in uncluttering my Desktop from icons/shortcuts that would slow it down. Not to mention, give it a very simple, clean look.

Share:

TWEAK: Quantifiably Measure Boot Time Optimizations

If there is a word that first comes to mind when running virtual machines (VM), I would say "lean". Meaning, if the VM does not need to run a certain service, then, disable it; ensure that only the services required should be running. This will not only improve utilization but it does free up resources, thereby minimizing the probability of contention. If you are using cloud services, the pay-per-use model pays out the leaner the virtual machine.

On the flip side, knowing which services really do contribute to a big reduction to wastage is key. The question then: How do you quantifiably measure which optimizations give the most bang for your buck? Read on..

One thing to note, this tweak will only work on modern Linux operating systems with systemd. The old-school "init"-run systems will not be able to run the command, as the required binaries will not be present.

The above statement is the give-away to the command used. In order to do this, execute the command "sudo systemd-analyze plot > some-file.svg" on a terminal window. Then open the resulting output file, in this case "some-file.svg" in your browser. Prior to making tweaks, take a baseline measurement and see where optimizations can be applied. Subsequently, after another tweak, run the same command again to measure and compare the results with the baseline.

The added benefit of executing this procedure is that, you also get an idea of the time it takes to boot-up your virtual machine.

systemd-analyze plot

Having done this baseline measurement in my virtual machine, I now know that it takes ~16seconds to boot-up. And that, the postfix service is taking its time to start-up causing my virtual machine a few seconds delay to completely boot. Understandably, mysql.service takes a while to start causing an additional ~7secs to boot time. I really cannot disable that service but I could optimize elsewhere.

If I really don't require postfix running there. It would shave off ~1sec off the boot time. But really, ~16secs boot time is not bad.

Out of curiosity, I ran the same command in my AWS EC2 instance. The screenshot is below.

AWS EC2 systemd-analyze

It is amazing to see that the EC2 instance, with a MySQL database running, only takes ~8secs to boot-up. Now that is lean or what!

RELATED: P2V (Physical to Virtual) Prep Work for Ubuntu

Go ahead and see if you can make tweaks in your environment. Let me know if this has helped by your comments and feedback.

Share:

INFO: Process audiodg.exe Consumes High Memory

A recent not-so-good experience led me to write about it.. Have you ever been in the "flow" and so absorbed in your work that when you get interrupted, you find it very difficult to get back to where you were at? I recently had that, and the disruption came from a technology failure, not a human interaction. I will get to the details next.

I was working on a large dataset in my notebook and all of a sudden I got an OOM notification (out of memory). The prompt was similar to "Your computer is running low on memory".. I could not get a screenshot of the error as I could not do anything more after that and was forced to press the power button long enough to restart.

After reboot, I tried to replicate what I was doing previously and launched the Task Manager to see if it has clues to the issue. What I saw almost pushed me off my chair. The executable audiodg.exe consumed 1.3GB of memory!

Although I have 16GB of memory to play with, I knew something is not right. Now that I was able to take a screenshot to share, you will find it below. It shows a third of system memory already consumed.

AUDIODG.EXE 1.2GB Memory

The executable audiodg.exe is an integral part of the Windows 7 Operating System. It is the "Windows Audio Device Graph Isolation" and if you terminate the process you lose audio output on your notebook, as in my experience.

Given my encounter with low memory and eventual unresponsive system, I would not want to experience that same scenario again and need to resolve it as much as I can. So I tried several suggestions from the web -- check for virus, check the digital signature of the file, etc.. And soon enough a solution was found.

It is worth noting that even on a fresh reboot, the process audiodg.exe still consumes about the same amount of memory. So memory leaking was scratched out as a possible suspect.

The culprit was installing an updated driver to the audio card of my notebook. After rollback to the previous driver, the problem went away. So I have this advise to folks out there who follow my posts: If you have a software running on your system that watches out for outdated drivers and you get notified each time a version is available, throw it away. Uninstall it, as it is useless. Just replace the driver if it causes you problems, otherwise things run fine and there is no need to update.

RELATED: Confirm Free Memory Slots on your Server (Linux)

This would sound like a cliche, but "if it ain't broken, don't fix it!" Trust me, there is truth to this advise. With that, let me leave you this question: How much memory does audiodg.exe consume on your computer?

Share:

TIP: Protect Your Router Against IP Spoofing

I was reading through some of the best practice configuration of Mikrotik routers, and routers in general. I found a very helpful tip about helping keep the internet secure for others. And this is related to the topic stated in the title -- IP Spoofing. In order to gain more information regarding this terminology, here's a resource that defined it clearly. Also quoted the same definition below.
IP Spoofing is a technique used to gain unauthorized access to machines, whereby an attacker illicitly impersonate another machine by manipulating IP packets. IP Spoofing involves modifying the packet header with a forged (spoofed) source IP address, a checksum, and the order value.

As a responsible infrastructure administrator, I am obliged to contribute to the security of others. And with that, likewise share the same information on how to do it as well for others benefit. If you own a Mikrotik router, follow the procedure below.

RP Filter. The "RP Filter" is used for packet source validation. As defined in RFC3704 Abstract, it is designed to limit the impact of distributed denial of service attacks, by denying traffic with spoofed addresses access to the network, and to help ensure that traffic is traceable to its correct source network.

To be better informed about this change, here's a link to the Mikrotik Wiki.

So how is this done in the Mikrotik?

To those who want to do it via command line interface (CLI), execute this using a privileged account:
/ip settings
set rp-filter=strict

Those who would rather use WinBox utility, IP » Settings. Set "RP Filter" to "strict".

Winbox IP Settings

In the screenshot above, "TCP SynCookies" is ticked. This is a further router protection from DDoS via SYN floods. For the CLI equivalent to that, the CLI command above should be changed to:
/ip settings
set rp-filter=strict tcp-syncookies=yes

RELATED: Mikrotik Articles in This Series

The above changes did not increase the resource consumption on my router. Monitor your router for changes to utilization of resources to see if the change does introduce significant load.

Share:

TIP: Rename Ubuntu16 Interfaces Back to ethX

If you have been working on Linux for a while, you will probably be very used to interface names that are ethX (eth something). In Ubuntu16 LTS, this is no longer the case. There is a long debate about this issue as it seems, and eventually this is the result. This post does not intend to spark another debate, nor feed the flames. The intention is that if you want to revert back to the "legacy" behavior you can, of course. And here's how.

Before that, in order to have a better picture of what and why, this change was introduced in systemd V197 and the explanation is discussed in lengthy detail. Visit the link to be better informed regarding the change and why it was put forward.

As put forth:
Starting with v197 systemd/udev will automatically assign predictable, stable network interface names for all local Ethernet, WLAN and WWAN interfaces. This is a departure from the traditional interface naming scheme ("eth0", "eth1", "wlan0", ...), but should fix real problems.

The manifestation of this in a new install of Ubuntu16 LTS virtual machine is an interface named "ens192".

Ubuntu New Interface Naming

To put it back to the original naming convention, edit the file /etc/default/grub. Look for the line:
GRUB_CMDLINE_LINUX=""
 ... change it to:
GRUB_CMDLINE_LINUX="net.ifnames=0 biosdevname=0"

Then execute, "update-grub" on a terminal. Next, edit the file /etc/network/interfaces and change all instances of ens192 (this the interface assigned to my virtual machine and may not be the same as yours).

WARNING! Do not reboot yet if you have no access to the console. You may permanently lose network connectivity as a result of this change! To make the change(s) take effect, reboot.

Executing the above steps, gave me back the network interface "eth0".

Ubuntu Legacy Interface Naming

Following best practice, I created a backup of the file /etc/default/grub prior to making the change. This is a screenshot of the diff between the current file and the file prior to the change.

Diff of Grub After Modification

RELATED: P2V (Physical to Virtual) Prep Work for Ubuntu

I have not executed this on a virtual machine with multiple interfaces. My suggestion on how to execute this procedure on a host with multiple interfaces is to go about the change one interface at a time. So far, this suggestion has worked for a friend whom I gave this advise to.

Share:

TIP: Test for "EternalBlue" Vulnerability Yourself

If you still haven't heard, there is a massive "ransomware" attack that is out there and organizations are starting to react to its effects. While you and I might not be the actual targets of this malware, you and I could still end up in its wake.. and worse, lose valuable data in the process.

The malware is well-known for "WannaCry", among other names. And what it does is encrypt your files asking for ransom in order to decrypt them (which is why it is called "ransomware"). You and I will then have a limited number of days to pay, or else the encrypted files are deleted.

This malware spreads itself across the network using a zero-day vulnerability which experts coined "EternalBlue". While Microsoft came out with the patch to address this vulnerability in its Windows Operating system, there are still a lot out there who are using both new and legacy unpatched systems, or are simply not aware of this existing threat.

If you have not done so, the link to the Windows patches is: Microsoft Security Bulletin 17-010 (Critical). In the essence of being informed, what WannaCry malware does is better explained in this youtube video: https://www.youtube.com/watch?v=88jkB1V6N9w.

Now if you have actually installed the updates and want to be sure, developers from a company Let's Get Digital came up with a tool to help you check systems. Download the software by clicking this link.

I tested it out on my computer. The result is in the screenshot below.

WANNACRY CHECK

It seems the patches in place are keeping me safe (for now at least).

RELATED: Install Adblock on Raspberry Pi via Pi-Hole

Go ahead and install the patch immediately, if you haven't done so. As the saying goes, an ounce of prevention is better than... But you already know that right?

Share:

HOW-TO: Mangle (or QoS) in a Mikrotik Router

First of all, let me tell you that I'm in no way a Mikrotik expert. My expertise is system administration, more into servers and storage. My specialization in the later years of infrastructure work focused primarily on VMware virtualization. I just understand a few concepts of networking that allow me to be comfortable around the equipment and possibly playing with it. There are occassions where necessity calls for that ease around hardware and these are one of those.

Previous articles have discussed the configuration on a Mikrotik Router as I have experienced it -- the initial configuration and succeeding LAN provisions, like DHCP and DNS. I have had this configuration working for me and had tested it to work.

The concept of QoS in this article is "Q-on-Q" in the Mikrotik linggo. There are a lot of ways to configure this and mine is not the only way. I have not tested the other configurations out there. This is the first one I have tested as this seems to be the easiest to implement and test (at least in my point of view).

There are two (2) components to this -- a queue tree and sets of mangle rules.

Queue Tree. The best analogy I could come up with for the concept of queue trees is the highway. Have a separate lane for faster and higher priority vehicles and leave the rest for vehicles that require roads to get through. The difference is QoS only kicks in when congestion happens. And in order for the configuration to kick in, at about 90% bandwidth utilization, I create an artificial congestion for this configuration to start to take control in anticipation of the real world actual congestion.

I was given an internet bandwidth of 20MBps up and 20MBps down to play with. Following the concept above, I created two (2) queues -- one queue for critical traffic with a CIR of 3MBps and another for best effort queue with a CIR of 15MBps. In effect, the artificial congestion at 90% utilization of 18MBps aggregated at the parent queue. QoS settings take over when bandwidth utilization for those queues are saturated as well as on their parent queues. The committed information rate or CIR (limit-at value) for that specific queue assures it that bandwidth, if required. Bandwidth for a particular queue that is unused can be "borrowed" by other queues.

I mirrored the same configs for both upload queues and download queues since my bandwidth is symmetrical. The queue tree configuration follows below.
/queue tree
add comment="----- uploads -----" max-limit=25M name=UPLDQ parent=global \
 priority=1 queue=ethernet-default
add comment="----- low priority -----" limit-at=15M max-limit=25M name=\
 UPLD_BEFF parent=UPLDQ priority=5 queue=ethernet-default
add comment="---- high priority -----" limit-at=3M max-limit=25M name=\
 UPLD_CRIT parent=UPLDQ priority=1 queue=ethernet-default
add name=upld_pr1_crit packet-mark=upld_pr1_crit parent=UPLD_CRIT \
 priority=1 queue=ethernet-default
add name=upld_pr2_crit packet-mark=upld_pr2_crit parent=UPLD_CRIT \
 priority=2 queue=ethernet-default
add name=upld_pr7_crit packet-mark=upld_pr7_crit parent=UPLD_CRIT \
 priority=7 queue=ethernet-default
add name=upld_pr1_beff packet-mark=upld_pr1_beff parent=UPLD_BEFF \
 priority=1 queue=ethernet-default
add name=upld_pr2_beff packet-mark=upld_pr2_beff parent=UPLD_BEFF \
 priority=2 queue=ethernet-default
add name=upld_pr4_beff packet-mark=upld_pr4_beff parent=UPLD_BEFF \
 priority=4 queue=ethernet-default
add name=upld_pr6_beff packet-mark=upld_pr6_beff parent=UPLD_BEFF \
 priority=6 queue=ethernet-default
add name=upld_pr7_beff packet-mark=upld_pr7_beff parent=UPLD_BEFF \
 priority=7 queue=ethernet-default
add name=upld_pr8_beff packet-mark=upld_pr8_beff parent=UPLD_BEFF \
 queue=ethernet-default
add max-limit=6M name=upl_pr8_ratelimited packet-mark=upld_pr8_lmtd \
 parent=UPLD_BEFF queue=ethernet-default
add comment="----- downloads -----" max-limit=25M name=DNLDQ \
 parent=global priority=1 queue=ethernet-default
add comment="----- low priority ----" limit-at=15M max-limit=25M \
 name=DNLD_BEFF parent=DNLDQ priority=5 queue=ethernet-default
add comment="---- high priority ----" limit-at=3M max-limit=25M \
 name=DNLD_CRIT parent=DNLDQ priority=1 queue=ethernet-default
add name=dnld_pr1_crit packet-mark=dnld_pr1_crit parent=DNLD_CRIT 
 priority=1 queue=ethernet-default
add name=dnld_pr2_crit packet-mark=dnld_pr2_crit parent=DNLD_CRIT \
 priority=2 queue=ethernet-default
add name=dnld_pr7_crit packet-mark=dnld_pr7_crit parent=DNLD_CRIT \
 priority=7 queue=ethernet-default
add name=dnld_pr1_beff packet-mark=dnld_pr1_beff parent=DNLD_BEFF \
 priority=1 queue=ethernet-default
add name=dnld_pr2_beff packet-mark=dnld_pr2_beff parent=DNLD_BEFF \
 priority=2 queue=ethernet-default
add name=dnld_pr4_beff packet-mark=dnld_pr4_beff parent=DNLD_BEFF \
 priority=4 queue=ethernet-default
add name=dnld_pr6_beff packet-mark=dnld_pr6_beff parent=DNLD_BEFF \
 priority=6 queue=ethernet-default
add name=dnld_pr7_beff packet-mark=dnld_pr7_beff parent=DNLD_BEFF \
 priority=7 queue=ethernet-default
add name=dnld_pr8_beff packet-mark=dnld_pr8_beff parent=DNLD_BEFF \
 queue=ethernet-default
add max-limit=6M name=dnld_pr8_lmtd packet-mark=dnld_pr8_lmtd \
 parent=DNLD_BEFF queue=ethernet-default

As seen from above, I adopted a naming convention for the queues (and their corresponding packet-marks). Packet-marks take the name of the queue names; whereas queue names have a specific naming concatenated from their function (dnld for download; upld for upload), priority (pr1 for priority 1 and so on..) and parent queue (beff for best effort; crit for critical or high priority queue). It helps me identify the queue assignment when classifying packets based on the kind of traffic they belong to).

Mangle Rules. Now that the queues are made, let's classify traffic by marking the packets. These packet marks or tags identify them as to which particular queue they would go to. Do you see now how these two components go hand in hand?

Note that these packet marks are only applicable within the Mikrotik router. The order of the rules are based on traffic volume. This gives me efficiency as the rules are evaluated from top to bottom. When the top rules are hit first, rules further down need no execution. The procedure below moves everything to Priority 4, and other packets are reclassified to lower or higher priority from that baseline. By default all packets have Priority 8. Below are the mangle rules I use.
/ip firewall mangle
add action=mark-connection chain=prerouting comment=">>>>> INTRANET TRAFFIC" \
 disabled=yes new-connection-mark=no-mark
add action=jump chain=forward dst-address=10.0.0.0/8 jump-target=local-net \
 src-address=10.0.0.0/8
add action=mark-connection chain=local-net new-connection-mark=local-net \
 passthrough=yes
add action=fasttrack-connection chain=local-net connection-mark=local-net
add action=accept chain=local-net connection-mark=local-net
add action=return chain=local-net
add action=accept chain=prerouting comment=">>>>> SEPARATOR (DO NOT ENABLE)" \
 disabled=yes
add action=mark-packet chain=prerouting in-interface=all-ethernet \
 new-packet-mark=dnld_pr4_beff
add action=mark-packet chain=postrouting new-packet-mark=upld_pr4_beff \
 out-interface=all-ethernet
add action=accept chain=prerouting comment=">>>>> SEPARATOR (DO NOT ENABLE)" \
 disabled=yes
add action=jump chain=prerouting comment="NEW CONNECTIONS" connection-state=\
 new in-interface=all-ethernet jump-target=crit-dnld-pr1
add action=jump chain=postrouting connection-state=new jump-target=\
 crit-upld-pr1 out-interface=all-ethernet
add action=jump chain=prerouting jump-target=crit-dnld-pr1 port=53 protocol=udp
add action=jump chain=prerouting comment="BIG BYTES (IN)" connection-bytes=\
 2500000-0 connection-rate=2500-1G in-interface=ether1 jump-target=\
 beff-bulk-download protocol=tcp
add action=mark-packet chain=beff-bulk-download new-packet-mark=\
 dnld_pr8_beff passthrough=no
add action=return chain=beff-bulk-download
add action=jump chain=postrouting comment="BIG BYTES (OUT)" connection-bytes=\
     2500000-0 connection-rate=2500-1G jump-target=beff-bulk-upload \
 out-interface=ether1 protocol=tcp
add action=mark-packet chain=beff-bulk-upload new-packet-mark=\
 upld_pr8_beff passthrough=no
add action=return chain=beff-bulk-upload
add action=jump chain=prerouting comment="WEB TRAFFIC - INBOUND" \
 in-interface=ether1 jump-target=beff-http-down port=80,443 protocol=tcp
add action=jump chain=prerouting in-interface=ether1 jump-target=\
 beff-http-down port=80,443 protocol=udp
add action=jump chain=beff-http-down connection-bytes=2500000-0 \
 jump-target=beff-bulk-download protocol=tcp
add action=mark-packet chain=beff-http-down new-packet-mark=\
 dnld_pr6_beff passthrough=no
add action=return chain=beff-http-down
add action=jump chain=prerouting comment="SYN PACKETS" in-interface=ether1 \
 jump-target=crit-dnld-pr2 protocol=tcp tcp-flags=syn
add action=jump chain=postrouting jump-target=crit-upld-pr2 out-interface=\
 ether1 protocol=tcp tcp-flags=syn
add action=jump chain=forward comment="PR1 - RTP conn/packet" \
 jump-target=crit-dnld-pr1 port=10000-20000 protocol=udp
add action=jump chain=forward comment="PR1 -- FACETIME" jump-target=\
 crit-dnld-pr2 port=5223,4080,3478 protocol=tcp
add action=mark-connection chain=forward comment="DSCP 46 (VoIP)" \
 connection-mark=no-mark dscp=46 new-connection-mark=VoIP-conn \
 passthrough=yes
add action=jump chain=prerouting comment="PR2 -- SIP (VoIP)" jump-target=\
 crit-dnld-pr1 port=5060-5061 protocol=tcp
add action=jump chain=prerouting jump-target=crit-dnld-pr1 port=5060-5061 \
 protocol=udp
add action=jump chain=forward comment="PR8 -- P2P conn/packet" jump-target=\
 beff-p2p p2p=all-p2p src-address=10.0.0.0/8
add action=mark-packet chain=beff-p2p new-packet-mark=dnld_pr8_lmtd \
 passthrough=no
add action=return chain=beff-p2p
add action=accept chain=prerouting comment=">>>>> SEPARATOR (DO NOT ENABLE)" \
 disabled=yes
add action=mark-packet chain=crit-dnld-pr1 new-packet-mark=dnld_pr1_crit \
 passthrough=no
add action=return chain=crit-dnld-pr1
add action=mark-packet chain=crit-dnld-pr2 new-packet-mark=dnld_pr2_crit \
 passthrough=no
add action=return chain=crit-dnld-pr2
add action=mark-packet chain=crit-upld-pr1 new-packet-mark=upld_pr1_crit \
 passthrough=no
add action=return chain=crit-upld-pr1
add action=mark-packet chain=crit-upld-pr2 new-packet-mark=upld_pr2_crit \
 passthrough=no
add action=return chain=crit-upld-pr2

With the configuration above, packets are re-classified according to traffic type. Even if someone is browsing the web and somebody else is uploading files through popular cloud storage like Dropbox or Google Drive, VoIP calls are still as clear as they need to be. My internal customers are satisfied with the speed of their internet and cloud experience.

RELATED: LAN Configuration of a Mikrotik Virtual Router

If you find something amiss in my configuration or if you found a way to improve it, I would appreciate some feedback. Hope this helps.

Share:

ERROR: UnicodeEncodeError.. codec cannot encode character

I live in a country where we have an alphabet that goes beyond the English set of characters. It is not your usual A-Z; sometimes I get to encounter a few characters that don't belong to that set. Reading, writing and pronouncing them do not present a serious challenge. It is getting scripts to crunch them that do. The language is simply not programming friendly.

I'm using Python scripts to process large datasets. It is pretty powerful and it gets the job done. Only when it encounters these special characters that it is brought to its knees. The error might be familiar to fellow "parsel-tongue" (the monicker some of would call Python coders). For me the most common encounter would be on the character "ñ".

The error:

UnicodeEncodeError: 'ascii' codec can't encode character u'\x00f1' in position 20: ordinal not in range(128)

Data would not be accurate if these characters are not properly processed. The error above is a welcome distraction, since there are times when the scripts would simply cut the character and not show any error at all. In that case, places like "Dasmariñas, Cavite" and "Biñan, Laguna" will be "Dasmarias, Cavite" and "Bian, Laguna". Person's names aren't spared either. And the list goes on..

Processing these manually is not an option so I had to find a solution to the dilemma. Encoding text characters to UTF-8 was suggested. I used to set it using the notation string.encode('utf-8')..

Until I discovered a suggestion to set this to a system-wide default encoding..

import sys
reload(sys)
sys.setdefaultencoding('utf8')

Inserting these lines at the beginning of scripts sets the default character encoding to UTF-8. I stumbled upon the solution from this blog: http://www.markhneedham.com/blog/2015/05/21/python-unicodeencodeerror-ascii-codec-cant-encode-character-uxfc-in-position-11-ordinal-not-in-range128/.

I spent quite a significant amount of time working around this pain point. By far, this solution has helped me a lot in processing data. I hope it helps someone out there.

RELATED: Could not setup macAddress for ethernet0

As always, your mileage may vary. There are a lot of posts regarding this solution -- caveats, disadvantages and bugs. Read and understand them, and be aware that they exist.

Share:

TIP: Configure NGROK Tunnel with Supervisor

I use a Raspberry PI (RPI) at home. I have blogged several times about my adventures with the RPI and some automation that I programmed in. It is currently running a very lightweight and optimized version of Linux named DietPI. The RPI is cheap. It operates cheap, since it doesn't consume a lot of electricity meaning I could leave it running headless 24x7x365. The only time it reboots is if there are critical updates that require it.

Since it is running 24x7, the RPI could also serve as my SSH tunnel to my home network from the internet. I use ngrok to achieve this and forward the SSHD port to the tunnel server. Ngrok does not run in daemon-mode and the developer has expressed that this feature will not be built-into the software. But on Linux this is not a really problem.

A supervisor could handle the software and even restart it if necessary. This is how I did it on my RPI.

First, install supervisor and download the latest version of ngrok.
apt-get -y install supervisor

Download ngrok off its developer's website, https://ngrok.com/download. Choose Linux ARM. Extract the contents of the zip file and copy it to /usr/local/bin. While in the ngrok website, register and obtain an authtoken.

NGROK AuthToken

Next, generate the default ngrok configuration file by running:
/usr/local/bin/ngrok authtoken [putyourownauthtokenhere]

A configuration file will be generated in $HOME/.ngrok2/ngrok.yml. I modified this configuration file and copied it to /etc. The entire contents of my ngrok.yml is below.

NGROK Configuration ngrok.yml

On to supervisor configuration. Create the configuration file as follows:
[program:ngrok]
command=/usr/local/bin/ngrok start --all --config=/etc/ngrok.yml
autostart=true
autorestart=true
stopsignal=QUIT

Then, set supervisor to autostart at boot.
systemctl enable supervisor
systemctl start supervisor

To check the status of supervisor controlled daemons, run..
supervisorctl status

Check the dashboard on the ngrok website to see how you could connect to the tunnel from any internet connection.

RELATED: Root Backdoor to VMware ESXi Host

The best part is: this configuration doesn't have to modify firewall configurations nor forward ports on the router.


Share:

INFO: HP Notebook Battery Recall

Nowadays, whenever the mention of battery is heard, it immediately connotes the Samsung Galaxy Note 7.. This is not isolated to Samsung though. Neither is it limited to mobile phones either. It is applicable to all gadgets with batteries in them, including notebooks or laptops.

Last Tuesday, HP announced the recall of about ~100,000 batteries of its notebooks. If you haven't heard about it yet, the announcement is here.

You may not be able to check the physical hardware itself due to the rugged design of some notebooks. Some require specialized hardware to open the units but you will be able to check the device by a utility that HP made available in its website. Using it this way will avoid untoward voiding of warranties due to unnecessary tampering of seals.

HP Battery Recall Utility

As you can see from the screenshot above, the laptop assigned to me is safe from the defective batteries that were circulated. Ensuring that the safety of the equipment you are using is paramount.

If you have friends or relatives that use HP notebooks, let them know about the recall. The period covered by the recall are notebooks purchased between Year 2013 to 2016. This is a huge window of time.

Share this information to help others avoid the risks of having defective batteries.

RELATED: Monitor Hard Drive Health

Should you wish to download the HP utility to detect if the battery on your notebook is affected, click this link to download.

Share:

INFO: IP Shifter, Profile-Based Network Configuration

In this time where technology abounds and the internet of things (IoT) is being ushered in, everything seems to be either automated or has some form of dynamic-ity built-in. DHCP (or Dynamic Host Configuration Protocol), has been an industry standard for that dynamic assignment of IP addresses. It defines how one device connects to network and communicates with the rest of the devices in the internet of things.

There are many cases where DHCP is not applicable -- special services like DNS and active directory are there to name a few. To these systems are assigned so-called static IP addresses. And there are times when you as the support personnel need to shift between both static and dynamic assignment. If you have experienced this, you know the pain in encoding the static IP address(es) to machines. Not to mention different operating systems follow different procedures and different configuration file locations.

In the Windows world, this seems to be standard. But then again, it is still cumbersome to do. There must be a way to shift or at least a semi-automated way to do it.

One tool that I have used specifically for this purpose is "IP Shifter" by ZQWARE.

ZQWARE IP Shifter

I have configured it to easily shift between DHCP IP address and static IP address using profiles. The change in configuration happens with just a few clicks.

As you will see from the screenshot above, I have a profile that sets my wired connection (LAN or Local Area Network) to DHCP, a profile that sets the LAN to a pre-assigned static IP address, and a profile that sets my wireless connection (or WIFI) to DHCP. You may also add as many predefined profiles as you wish. Simply choose the profile and hit "Apply". It is that simple.

RELATED: Automatically Disable WIFI on LAN Connectivity

Coming from an infrastructure background, this tool has helped me save time moving from one static IP to the next one. I hope it makes your work easier as well. You may download the utility from its developer, ZQWARE. Please don't forget to donate to the developer if you find it very useful.


Share:

HOW-TO: NAT (Network Address Translation) on a Mikrotik Router

Previous articles have discussed the configuration on a Mikrotik Router as I have experienced it -- the initial configuration and succeeding LAN provisions, like DHCP and DNS. I have linked those to the corresponding posts, should you want to check them out. This time, let's outline the internet access side of the configurations.

It is likely that your internet service provider (ISP) will not give you an entire block of IP addresses (otherwise, it will be a very expensive service). They expect you configure some form of network address translation in order to access the internet or traverse to another network. In order to understand the concepts, let us define the two common methods of NAT, which are source NAT (in Mikrotik lingo "srcnat") and destination NAT (in Mikrotik lingo "dstnat"). Just keep in mind that for connections bound to the internet (going out of the network), srcnat is involved; consequently, for connections going in to the local area network, it is dstnat.

NAT in this case does the one-to-many translations. As the traffic passes through the router bound for the internet, the router "masquerades" the IP address of the packet with the public IP address (refer to the initial configuration post) of the router (as additional reading references, you may want to checkout the RFC1918 standard). The router also performs another significant function of tracking the active connections. When inbound packets return, it uses this tracking information to determine the private IP address to forward the packets to.

Having mentioned that, there are two major configuration blocks that need to be added to the Mikrotik router. The NAT part and the firewall forward chain part. At your discretion, you may also want to adjust connection tracking parameters of the router, if the default configuration does not fit.

LAN-to-ISP Network Topology

SRCNAT. First, source NAT or srcnat. Still taking into account the same configuration that we used in the previous articles. Given a static public IP address, srcnat is best deployed.
/ip firewall nat
add action=srcnat chain=srcnat out-interface=ether1 \
 src-address=192.168.1.0/24 to-addresses=1.1.1.2

Another way of configuring this is to use another form of source NAT called "masquerade". Masquerade is a specialized form of srcnat. While srcnat requires a destination IP address, masquerade requires a specific interface and retrieves the IP address assigned to the interface when performing the NAT process. There is an associated overhead to masquerade due to this. Just know that in the absence of a static public IP, masquerade is the solution to go. Masquerade was created to work with dynamic IP addresses on the outbound interfaces.
/ip firewall nat
add action=masquerade chain=srcnat out-interface=ether1 \
 src-address=192.168.1.0/24

Given a static public IP address on the outbound interface, both configurations will work. However, it is recommended to use the first configuration to minimize overhead. I have not tested how big the overhead is on my setup but I guess it will vary from setup to setup.

FORWARD chain. The router's built-in firewall needs to be instructed to forward packets NAT'd to the local area network. It needs to accept new connections initiated from the LAN as well.

/ip firewall filter
add chain=forward action=drop comment="DROP invalid packets" connection-state=invalid
add chain=forward action=accept comment="FORWARD packets from LAN" \
 connection-state=related,established

This block of code needs to come after the input chain (router protection).

RELATED: Initial Configuration of a Mikrotik Virtual Router

There you go, after putting the above code in conjuction with the previous configurations done, you will now have a working router able to provide basic network connectivity plus internet access. Next we will discuss quality of service (QoS) or packet prioritization and bandwidth shaping on the Mikrotik router.

Share:

Subscribe for Latest Update

Popular Posts

Post Labels

100gb (1) acceleration (1) acrobat (1) adblock (1) advanced (1) ahci (1) airdrop (2) aix (14) angry birds (1) article (21) aster (1) audiodg.exe (1) automatic (2) autorun.inf (1) bartpe (1) battery (2) bigboss (1) binance (1) biometrics (1) bitcoin (3) blackberry (1) book (1) boot-repair (2) calendar (1) ccleaner (3) chrome (5) cloud (1) cluster (1) compatibility (3) CPAN (1) crypto (3) cydia (1) data (3) ddos (1) disable (1) discount (1) DLNA (1) dmidecode (1) dns (7) dracut (1) driver (1) error (10) esxi5 (2) excel (1) facebook (1) faq (36) faucet (1) firefox (17) firewall (2) flash (5) free (3) fun (1) gadgets (4) games (1) garmin (5) gmail (3) google (4) google+ (2) gps (5) grub (2) guide (1) hardware (6) how (1) how-to (45) huawei (1) icloud (1) info (4) iphone (7) IPMP (2) IPV6 (1) iscsi (1) jailbreak (1) java (3) kodi (1) linux (28) locate (1) lshw (1) luci (1) mafia wars (1) malware (1) mapsource (1) memory (2) mikrotik (5) missing (1) mods (10) mouse (1) multipath (1) multitasking (1) NAT (1) netapp (1) nouveau (1) nvidia (1) osmc (1) outlook (2) p2v (2) patch (1) performance (19) perl (1) philippines (1) php (1) pimp-my-rig (9) pldthomedsl (1) plugin (1) popcorn hour (10) power shell (1) process (1) proxy (2) pyspark (1) python (13) qos (1) raspberry pi (7) readyboost (2) reboot (2) recall (1) recovery mode (1) registry (2) rename (1) repository (1) rescue mode (1) review (15) right-click (1) RSS (2) s3cmd (1) salary (1) sanity check (1) security (15) sendmail (1) sickgear (3) software (10) solaris (17) squid (3) SSD (3) SSH (9) swap (1) tip (4) tips (42) top list (3) torrent (5) transmission (1) treewalk (2) tunnel (1) tweak (4) tweaks (41) ubuntu (4) udemy (6) unknown device (1) updates (12) upgrade (1) usb (12) utf8 (1) utility (2) V2V (1) virtual machine (4) VirtualBox (1) vmware (14) vsphere (1) wannacry (1) wifi (4) windows (54) winpe (2) xymon (1) yum (1) zombie (1)

Blog Archives

RANDOM POSTS