HOW-TO: Disabling Built-in Flash Player in Google Chrome

One of the biggest reasons I use Google's Chrome browser is the innate capability to translate content that is posted in a foreign language. This comes built into the browser itself and you don't have to do anything after installation. No other browser has this capability, to date.

Another reason, is Google Chrome is more secure than other browsers with its sandbox environment and what nots. Although this is subject to debate, I find this acceptable as it is and with that in mind, I use Chrome most of the time. There are still other functionality I find Mozilla's Firefox is better at, especially now that version 7 has better memory management.

While all these built-in functionality is great, there are exceptions to the rule. What am I pointing to? It is the Flash Player that is built-into Google Chrome. Did you know that Flash Player updates are included in Chrome system updates? Believe it.

That may not be a bad thing in itself, you may want to have control over how your browser behaves. And since you probably don't let Chrome monopolize your browsing behavior and we don't know which Flash Player takes priority and precedence, we can disable the built-in Flash Player and let the installed Flash Player take over.

Launch Google Chrome and type "about:plugins" (or "chrome://plugins") to the address bar. On the upper right you can click on the "plus" sign next to Details. This opens the plug-ins installed on the browser.

On my Chrome, I have 3 versions of Flash Player installed. And below is the screenshot of that.

Disabling Built-in Flash Player in Google Chrome

You can also see the versions of Flash Player plug-ins installed on the browser. And from the screenshot below you can see those information. From here, you can enable or disable the Flash Player plug-ins.

Disabling Built-in Flash Player in Google Chrome

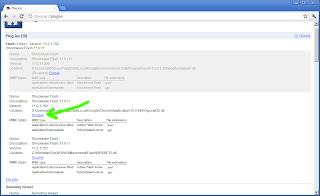
I tend to think that the order in which the Flash Player plug-ins appear also indicates precedence but this is not confirmed. It is just a hunch. So there you go folks, disabling the built-in Flash Player in Google Chrome.

Share:

TIP: Dexpot Utility for Virtual Desktops

As a system administrator, I need a lot of real estate on my desktop to be able to do multitasking and accomplish things in parallel. In the *nix environment this doesn't cause issues as there are virtual desktops readily available. This is true regardless of whether you are on the command-line or the graphical user interface (GUI). Even on the text-mode interface, Linux has virtual terminals still making it possible to do multiple tasks at once.

However, most sysads nowadays use Windows and just open terminal connections to the remote server. There are no virtual desktops on the Windows environment. And often, given the mobility preference, screen size is limited. This is where virtual desktops play a big factor.

Where this functionality is absent, dexpot comes to fill the gap. You can have up to 20 multiple virtual desktops, if you require that many. This is an easy way of increasing work area without having to shell out. What's more, switching to another desktop is easy as this functionality is supplied via hotkey.

For ease-of-use, this is how I configure dexpot. For hotkeys, I assign [CTRL]+[1] ... [CTRL]+[4] for desktop switching. You can customize the same for your own taste.

Dexpot Utility for Virtual Desktops

Then I also let the Desktop Manager run with dexpot. I place the icons near the system tray so that I could either use hotkeys to switch desktops or click on the Desktop Manager icons. Below is how it looks.

Dexpot Utility for Virtual Desktops

For some reason, the developers assigned German as the default language of dexpot. It is quite difficult to change the language settings on the application interface if you don't understand German. The fastest way to get around this configuration is to explore the directory sprache (under the dexpot directory). In this directory you will find language files. Delete everything except english.dxs (or move them to another folder if you wish). This will make dexpot run in English and is the easiest way to get this configuration done with less effort.

Even with a small screen on my Dell Latitude D630 notebook, dexpot has given me a lot of real estate with the virtual desktop functionality. You might find this useful too.

Share:

INFO: What is a "Sticky Bit"?

At a recent job interview, I was asked this question. I was able to satisfactorily answer the question but failed to answer the follow-up question -- what is the difference between the sticky bit "t" (small letter) and the sticky bit "T" (bold letter)? This experience led me to improve my knowledge further. This post is dedicated to the experience I had, and to share the knowledge to those who quest for it.

What is the "Sticky Bit"? ("t" and "T"). The sticky bit is primarily used on shared directories with open permissions, such as /var/tmp and /tmp. Directories with open permissions (or publicly writable) present a lot of problems because users **CAN CREATE** files, **READ/EXECUTE** files owned by other users, and at the same time are **ALLOWED EDIT/REMOVE** privileges to files owned by other users.

With sticky bit set on publicly writable directories, users **CAN CREATE** files, **READ/EXECUTE** those files as well as files owned by other users, but are **NOT ALLOWED EDIT/REMOVE** privileges to files they don't own. The only exception to this is the super-user root which can edit or remove files.

In simple terms, sticky bit is used to indicate special treatment of certain directories. A directory for which the sticky bit is set restricts deletion or modification of files it contains. A file in a sticky bit set directory may only be removed, modified or renamed by a user who has write permission on the directory, and either owns the file, owns the directory, or is the super-user. This is useful for directories such as /tmp, which must be publicly writable, but should deny users permission to arbitrarily delete or rename the files of others.

It is worthy to note here that the directories with open permissions (or publicly writable) can be any arbitrary directory, not just limited to /tmp and /var/tmp. Its just that /tmp and /var/tmp exist by default on the system.

Which directory has sticky permissions? How do you identify a directory that has sticky bit set? To illustrate further see the example below.

user@host# ls -ld /sticky/directory
drwxrwxrwt  2   user   group   512   Jun 20 11:02  /sticky/directory

On the output of the "ls" command, see the "t" (on drwxrwxrwt)? That tells us that the sticky bit is set.
A "T" refers to when the execute permissions are OFF.
A "t" refers to when the execute permissions are ON.

How to set sticky bit permissions. The leading "1" in the "chmod" command sets the sticky bit.
user@host# chmod 1777 /sticky/directory (permissions for "other" have execute bit ON) 
drwxrwxrwt
user@host# chmod 1776 /sticky/directory (permissions for "other" have execute bit OFF)
drwxrwxrwT

The equivalent of the above commands in another syntax.
user@host# chmod o+t /sticky/directory
user@host# chmod o+x /sticky/directory
drwxrwxrwt        
user@host# chmod o+t /sticky/directory
user@host# chmod o-x /sticky/directory
drwxrwxrwT
Or..
user@host# chmod o=rwxt /sticky/directory
drwxrwxrwt        
user@host# chmod o=rwt /sticky/directory
drwxrwxrwT

There you go, more information regarding sticky bit. To my knowledge, sticky bit for files are not supported by any modern implementation of Unix or Linux. It is only significant and applicable to directories.

Share:

FAQ: Mouse Randomly Freezing on Windows 7

"There’s No Such Thing As A Silly Question" -- does the cliche sound familiar? In this part of pimp-my-rig reloaded, technical questions are answered. Mail them to me and I will post the answers here. If you have a better answer, by all means share it with us.

Q. I recently encountered something that was both weird and quite disappointing -- my mouse started freezing randomly and it did so at times when it mattered the most. This can be annoying at times. Searching for solutions on the internet was a bit futile and I also learned that a lot of people have been complaining about this problem for years now. Their petitions to Microsoft seem to have fallen on deaf ears.

A. The only other alternative was to use a PS/2 mouse, which I don't have. I remember having a USB to PS/2 converter packaged with my Logitech MX518 Optical Mouse but since I bought it years ago I can't recall where that adapter is now.

I have to make this mouse work without having to resort to buying another one. I know it works since I tested in on my notebook (running on XP) and it doesn't exhibit the same random freezing.

A friend recently gave me this tip for me to try out. It involves making changes to the registry. Before proceeding heed this warning. WARNING: Changes to the registry can render your system unusable. Be warned that changes to the registry can be harmful to your system. But when done right, you can fix the random freezing of your mouse.

Now that you have been warned, open the registry editor Start -> Run.. -> regedit. Browse over to HKEY_LOCAL_MACHINE\SYSTEM\CurrentControlSet\Enum\HID. Under this branch of the registry you will see keys starting with VID, which we can't comprehend.

To make life easier, right click on HID and select Find. You will see a similar window as the screenshot below.

Mouse Randomly Freezing on Windows 7

Look for the entry "Mouse". You will find it under VID branch having a key that starts with "6&XXXXX" (see below). This string might be different on your machine. This screenshot is for my Logitech MX518 Optical Mouse. If you have the same mouse, the key could be the same -- 6&c111417&1&0000.

Mouse Randomly Freezing on Windows 7

Under the 6&XXXXX branch is another key "Device Parameters". Under this key add as DWORD "HScrollHighResolutionDisable" and give it a value of "1". Add another DWORD "VScrollHighResolutionDisable" and similarly give it a value of "1".

Mouse Randomly Freezing on Windows 7

Close the registry editor and reboot. Then check if this solves the random freezing of your USB mouse. You may consider looking for other values of "Mouse" on the HID registry key and repeat the process. On my desktop, the "Mouse" entry appeared only once. For a week now, my mouse has been freeze-free.

Share:

REVIEW: Arctic Cooling Freezer PRO13 CO

I recently received a brown box which courier FedEx brought. I opened it and a brand new heatsink Arctic Cooling Freezer PRO13 CO was inside the box for review.

Here is a brief rundown of the specifications of the Arctic Cooling Freezer PRO13 CO:
Heatsink Material : Aluminum fins x 47
Thickness of fins : 0.5 mm
No. of Heatpipes : 4
Fan (mm): 120mm x 1
           50mm x 1
Rated Fan Speed : 120mm: 300 - 1350 RPM
                  50mm: 700 - 2700 RPM
Airflow : 49.7 CFM / 96.8 m³/h
Cooling Capacity (Watts) : 300
Noise Level (Sone) : 0.4
Bearing : Dual Ball Bearing
Dimensions (Product) : 134L x 96W x 159H mm
Dimensions (Packaging) : 137L x 99W x 173H mm
Limited Warranty : 6 years
Product Net Weight : 0.893 kg
Gross Weight : 1.6 kg

A big change to the heatsink packaging is notable. What used to be black boxes bearing the Arctic Cooling logo was the usual packaging. For Freezer PRO13 CO, it is now a clear blister pack that displays the heatsink and fan (HSF).

Arctic Cooling Freezer PRO13 CO

Arctic Cooling Freezer PRO13 CO

Opening the package is quite easy. It is packed with mounting brackets, push pins and mounting screws. It also includes the instruction manual.

Below is a close-up of the HSF with its 9-blade 1350RPM fan. 120mm fans offer big airflow without the painful sound piercing your ears. At 1350rpm, that is what you'll expect on the Freezer PRO13 CO.

Arctic Cooling Freezer PRO13 CO

Aside from the 120mm fan, the Freezer PRO13 CO also comes with a 50mm radial fan on the bottom of the heatsink. This patented "Cross Blow" technology at the base of the cooler also cools the surrounding areas of the heatsink.

Arctic Cooling Freezer PRO13 CO

We removed the fans to take a closer look at the heatsink. Below you can see the heatsink and its base.

Arctic Cooling Freezer PRO13 CO

Arctic Cooling Freezer PRO13 CO

A heatsink this heavy (893g) should come with a backplane and stronger mounting brackets. However, the push pins hold the Freezer PRO13 CO without problems. It also doesn't give any mounting problems with surrounding components, like tall memory modules or the video card. The Gigabyte X58XP-UD5 has a tight fit on the CPU and memory area but the Freezer PRO13 CO fits without problems.

Arctic Cooling Freezer PRO13 CO

In the end, everything is all about the heatsink performance and here is how it fared.

Arctic Cooling Freezer PRO13 CO

Compared to the stock intel heatsink, the Freezer PRO13 CO is 6°C cooler at idle. This gap widens to 11°C at load. What I'd like to see is an option to switch the fan to a bit more than 1350 rpm especially for overclocking purposes. But with this performance, the Freezer PRO13 CO will not disappoint. If silence is your preference this is the heatsink for you.

Appreciation goes to Arctic Cooling for sending us a sample for review. Also, to my good friend Xavier Zulueta for reviewing the Arctic Cooling Freezer PRO13 CO.

Share:

HOW-TO: Tabbed Putty with PuttyCM (Windows 7)

If you work as a system administrator and your workstation has windows (particularly Windows 7), chances are you connect to the Linux, Solaris, AIX or whatever flavor of *nix using putty. If by any chance you don't you might want to try putty, instead of the current program you're using.

I have used putty since I started working as a Unix sysad. And I can tell that putty in itself is a superb and versatile tool. But work starts getting complicated once you have several putty sessions open. And it becomes even challenging once you open more putty sessions. PuttyCM (or Putty Connection Manager) organizes putty sessions into tabs or split windows (by dragging a tab). This way, working becomes organized and much faster. You may want to download PuttyCM to try it out.

However, PuttyCM doesn't work out-of-the-box in Windows 7. So here's a pimp-my-rig feature designed to guide you in configuring PuttyCM to make it work in Windows 7. To give you a better understanding of what I mean by it doesn't work, here is the screenshot of PuttyCM connecting to my Popcorn Hour C-200 NMJ.

Tabbed Putty with PuttyCM (Windows 7)

As you can see, it doesn't work well. You are able to use the connection manager or putty sessions but it doesn't display the connection properly. And you can't do your job with PuttyCM. So it is just back to plain Putty or so it seems.

Here's how to make PuttyCM work in Windows 7.

Explore to the directory containing the PuttyCM executable (its filename is: puttycm.exe). Right-click the executable file and go to Compatibility tab. Choose compatibility for Windows Vista. You may choose Vista SP1 or SP2 as these work as well. Toward the bottom of the Compatibility tab, tick "Run this program as an administrator". You will be seeing a window similar to the one below.

Tabbed Putty with PuttyCM (Windows 7)

Now try to launch PuttyCM and connect to a host.

How sweet it is to see the terminal connection display.

Tabbed Putty with PuttyCM (Windows 7)

So there you go folks, working tabbed putty with PuttyCM in Windows 7. As of this writing, PuttyCM version 0.7.1 build 136 (beta) works. And the current alpha 0.7.1 build 233 works in Windows 7 and Windows 7 SP1.

Share:

FAQ: Error Running 64bit Commands

"There’s No Such Thing As A Silly Question" -- does the cliche sound familiar? In this part of pimp-my-rig reloaded, technical questions are answered. Mail them to me and I will post the answers here. If you have a better answer, by all means share it with us.

Q. I recently encountered an error that made me scratch my head. I knew I had encountered it before and had resolved the problem. Unfortunately, my notes were not available at work due to the security policies in place. But when I got home, the putty logs that I saved from before proved really useful.

Encountering weird errors like this one really makes its mark on your memory. To give you an idea what it is, see below. Simple commands like uptime will return errors, and will not run. In fact, all 64-bit executables refuse to run and will give the same error as below.

user@host > uptime
exec(): 0509-036 Cannot load program uptime because of the following errors:
        0509-033 Cannot run a 64-bit program until the 64-bit
        environment has been configured. See the system administrator.

A. Fortunately, I enabled logging on my putty and saved them for future review. And the time for reaping the benefits of that move paid out.

This was how I resolved that problem above. The command to run is "smitty load64bit" or "smit load64bit" (should be executed as root or a privileged user). After smit loads, select "Enable Now".

Once executed, 64bit commands will now run without hitch. No need to reboot the machine.

To my curiosity, I checked the output of smit.log and below is how it looks.

user@host > cat smit.log

[Apr 28 2010, 07:31:21]
    Starting SMIT

(Menu screen selected as FastPath,
        id          = "system",
        id_seq_num  = "220",
        next_id     = "load64bit",
        title       = "Enable 64-bit Application Environment".)

(Menu screen selected,
        FastPath    = "load64bit",
        id_seq_num  = "220",
        next_id     = "load64bit",
        title       = "Enable 64-bit Application Environment".)

(Dialogue screen selected,
        FastPath    = "run64now",
        id          = "run64now",
        title       = "".)

[Apr 28 2010, 07:31:33]

    Command_to_Execute follows below:
>> /etc/methods/cfg64


    Output from Command_to_Execute follows below:

---- start ----


---- end ----

[Apr 28 2010, 07:31:37]
    Exiting SMIT


From the output of smit.log above, you can deduce that if you will not be using smit you can instead use "/etc/methods/cfg64" to accomplish the same results.

Share:

Subscribe for Latest Update

Popular Posts

Post Labels

100gb (1) acceleration (1) acrobat (1) adblock (1) advanced (1) ahci (1) airdrop (2) aix (14) angry birds (1) article (21) aster (1) audiodg.exe (1) automatic (2) autorun.inf (1) bartpe (1) battery (2) bigboss (1) binance (1) biometrics (1) bitcoin (3) blackberry (1) book (1) boot-repair (2) calendar (1) ccleaner (3) chrome (5) cloud (1) cluster (1) compatibility (3) CPAN (1) crypto (3) cydia (1) data (3) ddos (1) disable (1) discount (1) DLNA (1) dmidecode (1) dns (7) dracut (1) driver (1) error (10) esxi5 (2) excel (1) facebook (1) faq (36) faucet (1) firefox (17) firewall (2) flash (5) free (3) fun (1) gadgets (4) games (1) garmin (5) gmail (3) google (4) google+ (2) gps (5) grub (2) guide (1) hardware (6) how (1) how-to (45) huawei (1) icloud (1) info (4) iphone (7) IPMP (2) IPV6 (1) iscsi (1) jailbreak (1) java (3) kodi (1) linux (28) locate (1) lshw (1) luci (1) mafia wars (1) malware (1) mapsource (1) memory (2) mikrotik (5) missing (1) mods (10) mouse (1) multipath (1) multitasking (1) NAT (1) netapp (1) nouveau (1) nvidia (1) osmc (1) outlook (2) p2v (2) patch (1) performance (19) perl (1) philippines (1) php (1) pimp-my-rig (9) pldthomedsl (1) plugin (1) popcorn hour (10) power shell (1) process (1) proxy (2) pyspark (1) python (13) qos (1) raspberry pi (7) readyboost (2) reboot (2) recall (1) recovery mode (1) registry (2) rename (1) repository (1) rescue mode (1) review (15) right-click (1) RSS (2) s3cmd (1) salary (1) sanity check (1) security (15) sendmail (1) sickgear (3) software (10) solaris (17) squid (3) SSD (3) SSH (9) swap (1) tip (4) tips (42) top list (3) torrent (5) transmission (1) treewalk (2) tunnel (1) tweak (4) tweaks (41) ubuntu (4) udemy (6) unknown device (1) updates (12) upgrade (1) usb (12) utf8 (1) utility (2) V2V (1) virtual machine (4) VirtualBox (1) vmware (14) vsphere (1) wannacry (1) wifi (4) windows (54) winpe (2) xymon (1) yum (1) zombie (1)

Blog Archives

RANDOM POSTS