In the previous article, we discussed about the configuration of the Mikrotik router, with particular focus on connectivity and protection from unauthorized access. This time, we could start with specific services that it will provide to the local area network (LAN).
Configuring on the LAN side, requires that we prevent locking ourselves out of the router while executing changes. What does this mean? Any change that will potentially disconnect us from the router will be blocked. The router is smart enough to figure this out. In the Mikrotik linggo, the term used to refer to this is "safe mode". The name itself is very intuitive!
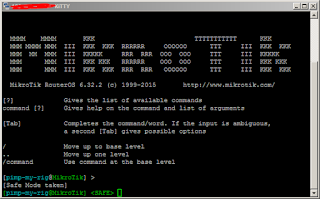
To enable safe mode, simultaneously press [CTRL]+[X] on the keyboard. The same set of hotkeys used for "cut" to those familiar with the Windows world. Upon enabling safe mode, the terminal prompt changes with the string ‹SAFE› appended to it. You will see that in the screenshot below.
To release safe mode, the same set of keys are used. Similarly, the prompt returns to normal and it shows that safe mode is no longer in effect.
Without further ado, let us configure the router to be able to perform DNS lookups for our network. This configuration forwards queries to Google's public DNS servers (8.8.8.8 and 8.8.4.4) at the same time caches the queries in the router's memory. Change the DNS servers to your own if Google's DNS servers are not desired.
Next, let us prepare the network segments used on the LAN side by defining an IP pool. This will be used for DHCP services later. Let us assume a segment from 192.168.1.0/24.
Once the pool is defined, let's use that pool for DHCP services. This is done in two-parts. First, define the network segment.
Second, define the DHCP directive.
This configuration will not be complete without assigning the LAN gateway IP address to an existing interface on the router. In this case, it is ether3.
At this point, the router is able to provide communication between the devices in the local area network. It will be able to support devices that require dynamic host configuration protocol (or DHCP) for automatic configuration of IP addresses. Internet connectivity could not be established since the RFC1918 addresses (to which the 192.168.0.0/16 network belongs) are non-routable on the internet. What needs to happen is network address translation (or NAT). And the Mikrotik router is just as able to perform this task. We will discuss that in the next article.
RELATED: Initial Configuration of a Mikrotik Virtual Router
For now the router is able to provide network connectivity to hosts within the LAN. It could provide DHCP addresses and cache DNS queries. Please note that all capitalized configuration keywords (e.g. POOL1, DHCP1 and LOCAL_LAN) can be replaced with your own naming convention(s).
Configuring on the LAN side, requires that we prevent locking ourselves out of the router while executing changes. What does this mean? Any change that will potentially disconnect us from the router will be blocked. The router is smart enough to figure this out. In the Mikrotik linggo, the term used to refer to this is "safe mode". The name itself is very intuitive!
To enable safe mode, simultaneously press [CTRL]+[X] on the keyboard. The same set of hotkeys used for "cut" to those familiar with the Windows world. Upon enabling safe mode, the terminal prompt changes with the string ‹SAFE› appended to it. You will see that in the screenshot below.
To release safe mode, the same set of keys are used. Similarly, the prompt returns to normal and it shows that safe mode is no longer in effect.
Without further ado, let us configure the router to be able to perform DNS lookups for our network. This configuration forwards queries to Google's public DNS servers (8.8.8.8 and 8.8.4.4) at the same time caches the queries in the router's memory. Change the DNS servers to your own if Google's DNS servers are not desired.
/ip dns
set allow-remote-requests=yes cache-size=4098KiB servers=8.8.4.4,8.8.8.8
Next, let us prepare the network segments used on the LAN side by defining an IP pool. This will be used for DHCP services later. Let us assume a segment from 192.168.1.0/24.
/ip pool
add name=POOL1 ranges=192.168.1.11-192.168.1.239
Once the pool is defined, let's use that pool for DHCP services. This is done in two-parts. First, define the network segment.
/ip dhcp-server network
add address=192.168.1.0/24 comment=LOCAL_LAN dns-server=192.168.1.1 \
domain=pimp-my-rig.local gateway=192.168.1.1 \
ntp-server=NTP_SVR_IP_HERE wins-server=WINS_SVR_IP_HERE
Second, define the DHCP directive.
/ip dhcp-server
add add-arp=yes address-pool=POOL1 authoritative=yes disabled=no \
interface=ether3 lease-time=1d name=DHCP1
This configuration will not be complete without assigning the LAN gateway IP address to an existing interface on the router. In this case, it is ether3.
/ip address
add address=192.168.1.1/24 comment=LOCAL_LAN interface=ether3 network=192.168.1.0
At this point, the router is able to provide communication between the devices in the local area network. It will be able to support devices that require dynamic host configuration protocol (or DHCP) for automatic configuration of IP addresses. Internet connectivity could not be established since the RFC1918 addresses (to which the 192.168.0.0/16 network belongs) are non-routable on the internet. What needs to happen is network address translation (or NAT). And the Mikrotik router is just as able to perform this task. We will discuss that in the next article.
RELATED: Initial Configuration of a Mikrotik Virtual Router
For now the router is able to provide network connectivity to hosts within the LAN. It could provide DHCP addresses and cache DNS queries. Please note that all capitalized configuration keywords (e.g. POOL1, DHCP1 and LOCAL_LAN) can be replaced with your own naming convention(s).


![[Errno 104] Connection reset by peer](https://blogger.googleusercontent.com/img/b/R29vZ2xl/AVvXsEhruTrd3P6JZPk6MX2QCerNsaoIpuHzBoh-Sokmf0XDGD0m16UHawn-zEb7i7e2NybInhOaMMqPUlxskqS3qY9UMX28sp-AkybF1TQPlXY5OOmC8xPIvKHuA7dYjHfeRCDgCFhyzIuw-h5K/s320/S3CMDERRR.PNG)


