HOW-TO: Create a USB VMware ESXi 5 Installer

Not all servers are created equal -- some have optical drives, some don't have. Given that, there might be times where you will be needing an alternative way of installing operating systems to that server. In the case of a VMware ESXi 5 hypervisor, the installer has a smaller footprint compared to most operating systems but, nevertheless, without any optical drive on the server the only other alternative is to install via USB.

This is not rocket science. USB installers are in fact a bit common nowadays. We have covered several how to's including the install of Windows 7 via USB. Aside from Windows, almost all flavors of Linux can be installed via USB, although the network install of Linux is the most prefered.

To create a USB installer, you will be needing the latest VMware ESXi ISO image from VMware. It needs a registered account to be able to download the ISO file. Register as it will be worth it.

Aside from the ISO file, you will also be needing the UNetbootin application. You may visit its sourceforge project page here. The current version of UNetbootin as of this writing is 5.81.

With the pre-requisites satisfied, launch UNetbootin. Tick on "Diskimage", select "ISO" on the dropdown (this is the default selection), and browse the location of the downloaded VMware ESXi 5 ISO file. You should have a Window similar to this (see below).

UNetbootin Start Window

Double check and ensure that the right USB drive is selected. Hit "OK" and watch UNetbootin build the USB installer.

UNetbootin Building

When UNetbootin installs the Bootloader (STEP#3), you will be asked to overwrite a file -- MENU.C32 -- accept that dialog. This is the only interaction that happens during the build. Everything else is automatic.

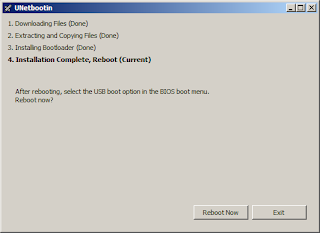
Upon completion, simply press "Exit". There is no need to reboot.

UNetbootin Done

The only caveat I have encountered on this build is that the USB drive used was formatted NTFS. This doesn't work so early on, you need to format the USB drive with a FAT32 filesystem. This solved a few headaches for me.

Share:

HOW-TO: Setup ISC Bind9 for Windows

On our guide to setting up a caching name server via Treewalk, it outlined the procedure to follow in configuring the Treewalk (a fork of bind) on Windows. However, the download link for Treewalk is no longer available and as it seems, development for it has stopped altogether.

You should look no further than bind itself, not its fork. ISC bind is still being actively developed and bugfixes are still being published for it. What deters users from using bind is it is a bit tricky to setup while treewalk is a simple install and run. So let's try to configure and install ISC bind.

First, download the Windows binaries of bind. As of this writing, the current production version is 9.9.1-P2. A zip file named bind991-p2.zip will be downloaded on your computer.

Extract this file under path C:\Windows\DNS\bin. This directory does not exist by default so you might want to create it first. Configuration files will also be created in C:\Windows\DNS\etc, and likewise this directory does not exist by default and will need to be created.

Create a file named.conf in the C:\Windows\DNS\etc directory. A sample configuration can be found here. On this sample configuration file, change the "directory" directive and replace the value /var/named to C:\Windows\DNS\etc. It should get you started.

From the above, it is obvious that this configuration is intended for Linux or Unix. The "logging" directive needs fixing as well. It is not applicable Windows implementations of bind. Drop the path, and just leave the filename.

Now, it is time to setup the service. Execute the command below in a privileged command prompt (note the space after the equal sign):

sc create bind9 binpath= C:\Windows\DNS\bin\bind.exe DisplayName= "Bind9 DNS Server" start= auto
sc start bind9

You should be getting a similar window as this one.

Using SC to Add Bind DNS Server Service

Checking the service, it should have started and properly setup to start with Windows even when rebooted. The service will automatically start.

Bind9 DNS Server Service

Now, try out the caching name server. You should be feeling the impact of faster performance and speedy DNS lookups as the DNS cache is built.

Share:

HOW-TO: Resolve 800B0100 Windows Update Error

It's been a while since I last ran Windows Update. And with the news of hacking and security breaches going around, it would be prudent to keep systems updated and patched. Not that someone would waste their time hacking into my system but it is a good practice to keep up to date just the same.

With that in mind, I discovered that I need to apply 37 patches to keep my system up to date. But only 31 of them applied and the other six (6) resulted in a weird error -- Windows Update 800B0100 Error code. Sure enough Microsoft had this in their knowledge base (at this link). However, performing those tasks did not resolve the problem.

For comparison and just so you also have an idea if we both have the same error, I get below screenshot of the Windows Update window.

800B0100 Windows Update Error

Googling the issue brings up countless other users who experienced the same issue. One after the other, the solutions and suggestions presented failed and failed. The only other probable solution that I have yet to perform is the re-install which I'd like to avoid as much as possible.

Before heading down this path, I decided to phone a friend -- a phone call which turned out to be one of the most valuable phone calls I will ever make. To cut it short, this procedure resolved the issue.

[1] Turn off Windows Update (execute "sc stop wuauserv" on a privileged command prompt). This temporarily disables Windows Update, but is not permanent and does not survive reboots.

[2] Browse the directory %WINDIR%\SoftwareDistribution\Download and delete all contents of this folder. NOTE: Delete the contents only, not the folder.

[3] Likewise, browse the directory %WINDIR%\SoftwareDistribution\DataStore. Under this directory there is a file called "DataStore.edb". Delete this file.

[4] Under the directory %WINDIR%\SoftwareDistribution\DataStore\Logs, delete all files. NOTE: Again, delete the contents only, not the folder.

[5] Download the Microsoft FixIt Update Repair tool (http://go.microsoft.com/?linkid=9665683). This fixit solution has both Default and Aggressive modes. Try Default mode first. Then reboot.

[6] Manually run Windows Update and see if the update error is gone. If not, re-run the procedure above and on step #5, run the tool in Aggressive mode. Then reboot.

In my experience, I had to run the fixit Update Repair Tool in aggressive mode before the problem went away.
Share:

FAQ: Resolve Windows Photo Viewer Rotation Error

So you got a smart phone.. What's cool about this gadget is the built in high resolution camera that can take pictures. Indeed, it is rare to find phones without these cameras built in. Smart phones have founds its niche in everyone's life, that one can't leave home without it.

The data inside them is useless without the ability to upload them to a computer, or a storage device for archiving or permanent storing. However, one could be taken by surprise to find pictures upside down. This is true for an iPhone 4/4S. How then does one rotate the uploaded photos when the built-in tool to rotate shows an error.

The Windows Photo Viewer that is built into Windows 7 could rotate pictures, but this is a hit or miss thing. About 50% of the time it will work as designed, but what about when it presents "Windows Photo Viewer can't save the changes to this picture because there's a problem with the picture's file properties." (see snapshot below)


There's nothing you can do about Windows Photo Viewer to force it to save the photo or picture. You have to use a third party utility to do this. The JPEG Lossless Rotator can do this job for you without any fuss. In fact, there are other utilities that can do the same, but I found this tool the easiest to use. It can also integrate with Explorer and you can simply right click on an image to rotate it.

This way once pictures are uploaded to the computer, just launch the JPEG Lossless Rotator application and browse to the folder containing the uploaded pictures and rotate away.


The application can also do it by batches. And you can see the thumbnails of each photo as they appear. Or click them one by one from Windows Explorer.

With the rotation issues resolved, go ahead and take pictures with that iPhone and rotate them after uploading.
Share:

HOW-TO: Resolve Freezing Acrobat Reader X

If you have been sharing documents for collaboration or information sharing, one cannot escape the use of Adobe Acrobat Reader to open the PDF files. PDF (short for Portable Document Format) is used due to its flexibility and independency from any operating system, hardware, or application used. You name it, you can probably use it.

For Windows desktops and notebooks, Adobe Acrobat Reader is the most commonly used to read PDF files. This is because PDF is a proprietary format owned and patented by Adobe. Sometime in July 2008, Adobe released the PDF as an open public patent, granting rights to use, make, sell implementations of PDF. Lately, their very own Acrobat Reader has been upgraded to version 10 -- Acrobat Reader X as they call it. While it is the best version, it is plagued with its own set of headaches. To top this list is the freezing of the application when it opens a PDF file.

When you open a PDF file, Adober Acrobat Reader will launch and open the PDF file but it will sit there and freeze for about 15-20 seconds. The application window will display the "(Not Responding)" tag and once the window is focused the cursor becomes an hour glass. This is the manifestation of the freezing.

The freezing goes away after about 15-20 seconds and Acrobat Reader will function normally after that. This is true regardless of any PDF file opened. But the commonality of the problem seems to be related to version 10 (or X) of Adobe Acrobat Reader.

To resolve this issue, launch Acrobat Reader X. Under Edit -> Preferences -> General, untick the option "Enable Protected Mode at Startup" (refer to screenshot).


Accept all changes and re-launch Acrobat Reader or re-open that PDF file you were previously trying to view. Notice the big change in responsiveness. The freezing is gone.

Another suggestion in addition to this tweak is to remove files from %appdata%\Adobe\Acrobat. In this directory you will see versions of Acrobat Reader. Delete everything except "10.0". That also solved some problems with freezing along with the disabling of protected mode at startup. Hope this helps.

Share:

Subscribe for Latest Update

Popular Posts

Post Labels

100gb (1) acceleration (1) acrobat (1) adblock (1) advanced (1) ahci (1) airdrop (2) aix (14) angry birds (1) article (21) aster (1) audiodg.exe (1) automatic (2) autorun.inf (1) bartpe (1) battery (2) bigboss (1) binance (1) biometrics (1) bitcoin (3) blackberry (1) book (1) boot-repair (2) calendar (1) ccleaner (3) chrome (5) cloud (1) cluster (1) compatibility (3) CPAN (1) crypto (3) cydia (1) data (3) ddos (1) disable (1) discount (1) DLNA (1) dmidecode (1) dns (7) dracut (1) driver (1) error (10) esxi5 (2) excel (1) facebook (1) faq (36) faucet (1) firefox (17) firewall (2) flash (5) free (3) fun (1) gadgets (4) games (1) garmin (5) gmail (3) google (4) google+ (2) gps (5) grub (2) guide (1) hardware (6) how (1) how-to (45) huawei (1) icloud (1) info (4) iphone (7) IPMP (2) IPV6 (1) iscsi (1) jailbreak (1) java (3) kodi (1) linux (28) locate (1) lshw (1) luci (1) mafia wars (1) malware (1) mapsource (1) memory (2) mikrotik (5) missing (1) mods (10) mouse (1) multipath (1) multitasking (1) NAT (1) netapp (1) nouveau (1) nvidia (1) osmc (1) outlook (2) p2v (2) patch (1) performance (19) perl (1) philippines (1) php (1) pimp-my-rig (9) pldthomedsl (1) plugin (1) popcorn hour (10) power shell (1) process (1) proxy (2) pyspark (1) python (13) qos (1) raspberry pi (7) readyboost (2) reboot (2) recall (1) recovery mode (1) registry (2) rename (1) repository (1) rescue mode (1) review (15) right-click (1) RSS (2) s3cmd (1) salary (1) sanity check (1) security (15) sendmail (1) sickgear (3) software (10) solaris (17) squid (3) SSD (3) SSH (9) swap (1) tip (4) tips (42) top list (3) torrent (5) transmission (1) treewalk (2) tunnel (1) tweak (4) tweaks (41) ubuntu (4) udemy (6) unknown device (1) updates (12) upgrade (1) usb (12) utf8 (1) utility (2) V2V (1) virtual machine (4) VirtualBox (1) vmware (14) vsphere (1) wannacry (1) wifi (4) windows (54) winpe (2) xymon (1) yum (1) zombie (1)

RANDOM POSTS