FAQ: Cloned Linux Virtual Machine with Boot Errors

Q. While working on a few cloned RHEL virtual machines just a few days ago, I encountered a weird error that almost stopped me dead on my tracks. I was expecting the tasks to be a breeze since cloning via virtual machine templates is as easy as click, click, click.

As it turned out, what was supposedly a few clicks was more complex than what I thought. The clone virtual machines simply refused to boot. To give you a better understanding of the error see the screenshot below.


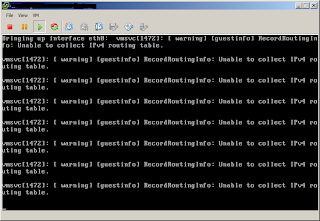
Opening the console of the virtual machine, the repeated errors prompted are:
vmsvc[xxx]: [ warning] [guestinfo] RecordRoutingInfo: Unable to collect IPV4 routing table.

The messages above are repeated at about every minute.. And, worse, the boot sequence is stuck at this phase and will not proceed.

After exhausting my patience waiting for the host to boot up, I gave up and resorted to shutting down the virtual machines to figure out what was wrong. The VMware logs didn't give a clue what was wrong. Even RedHat forums didn't have information regarding the error.

What was striking was the "vmsvc" string, indicating this was somewhat VMware configuration related or a service related to VMware. This was happening to a RHEL Linux virtual machine. So I tried a different flavor of Linux -- CentOS. Same result. But for Windows Server 2003, it was not.

Google search came out with this same exact error message on the VMware Knowledge Base (KB #2048572). Executing the procedure in the resolution part did not help either.

It only applied when the guest operating system's time is ahead of the host. But that gave me a further clue -- how about if the time of the cloned guest is too far off from the host ESXi host? (Afterall it was converted to a template a while back. And it was not selective, as every cloned machine displayed this manifestation.)

It turned out this was the case. I decided to disable time synchronization completely between the host ESXi and guest RHEL virtual machine.. Bingo error gone.

A. To completely disable the time sync between the host ESXi hypervisor and the guest RHEL virtual machine, simply shutdown or power off the guest virtual machine and edit the .vmx configuration file. Add the following lines, if they don't exist:
tools.syncTime = "0"
time.synchronize.continue = "0"
time.synchronize.restore = "0"
time.synchronize.resume.disk = "0"
time.synchronize.shrink = "0"
time.synchronize.tools.startup = "0"
time.synchronize.tools.enable = "0"
time.synchronize.resume.host = "0"

It helps to enable SSH on the ESXi server and use vi to make changes to the guest .vmx file. After adding the above lines, problem was solved and subsequent clones were easier.

The only task left to be done was to convert the template to a VM, make the same changes and re-template. This was a very fruitful learning experience.

Share:

HOW-TO: Migrate Sickbeard to its Bricky Fork

The demise and take down of most Usenet premium providers left most of its followers with lesser and lesser options by the day. Not only its followers feel the grunt as a result, but its service dependent software as well. One of the end services I use myself is Sickbeard.

Sickbeard is my choice in automated download of TV series that I follow and watch. The best feature is the automatic download of episodes that you program it to automatigically download for you. Another neat feature is it notifies you of this download through your PC, phone or twitter (and other social media) services. But Sickbeard relies heavily on Usenet as it has limited torrent support.

Due to the above limitation, it forked to its bricky counterpart -- Sickbeard with better torrent support. The screenshot below is for the original version of Sickbeard.


I have a Popcorn Hour C-200 (touted as one of the best media players out in the market during its time). The outstanding feature of this media player is it could run Sickbeard -- meaning not only could it play the TV series, it could download and manage them automatically as well. This part was discussed in detail on our previous article on "Install Sickbeard on Popcorn Hour C-200".

The above link is used to install the original main Sickbeard version, the one with limited torrent support. To install the bricky fork, the above "HOW-TO" still applies. Just choose not to start Sickbeard after the install.

It is important (or should I say very important) to have a shell to the C-200 for the next steps to work. This could be done via BusyBox or LTU (Linux Terminal Utilities). Checkout the links on how that is done then follow the procedure below:

[1] Open a terminal connection via PuTTY or another utility. Browse the directory /share/Apps/sickbeard. All the other steps below will discuss about changes to files and directories relative to this path.

[2] Remove the directory .git. Do this so the bricky fork will not conflict with the original midgetspy version of sickbeard. I also removed the file .gitignore but this seems irrelevant. You may opt to remove it in this step.

[3] On the same directory /share/Apps/sickbeard, is the file setup.sh. Look for the line:
git clone git://github.com/midgetspy/Sick-Beard.git SB
.. change it to this line:
git clone git://github.com/bricky/Sick-Beard.git SB

[4] Remove the directory autoProcessTV under /share/Apps/sickbeard. If you don't want to remove it, you may choose to rename it instead. Any arbitrary name aside from the original name will do.

[5] Execute setup.sh on the command line. Either of these commands will work:
/share/Apps/sickbeard/setup.sh install
.. or
cd /share/Apps/sickbeard; ./setup.sh install

[6] Once the git clone is complete, run this:
/share/Apps/AppInit/appinit.cgi start sickbeard

The obvious difference between the two versions is the availability of more torrent search engines for the bricky fork. If you browse to the "Search Providers" portion of the configuration you will see more options for bricky fork than the original.


As seen from the above screenshot, there are more providers available for this fork of Sickbeard. I hope this post helps you get more from Sickbeard.


Share:

INFO: RHEL Cluster -- Luci Installation Error

I have had the chance of administering and maintaining several implementations of Red Hat Cluster, but I never really had the chance to build one from scratch. So a chance presented itself recently and I bumped into several unforgettable experiences along the way. It roused my inquisitive nature and fruitful learnings were gleaned off the obstacles. One of them was with the initial install of luci (and ricci).

The easiest way to configure a Red Hat Cluster is via luci (and ricci), especially for a RHEL Cluster noob like me. I couldn't argue with that statement. It is easier, although I would love to go a little deeper and understand the command line equivalents of the web based configurations done. So I got to install luci after configuring ricci.

To initialize the luci configuration, I ran this command:
[root@vhost ~]# /usr/bin/paster make-config luci /var/lib/luci/etc/luci.ini --no-default-sysconfig --no-install

However, the result was not as expected. And a configuration file was not created. The errors are below:
[root@vhost ~]# /usr/bin/paster make-config luci /var/lib/luci/etc/luci.ini --no-default-sysconfig --no-install
Distribution already installed:
  luci 0.26.0 from /usr/lib/python2.6/site-packages
Traceback (most recent call last):
  File "/usr/bin/paster", line 9, in 
    load_entry_point('PasteScript==1.7.3', 'console_scripts', 'paster')()
  File "/usr/lib/python2.6/site-packages/paste/script/command.py", line 84, in run
    invoke(command, command_name, options, args[1:])
  File "/usr/lib/python2.6/site-packages/paste/script/command.py", line 123, in invoke
    exit_code = runner.run(args)
  File "/usr/lib/python2.6/site-packages/paste/script/appinstall.py", line 68, in run
    return super(AbstractInstallCommand, self).run(new_args)
  File "/usr/lib/python2.6/site-packages/paste/script/command.py", line 218, in run
    result = self.command()
  File "/usr/lib/python2.6/site-packages/paste/script/appinstall.py", line 295, in command
    self.distro, self.options.ep_group, self.options.ep_name)
  File "/usr/lib/python2.6/site-packages/paste/script/appinstall.py", line 234, in get_installer
    'paste.app_install', ep_name)
  File "/usr/lib/python2.6/site-packages/pkg_resources.py", line 2229, in load_entry_point
    return ep.load()
  File "/usr/lib/python2.6/site-packages/pkg_resources.py", line 1947, in load
    if require: self.require(env, installer)
  File "/usr/lib/python2.6/site-packages/pkg_resources.py", line 1960, in require
    working_set.resolve(self.dist.requires(self.extras),env,installer))
  File "/usr/lib/python2.6/site-packages/pkg_resources.py", line 550, in resolve
    raise VersionConflict(dist,req) # XXX put more info here
pkg_resources.VersionConflict: (WebOb 0.9.6.1 (/usr/lib/python2.6/site-packages), Requirement.parse('WebOb>=0.9.7'))

The "python-webob-0.9.6.1-3.el6.noarch" RPM was properly installed but it looks like the package it is looking for is versions higher. As checked, the python-webob package available is already installed.

I also tried several versions of python-webob packages from several known repositories. Only to fail with the same errors above.

It turns out the "python-repoze-who-friendlyform.noarch" package is in conflict with other repositories. When installing luci, install from the base repository only. Disable EPEL and other enabled repositories.

[root@vhost ~]# yum -y install luci
Loaded plugins: fastestmirror, security
Loading mirror speeds from cached hostfile
Setting up Install Process
Resolving Dependencies
--> Running transaction check
---> Package luci.i686 0:0.26.0-37.el6.centos will be installed
--> Processing Dependency: python-repoze-who-friendlyform for package: luci-0.26.0-37.el6.centos.i686
--> Running transaction check
---> Package python-repoze-who-friendlyform.noarch 0:1.0-0.3.b3.el6 will be installed
--> Finished Dependency Resolution

Dependencies Resolved

============================================================================================================
 Package                                 Arch            Version                        Repository     Size
============================================================================================================
Installing:
 luci                                    i686            0.26.0-37.el6.centos           base          553 k
Installing for dependencies:
 python-repoze-who-friendlyform          noarch          1.0-0.3.b3.el6                 base           13 k

Transaction Summary
============================================================================================================
Install       2 Package(s)

Total download size: 566 k
Installed size: 2.2 M
Downloading Packages:
(1/2): luci-0.26.0-37.el6.centos.i686.rpm                                            | 553 kB     00:00 ... 
(2/2): python-repoze-who-friendlyform-1.0-0.3.b3.el6.noarch.rpm                      |  13 kB     00:00 ... 
------------------------------------------------------------------------------------------------------------
Total                                                                       4.9 MB/s | 566 kB     00:00     
Running rpm_check_debug
Running Transaction Test
Transaction Test Succeeded
Running Transaction

  Installing : python-repoze-who-friendlyform-1.0-0.3.b3. [                                           ] 1/2
  Installing : python-repoze-who-friendlyform-1.0-0.3.b3. [##                                         ] 1/2
  ...
  Installing : python-repoze-who-friendlyform-1.0-0.3.b3. [########################################## ] 1/2
  Installing : python-repoze-who-friendlyform-1.0-0.3.b3.el6.noarch                                     1/2 
  Installing : luci-0.26.0-37.el6.centos.i686 [                                                       ] 2/2
  Installing : luci-0.26.0-37.el6.centos.i686 [#                                                      ] 2/2
  ...
  Installing : luci-0.26.0-37.el6.centos.i686 [###################################################### ] 2/2
  Installing : luci-0.26.0-37.el6.centos.i686                                                           2/2 

  Verifying  : luci-0.26.0-37.el6.centos.i686                                                           1/2 
  Verifying  : python-repoze-who-friendlyform-1.0-0.3.b3.el6.noarch                                     2/2 

Installed:
  luci.i686 0:0.26.0-37.el6.centos                                                                          

Dependency Installed:
  python-repoze-who-friendlyform.noarch 0:1.0-0.3.b3.el6                                                    

Complete!
[root@vhost ~]# /usr/bin/paster make-config luci /var/lib/luci/etc/luci.ini --no-default-sysconfig --no-install
Distribution already installed:
  luci 0.26.0 from /usr/lib/python2.6/site-packages
/usr/lib/python2.6/site-packages/tw/core/view.py:223: DeprecationWarning: object.__new__() takes no parameters
  obj = object.__new__(cls, *args, **kw)
Creating /var/lib/luci/etc/luci.ini
Now you should edit the config files
  /var/lib/luci/etc/luci.ini
[root@vhost ~]# service luci start
Adding following auto-detected host IDs (IP addresses/domain names), corresponding to `host.localdomain' address, to the configuration of self-managed certificate `/var/lib/luci/etc/cacert.config' (you can change them by editing `/var/lib/luci/etc/cacert.config', removing the generated certificate `/var/lib/luci/certs/host.pem' and restarting luci):
(none suitable found, you can still do it manually as mentioned above)

Generating a 2048 bit RSA private key
writing new private key to '/var/lib/luci/certs/host.pem'
[  OK  ]
Start luci...
Point your web browser to https://host.localdomain:8084 (or equivalent) to access luci

So after reinstalling the luci package from the base repo (from the ISO itself), I was able to successfully initialize luci and continue with the cluster configuration.


Share:

INFO: Plants VS Zombies 2 FREE!

Were you addicted to "Plants vs Zombies"? Or are you aware that it even exists? If this is the first time you have heard about it, it's about time as the game is free. The game could be downloaded off the apple store for free!

The screenshot below will tell you that I'm not kidding. It is taken today off of my iPhone. It is not often that this game is offerred for free. Right now the old version of the game is not free and costs US$0.99. Not sure how much the new version will be when it sells.


The game has been installed on my iPhone (screenshot below). I haven't played it yet as I'm excited to let everyone know that the game is free.


So what are you waiting for? Download the game for free and try it out for yourself.


Share:

HOW-TO: Monitor Hard Drive Health

If there is one thing I know for sure as a system administrator -- it is disaster strikes when you least expect it. This is true for just about every aspect of the sysad job. But this is likewise very true for life outside the professional arena. Your computer can have a disaster when you least expect it. This is why it is important to monitor your own computer. And if monitoring is not enough, ensure that it alerts you as well.

I decided to post this article due to a recent experience that saved me from what could have been a potentially big headache. I started noticing my computer freezing at odd times when I'm in the middle of doing something. It irritated me a lot of times but I was just busy finishing up some work to really mind the problem. So I ended up ignoring it to focus on more important things that I need to finish.

Just last week my computer froze and it just simply will not respond for a while. The drive activity LED was flashing indicating a busy drive. I wasn't doing anything so initially, I suspected it to be a virus. Nothing suspicious was running on the task manager and it would happen from time to time -- frequent enough to warrant my attention this time.

I had Acronis Drive Monitor (download here) installed before. I simply stopped it from starting since some startup analyzer suggested I disable it. I decided to run it this time.

I was a bit surprised at what I saw as the drive monitor alerted that something was critical about the health of my hard drive. The screenshot below has the details.


As you can see from the screenshot, it rated my drive health at 60%. The S.M.A.R.T. attributes of my drive triggered the drive monitor alerting me of the criticality of the situation.

As checked, the "Reallocation Event Count" on my hard drive was through the roof. Further research on this attribute indicated my drive had a lot of bad sectors (thus the reallocation events). And it indicated the imminent failure of the hard drive. The same drive monitor has the S.M.A.R.T. parameters tab. See below.


As seen from the status, it indicated that my drive was failing. So without further ado, I commissioned another drive and copied the contents of the failing drive to it. The drive monitor saved me from a potentially difficult situation. I wasn't much concerned about losing the hard drive, but more of the data in it.

If you have not installed the Acronis Drive Monitor, download the software and install it on your computer. It is freely available from the Acronis website as indicated above. Just let it run in the background and it will alert you of potential problems before they happen. You will not regret using this software.


Share:

Subscribe for Latest Update

Popular Posts

Post Labels

100gb (1) acceleration (1) acrobat (1) adblock (1) advanced (1) ahci (1) airdrop (2) aix (14) angry birds (1) article (21) aster (1) audiodg.exe (1) automatic (2) autorun.inf (1) bartpe (1) battery (2) bigboss (1) binance (1) biometrics (1) bitcoin (3) blackberry (1) book (1) boot-repair (2) calendar (1) ccleaner (3) chrome (5) cloud (1) cluster (1) compatibility (3) CPAN (1) crypto (3) cydia (1) data (3) ddos (1) disable (1) discount (1) DLNA (1) dmidecode (1) dns (7) dracut (1) driver (1) error (10) esxi5 (2) excel (1) facebook (1) faq (36) faucet (1) firefox (17) firewall (2) flash (5) free (3) fun (1) gadgets (4) games (1) garmin (5) gmail (3) google (4) google+ (2) gps (5) grub (2) guide (1) hardware (6) how (1) how-to (45) huawei (1) icloud (1) info (4) iphone (7) IPMP (2) IPV6 (1) iscsi (1) jailbreak (1) java (3) kodi (1) linux (28) locate (1) lshw (1) luci (1) mafia wars (1) malware (1) mapsource (1) memory (2) mikrotik (5) missing (1) mods (10) mouse (1) multipath (1) multitasking (1) NAT (1) netapp (1) nouveau (1) nvidia (1) osmc (1) outlook (2) p2v (2) patch (1) performance (19) perl (1) philippines (1) php (1) pimp-my-rig (9) pldthomedsl (1) plugin (1) popcorn hour (10) power shell (1) process (1) proxy (2) pyspark (1) python (13) qos (1) raspberry pi (7) readyboost (2) reboot (2) recall (1) recovery mode (1) registry (2) rename (1) repository (1) rescue mode (1) review (15) right-click (1) RSS (2) s3cmd (1) salary (1) sanity check (1) security (15) sendmail (1) sickgear (3) software (10) solaris (17) squid (3) SSD (3) SSH (9) swap (1) tip (4) tips (42) top list (3) torrent (5) transmission (1) treewalk (2) tunnel (1) tweak (4) tweaks (41) ubuntu (4) udemy (6) unknown device (1) updates (12) upgrade (1) usb (12) utf8 (1) utility (2) V2V (1) virtual machine (4) VirtualBox (1) vmware (14) vsphere (1) wannacry (1) wifi (4) windows (54) winpe (2) xymon (1) yum (1) zombie (1)

RANDOM POSTS