TWEAK: Prefer Wired over Wireless Connection in Windows 7

How are you connected to the network or the intranet? Wired? Wifi? Both? Nowadays, it is no longer uncommon to find laptops or notebooks being used in modern offices. These devices are equipped to both be a workstation and a mobile platform at the same time. Its portability with matching punching and crunching power could give most desktops a run for its money.

Going back to the question above, how about if the laptop is connected wired and wireless to the local area network? Which connectivity takes precedence? The answer to this question seems insignificant.. but try transferring large files across the network -- you will then start to notice the difference in speed.

The previous generation networks were 100Mbps for wired (Fast Ethernet) and 54Mbps for wifi (Wireless G) -- the gap is a bit close. Today's generation of networks are 1Gbps for wired (Gigabit Ethernet) and 300Mbps for wifi (Wireless N) where the disparity is every evident. So when connected at the same time, it is important to prefer the faster Gigabit Ethernet over Wireless N.

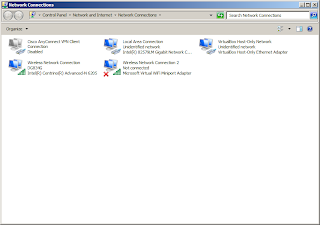
To configure this to be the default behavior, open the Network Connections. You can get to this in a different number of ways. One, Start -> Search programs and files for "Network Connections" and open "View Network Connections" (under Control Panel). Another would be to right click on the network access icon on the system tray -> Open Network and Sharing Center -> Change adapter settings. Either of the above will get you to the window similar to below.

Network Connections


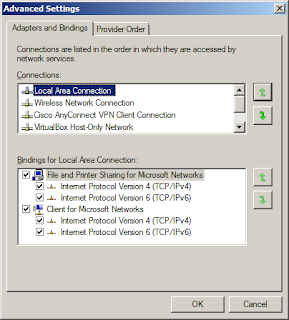
Press ALT to show the menu's and select Advanced -> Advanced Settings..


Network Advanced Settings


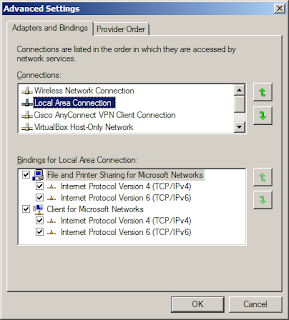
As you can see, the default behavior is Wireless Network Connection first, before Local Area Connection. If you notice the line above the list box, it says "Connections are listed in the order in which they are accessed by network services." The default preference is the wireless connection, which is usually the slower more unstable connection.

Notice too the arrows right next to the list box. From there, you can set the preferences. You can move Local Area Connection on top of the list so that the faster, more stable wired connection gets preference over wireless. This way, whenever both connections are present, wired gets priority over wireless.

Network Advanced Settings


Experiment on your end and see the difference in performance. In my experience, I got about 8.3MB/s copy speed over Wireless N compared to about 11MB/s on Fast Ethernet. Even the newer fatter wireless bandwidth could not cope with Fast Ethernet speeds in throughput. Gigabit finished quickest at about 54MB/s but this may be the harddrive limiting the speed.

I also believe this should be the default setting right out-of-the-box. Not sure why Microsoft configured Windows 7 to behave this way. Given that, I'm inclined to say Windows XP would have a similar behavior and a likewise similar tweak.

Share:

TWEAK: Faster Remote Desktop Connection

Remote Desktop Connection (or RDP in the sysad slang) is essential to administration of Windows-based machines. With the widespread adoption and migration to Windows 7, one could not help but notice the slowdown of RDP. The difference in performance between XP and Windows 7 is a bit broad.

This is made even more complex by most office networks still on the fast ethernet (or 100MBps) infrastructure. Or so I thought.. Even at gigabit Ethernet, the performance disparity is still huge. Let's tweak it then to raise the performance bar.

Making RDP perform faster is a two-fold tweak -- a tweaking on the network parameters and tweaking on the remote desktop application. I'd recommend reading and understanding the entire procedure before trying it out.

Network. The following changes to the network parameters improve performance of the network as a whole, not just limited to RDP. Open a command prompt with elevated privilege and run the following commands.

netsh interface tcp set global autotuninglevel=highlyrestricted
netsh interface tcp set global rss=disabled

In order to get a pre-tweak setting of the network parameters, try to run "netsh interface tcp show global" prior to executing the commands above. The same command can be used to validate the post-tweak settings. On my Windows 7 workstation, here is the post-tweak setting (see screenshot).

Faster Remote Desktop Connection

Remote Desktop Connection. Another way to tweak RDP for better performance is to remove most of the eye-candy that comes with Windows. Launch the Remote Desktop Connection application (or execute mstsc.exe on the Run box).

Before connecting to anything, click on options at the lower left corner of the RDP application window. Next, click the "Display" tab. Slide the Display Configuration to a smaller size. Under Colors, select "High Color (16 bit)" from the dropdown.

Faster Remote Desktop Connection

Now click the "Experience" tab and uncheck all of the settings to optimize performance.. Or simply select "Modem (56 Kbps)" from the dropdown menu. Yes, select Modem (56 Kbps) even though your LAN speed is faster and way better than 56 Kbps.

Faster Remote Desktop Connection

Now try to connect to a host using RDP and see the difference in speed and performance.
Share:

TWEAK: Performance Tip -- Exclude from AV Scan

When you have been using Windows-based computers long enough you will notice that performance degrades over time. There are a lot of causes to this and disk fragmentation is one of them. But little do users know that what contributes a lot to the degradation is the presence of the anti-virus. Add fragmentation to the mix and the performance decline worsens.

For an average user, however, running without an anti-virus is synonymous with suicide. The performance hit that's a consequence of the anti-virus is more acceptable than having to re-install the OS and recover the files. Anti-virus are created to behave with paranoia as the foremost consideration. And it will be very paranoid -- it will scan every file accessed; it will scan memory; it will scan as you boot; it will scan even when you're not doing anything!

Not everything that is in your computer can be infected by a virus. So it is wise to make your anti-virus a little bit smarter than it was programmed to be. What does this mean? It means, exclude files you know to be safe from being scanned. Plain text files are perfect candidates for this. Anything that is text-based (and don't automatically execute) are generally safe. Their extensions are .txt, .log and the like.

Aside from text-based files, multimedia files like mp3, avi, mp4 and mkv are generally safe, especially if they came from trusted sources. It is wise then to make the anti-virus skip them. Also, the anti-virus is not that friendly with Windows page file. It scans that too! Your computer system can perform better if that file is skipped from being scanned.

McAfee. With McAfee, this configuration is in the VirusScan Console under Tasks > On Access Scanner Properties.

Performance Tip: Exclude from AntiVirus Scan

Click on "All Processes" and get to the "Exclusions" tab. There is an Exclusions button that will allow you to control the behavior of the On-Access Scanner module.

Performance Tip: Exclude from AntiVirus Scan

ESET NOD32. With NOD32, this configuration can be set by pressing "F5" thus opening the Advanced Configuration menu.

Performance Tip: Exclude from AntiVirus Scan

Then go to Computer > Antivirus and antispyware > Real-time file system protection. Click on the Setup button and include all file system extensions.


Performance Tip: Exclude from AntiVirus Scan

For directory exclusions, go to Computer > Antivirus and antispyware > Exclusions and put the paths to be excluded from on access scans.

Performance Tip: Exclude from AntiVirus Scan

I get good performance from my computer when I set it up this way. There is always a drawing of lines between security and functionality. In the end, what matters is for you have to have your say in the matter.

Share:

FAQ: clock_gettime Error Compiling Xymon Client

"There’s No Such Thing As A Silly Question" -- does the cliche sound familiar? In this part of pimp-my-rig reloaded, technical questions are answered. Mail them to me and I will post the answers here. If you have a better answer, by all means share it with us.

Q. I recently received an email from a previous colleague asking for help regarding errors in compiling XYmon client on a machine running Fedora 13. Yes, the host is a bit old but since the application running is mission critical downtime is not acceptable and putting it under the microscope with a xymon client is a well-thought move.

To give you a better picture of the error, here are a few lines of the xymon client compile, after running "make -s".

(other lines snipped for brevity)
...
timefunc.c: In function âtimespec_textâ:
timefunc.c:140: warning: pointer targets in assignment differ in signedness
timefunc.c:187: warning: pointer targets in passing argument 2 of âaddtobufferâ differ in signedness
/var/tmp/xymon-4.3.7/include/../lib/strfunc.h:16: note: expected âchar *â but argument is of type âunsigned char *â
../lib/xymonclient.a(timefunc-client.o): In function `getntimer':
/var/tmp/xymon-4.3.7/lib/timefunc.c:67: undefined reference to `clock_gettime'
../lib/xymonclient.a(timefunc-client.o): In function `gettimer':
/var/tmp/xymon-4.3.7/lib/timefunc.c:55: undefined reference to `clock_gettime'
collect2: ld returned 1 exit statustfc
make[1]: *** [../client/xymon] Error 1
make: *** [common-client] Error 2

So as you can see, the error is fatal and compilation will not complete successfully. I have been through this error before and made notes of the things done to resolve.

A. Xymon was built to take into account regular expressions on things being monitored -- log files, directory sizes, etc, etc. These files can be monitored by classes and/or pattern matches that can be defined by regular expressions. And for xymon to function properly, the pcre-devel (PERL Compatible Regular Expressions) rpm has to be installed.

So install pcre-devel via yum.

[root@host /var/tmp] yum -y install pcre-devel
Loaded plugins: fastestmirror, presto, refresh-packagekit
Loading mirror speeds from cached hostfile
 * fedora: mirror.cse.iitk.ac.in
 * updates: mirror.cse.iitk.ac.in
Setting up Install Process
Resolving Dependencies
--> Running transaction check
---> Package pcre-devel.i686 0:7.8-3.fc12 set to be installed
--> Finished Dependency Resolution

Dependencies Resolved

================================================================================
 Package                   Arch         Version             Repository     Size
================================================================================
Installing:
 pcre-devel                i686         7.8-3.fc12          fedora        278 k

Transaction Summary
================================================================================
Install       1 Package(s)

Total download size: 278 k
Installed size: 0.9 M
Downloading Packages:
Setting up and reading Presto delta metadata
Processing delta metadata
Package(s) data still to download: 278 k
(1/1): pcre-devel-7.8-3.fc12.i686.rpm                    | 278 kB     00:02     
--------------------------------------------------------------------------------
Total                                           271 kB/s | 278 kB     00:02     

Running rpm_check_debug
Running Transaction Test
Transaction Test Succeeded
Running Transaction
  Installing     : pcre-devel-7.8-3.fc12.i686 [###########################] 1/1

Installed:
  pcre-devel.i686 0:7.8-3.fc12

Complete!

Once pcre-devel is installed, xymon client will compile with a few warnings that can be ignored. Do a "make install" after compile completes. Run the xymon client via "/home/xymon/client/runclient.sh start". The path /home/xymon is the path chosen when running "./configure.client" (or "./configure -client").

This step is optional, but I found that it solves some issues with other versions of Fedora/RedHat based systems. Before running ./configure, define the environment variable LIBRTDEF. Do it with command "export LIBRTDEF=-lrt"

In running xymon client, pcre-devel is more often than not a major dependency. So better install it before doing the compile.

Share:

HOW-TO: Determine if the SSD Supports TRIM

The gigantic technological leap SSD offered than conventional hard drives is nothing compared to the upgrade gap between a next generation processor or video card. It is bounds and leaps greater. Since its introduction over a year ago, SSDs have always been the talk of the town when it comes to raw performance.

This technology is, however, dependent on another technology that has to be supported by the operating system -- TRIM. Trim is the difference that makes conventional storage manage data better than SSDs. When data is written to a "virgin" cell of an SSD, it is a straight write but if the cell to be written has old junk (deleted data) the undergoing process is a read-modify-write. Imagine a heavily fragmented drive when a delete is performed, performance would suffer. And this questions the long-term performance of the SSD.

Windows 7 is where trim got introduced. The trim command reorganizes data to be written and also deletes junk data existing on the NAND cell. It scrubs junked data when a delete is performed so that when a write command is subsequently performed on a NAND cell, it is always "already" clean.

How then do you determine if your drive supports TRIM? You can use the software CrystalDiskInfo to determine and ensure that the SSD supports trim. Download the software from its webpage. I used the portable zipped version of the software.

This is how CrystalDiskInfo looks like (refer to screenshot).

How To Determine if the SSD Supports TRIM

As seen from the screenshot, the OCZ Vertex3 60GB SSD supports the TRIM feature. You may then tweak the OS to take advantage of the trim feature on the SSD.

On Windows 7, the command to use is "fsutil.exe behavior set DisableDeleteNotify 0". The feedback will be "DisableDeleteNotify = 0" (as seen below).

How To Determine if the SSD Supports TRIM

If your SSD supports TRIM, better make use of it so long term performance of your SSD will not suffer. Windows 7 supports trim, so might as well make it the default operating system. Here's a guide to migrate from the conventional drive to the SSD.

Share:

Subscribe for Latest Update

Popular Posts

Post Labels

100gb (1) acceleration (1) acrobat (1) adblock (1) advanced (1) ahci (1) airdrop (2) aix (14) angry birds (1) article (21) aster (1) audiodg.exe (1) automatic (2) autorun.inf (1) bartpe (1) battery (2) bigboss (1) binance (1) biometrics (1) bitcoin (3) blackberry (1) book (1) boot-repair (2) calendar (1) ccleaner (3) chrome (5) cloud (1) cluster (1) compatibility (3) CPAN (1) crypto (3) cydia (1) data (3) ddos (1) disable (1) discount (1) DLNA (1) dmidecode (1) dns (7) dracut (1) driver (1) error (10) esxi5 (2) excel (1) facebook (1) faq (36) faucet (1) firefox (17) firewall (2) flash (5) free (3) fun (1) gadgets (4) games (1) garmin (5) gmail (3) google (4) google+ (2) gps (5) grub (2) guide (1) hardware (6) how (1) how-to (45) huawei (1) icloud (1) info (4) iphone (7) IPMP (2) IPV6 (1) iscsi (1) jailbreak (1) java (3) kodi (1) linux (28) locate (1) lshw (1) luci (1) mafia wars (1) malware (1) mapsource (1) memory (2) mikrotik (5) missing (1) mods (10) mouse (1) multipath (1) multitasking (1) NAT (1) netapp (1) nouveau (1) nvidia (1) osmc (1) outlook (2) p2v (2) patch (1) performance (19) perl (1) philippines (1) php (1) pimp-my-rig (9) pldthomedsl (1) plugin (1) popcorn hour (10) power shell (1) process (1) proxy (2) pyspark (1) python (13) qos (1) raspberry pi (7) readyboost (2) reboot (2) recall (1) recovery mode (1) registry (2) rename (1) repository (1) rescue mode (1) review (15) right-click (1) RSS (2) s3cmd (1) salary (1) sanity check (1) security (15) sendmail (1) sickgear (3) software (10) solaris (17) squid (3) SSD (3) SSH (9) swap (1) tip (4) tips (42) top list (3) torrent (5) transmission (1) treewalk (2) tunnel (1) tweak (4) tweaks (41) ubuntu (4) udemy (6) unknown device (1) updates (12) upgrade (1) usb (12) utf8 (1) utility (2) V2V (1) virtual machine (4) VirtualBox (1) vmware (14) vsphere (1) wannacry (1) wifi (4) windows (54) winpe (2) xymon (1) yum (1) zombie (1)

RANDOM POSTS