ARTICLE: SBSettings -- Manage iPhone Settings Better

There are numerouse reasons why people jailbreak or root their smart phones. One of the many reasons is -- to use applications they can't or aren't authorized to use otherwise. I share this sentiment with the many. And just like any tool, there are advantages as well as disadvantages. Just like the trade-off between functionality and security, the choice should be left to you, not made for you. After all, you were the one who paid for the device.

Let's discuss the jailbreak of the iPhone in particular. Regardless of your reasons, I know you are interested in the jailbreak to make more use of your iPhone, to install an application that makes more efficient use of the device. The particular application I'm referring to is SBSettings. If you have a jailbroken iPhone this application can be installed via Cydia.

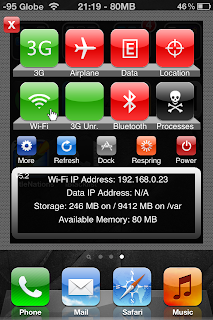
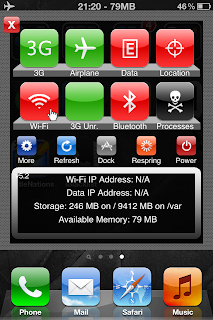
SBSettings can turn communication features on or off by tapping the icon. A red icon means the feature is turned off while the green icon means the feature is turned on. The screenshot below best describes the state of the communication features.

SBSettings Screenshot

As seen from above, SBSettings is a one-stop shop to turn on or off 3G, wifi, bluetooth or airplane mode. Otherwise, you would have to scroll through different screens to get all these done.

Airplane Mode

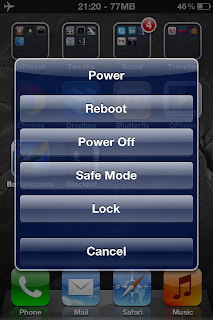
From the above screen you may power off or reboot the device as well. It can also be used to re-spring the device. So, SBSettings is a simple tool to get to many functions at once.

Power Options

Tapping the lowest right icon (Processes), lets you close applications. Think of it as your simplified task manager. As you can see, there are a lot of functionality SBSettings can offer without too much hassle.

iPhone Task Manager

I set my SBSettings to launch on a three-finger pinch. But it can be launched from different key stroke combinations.

And, did I mention it's free? So if you decide to jailbreak your iPhone, SBSettings is the next app to install.

Share:

FAQ: iPhone and "No Service" Problem

Q. I have an iPhone but it often displays "No Service". I have tried to switch to airplane mode and back but no go.

The only solution that works for me is to bounce the phone or power cycle it. This is the only solution that works but is very painful especially when you need to use the phone right away.

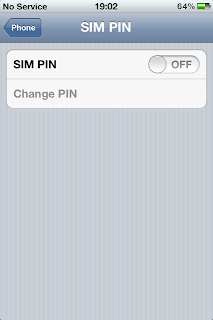
A. Chances are your phone has this display on screen (see below).


I have had my share of quarrels with the service provider and have been issued a different SIM card but that has not resolved anything. Not a single week passes that I don't get this "No Service" plague. As I'm running out of suspects, I couldn't help but point to the phone as the likely cause.

This problem can be attributed to the switching between 2G and 3G modes which the iPhone has difficulty handling. Could also be a bug in the iOS software. Like most of you I'm using an iPhone 4S with the not so latest iOS 5.1.1. Upgrading to iOS6 would be disastrous but that is an entirely different issue altogether.

To resolve this "No Service" issue, here's the workaround that I've done: turn off the SIM PIN. To do this, you need to go to Settings » Phone » SIM PIN » (tap) SIM PIN OFF.


After putting this setting, the "No Service" displayed on the phone recovered to regain the carrier signal and the phone could be used for its primary purpose of calling and sending SMS.

I have had this setting for over a couple of weeks now and the "No Service" phenomenon has not returned (and hopefully will not).

Turning off the SIM PIN is not very secure but that is what makes the phone "usable". I have been on the hunt for a working solution to this problem and found that many share the same problem or something similar. While this may not solve everyone's issues, I'm hoping that it will work for many.

Share:

FAQ: Logged on With a Temporary Profile

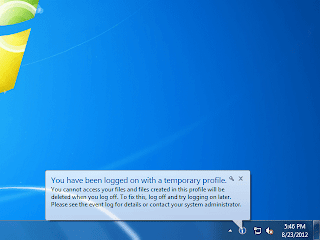
Q. For some strange reason, you get this notification from the system tray saying "You have been logged on using a temporary profile." All your desktop icons are gone, including your profile settings. With all this, you got the presence of mind to check your email and it is not even configured.

Don't panic when you see this. You old profile is still intact and retrievable.

A. Before starting, confirm that the notification is similar to the one below.

You have been logged on using a temporary profile

When you see this happen, restart your PC to release the locks on your profiles. This is really optional but Windows doesn't always release the files (or hives) of a profile, so just to be safe execute a reboot.

[1] Log on with the Administrator account (or another account with Administrative privileges).

[2] Delete the directory C:\Users\TEMP.

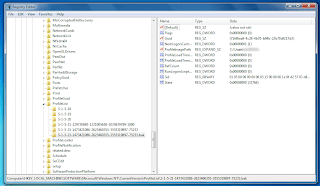
[3] Open the registry editor and browse this path: "HKEY_LOCAL_MACHINE\SOFTWARE\Microsoft\WindowsNT\CurrentVersion\ProfileList".

Here you will be seeing the two (2) similar SIDs. The SID will be the same except the other has ".bak" trailing it. Delete this branch of the registry.

NOTE:
To verify, check the value "ProfileImagePath" of the SIDs, they should be pointing to the same directory.

ProfileList

[4] Restart once again and then you're done. The original profile has been recovered.

Hope this helps.

Share:

HOW-TO: Sync Calendar to iPhone (without iTunes)

Let's face it, many of you can't have iTunes installed on your work computers -- even to the point where the act of installing it will cost you your job. Some don't like them in their home computer, simply because it is one big piece of bloat. I share the same sentiment. The software often comes with added software that run together with it.

I have setup a virtual machine for iTunes purposes. That way if I need it to run, I just fire up the virtual box and use the software's function. This way it doesn't introduce vulnerabilities to my system. But that may be cumbersome to some. So how do you sync your calendar to your phone? Or sync the phone entirely to your machine without iTunes?

One of the ways to do this is via iCloud. iCloud can sync all of the contents of your iPhone or you could simply select particular data to sync. Download from the iCloud webpage.

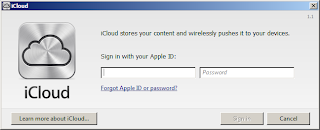
Upon completion of the download, launch the software. It will ask for you to login. Use your apple ID credentials.

iCloud Sign In

Next, tick on the data you need to sync. For me, I only sync my calendar to the iPhone. So I simply tick "Calendars & Tasks with Outlook". This option uses the iCloud storage of your apple ID, so you can also track its usage from the iCloud interface.

Select Information to Sync

On your phone, make sure that the iCloud calendar is checked or selected. When you see a corresponding check mark next to the iCloud calendar, you should be all set. After a while you should be seeing calendar entries getting pushed to your iPhone. If you have set other iDevices you own to sync with iCloud, the calendar entries from Outlook will sync to those devices as well.

The downside to this? You lose the ability to sync the phone to your computer since it is now using iCloud for backup.

Share:

HOW-TO: Confirm Free Memory Slots on your Server (Linux)

Often times, we system administrators let our fingers do the walking.. sometimes, literally. This is true for just about every activity involving administration. The only time when the system administrator meets face to face with the physical hardware they administer is when they need to replace failed parts or when upgrading hardware.

Upgrading though needs a few pre-requisites that need to be planned out in advance. Memory upgrades being an example, one needs to know what kind of memory is installed on the server, and if there are free memory slot(s). The last mentioned being a very important tidbit of information. A memory upgrade is not possible without free memory slots. This is a major gotcha that you need to avoid.

In the Linux world, this can be done in many ways. Let's discuss two of the more commonly used commands -- dmidecode and lshw.

Using dmidecode. Almost every linux box I have administered came with dmidecode installed by default. It is a rare encounter to find a box without dmidecode installed.

Launch a command terminal and run "sudo dmidecode --type memory". Running dmidecode by itself will spew out a lot of information regarding your machine. Putting the arguments "--type memory", singles out memory devices, keeping the needed info only.

Another argument that will limit the output to just memory listing is "-t 17". These commands will be showing a similar output as below.

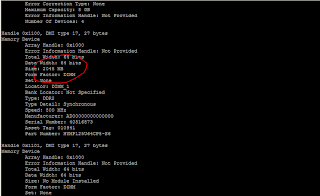
dmidecode memory slot populated

As you can see from the above example, DIMM Slot #1 is populated with a 2GB DDR2-800 module. Even the part number and serial of the memory module is detected.

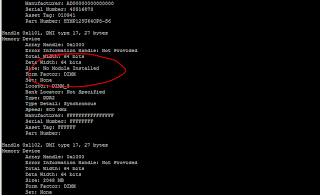
How about when the slot is empty? Take a look at the screenshot below for the output of dmidecode when a slot is empty.

dmidecode memory slot empty

Using lshw. Another very useful command is lshw. It will display all the installed hardware on the system. And just like dmidecode, you may choose to run it only to display or single out memory devices.

Launch a command prompt and run "sudo lshw". Adding "-C memory" or "-class memory" will limit the display to just the memory slots and modules.

lshw class memory

There you go, plan the memory upgrades properly given the above commands. They ensure not only having empty memory slots to fill, but also display the proper memory module to install. Given the above information, you can never go wrong with the upgrade.

Share:

Subscribe for Latest Update

Popular Posts

Post Labels

100gb (1) acceleration (1) acrobat (1) adblock (1) advanced (1) ahci (1) airdrop (2) aix (14) angry birds (1) article (21) aster (1) audiodg.exe (1) automatic (2) autorun.inf (1) bartpe (1) battery (2) bigboss (1) binance (1) biometrics (1) bitcoin (3) blackberry (1) book (1) boot-repair (2) calendar (1) ccleaner (3) chrome (5) cloud (1) cluster (1) compatibility (3) CPAN (1) crypto (3) cydia (1) data (3) ddos (1) disable (1) discount (1) DLNA (1) dmidecode (1) dns (7) dracut (1) driver (1) error (10) esxi5 (2) excel (1) facebook (1) faq (36) faucet (1) firefox (17) firewall (2) flash (5) free (3) fun (1) gadgets (4) games (1) garmin (5) gmail (3) google (4) google+ (2) gps (5) grub (2) guide (1) hardware (6) how (1) how-to (45) huawei (1) icloud (1) info (4) iphone (7) IPMP (2) IPV6 (1) iscsi (1) jailbreak (1) java (3) kodi (1) linux (28) locate (1) lshw (1) luci (1) mafia wars (1) malware (1) mapsource (1) memory (2) mikrotik (5) missing (1) mods (10) mouse (1) multipath (1) multitasking (1) NAT (1) netapp (1) nouveau (1) nvidia (1) osmc (1) outlook (2) p2v (2) patch (1) performance (19) perl (1) philippines (1) php (1) pimp-my-rig (9) pldthomedsl (1) plugin (1) popcorn hour (10) power shell (1) process (1) proxy (2) pyspark (1) python (13) qos (1) raspberry pi (7) readyboost (2) reboot (2) recall (1) recovery mode (1) registry (2) rename (1) repository (1) rescue mode (1) review (15) right-click (1) RSS (2) s3cmd (1) salary (1) sanity check (1) security (15) sendmail (1) sickgear (3) software (10) solaris (17) squid (3) SSD (3) SSH (9) swap (1) tip (4) tips (42) top list (3) torrent (5) transmission (1) treewalk (2) tunnel (1) tweak (4) tweaks (41) ubuntu (4) udemy (6) unknown device (1) updates (12) upgrade (1) usb (12) utf8 (1) utility (2) V2V (1) virtual machine (4) VirtualBox (1) vmware (14) vsphere (1) wannacry (1) wifi (4) windows (54) winpe (2) xymon (1) yum (1) zombie (1)

RANDOM POSTS