ARTICLE: Unattended Windows XP Installation

Slipstreaming Service Pack 3 is a fairly simple and straight-forward task to do. With just a few strokes of the keyboard, slipstreaming is done. The distribution folder can now be used to install on a new machine Windows™ XP Professional with Service Pack 3 integrated.

However, a more advanced installation can be done. Providing default answers to the common questions the installation steps would ask. This way, routinary inputs from the user are skipped during install and an answer file could be used to provide them to the installation wizard -- the unattended install.

From the Microsoft™ website, download the SP3 Deployment Tools (filename: deploy.cab, md5 checksum 7f95cc11fed63e35ce93cc77380957ee). It contains a file "SETUPMGR.EXE" which will create an answer file based on the answers given to the wizard. Extract the file and run it.. (follow the snapshots)


Tick "Create New"..


Tick "Unattended setup"..


Select "Windows XP Professional"..


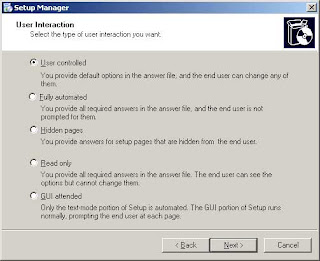
Select "User controlled" or "Hidden Pages". Once tested out the answer file can be modified to "Fully automated".


Next, select "Setup from a CD", as the answer file will be used in a CD later.


Then, accept the EULA and start filling out the necessary information for the default answers to the installation. If skipped, the install wizard will ask for the information during the GUI set-up of Windows™. This is why "Fully automated" is not selected as the default user interaction in the previous page of the setup manager.

If you are sure on the data to be entered, make sure to fill-up the required fields and select "Fully automated" as the user interaction.


Save the file as "unattend.txt". Remember where it is located as it is important for later use. Save it in a directory where it is easy to find, like drive "C:\".


Since we are to create an unattended CD installer, copy "unattend.txt" as "winnt.sif" to the directory "C:\XPCD\i386". The directory C:\XPCD, is assumed to be the directory where the contents of the original Windows XP install CD was copied to.

Re-Create the Install CD. Create the image of the install CD using either cdimage.exe or oscdimg.exe. The binaries can be taken from the Windows OEM Pre-installation Kit CD.
cdimage -l XPCD -b etfsboot.com -n -h C:\XPCD XPCD.iso

After creating the install CD image, XPCD.iso can be burned to a blank CD. To ensure that the install CD is working without hitch, installation can be tried on a virtual machine prior to finally burning it to a blank CD.

Share:

Subscribe for Latest Update

Popular Posts

Post Labels

100gb (1) acceleration (1) acrobat (1) adblock (1) advanced (1) ahci (1) airdrop (2) aix (14) angry birds (1) article (21) aster (1) audiodg.exe (1) automatic (2) autorun.inf (1) bartpe (1) battery (2) bigboss (1) binance (1) biometrics (1) bitcoin (3) blackberry (1) book (1) boot-repair (2) calendar (1) ccleaner (3) chrome (5) cloud (1) cluster (1) compatibility (3) CPAN (1) crypto (3) cydia (1) data (3) ddos (1) disable (1) discount (1) DLNA (1) dmidecode (1) dns (7) dracut (1) driver (1) error (10) esxi5 (2) excel (1) facebook (1) faq (36) faucet (1) firefox (17) firewall (2) flash (5) free (3) fun (1) gadgets (4) games (1) garmin (5) gmail (3) google (4) google+ (2) gps (5) grub (2) guide (1) hardware (6) how (1) how-to (45) huawei (1) icloud (1) info (4) iphone (7) IPMP (2) IPV6 (1) iscsi (1) jailbreak (1) java (3) kodi (1) linux (28) locate (1) lshw (1) luci (1) mafia wars (1) malware (1) mapsource (1) memory (2) mikrotik (5) missing (1) mods (10) mouse (1) multipath (1) multitasking (1) NAT (1) netapp (1) nouveau (1) nvidia (1) osmc (1) outlook (2) p2v (2) patch (1) performance (19) perl (1) philippines (1) php (1) pimp-my-rig (9) pldthomedsl (1) plugin (1) popcorn hour (10) power shell (1) process (1) proxy (2) pyspark (1) python (13) qos (1) raspberry pi (7) readyboost (2) reboot (2) recall (1) recovery mode (1) registry (2) rename (1) repository (1) rescue mode (1) review (15) right-click (1) RSS (2) s3cmd (1) salary (1) sanity check (1) security (15) sendmail (1) sickgear (3) software (10) solaris (17) squid (3) SSD (3) SSH (9) swap (1) tip (4) tips (42) top list (3) torrent (5) transmission (1) treewalk (2) tunnel (1) tweak (4) tweaks (41) ubuntu (4) udemy (6) unknown device (1) updates (12) upgrade (1) usb (12) utf8 (1) utility (2) V2V (1) virtual machine (4) VirtualBox (1) vmware (14) vsphere (1) wannacry (1) wifi (4) windows (54) winpe (2) xymon (1) yum (1) zombie (1)

Blog Archives

RANDOM POSTS