TWEAK: Enable Concurrent Desktop Connections (Windows 7 SP1)

Concurrent desktop sessions or connections are only available with Server versions of Windows. On desktops, opening Remote Desktop session kicks the current user off the console session. That behavior is not desired but with today's powerful desktops, your Windows 7 machine can cater to multiple remote desktop connections or some call this concurrent desktop sessions.

Please note that doing this voids your Windows 7 license and it could render your desktop unusable. Make sure to have a backup of your desktop before trying the procedure yourself. Like always, I strongly advise that you read through the procedure thoroughly before trying things out.

Before making this post, I have made sure that it works. I use it on my home desktop running Windows 7 x64 Ultimate.

Here goes.

Download the files required from the MissingRemote page. The procedure I followed is also found in this page. In order to download the files, registration is required. Likewise, you can also google for "W7-SP1-RTM-RDP-v4", and you will find the files required.

Extract the files and open a command prompt (as Administrator) on the path where the files are extracted. You will know that the command prompt is running "as Administrator" if you find the word "Administrator" on the title block of the command window that opens. Or you may right-click on the executable script "install.cmd" on the extract path and run it "as Administrator". You will see a similar window as below.

Enable Concurrent Desktop Connections (Windows 7 SP1)

With whatchanged.exe, I monitored the changes made to my desktop in order to be able to revert it back in the future. Whatchanged.exe logged significant changes in the registry (as you can see from the screenshot above). You may find those on the directory where whatchanged.exe is located.

Once this is done, you can now connect via Remote Desktop to the tweaked desktop and the console session will not be kicked off. This can be further tweaked by allowing concurrent sessions of the same user without passwords. This is useful since on most desktops are configured for automatic login and most users don't use a password with their associated usernames.

You will have to open a registry editor and browse to the registry key HKLM\SYSTEM\CurrentControlSet\Control\Lsa. Look for the dword "LimitBlankPasswordUse" and change the value to "0" (it is set by the install.cmd script to 1).

Likewise for concurrent sessions of the same user, open registry key HKLM\SYSTEM\CurrentControlSet\Control\Terminal Server. Look for the dword "fSingleSessionPerUser" and change the value to "0" (the value set by the install.cmd script is 1).

Now you can execute a remote desktop connection to the tweaked desktop without password on your passwordless account.

Share:

FAQ: Error Resizing a Logical Volume in AIX

"There’s No Such Thing As A Silly Question" -- does the cliche sound familiar? In this part of pimp-my-rig reloaded, technical questions are answered. Mail them to me and I will post the answers here. If you have a better answer, by all means share it with us.

The beauty of a volume manager is that the backing device, or meta device as what other operating systems would call it, is made independent from the operating system. The storage device itself is controlled by another layer that is put in place by the volume manager. Thereby, the operating system does not have direct control over this storage. This way the volume group and its underlying logical volumes can be resized on demand.

Several operating systems implement this kind of obscurity including but not limited to Linux and Unix. Today we take a look at this functionality in AIX. However, resizing volumes sometimes has its own set of headaches and we need to be prepared to get around the configuration and the issues encountered each time.

Q. A colleague was trying to resize a logical volume since the application has demanded increased disk space and more breathing room. However, what he thought was a simple change to execute resulted in an error. And thus opened additional learning opportunities for us both. The change and its error was below:

root@host:/root => chfs -a size=+24G /dev/appdata01lv
0516-787 extendlv: Maximum allocation for logical volume appdata01lv
        is 3804.
root@host:/root => lslv appdata01lv
LOGICAL VOLUME:     appdata01lv            VOLUME GROUP:   appvg
LV IDENTIFIER:      00c175f4004c00635401257a0b3fe3.9 PERMISSION:     read/write
VG STATE:           active/complete        LV STATE:       opened/syncd
TYPE:               jfs2                   WRITE VERIFY:   off
MAX LPs:            3804                   PP SIZE:        32 megabyte(s)
COPIES:             1                      SCHED POLICY:   parallel
LPs:                3804                   PPs:            3804
STALE PPs:          0                      BB POLICY:      relocatable
INTER-POLICY:       maximum                RELOCATABLE:    yes
INTRA-POLICY:       middle                 UPPER BOUND:    1024
MOUNT POINT:        /mount/point/info      LABEL:          /label/has/been/hidden
MIRROR WRITE CONSISTENCY: on/ACTIVE
EACH LP COPY ON A SEPARATE PV ?: yes
Serialize IO ?:     NO
DEVICESUBTYPE : DS_LVZ
COPY 1 MIRROR POOL: None
COPY 2 MIRROR POOL: None
COPY 3 MIRROR POOL: None

A. This change can be done online without losing data nor incurring any downtime. And that is the beauty of a volume manager.

As seen from the output of the commands above, he was trying to add 24GB of space to an existing volume "appdatal01lv" but the logical volume itself seems to deny the adding of additional space to it saying that the "Maximum allocation for logical volume appdata01lv" has been hit.

He got a bit stuck here for a bit, while I was reviewing my notes from changes that I executed before. I knew I had hit this roadblock before.

From a previous change I implemented, I modified the property "MAX LPs" for the target logical volume before adding space to that volume. That step, though sometimes no longer necessary, was missing in his procedure and this time it is not optional.

We implemented the additional step to his procedure and it executed with success.

root@host:/root => chlv -x 7500 appdata01lv
root@host:/root => chfs -a size=+24G /dev/appdata01lv
Filesystem size changed to 299630592
root@host:/root => lslv appdata01lv
LOGICAL VOLUME:     appdata01lv            VOLUME GROUP:   appvg
LV IDENTIFIER:      00c175f4004c00635401257a0b3fe3.9 PERMISSION:     read/write
VG STATE:           active/complete        LV STATE:       opened/syncd
TYPE:               jfs2                   WRITE VERIFY:   off
MAX LPs:            7500                   PP SIZE:        32 megabyte(s)
COPIES:             1                      SCHED POLICY:   parallel
LPs:                4572                   PPs:            4572
STALE PPs:          0                      BB POLICY:      relocatable
INTER-POLICY:       maximum                RELOCATABLE:    yes
INTRA-POLICY:       middle                 UPPER BOUND:    1024
MOUNT POINT:        /mount/point/info      LABEL:          /label/has/been/hidden
MIRROR WRITE CONSISTENCY: on/ACTIVE
EACH LP COPY ON A SEPARATE PV ?: yes
Serialize IO ?:     NO
DEVICESUBTYPE : DS_LVZ
COPY 1 MIRROR POOL: None
COPY 2 MIRROR POOL: None
COPY 3 MIRROR POOL: None

To change the "MAX LPs" property, chfs -x NEW_VALUE has to be executed to the logical volume.

For this particular error message, the solution is to modify "MAX LPs" to cater to the additional storage requirement. You can check the current allocation from the value of "LPs" just another line below "MAX LPs". The change should not make the value of LPs go over its set MAX.

If you have changes involving increase in disk space using the AIX volume manager, better check for the value of "MAX LPs" before executing the change. Or you can note the additional step above so when implementation time comes, it will proceed without further delays.

Share:

TWEAK: Streaming Video on PCH-C200 via MediaTomb

Now that you have your Popcorn Hour C-200 (PCH-C200) setup to automatically download movies via CouchPotato and download TV shows via SickBeard, all that it takes is to wait for the movie or TV show to become available on the jukebox. If you set-up notifications, then simply wait for the notification to arrive.

However, if you have different TV sets but only one C-200 jukebox, that presents a bit of a problem doesn't it? A very simple solution to this problem is to move the C-200 jukebox to the TV you want to watch at. Still, this solution is a bit cumbersome and will not work if two persons want to watch different content at the same time.

I'd assume that since you have CouchPotato and SickBeard working, you have a home network setup. You can use the same network to stream video from your C-200. You can use a DLNA server to stream digital content (video, movies and mp3) from your C-200 jukebox. To know more about DLNA (or Digital Living Network Alliance), here is what wikipedia has to say about it:

The Digital Living Network Alliance (DLNA) is a non-profit collaborative trade organization established by Sony in June 2003, and has more than 250 member companies in the mobile, consumer electronics, PC, and service provider industries. Alliance members have stated the common goal of using standards-based technology to make it easier for consumers to use, share and enjoy their digital photos, music and videos. As of January 2011, over 9,000 different devices have obtained "DLNA Certified" status, indicated by a logo on their packaging and confirming their interoperability with other devices. It is estimated that more than 440 million DLNA-certified devices, from digital cameras to games consoles and TVs, have been installed in users' homes.
-- taken from Wikipedia: DLNA

This can be done several ways and there are several software available to accomplish this. This article concentrates on MediaTomb. First of all download MediaTomb from its sourceforge download page. Consult the readme.txt file in the tar.gz file for dependencies.

I use the "local" package from the CSI interface to satisfy dependencies. The avilable mediatomb package (v0.12.1) from "local" doesn't work for me. But the older static version from sourceforge (v0.11) works. There is also another pre-compiled mediatomb v0.11 from the NMT repository. All v0.11 packages work on the C-200 jukebox.

The easier way is to download the mediatomb packaged binaries from the NMT repository. You can install this via the Community Software Installer (or CSI) using the "Install from Zip File" option.

Mediatomb will automatically start upon installation via CSI. It will also generate its default database and config file. Mediatomb needs to be stopped as the default config will not make it function properly. You will find the installation under /share/Apps/Mediatomb and the corresponding config file is /share/Apps/Mediatomb/.mediatomb/config.xml.

You will need to add the following lines to the config.xml file under tag <import>:

<magic-file>/share/Apps/Mediatomb/usr/share/file/magic</magic-file>
<filesystem-charset>ISO-8859-1</filesystem-charset>
<metadata-charset>ISO-8859-1</metadata-charset>

For better performance, look for the code <virtual-layout> and set the value to "disabled" (default is "builtin"). This is optional, but I find better performance out of this tweak.

After making the above changes, start mediatomb (using mediatomb.sh start). Then launch a browser and point to http://C200-IP:49152/ (replace C200-IP with the IP address of your C-200 jukebox). The default username and password to access the browser interface is mediatomb and mediatomb. You can change those defaults inside the config.xml file.

Browse the filesystem tree and add the paths that need to be added, scanned and/or monitored as media is added. Add to this configuration the paths of destination files for both SickBeard and CouchPotato. You can monitor errors via the log file. For my case I set Timed, Full, Recursive and every 14400 seconds on the directories/paths that I add for scanning/monitoring.

Streaming Video on Popcorn Hour C-200 (PCH-C200) via MediaTomb

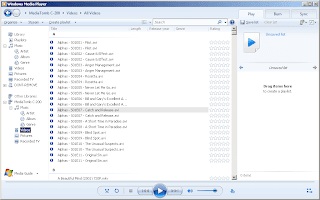
The glitch I found on MediaTomb is that it displays duplicate entries of files on Windows Media Player 12 library. You can see this better illustrated by the screenshot below. As you can see, each episode of the TV show "Alphas" is listed twice.

Streaming Video on Popcorn Hour C-200 (PCH-C200) via MediaTomb

Aside from that, the icons displayed seem to be generic and not video specific. I don't find these glitches very significant as long as the functionality I want is there. This duplicate entry issue is not present when viewing media listings on the LG and Samsung DLNA-enabled TV. Seems to manifest only with Windows Media Player 12. On Windows notebooks, I tested the streaming functionality on Windows Media Player 12 library and VLC v1.1.19, using the Advanced Open option to open media files.

Share:

HOW-TO: Install CouchPotato on Popcorn Hour C-200 (PCH-C200)

From the previous article that discussed how to Install SickBeard on the Popcorn Hour C-200, we learned how to automate the search and download of our favorite TV shows. If there is SickBeard for TV shows, there must be another for Movies. You are right on the money and CouchPotato is the equivalent PVR for movies.

"CouchPotato is an automatic NZB and torrent downloader. You can keep a "movies I want"-list and it will search for NZBs/torrents of these movies every X hours. Once a movie is found, it will send it to SABnzbd or download the .nzb or .torrent to a specified directory." -- taken from the CouchPotato website.

Install. CouchPotato works well with the Popcorn Hour C-200 just like SickBeard. And, like SickBeard, CouchPotato needs the Community Software Installer (or CSI). Under the Applications tab, select couchpotato and install it to the C-200.

In case you haven't done so, both CouchPotato and SickBeard require the "local" package installed to be able to run. The "local" package is installed via CSI as well.

Configure. Access the web page of CouchPotato to be able to get to the configuration page. Launch your favorite browser, point to "http://C200-IP:5000/movie" (replace C200-IP with the IP address of your PCH-C200) and CouchPotato configuration is done by clicking on the gear icon (to the right of "Logs").

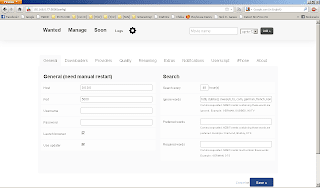
Under the "General" tab, nothing much to configure here. But perhaps if you wish to ignore NZBs (or torrents) with keywords in them, you might want to configure under "Ignore words". Think of this field as a blacklist of keywords. Or if you wish to make "Director's Cut" take precedence over other NZBs (or torrents), the same configuration can be put under the "Preferred" or "Required" words.

Install CouchPotato on Popcorn Hour C-200

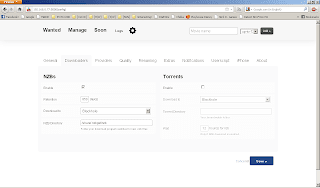
The "Downloaders" tab will make you select between NZBs, torrents or both. I use blackhole directory for either NZB or torrent in my configuration. For TV shows, it is easier to configure with NZBs but large high definition movies are not very much available unless subscribed to a Usenet search provider. So torrents seem to be favorable here.

Install CouchPotato on Popcorn Hour C-200

On the "Providers" page you can configure CouchPotato with the Usenet index service provider to use. It is clear that this is for NZBs. And most of the usenet search providers for CouchPotato require subscription. Given that, this favors the use of torrents. If you are using torrents, thepiratebay.org is the default search service provider. No further configuration is necessary for torrents.

Install CouchPotato on Popcorn Hour C-200

For full automation, the "Renaming" tab can be set to configure the naming convention and also the "blackhole" and target directory where the movies will be stored. Here, be careful with the "Cleanup" option. When ticked, CouchPotato will automatically remove the unnecessary files downloaded with the video file. When you have reviewed the logs and verified CouchPotato works to your liking, you can tick this option.

Install CouchPotato on Popcorn Hour C-200

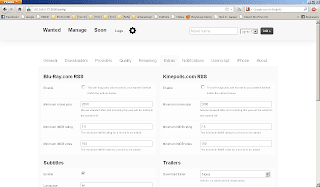
Extras enables or disables the automatic downloading of subtitles and trailers for the movies downloaded and processed by CouchPotato.

Install CouchPotato on Popcorn Hour C-200

Add Movies. After configuration, you can start adding movies for CouchPotato to search, download and post-process. So with SickBeard and CouchPotato, more functionality are added to your Popcorn Hour C-200 Network Media Jukebox. Visit us again soon as I will outline several steps to transform your NMJ to serve as a DLNA server.

Share:

HOW-TO: Install SickBeard on Popcorn Hour C-200 (PCH-C200)

"I know what I have, but I'm not sure what it is capable of." This cliche sounds familiar isn't it? I belong to this category, and it is highly probable that many others share the same fate. Thanks to the internet and the many forums and blogs that information is freely available to those who want to know more about their gadgets and what they are capable of.

If you have a Popcorn Hour C-200 (PCH-C200), there is more to the device than its intended purpose of being a Networked Media Jukebox (NMJ). There's more to the device than playing multimedia content -- it can download those too!

Sick Beard is a PVR for newsgroup users (with limited torrent support). It watches for new episodes of your favorite shows and when they are posted it downloads them, sorts and renames them, and optionally generates metadata for them. It currently supports NZBs.org, NZBMatrix, NZBs'R'Us, Newzbin, Womble's Index, NZB.su, TVTorrents and EZRSS and retrieves show information from theTVDB.com and TVRage.com. --taken from the official webpage of SickBeard

Install. You would be interested to know that this software can automate the downloads of your favorite TV Shows. And this is done automatically without you having to do anything. All that it takes is to properly configure SickBeard, add your favorite shows, and watch your favorite TV shows on the C-200.

For this install, you will be needing the Community Software Installer (or CSI). Under the Applications tab, select sickbeard and install it to the C-200. It is that simple.

Configure. Now that sickbeard is installed, configuration has to be done. It is important that you point sickbeard to the right directories -- the directory where it will monitor the downloaded TV files and, (optional) if you are using the blackhole method, point it to the blackhole directories of NZBget (usenet) or transmission (torrent).

Launch your favorite browser and point to "http://C200-IP:8081/home" (replace C200-IP with the IP address of your PCH-C200) and click on "Config". You can have several options here. The "General" tab is straight forward.

Under "Search Settings", I ticked "Download propers". And from here, I also choose "NZB Search" using the blackhole method. You can also set sickbeard to download via torrent and put the blackhole directory of the transmission client.

Install SickBeard on Popcorn Hour C-200

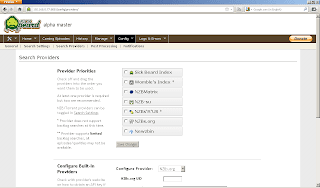
Next, configure the providers. Tick the providers that you want to utilize. You may change the order of the providers via drag-and-drop. Since I'm not really into backlogs, the "Sick Beard Index" and "Wombie's Index" are sufficient. Most of the other providers need subscription but if you have active subscriptions you may put the API keys in the appropriate forms on this page.

Install SickBeard on Popcorn Hour C-200

Post processing is also important if you want to automate the renaming of your favorite TV shows. This part of the automation process is needed if you want to add episode titles. You may also configure how the renaming would appear, including the separators and season folders. A word of caution in this part of the configuration, tick the box corresponding to "Keep Original Files", until you are really sure that SickBeard works or once SickBeard functionality has been tested.

Once "Keep Original Files" is unticked, post processing of downloaded files will delete or clean-up all of the other downloaded files and will retain only the .avi or .mkv file. This box comes ticked by default, so no need to worry.

The directory named in this part of the configuration is the directory where transmission or nzbget will download the files to. This is not the directory where your TV shows will be stored permanently. Think of it as a bucket where you will temporarily store the downloads -- sort of the "blackhole" folder of SickBeard.

Install SickBeard on Popcorn Hour C-200

With all the configuration done, it is time to add shows for SickBeard to download. Under the "Home" tab, is where you can "Add Shows". When adding shows, you are also asked where the episodes will be stored. Give this the path to folder where you want the episodes to be stored after post-processing. This should be a different directory than the "blackhole" folder above.

The addition will trigger SickBeard to search if any of the providers have indexed the added show, and you can see if SickBeard has downloaded the appropriate file (nzb or torrent) to the appropriate download client.

Also, you can view SickBeard logs from the web interface or on the C-200 itself. And aside from that, you can check if the TV show is scheduled to be aired soon.

Further tweaks can be done on the SickBeard installed on the C-200. Check out the "Notifications" tab under the "Config" menu and configure the notification options.

SickBeard takes care of the TV shows, but for Movies the equivalent software is CouchPotato. And the installation of CouchPotato is what we will outline next.

Share:

Subscribe for Latest Update

Popular Posts

Post Labels

100gb (1) acceleration (1) acrobat (1) adblock (1) advanced (1) ahci (1) airdrop (2) aix (14) angry birds (1) article (21) aster (1) audiodg.exe (1) automatic (2) autorun.inf (1) bartpe (1) battery (2) bigboss (1) binance (1) biometrics (1) bitcoin (3) blackberry (1) book (1) boot-repair (2) calendar (1) ccleaner (3) chrome (5) cloud (1) cluster (1) compatibility (3) CPAN (1) crypto (3) cydia (1) data (3) ddos (1) disable (1) discount (1) DLNA (1) dmidecode (1) dns (7) dracut (1) driver (1) error (10) esxi5 (2) excel (1) facebook (1) faq (36) faucet (1) firefox (17) firewall (2) flash (5) free (3) fun (1) gadgets (4) games (1) garmin (5) gmail (3) google (4) google+ (2) gps (5) grub (2) guide (1) hardware (6) how (1) how-to (45) huawei (1) icloud (1) info (4) iphone (7) IPMP (2) IPV6 (1) iscsi (1) jailbreak (1) java (3) kodi (1) linux (28) locate (1) lshw (1) luci (1) mafia wars (1) malware (1) mapsource (1) memory (2) mikrotik (5) missing (1) mods (10) mouse (1) multipath (1) multitasking (1) NAT (1) netapp (1) nouveau (1) nvidia (1) osmc (1) outlook (2) p2v (2) patch (1) performance (19) perl (1) philippines (1) php (1) pimp-my-rig (9) pldthomedsl (1) plugin (1) popcorn hour (10) power shell (1) process (1) proxy (2) pyspark (1) python (13) qos (1) raspberry pi (7) readyboost (2) reboot (2) recall (1) recovery mode (1) registry (2) rename (1) repository (1) rescue mode (1) review (15) right-click (1) RSS (2) s3cmd (1) salary (1) sanity check (1) security (15) sendmail (1) sickgear (3) software (10) solaris (17) squid (3) SSD (3) SSH (9) swap (1) tip (4) tips (42) top list (3) torrent (5) transmission (1) treewalk (2) tunnel (1) tweak (4) tweaks (41) ubuntu (4) udemy (6) unknown device (1) updates (12) upgrade (1) usb (12) utf8 (1) utility (2) V2V (1) virtual machine (4) VirtualBox (1) vmware (14) vsphere (1) wannacry (1) wifi (4) windows (54) winpe (2) xymon (1) yum (1) zombie (1)

Blog Archives

RANDOM POSTS