HOW-TO: Tryout IPV6 via IPV6 Tunneling (Windows 7)

They say that most of the world will be connected via the global information highway or what is known as the internet soon. While technology is getting there, a burgeoning problem seems to emerge. The communication layer known as IPv4 (which we commonly know as the "IP address") will run out before that prediction ever becomes a reality.

Its successor -- IPv6 -- has been here for years now and while the world has not wholly embraced the technology in the literal sense of the word, it is "better" and will inevitably succeed IPv4 in the near future. In fact, most of the modern operating systems we commonly use support IPv6 protocols. So why not give it a spin to get a real experience with what it does, right? In a nutshell IPv6 is:

Internet Protocol version 6 (IPv6) is a version of the Internet Protocol (IP). It is designed to succeed the Internet Protocol version 4 (IPv4). The Internet operates by transferring data between hosts in small packets that are independently routed across networks as specified by an international communications protocol known as the Internet Protocol.

Each host or computer on the Internet requires an IP address in order to communicate. The growth of the Internet has created a need for more addresses than are possible with IPv4. IPv6 was developed by the Internet Engineering Task Force (IETF) to deal with this long-anticipated IPv4 address exhaustion, and is described in Internet standard document RFC 2460, published in December 1998.[1] Like IPv4, IPv6 is an internet-layer protocol for packet-switched internetworking and provides end-to-end datagram transmission across multiple IP networks. While IPv4 allows 32 bits for an Internet Protocol address, and can therefore support 232 (4,294,967,296) addresses, IPv6 uses 128-bit addresses, so the new address space supports 2128 (approximately 340 undecillion or 3.4×1038) addresses. This expansion allows for many more devices and users on the internet as well as extra flexibility in allocating addresses and efficiency for routing traffic. It also eliminates the primary need for network address translation (NAT), which gained widespread deployment as an effort to alleviate IPv4 address exhaustion.

-- taken from Wikipedia: IPv6

Philippines is one of those countries who have not implemented IPv6 just yet. ISPs here stick to IPv4. So if your current location has no support for IPv6, how do you take advantage of this technology? The answer is via IPv6 tunnelling. There are many ways of implementing tunneling. But here, we focus on gogo6 client. Download the required software from its webpage, then go ahead and install it.

Launch the gogoCLIENT utility. Under the "Basic" tab, tick Connect Anonymously and connect to server "anonymous.freenet6.net". You should be having a similar screenshot as below.


Now go to the "Advanced" tab. Set Tunnel Mode to "IPV6-in-UDP-IPV4 Tunnel (NAT Traversal)". Tunnel Authentication Mode should remain "Anonymous" (this is set to Anonymous by default).


Go back to the "Basic" tab and click Connect. You should be able to connect to the nearest freenet6 server on your current location. On the "Status" tab, you will be able to see connection details.


Once successful, your computer can now connect to multiple IPv6 websites. To test this, browse google's IPv6 search page via http://ipv6.google.com.

The above procedure is what I followed to get IPv6 working on my desktop. It is running Windows 7 x64 Ultimate. As always, your mileage may vary.

Share:

HOW-TO: Unblock Microsoft Outlook "Unsafe" Attachments

There are folks who send you mails disguised from persons you might know, but little do you know of the malicious content they send as attachment. In the name of security, Microsoft has started to put in place measures so that the average joe will not be able to potentially stumble on attachments that auto-execute when clicked. That is a good practice. And while that is not bad, they should also advise the end-user how to bypass such security when necessary.

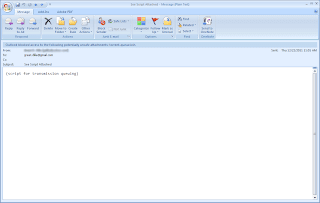
This is not the case, however. Microsoft Outlook will block registry files, executable files, javascript files, scripts and other files that are potentially hazardous. This is a blanket rule that doesn't have an exception. So whenever you get sent an attachment that fits the rule, even if you are sure it will not cause any harm it gets blocked. And you will be getting a window just like below (from Microsoft Outlook 2007).

Unblock Microsoft Outlook Attachments

Error message will look like below (filename may differ):
Outlook blocked access to the following potentially unsafe attachments: attachment_filename.exe

How then do you access the attachment when you are sure of the sender and the attachment is confirmed to be safe? This is another classic scenario of functionality versus security. Follow the procedure below to be able to access the blocked attachment.

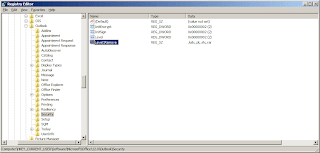
If Microsoft Outlook is open, close it. Then open the registry editor and browse to the below registry branch.

Locate the following key(s) depending on the version of Microsoft Outlook you have:
* Outlook 2000 [HKEY_CURRENT_USER\Software\Microsoft\Office\9.0\Outlook\Security]
* Outlook 2002 [HKEY_CURRENT_USER\Software\Microsoft\Office\10.0\Outlook\Security]
* Outlook 2003 [HKEY_CURRENT_USER\Software\Microsoft\Office\11.0\Outlook\Security]
* Outlook 2007 [HKEY_CURRENT_USER\Software\Microsoft\Office\12.0\Outlook\Security]
* Outlook 2010 [HKEY_CURRENT_USER\Software\Microsoft\Office\14.0\Outlook\Security]

Look for the key "Level1Remove". If it does not exist create it as a string data type. Separate each file extension entry with semi-colons. Make sure to follow the syntax as this is case sensitive. As I use my email to archive scripts, I usually send a mail to myself with the script attached. So this is how it looks on my registry (see below).

Unblock Microsoft Outlook Attachments

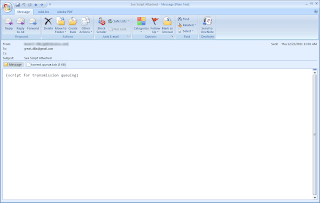
After making the necessary changes above, launch Microsoft Outlook and re-open the email with the attachment(s) and you can now access the attachment.

Unblock Microsoft Outlook Attachments

There you go folks.. Another tweak to access blocked attachments. As a security measure especially on shared computers, once you add this and access the required attachment remove the registry entry Level1Remove. Just add it when you require access to blocked attachments in the future.

Share:

TIP: Backup Wireless Network Settings (Windows 7)

One of the many advantages of Windows 7 over its predecessors is the wide array of options in backing up the system. Already inherent in its line-up of tools is the capability to create its own repair disc. But the most overlooked capability, which I think is just as useful, is the capacity to backup wireless settings.

This feature can be beneficial to you in two ways -- a backup of the configuration and a way to share wireless network configuration to another computer. Since it can backup the wireless network security key, it also serves as a way to recall the that key.

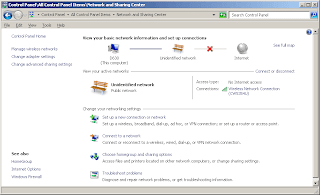
In order to create a backup of the wireless settings, go to Start --> Control Panel --> Network and Sharing Center (if using the view by icons). If your Control Panel is displayed in Category view, choose Network and Internet --> Network and Sharing Center. A similar window like below is displayed.

Backup Wireless Network Settings Windows 7

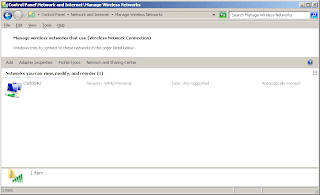
Click on Manage wireless networks (on the top left column).

Backup Wireless Network Settings Windows 7

You will be shown a list of wireless network infrastructures or ad-hoc networks that your computer can connect to. Double-click the wireless network you wish to backup.

Backup Wireless Network Settings Windows 7

Next, click on "Copy this network profile to a USB flash drive".The backup process requires a USB flash drive (UFD) to write the configuration files to. If your computer doesn't have one, you may plug one in. Then, click "Next".

Backup Wireless Network Settings Windows 7

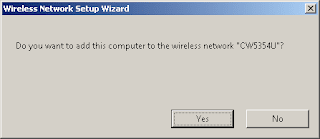
A few files will now be written on the UFD. The files "AUTORUN.INF" and "setupSNK.exe" are now present on the UFD, together with the directory "SMRTNTKY". These files contain the backup of the wireless network settings of the computer system.

You may choose to plug the UFD on another computer and run the executable "setupSNK.exe" to configure that computer to use the same wireless network settings as the original computer. This way you have imported the wireless network settings to another computer without having to do much work.

Backup Wireless Network Settings Windows 7

Since the UFD already contains a copy of the wireless network settings, it is a backup that you can secure in a safe place. You might be needing it one way or another in the future.

Share:

REVIEW: ARCTIC Z1 Desk Mount Monitor Arm

Cable clutter is a problem with the modern computer system. Everything that is wired into the system will contribute to the clutter -- be it network cables, monitor cables, power cable, mouse and keyboard, printer, scanner and everything else that gets hooked up to the computer. A very good way to minimize this is to organize them into sleeves but the downside is disconnecting one device will take up a lot of work. The other problem that complicates this is real estate. Too much equipment can both require and take up a lot of space.

Another clever way to organize is to put money and effort in it. Design a good system right from the start and do it right the first time. A very good example to this is the compudesk project which solves a lot of those headaches.

A simple method to work around the real estate problem is to deploy the appropriate space saving solution(s). One very simple and proven way to maximize workspace is the use of a monitor bracket or arm. And today we review the Arctic Z1 Monitor Arm. ARCTIC describes it as:
Z1 is a desk edge monitor mounting pole designed to maximize your workspace with total flexibility. The 3 stages articulation arm offers 360-degree adjustment of your monitor, thus providing ergonomic comfort at all times. This monitor arm is most welcome in the office and ideal for professionals.
-- taken from the ARCTIC Z1 product page

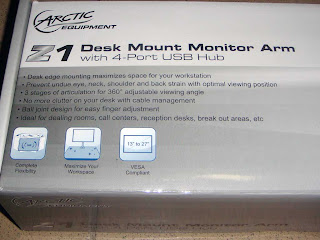
ARCTIC Z1 Desk Mount Monitor Arm

ARCTIC Z1 Desk Mount Monitor Arm

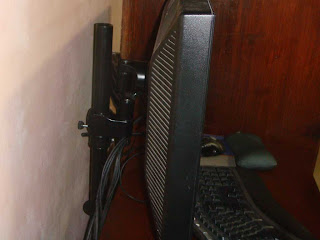
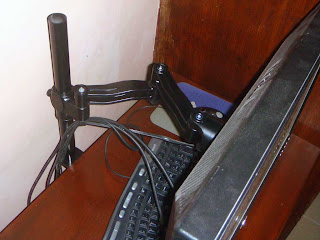
You can mount the Z1 in a variety of ways. Its pole can be clamped to the edge of the table, or bolted in place using the holes provided. Bolting it in place is more secure. In this review, I bolted the pole to the edge of my computer desk.

It is VESA compliant and could hold a wide range of monitor sizes (from 13" to the bigger 27"), thanks to its provisioned 75mm x 75mm and 100mm x 100mm holes. The bracket itself can support a monitor of up to 10kg/22lbs in weight. It is very sturdy and could hold my DELL E248WFP 24" Widescreen LCD monitor (which is about 15lbs) without problems.

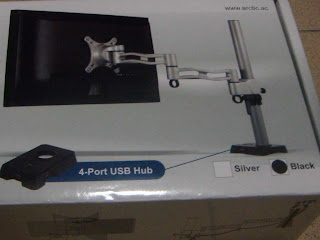
ARCTIC Z1 Desk Mount Monitor Arm

ARCTIC Z1 Desk Mount Monitor Arm

The black color that ARCTIC sent made the bracket very conspicuous. It's like the flat screen is floating without support. And, since I also have an ergonomic keyboard I now have a wide workspace to put it in.

Since I have always had problems with cable clutter, I didn't install the additional USB ports that came with the package. But if you require a USB port that is readily reachable, the Z1 comes with a 4-port USB hub that is installed on the base of the pole.

The Z1 recovered my workspace, maximizing it, and giving me a lot of real estate to play with on my desktop. With the cable loops on the bracket itself, cable management is added helping solve cable clutter especially if moving or swivelling the monitor from time to time.

To those who want to maximize workspace and at the same time solve cable clutter the ARCTIC Z1 Desk Mount Monitor Arm is a recommended solution. If you have got two monitors, the Z2 will fit the bill. Like me, I need a Z2 to mount the other E248WFP.

Our gratitude to ARCTIC for sending a Z1 Monitor Arm for review. The ARCTIC Z1 will definitely pimp your rig!

Share:

Subscribe for Latest Update

Popular Posts

Post Labels

100gb (1) acceleration (1) acrobat (1) adblock (1) advanced (1) ahci (1) airdrop (2) aix (14) angry birds (1) article (21) aster (1) audiodg.exe (1) automatic (2) autorun.inf (1) bartpe (1) battery (2) bigboss (1) binance (1) biometrics (1) bitcoin (3) blackberry (1) book (1) boot-repair (2) calendar (1) ccleaner (3) chrome (5) cloud (1) cluster (1) compatibility (3) CPAN (1) crypto (3) cydia (1) data (3) ddos (1) disable (1) discount (1) DLNA (1) dmidecode (1) dns (7) dracut (1) driver (1) error (10) esxi5 (2) excel (1) facebook (1) faq (36) faucet (1) firefox (17) firewall (2) flash (5) free (3) fun (1) gadgets (4) games (1) garmin (5) gmail (3) google (4) google+ (2) gps (5) grub (2) guide (1) hardware (6) how (1) how-to (45) huawei (1) icloud (1) info (4) iphone (7) IPMP (2) IPV6 (1) iscsi (1) jailbreak (1) java (3) kodi (1) linux (28) locate (1) lshw (1) luci (1) mafia wars (1) malware (1) mapsource (1) memory (2) mikrotik (5) missing (1) mods (10) mouse (1) multipath (1) multitasking (1) NAT (1) netapp (1) nouveau (1) nvidia (1) osmc (1) outlook (2) p2v (2) patch (1) performance (19) perl (1) philippines (1) php (1) pimp-my-rig (9) pldthomedsl (1) plugin (1) popcorn hour (10) power shell (1) process (1) proxy (2) pyspark (1) python (13) qos (1) raspberry pi (7) readyboost (2) reboot (2) recall (1) recovery mode (1) registry (2) rename (1) repository (1) rescue mode (1) review (15) right-click (1) RSS (2) s3cmd (1) salary (1) sanity check (1) security (15) sendmail (1) sickgear (3) software (10) solaris (17) squid (3) SSD (3) SSH (9) swap (1) tip (4) tips (42) top list (3) torrent (5) transmission (1) treewalk (2) tunnel (1) tweak (4) tweaks (41) ubuntu (4) udemy (6) unknown device (1) updates (12) upgrade (1) usb (12) utf8 (1) utility (2) V2V (1) virtual machine (4) VirtualBox (1) vmware (14) vsphere (1) wannacry (1) wifi (4) windows (54) winpe (2) xymon (1) yum (1) zombie (1)

RANDOM POSTS