First, let me thank the generosity of those who appreciated the pimp-my-rig posts and bought me coffee. I am humbled by your kindness. If you, likewise, appreciate the articles posted in this site and want to do the same, please hit the buy me coffee link at the right.
The advent of Raspberry Pi as a small (tiny even) affordable computing platform for programming use has started a revolution even better than simply having a sandbox for programming. It has transformed to multiple use -- beginning with embedded systems, and expanded to lightweight Linux installs and more.
Raspberry Pi could serve as a media center as well -- KODI. KODI is the media center software that runs on OSMC which stands for Open Source Media Center. Often times, these names are interchanged.
If you bought a Raspberry Pi for this exact purpose and don't know how to go about with the installation steps, follow along as I will guide you on how this is done. For all intents and purposes, this guide will be based on a Windows platform to install the image to the SD card.
First, download all the necessary software and binaries. The OSMC Installer (download here) is in the link, as well as the OSMC images for public release. The OSMC Installer for Windows, Linux and MAC OS are available for download as appropriate to your own operating system. This installer is also able to download the latest version of OSMC, including the older versions previously released. I prefer to install using a downloaded image (faster in case you need to re-install).
Next, plug the SD card to the computer's USB port and allow the computer to load the appropriate drivers for it. Once that is done, run the "OSMC Installer" downloaded earlier.
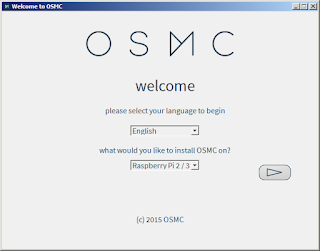
Select "English" (or the applicable language wherever you're at). Select the hardware version of Raspberry Pi you have. Most likely this will be either a Raspberry Pi 2 or a Raspberry Pi 3. You will then have a similar screenshot as shown below.
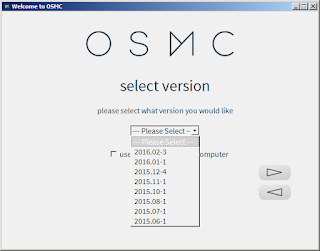
Hit the triangle to proceed to the next screen. And either select a version from the dropdown, or use a locally downloaded image.
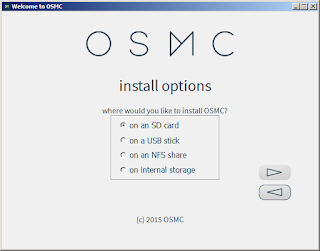
Hit the upper triangle to proceed.. Select "SD card" (default).
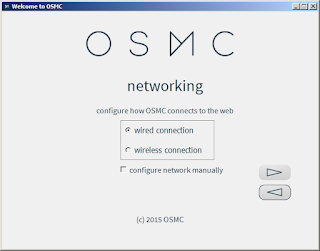
Hit the upper triangle to proceed.. Select "Wired connection" (default).
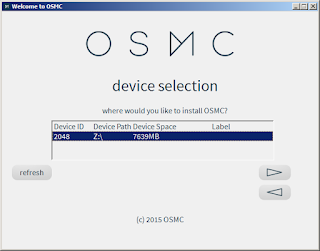
Hit the upper triangle again.. And select the proper SD or device. If there are multiple devices available, select the appropriate one or unplug the others. Otherwise, the data contained in the other devices will be lost if the wrong device is selected.
Then, accept the license agreement and wait for the image to be written to the SD card. After this is done, transfer the SD card to the Raspberry Pi and boot it. During first boot, OSMC will install itself on the SD card, reboot and you have a working OSMC with KODI media center.
Related: Create a USB VMware ESXi Installer
On the next article, I will outline how to install a PVR software on your KODI media center. Stay tuned.
Subscribe for Latest Update
Popular Posts
-
I personally use pihole to block ads, phishing and malicious websites (more leaning toward the latter), from access in my home network. This...
-
Wireless broadband technology using USB modems are entering the mainstream market. And with the widespread adoption of the local cellular ca...
-
This is the first of a two-part series that supplements the article Crypto Trading Bot -- Is It For Me? . Configurations of the crypto excha...
-
Ever heard of bitcoin? Nowadays it is quite rare to meet somebody who hasn't heard of bitcoin or has not encountered of anyone who talks...
-
At this point, I have a working persistent terminal session and installed all the necessary components to run PySpark . I just need a devel...
Post Labels
100gb
(1)
acceleration
(1)
acrobat
(1)
adblock
(1)
advanced
(1)
ahci
(1)
airdrop
(2)
aix
(14)
angry birds
(1)
article
(21)
aster
(1)
audiodg.exe
(1)
automatic
(2)
autorun.inf
(1)
bartpe
(1)
battery
(2)
bigboss
(1)
binance
(1)
biometrics
(1)
bitcoin
(3)
blackberry
(1)
book
(1)
boot-repair
(2)
calendar
(1)
ccleaner
(3)
chrome
(5)
cloud
(1)
cluster
(1)
compatibility
(3)
CPAN
(1)
crypto
(3)
cydia
(1)
data
(3)
ddos
(1)
disable
(1)
discount
(1)
DLNA
(1)
dmidecode
(1)
dns
(7)
dracut
(1)
driver
(1)
error
(10)
esxi5
(2)
excel
(1)
facebook
(1)
faq
(36)
faucet
(1)
firefox
(17)
firewall
(2)
flash
(5)
free
(3)
fun
(1)
gadgets
(4)
games
(1)
garmin
(5)
gmail
(3)
google
(4)
google+
(2)
gps
(5)
grub
(2)
guide
(1)
hardware
(6)
how
(1)
how-to
(45)
huawei
(1)
icloud
(1)
info
(4)
iphone
(7)
IPMP
(2)
IPV6
(1)
iscsi
(1)
jailbreak
(1)
java
(3)
kodi
(1)
linux
(28)
locate
(1)
lshw
(1)
luci
(1)
mafia wars
(1)
malware
(1)
mapsource
(1)
memory
(2)
mikrotik
(5)
missing
(1)
mods
(10)
mouse
(1)
multipath
(1)
multitasking
(1)
NAT
(1)
netapp
(1)
nouveau
(1)
nvidia
(1)
osmc
(1)
outlook
(2)
p2v
(2)
patch
(1)
performance
(19)
perl
(1)
philippines
(1)
php
(1)
pimp-my-rig
(9)
pldthomedsl
(1)
plugin
(1)
popcorn hour
(10)
power shell
(1)
process
(1)
proxy
(2)
pyspark
(1)
python
(13)
qos
(1)
raspberry pi
(7)
readyboost
(2)
reboot
(2)
recall
(1)
recovery mode
(1)
registry
(2)
rename
(1)
repository
(1)
rescue mode
(1)
review
(15)
right-click
(1)
RSS
(2)
s3cmd
(1)
salary
(1)
sanity check
(1)
security
(15)
sendmail
(1)
sickgear
(3)
software
(10)
solaris
(17)
squid
(3)
SSD
(3)
SSH
(9)
swap
(1)
tip
(4)
tips
(42)
top list
(3)
torrent
(5)
transmission
(1)
treewalk
(2)
tunnel
(1)
tweak
(4)
tweaks
(41)
ubuntu
(4)
udemy
(6)
unknown device
(1)
updates
(12)
upgrade
(1)
usb
(12)
utf8
(1)
utility
(2)
V2V
(1)
virtual machine
(4)
VirtualBox
(1)
vmware
(14)
vsphere
(1)
wannacry
(1)
wifi
(4)
windows
(54)
winpe
(2)
xymon
(1)
yum
(1)
zombie
(1)
RANDOM POSTS
-
the posts here are my own and not shared nor endorsed by the companies i am affiliated with.
i am a technologist who likes to automate and make things better and efficient. i can be reached via great [dot] dilla [at] gmail [dot] com.
if this post has helped, will you buy me coffee?


