I have done the upgrade using WU, and instead of downloading almost a gigabyte (yes, it is a hefty 903.2MB for the x64 version) for x64 version the WU module downloaded just 87.2MB. I might have most of the updates already installed, so that advise made a little more sense after this experience.
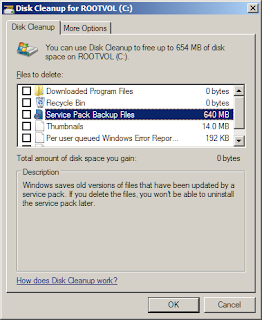
The installation of SP1 also backs up several critical files of the non-SP1 version. As seen in the below screenshot, the backup is an additional 640MB on the drive. It is not that huge on a desktop, but for mobile folks with limited disk space you may choose to remove the backup files after some time.
Understand, however, that once the backup files are removed SP1 could not be uninstalled.
There are several ways do to this. First is via the GUI. Launch the orb (or Start for Classic Shell users), and type "Disk Cleanup" on the search bar. The window launched is similar to the screenshot above. Tick the "Service Pack Backup Files" and click OK. All that is left is to wait for the prompt, and you're done.
For the savvy command-line admins, you may opt to use the command tool. Remember to launch the command tool using the "Run as Administrator" mode. Then execute:
dism /online /cleanup-image /spsuperseded
The above command executes and ends with:
Service Pack Cleanup operation completed. The operation completed successfully.
Too bad, I wasn't able to take a screenshot of the command line as I wasn't thinking about posting the procedure above. After remembering, it was too late. So whether on the command-line or the GUI, you may get rid of the service pack backup files and recover critical disk space.
In a future post, I will outline a procedure on how to slipstream the downloaded SP1 to the original ISO.


