I do installs from USB this since not all modern servers and notebooks have internal optical drives. And bringing an optical drive as standard toolkit is too much hassle. Creating your very own USB Windows 7 installer has been posted in this blog before. And in this case, I have used the same installer in the past few years without hitch. It is only now that I have encountered an error trying to install on a friend's notebook.
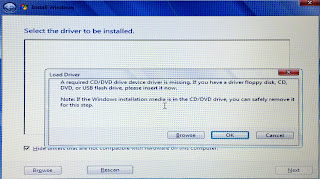
To give you a better idea of what the error screen looks like, I took a snapshot of the screen with my phone. It is shown below:
A required CD/DVD device driver is missing. If you have a driver floppy disk, CD, DVD, or USB flash drive, please insert it now.
The weird thing is that no matter what I do after this error, it will not allow me to proceed with the install (the "Next" button is greyed out). So I did the best solution for Windows -- REBOOT! Nada, same result. Out of sheer curiosity, I moved the installer to another USB port. This time the installation proceeded without the same error. And this really puzzled me. So post-installation, I did my research.
The error message is misleading and it will throw you off in the wrong direction. As it turns out, on the initial installation attempts wherein I failed, the installer was plugged to a USB 3.0 port.. to which the Windows 7 installer had no native drivers. This is the reason for the installation module asking for a driver that it did not have.
To successfully proceed with the install, the USB flash drive containing the installer needs to be plugged into a "legacy" USB 2.0 port that Windows 7 has native drivers for. If ever you encounter a similar problem, simply seek information from the hardware manual and locate the legacy USB ports and install from there.
RELATED: Build an Ultimate Boot USB
The solution was as simple as that.. But it is just as easy to miss it. Too much familiarity with the task often has its price.


