Popcorn Hour C-200 network media jukebox (NMJ) gained popularity among enthusiasts due to its inherent capabilities. It can play a wide variety of video formats including the more popular high definition formats H.264 and MPEG4-AVC. It can also play ISO files or a dump of a bluray disc.
It also has a wide variety of connectivity features -- HDMI being one of the many sought after. In networking components, it has gigabit ethernet for your bandwidth requirements. Wireless N connectivity is an optional add-on but if you don't like cable clutter, this is a very good solution.
However, the stock PCH-C200 can be improved further by installing a shell to access the C-200. Those savvy gadgeteers would want to do more customizations and having access to a shell via a command line utility like telnet. The best shell for embedded linux is busybox. And the install is very easy -- just a few clicks away.
The requirement for this to push through is to have the Community Software Installer (or CSI). If you don't have this utility, make sure to download it as the software is very useful in using your NMT/NMJ.
The Community Software Installer is dependent on FTP service running on the NMT. So before proceeding further enable FTP on the NMT.
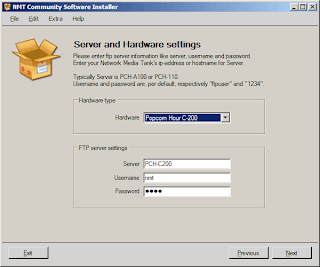
Launch the CSI and configure the type of NMT/NMJ you have. Under Extra > Settings, select the proper type of hardware. In this example, it is the Popcorn Hour C-200. Key in the ftpuser and password, which are "nmt" and "1234" respectively (without quotes). You should be seeing a similar screenshot to the one below.
Under Extra > Advanced > Manage Repositories, make sure the second box is enabled (ticked). This is pointing to the repository: http://repository.nmtinstaller.com/RepositoryInfo_C200.zip. This part of the procedure is just a check to see the correct repository is automatically configured by the procedure above. On my CSI, I didn't have to reconfigure this part. Nevertheless, it would not hurt to check it. Once set, hit Next.
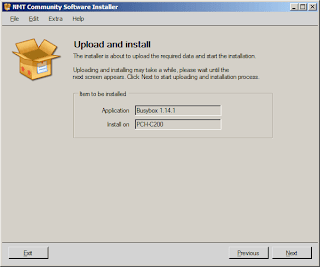
Having set the configuration, were now ready to install busybox on your PCH-C200. Under the Applications tab, right at the second line is BusyBox 1.14.1. Select it and click next. You should be seeing the Upload and install screen like below. Hit Next again.
CSI will then install BusyBox on the PCH-C200 and start the services associated with BusyBox. BusyBox service runs and starts with FTP so make sure this service is running before trying to connect to the C-200.
Using putty, try to telnet to the C-200. You should also be able to see a similar window as below.
There you go folks, BusyBox on your Popcorn Hour C-200.


